


As an OT and as a mum, I love seeing my kids become more independent. I love seeing them in the kitchen learning skills for life. I love seeing them planning, organising and making healthy choices. The Breville Boss To Go™ Plus machine is a handy tool to encourage independence in the kitchen.
I have created these simple breakfast smoothie recipes to help your kids start the day! Miss 9 loves using the Breville Boss To Go™ Plus to make these herself. The Breville Boss To Go™ Plus is a personal blender with a powerful 1000 watt motor. I really love the cafe style tumblers that it comes with that can be used to load up the ingredients. The tumblers have a smooth edge which means Miss 9 can drink straight out of them after she makes her smoothie. Travel lids supplied are perfect additions to the tumblers if we are running late in the morning! 

SENSORY BENEFITS - ORAL MOTOR INPUT
Oral motor input is important for the organization of the central nervous system (Williams and Shellenberger, 1994) and can help with regulating attention and mood (Oetter, Richter and Frick, 1993). Using the "oral system" is therefore a great way to start the day! You could also encourage your child to use a straw to drink their breakfast smoothie. "Sucking is also a calming and organizing activity which requires closing the lips, lip strength and the ability to hold the jaw in a stable position" (Yack, Aquilla and Sutton, 2015). Smoothies tend to be thicker than juices so require a stronger sucking action. You could try a novelty winding straw to encourage even stronger oral input. 
These breakfast smoothie combinations are milk-based. You may use full cream or lite milk or experiment with alternatives such as soy or almond milk. The fruit suggestions may also be changed according to seasonal preferences or your child's tastes. The Breville Boss To Go™ Plus boasts up to 42% finer particle size compared to some popular personal blenders so you can blend your smoothie to your desired consistency. I would also recommend drinking these smoothies straight away as they get really thick over time! Adding more milk or ice cubes will also help to make your smoothie thinner.
We also made our own almond meal to add to the Mango Sunrise Smoothie using the Breville Boss To Go™ Plus to grind up a handful of almonds in the stainless steel tumbler. It was so quick and easy to do! We have been making lots of non-diary juices and ice lollies using the Breville Boss To Go™ Plus! Stay tuned for more recipes to come. I hope you and your kids enjoy these breakfast smoothies! 


Disclosure: The Breville Boss To Go™ Plus was gifted to Your Kids OT for review. I did not receive remuneration for this review. All thoughts and opinions expressed here are my own.
References: Williams, M. & Shellenberger, S. (1994) "How Does Your Engine Run?":A Leader's Guide to The Alert Program for Self-Regulation. Stillwater:PDP Press Oetter, P., Richter, E. & Frick, S. (1998) M.O.R.E.:Integrating the Mouth with Sensory and Postural Funcitons. Hugo:PDP Press Yack, E., Aquilla, P. and Sutton, S. (2015) Building Bridges Through Sensory Integration (Third Edition). You may also like:


Christmas Stain Glass Cookies are so pretty and the kids love to eat them too! You can make them into decorations by making a hole with a straw before baking, then stringing them up for your tree. My kids just preferred to eat them!
I used a basic vanilla cookie which is fairly crisp (rather than short bread) so that it would hold its shape. These cookies are delicious even without the "stain glass" section. I have played around with the amount of sugar trying variations of 1 cup, 3/4 cup and 1/2 cup....they all work, so it really depends how sweet your tooth is and if you are trying to cut down sugar in your (your children's) food as to how much you might want to put into the cookie. I make these cookies in a Thermomix, however you can use a food processor too! Ingredients 185g butter, roughly chopped ½ cup sugar (90 grams) 1 tsp vanilla 2½ cups plain flour (390 grams) 1 egg and 1 extra egg yolk Boiled hard candy (various colours) 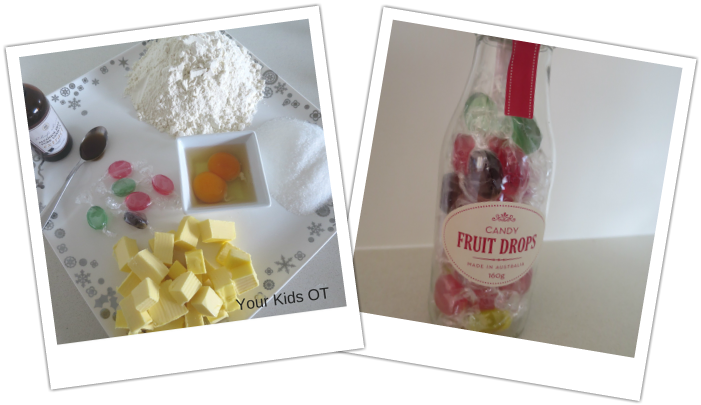
Thermomix Method.
1. Place the butter, sugar and vanilla into the TM bowl. Place on the lid and MC. Blitz for 25 seconds, spd 5. 2. Place the flour, egg and egg yolk into the TM bowl. Place on the lid and MC. Mix for 20 seconds, spd 5. 3. Scrape down the TM bowl with a spatula. Place on the lid and the MC. Knead for 30 seconds. 4. Repeat step 3. 5. Tip out the dough onto a piece of plastic kitchen wrap. Wrap the dough firmly with the plastic wrap and place it into the fridge for at least half an hour. 6. Preheat your oven to 180ºC. Place section of dough between two sheets of kitchen baking paper. 7. Using a rolling pin, roll over the top sheet of baking paper until the dough is approximately 5mm thick. 8. Lift off the kitchen baking paper and use a floured cookie cutter to cut out your shapes. 9. Place on baking trays lined with non-stick baking paper. 10. Use a smaller cutter to cut out a section of each cookie. 11. Place a candy into each cookie. 12. Bake in the oven for 15 minutes (until candy is melted and cookie is slightly brown). 13. Cool on baking tray for 2 minutes before transferring the cookie to a wire rack. 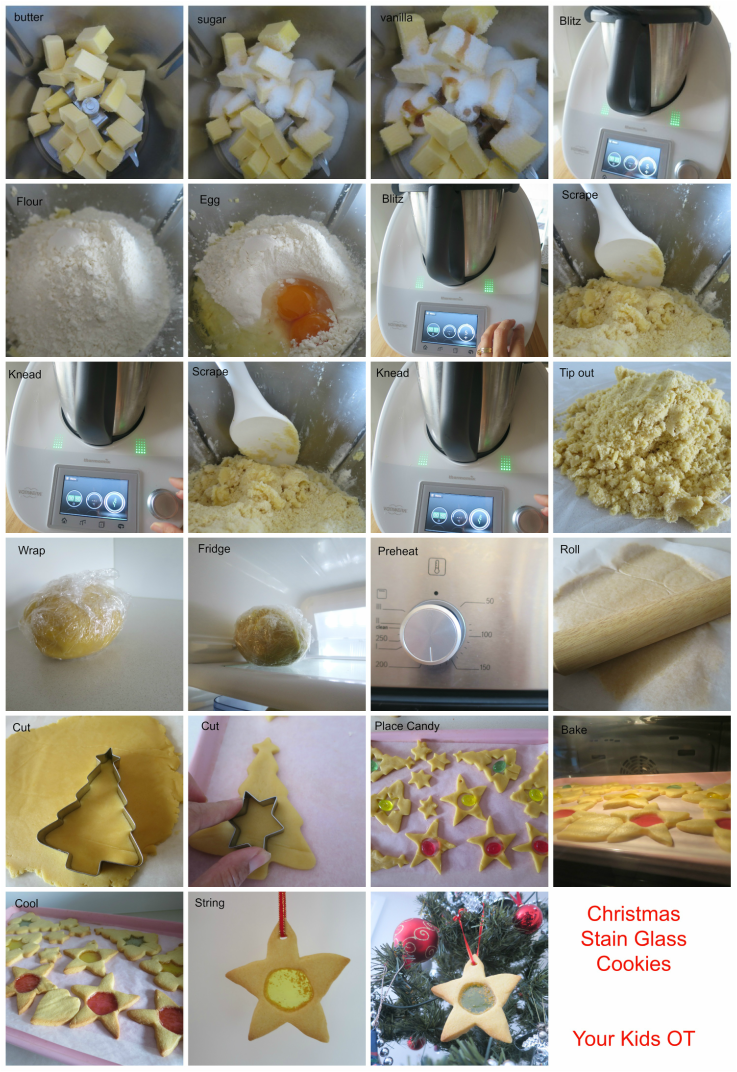

Traditional Method.
1. Place the butter, sugar and vanilla into a food processor. Blitz for approximately 25 seconds until combined. 2. Place the flour, egg and egg yolk into the food processor. Process until all the ingredients are combined and they form a smooth ball. 3. Tip out the dough onto a piece of plastic kitchen wrap. Wrap the dough firmly with the plastic wrap and place it into the fridge for at least half an hour. 4. Preheat your oven to 180ºC. Place section of dough between two sheets of kitchen baking paper. 5. Using a rolling pin, roll over the top sheet of baking paper until the dough is approximately 5mm thick. 6. Lift off the kitchen baking paper and use a floured cookie cutter to cut out your shapes. 7. Place on baking trays lined with non-stick baking paper. 8. Use a smaller cutter to cut out a section of each cookie. 9. Place a candy into each cookie. 10. Bake in the oven for 15 minutes (until candy is melted and cookie is slightly brown). 11. Cool on baking tray for 2 minutes before transferring the cookie to a wire rack. Tips: Don't roll your pastry out too thin, otherwise it will difficult to lift up the cookie. Oven temperatures may vary so you may need to adjust the cooking time. Children should be supervised when using the oven. 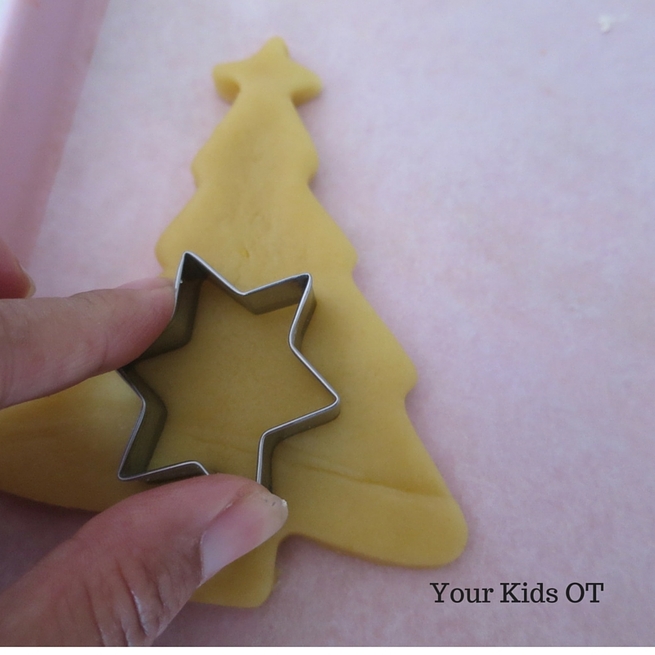

Your kids will love helping to make these cookies. They will love measuring out and adding the ingredients. They will love rolling the dough and using cookie cutters. They may especially love unwrapping the candy to add to the centre!
I love a cookie that can do double duty or triple duty.... these ones not only taste great, they look great on the tree and they make great gifts! Happy Baking! 
You may also like:
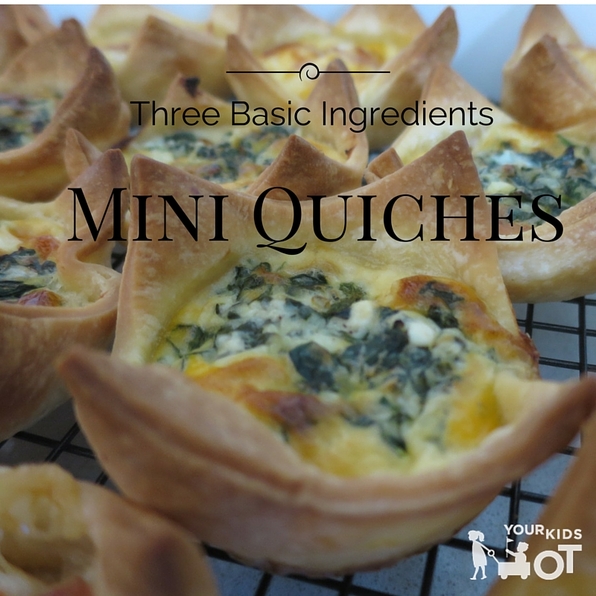

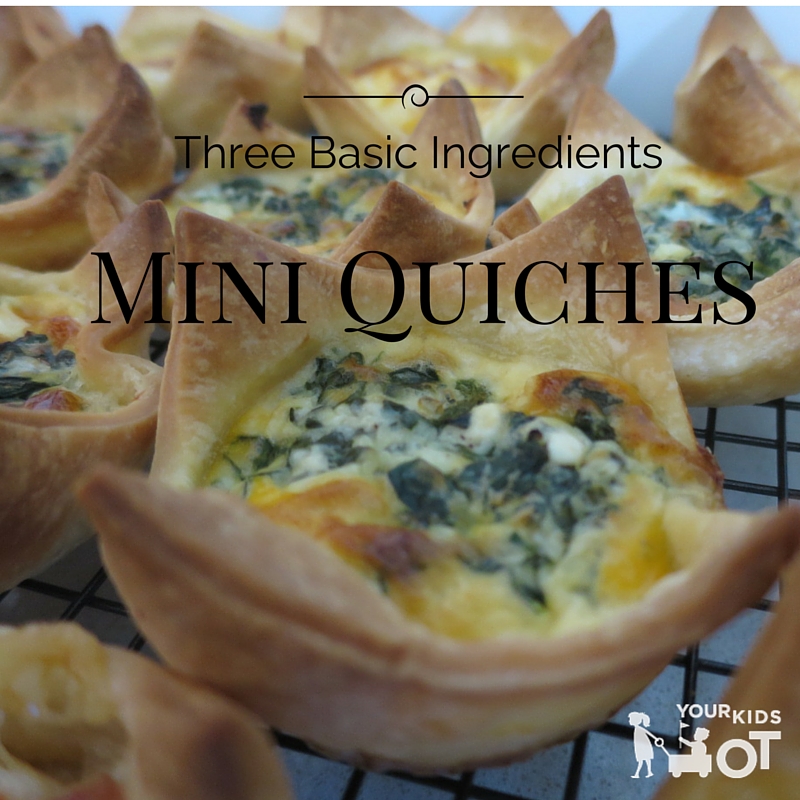
These mini quiches are enjoyed by the whole family! Recipes like this are perfect for encouraging your kids into the kitchen. They are easy to make and perfect for school lunch boxes. These mini quiches use three basic ingredients - milk, eggs and shortcrust pastry. This also makes a great school holiday activity (especially with all this rain we have been having)!
I often thaw out a whole packet of shortcrust pastry and multiply our ingredients to use up all the pastry. They are perfect for a picnic, birthday party or school lunch box! I even have a sneaky sweet way to use up any left over pastry - you will have keep reading to find out what we do! 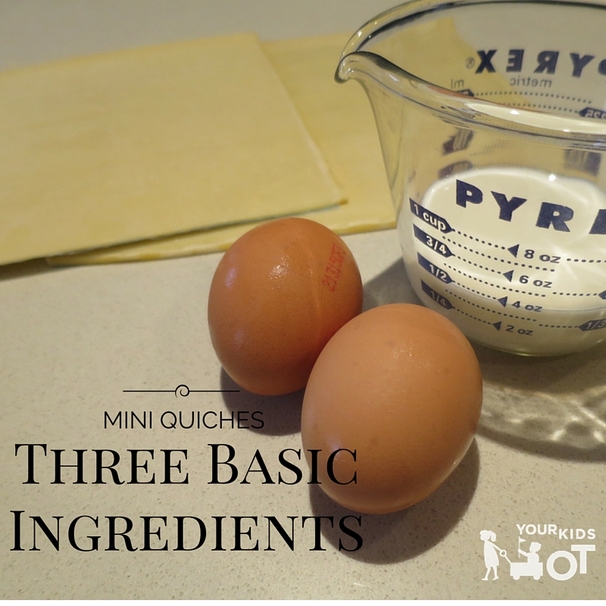

The fillings are really only limited by your imagination. It is also a good way to use up odds and ends in the fridge.
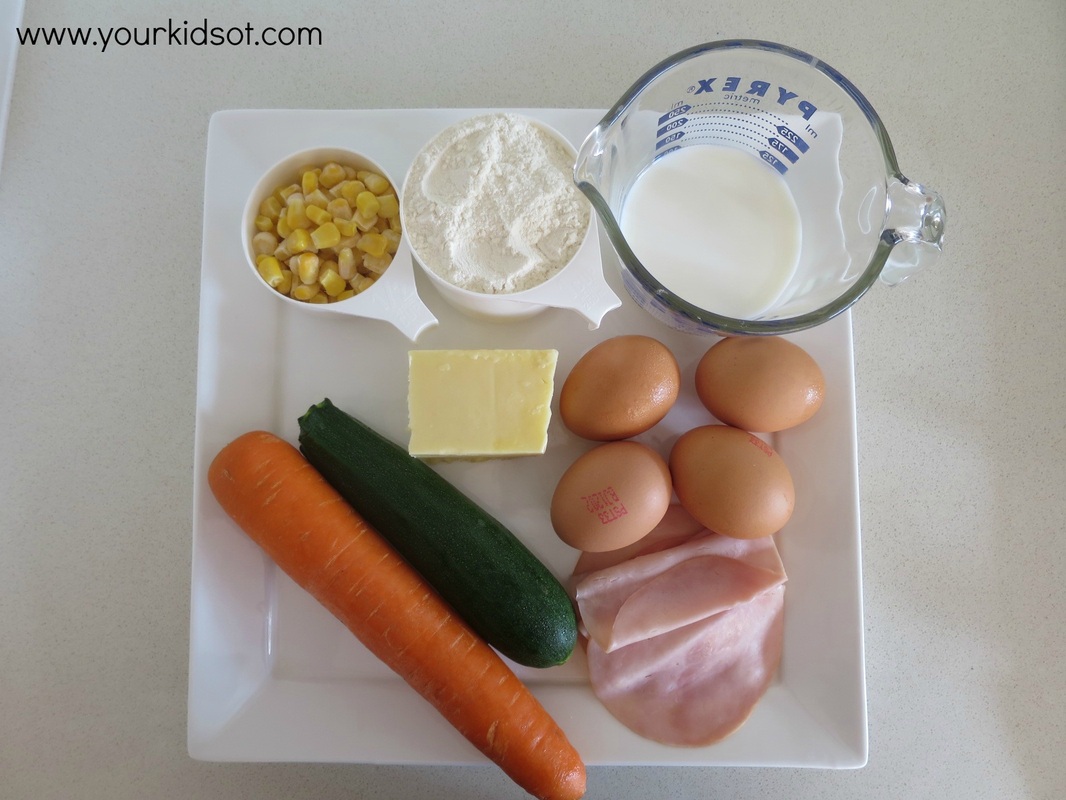
We love these combinations- * ham, cheese and corn * spinach and feta * red capsicum (pepper) and corn * caramelized onion and goat's cheese 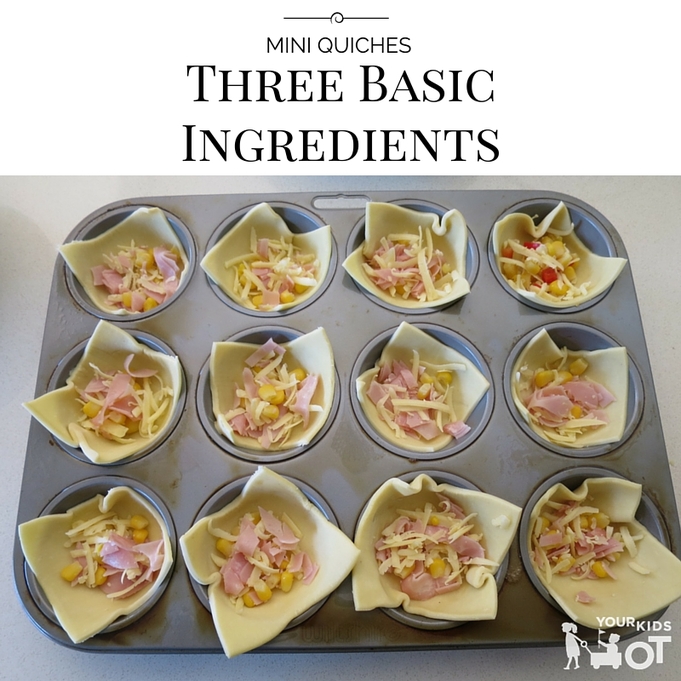

Each of these variations will make approximately 12 mini quiches.
Mini Quiches with Three Basic Ingredients Ingredients * 2 eggs * 1.5 sheets of shortcrust pastry * 100 ml milk Filling Ingredients * 1/2 cup grated cheese, 1/2 cup corn, 1/2 cup ham (finely sliced) or * 1 handful spinach (blanched in hot water, finely sliced), 6 tsp feta or * 1/2 cup red capsicum (finely diced), 1/2 cup corn, 1/2 cup grated cheese or * 1 onion (sliced and slowly carmelized in a saucepan), 6 tsp goat's cheese or Equipment needed * small knife * measuring jug * fork * 12 hole muffin tray * oven Method 1. Separate shortcrust pastry sheets and leave on the kitchen bench to thaw for a few minutes. 2. Preheat the oven to 180° C (356°F). 3. Lightly grease the muffin tray. 4. Once thawed, use the knife to cut each pastry sheet into 9 squares. 5. Place one square of pastry into each hole in the muffin tray. 6. Place your chosen filling into each pastry square. 7. In a jug, pour the milk and the eggs. 8. Use a fork to whisk the eggs and milk together. 9. Pour some of the milk mixture into each pastry square. 10. Place the muffin tray into the oven (use oven mitts). 11. Bake for 20 minutes until set. 12. Cool quiches on a wire rack until ready to eat. Notes: You may use a 8cm cookie cutter to cut out circles in the pastry if you prefer. Oven temperatures may vary so baking times may differ. Children will need supervision with use of knives and ovens. Use oven mitts (unlike Mr 5 here who forgot the oven was hot)! These mini quiches may be frozen (in a single layer). Reheat in the oven before serving. 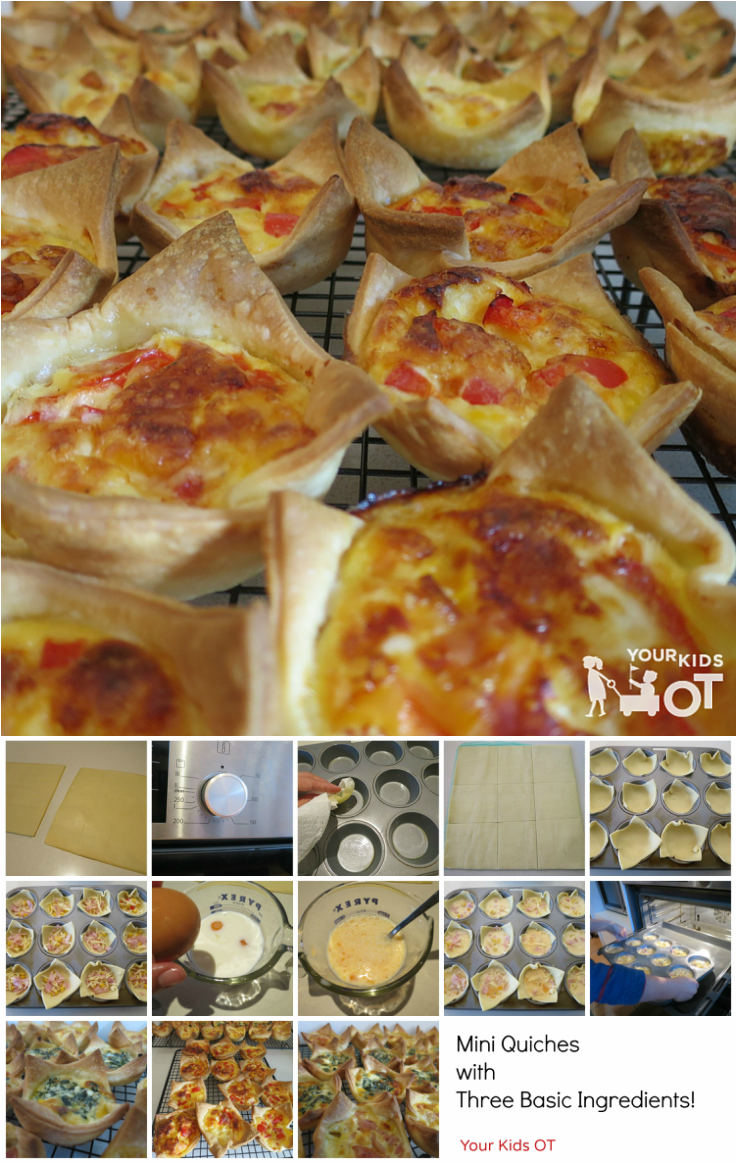

I mentioned you may have leftover pastry. This is how we used ours up!
A sweet variation: Mini Chocolate Tarts! Ingredients * 200g dark cooking chocolate * 100ml milk Method 1. Use a cookie cutter (8cm) to cut up leftover thawed pastry. 2. Preheat the oven to 180° C (356°F). 3. Place the cooking chocolate into a microwave safe jug. 4. Heat for one minute in the microwave. 5. Stir the chocolate. 6. Add the milk to the chocolate and stir. 7. Place the pastry circles into the muffin tray. 8. Pour the chocolate mixture into pastry circles. 9. Bake in the oven for 20 minutes until set. Note: Microwave cooking times may vary. Be careful not to burn the chocolate. You may need to heat the milk briefly with the chocolate if it does not combine well. You may want to increase or decrease the filling quantity depending on how much pastry you have to use. 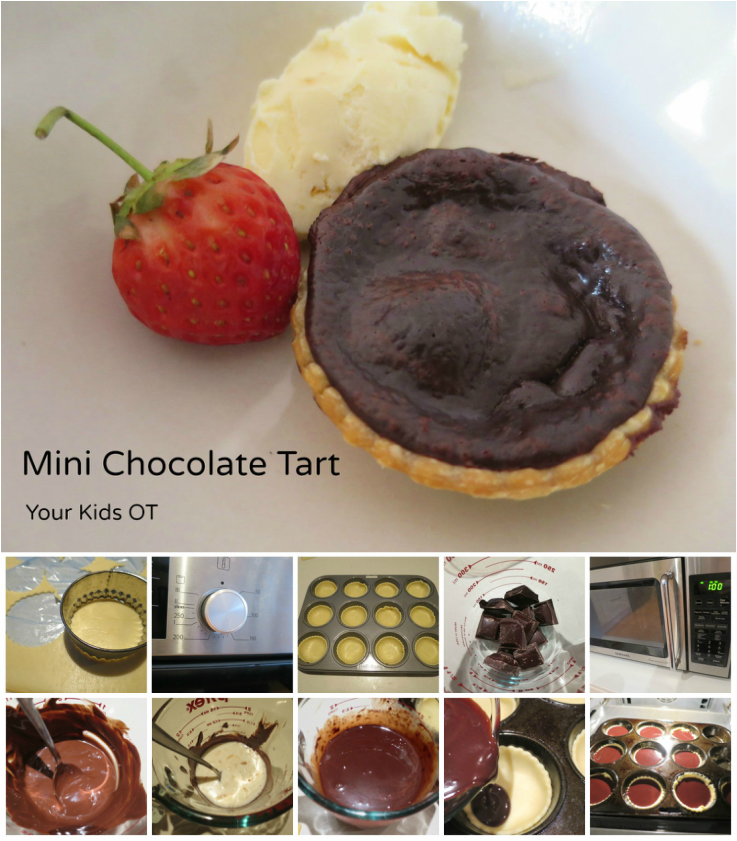

Serve up your chocolate tarts with some icecream and berries....yum! They are great warm or cold.
What is your favourite quiche filling? Savoury or sweet? 
You may also like:
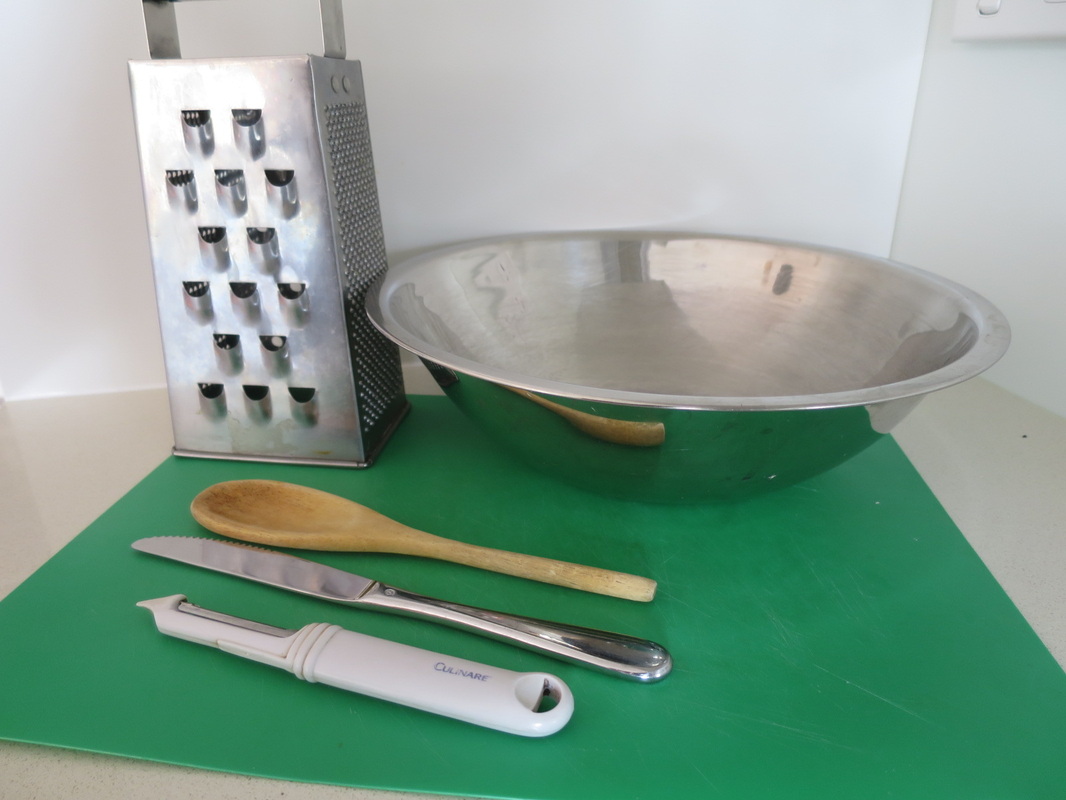
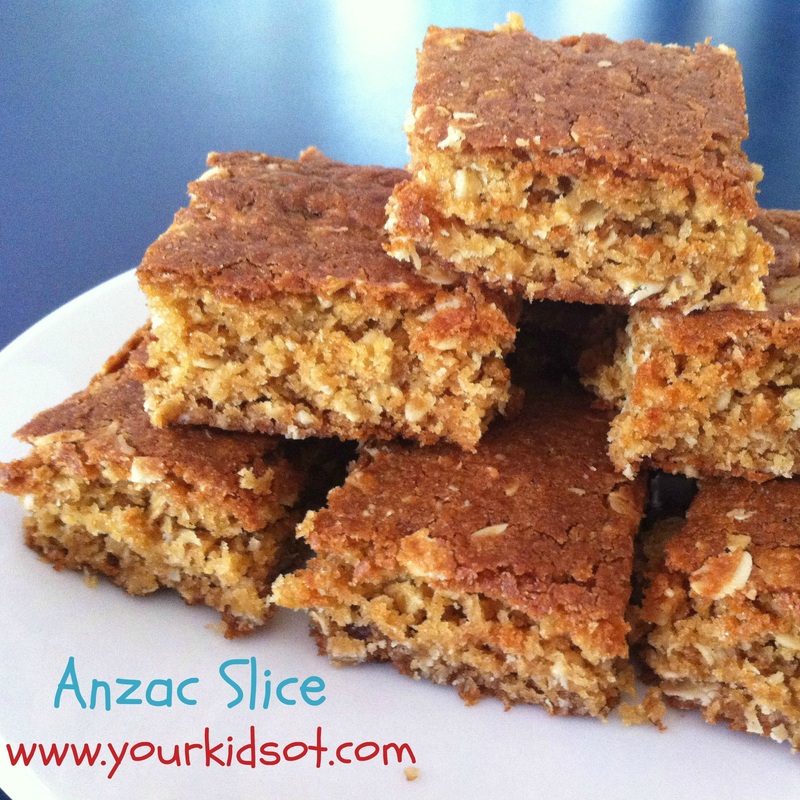
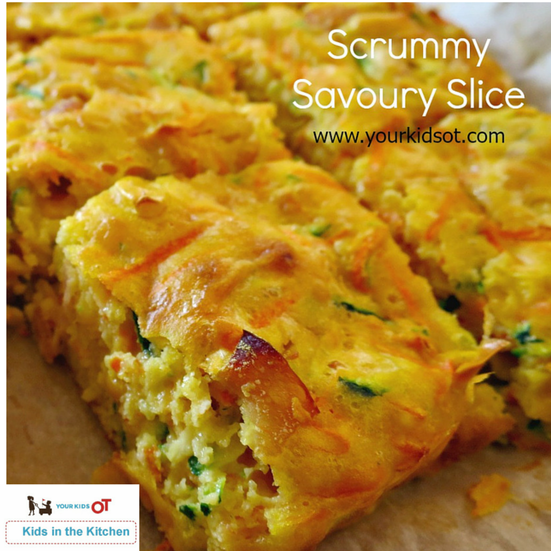  Packed full of veges, this slice can be made in one bowl. We have been eating variations of this slice since my kids were toddlers and it continues to make a regular appearance in their school lunch boxes. It is a great alternative to sandwiches. You can easily put these into individual muffin or friand tins for a different shape ... but I have to say I'm not fond of washing these up after! This a great recipe to get the kids into the kitchen and involved with helping. The zuchinni and carrot ends may be cut with a butter knife as well as the ham. Grating the veges and cheese is a bit trickier and maybe best left to older kids or the grown up in charge. You could also do this in a food processor or using a mandolin. We do most of the grating straight into the mixing bowl saving time!
Method 1. Preheat the oven to 180° C (356°F). 2. Peel the carrot, cut off one end and grate the carrot into the mixing bowl. 3. Rinse the zuchinni, cut off one end and grate the zuchinni into the mixing bowl. 4. Grate the cheese into the mixing bowl. 5. Slice up the ham into small pieces and add to the mixing bowl. 6. Add the corn into the mixing bowl. 7. Add the flour, milk and eggs to the mixing bowl. 8. Stir all the ingredients until well combined. 9. Line a baking tray with baking paper. 10. Pour the mixture into the baking tray and flatten with a wooden spoon. 11. Bake in the oven for 20 minutes. 12. Remove and cool in tray. 13. Slice and serve! 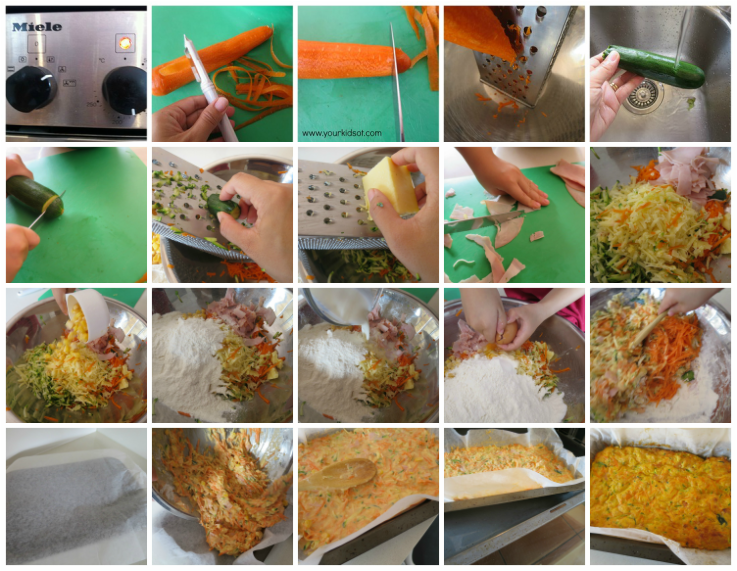 This scrummy savoury slice is also perfect for a picnic lunch or dinner! {We have friends who shared this particular slice with us at a lovely picnic dinner and it was a hit!} You can double the recipe and freeze in slices or individual muffin portions. This defrosts easily and then makes school lunches even easier. What's your favourite non-sandwich addition to the school lunch box?  You may also like...
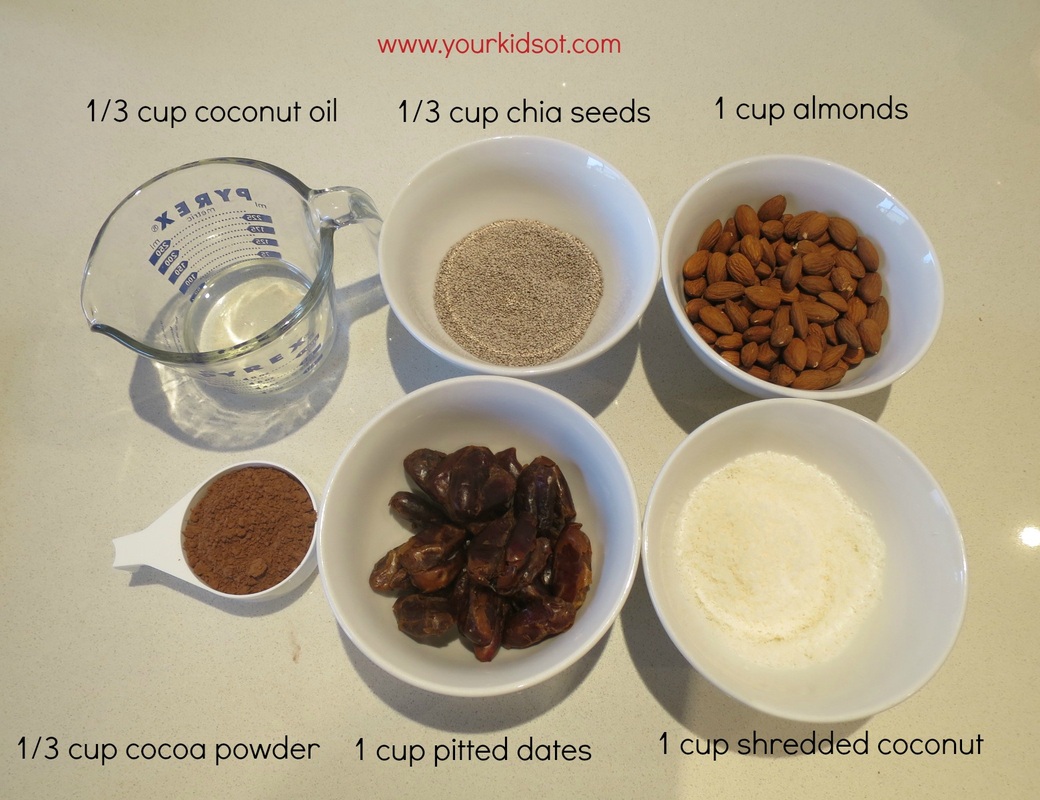
  Happy Australia Day! I hope you are celebrating the day with friends and family! We live in such a beautiful amazing country with stunning beaches, glorious weather, heavenly food and a community who love and support one another ... free to speak, vote, worship and live. A big congratulations to those on the Australian of the Years Honour Roll. Four Australian women who have worked to help those in domestic violence situations, with literacy and learning difficulties, the deaf and poor. Well deserved and truly inspirational. Australian of the Year 2015 Rosie Batty - Domestic Violence Campaigner Senior Australian of the Year 2015 Jackie French - Author Young Australian of the Year 2015 Drisana Levitzke-Gray - Deaf advocate Australia's Local Hero 2015 Juliette Wright - Social entrepreneur  Australian of the Year (Rosie Batty), Senior Australian of the Year (Jackie French), Young Australian of the Year (Drisana Levitzke-Gray), Australia's Local Hero 2015 (Juliette Wright). Australia Day also marks the last day of the school holidays for us. Back to school tomorrow which brings its own excitement and anticipation for the year ahead. Here is a quick and easy recipe that is healthy for school lunch boxes. I'm jumping on the "bliss ball" bandwagon that has been so popular in the last year. Here is a version that hopefully the kids will happily eat, looks like a lamington ball but is packed with healthy goodness. We made 25 bliss balls with this recipe.
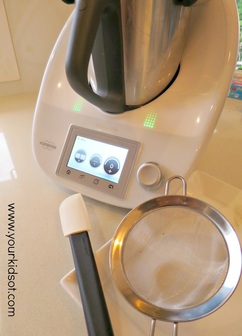
Method 1. Cover the dates with tap water and soak for 15 minutes. 2. Pour the dates into the sieve to drain off the water. 3. Place the almonds, cocoa, coconut oil, 1/2 cup shredded coconut and chia seeds into the Thermomix (or food processor). 4. In the Thermomix blitz for 20 seconds on speed 7 (or blitz in the food processor until all combined). 5. Scrape down the sides of the Thermomix (or food processor) with a spatula. 6. Add dates to the mixture. 7. In the Thermomix blitz for 10 seconds on speed 7 (or blitz in the food processor until the dates are incorporated). 8. Place 1/2 cup of shredded coconut on a plate. 9. Roll the mixture into balls. 10. Cover the balls with coconut. 11. Store in an airtight container in the fridge until ready to eat. 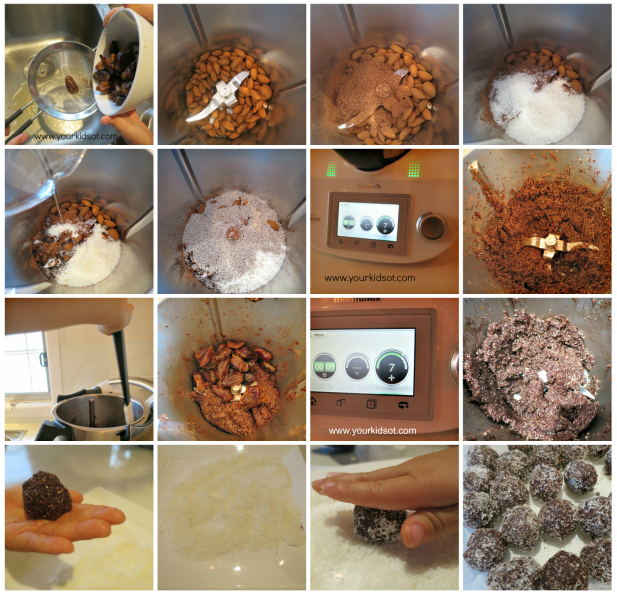 Your kids will love measuring, pouring scraping and rolling to make this recipe. You may find it easier to tip out the finished mixture prior to rolling it into balls avoiding those sharp blades. Mr 4 enjoyed helping with all aspects of this recipe, although operating the Thermomix was a little difficult for him. He especially enjoyed rolling the balls in the coconut! Note: Don't forget to check if you have a "nut free policy" at school! You may have to keep these for afternoon tea if you do! 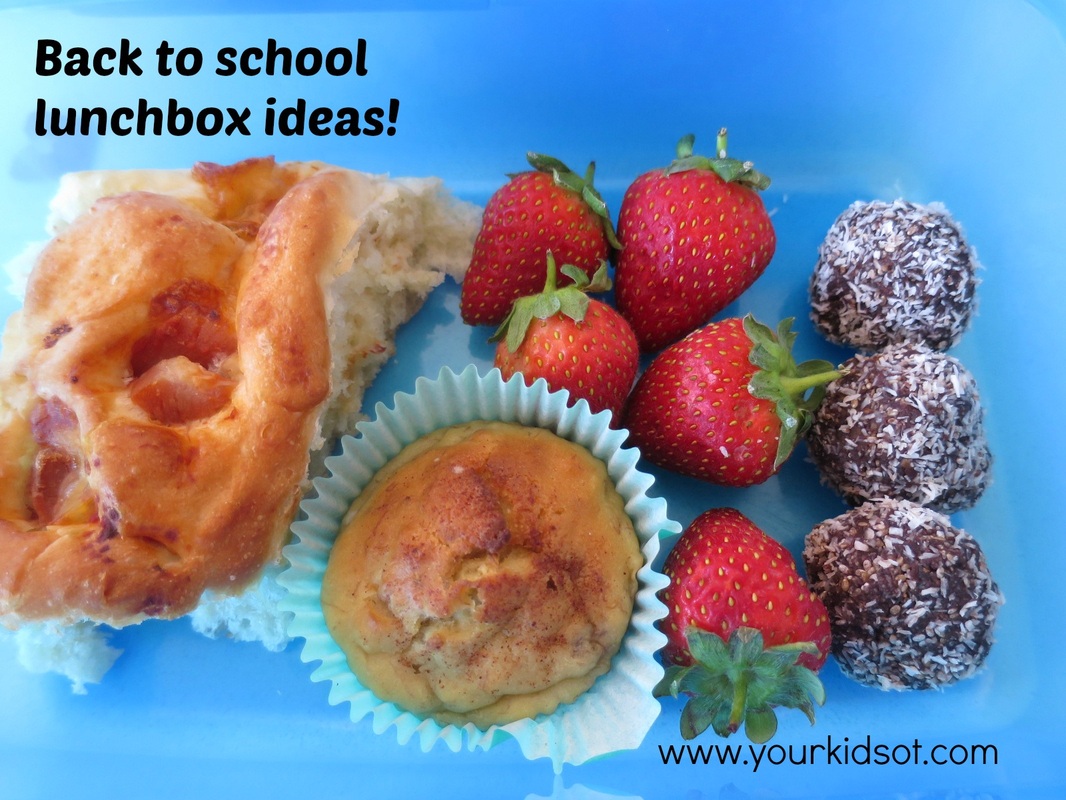  How are you feeling about the start of the new school year? What do your kids like in their lunchbox?  You may also like...
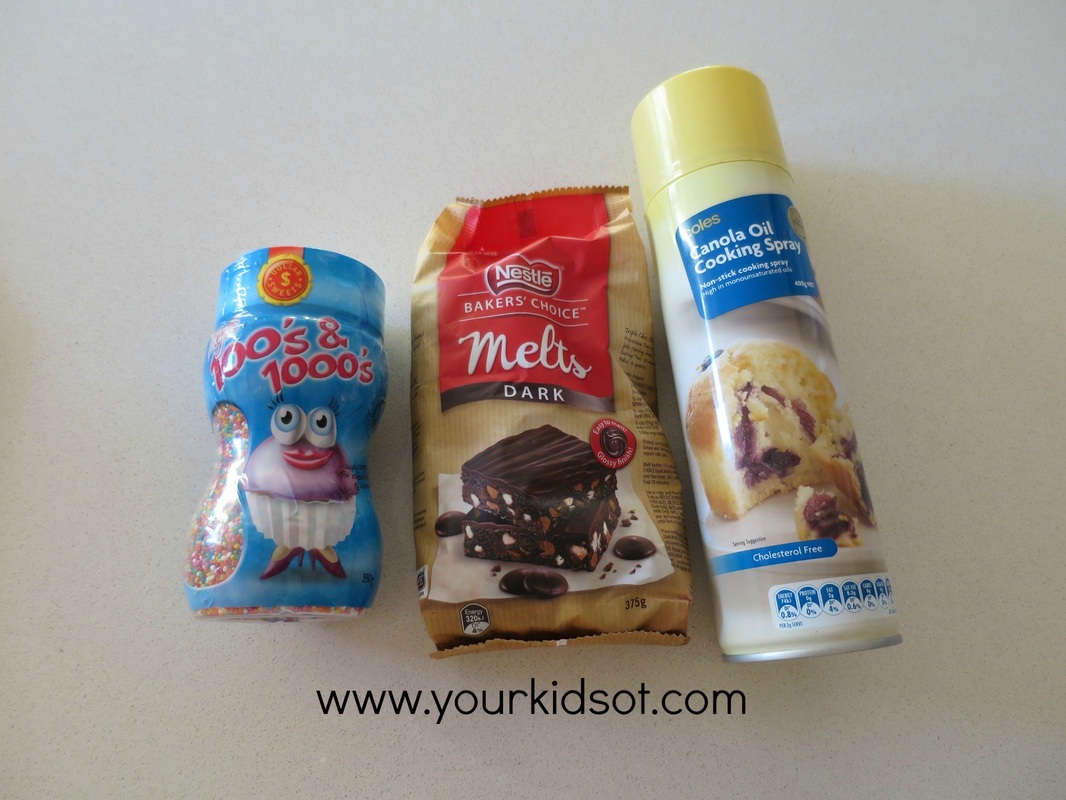
  Did you grow up with chocolate freckles as a kid? Chocolate covered in a sea of hundreds and thousands...well now you can make your own {any size you want}! I mentioned in a previous post that we made a couple of things for Miss 8's party favour bags. Well here is the sweet addition to the bag!
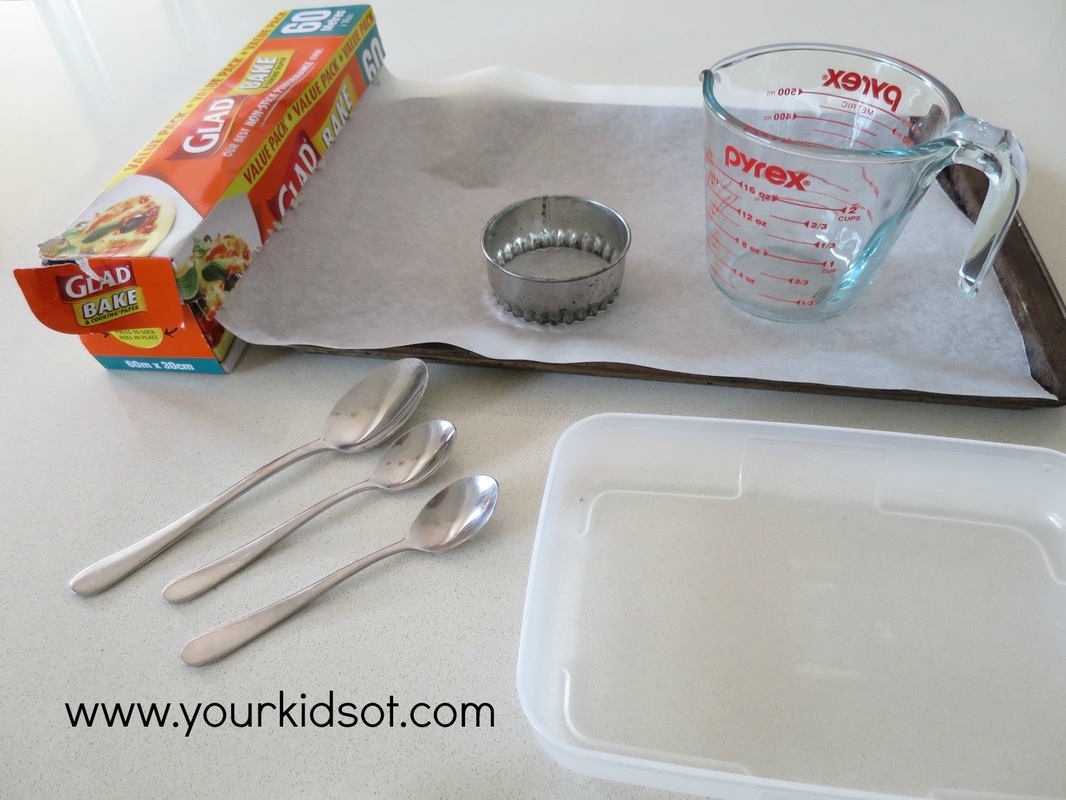
Method 1. Place the chocolate melts into the microwave safe jug. 2. Heat the chocolate for 1 1/2 minutes. 3. Stir the chocolate until smooth. 4. Oil the cookie cutter (use whatever you want for a desirable size). 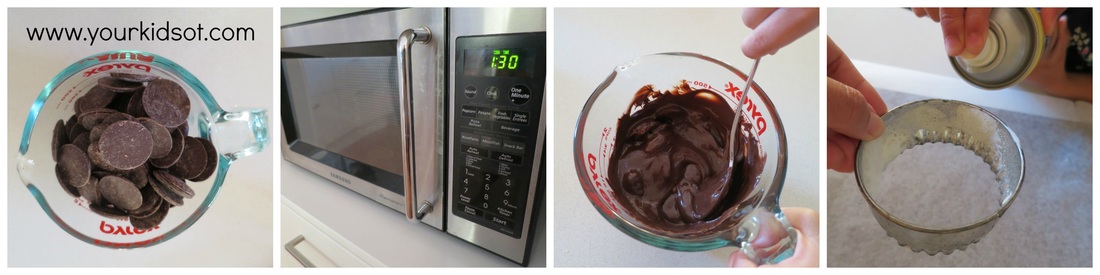 5. Pour the chocolate into the cookie cutter or spoon out the chocolate. Remove the cutter once you get the shape you want. 6. Flatten and smooth out the chocolate. 7. Pour some 100s and 1000s into a plastic container or bowl. 8. Spoon a generous amount of 100s and 1000s over the chocolate circle. 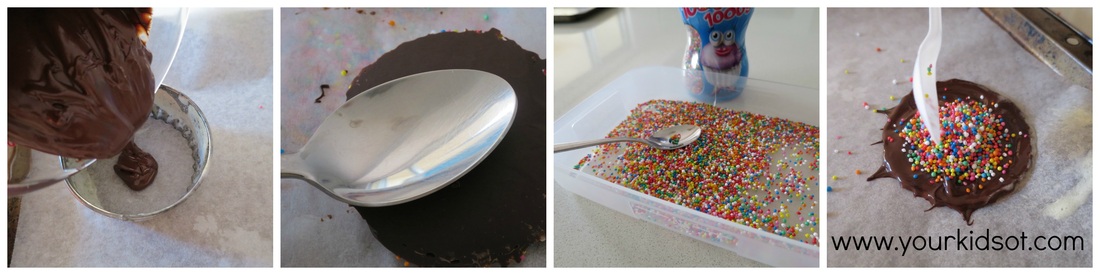 9. Repeat steps 5 through to 9 until you use up all the chocolate. 10.Place in the fridge to set. {The time will vary depending on how thick your chocolate is.} 11.Shake off excess 100s and 1000s. 12.Store in an airtight container away from direct sunlight. 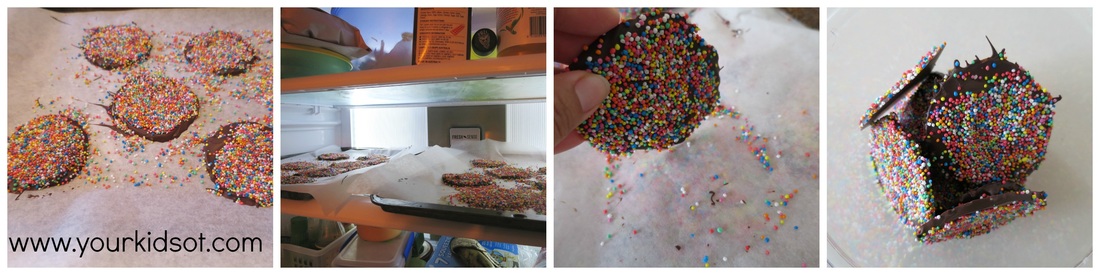 The kids and I were really pleased with how these turned out. I was a bit wary of them pouring and spreading the chocolate, so I did those parts. {Must have been in a don't-mess-up-my-kitchen sort of mood. Do you have those days?} The kids especially loved generously sprinkling over the 100s and 1000s. You could definitely use white or milk chocolate instead of dark.   These homemade chocolate freckles would make a lovely gift or something sweet for the school cake stall. Do you like chocolate freckles?
You may also like making...
 
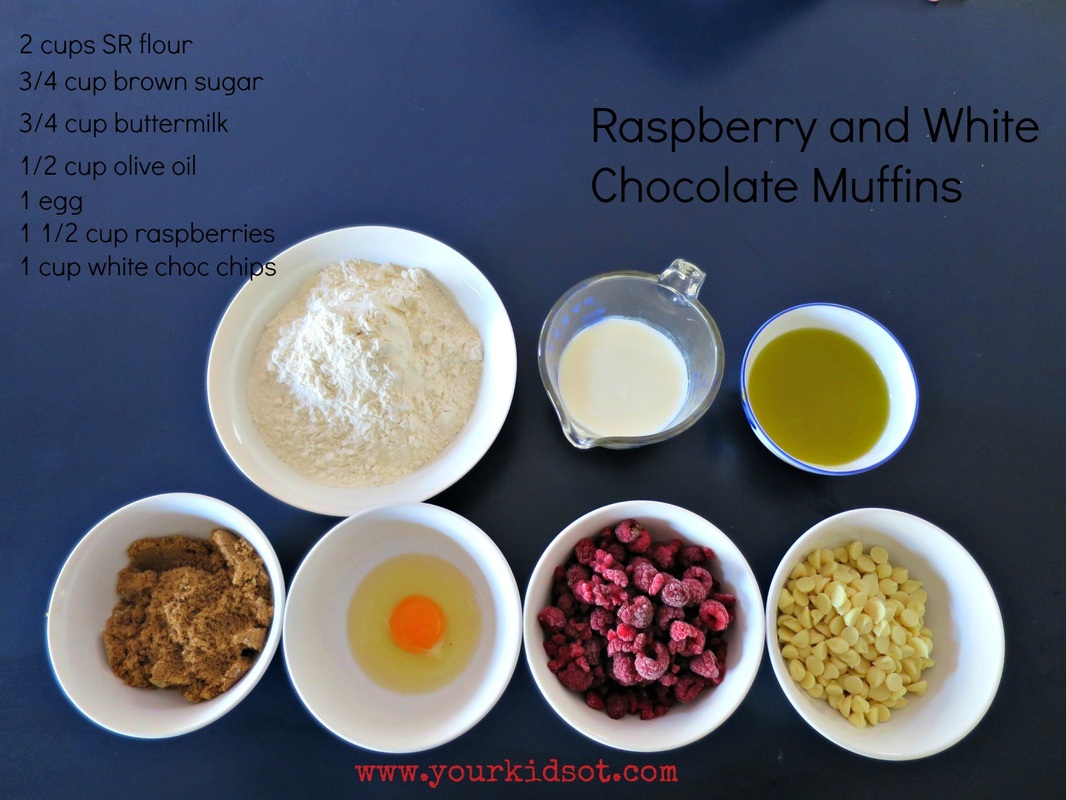
Method 1. Preheat the oven to 180° C (356°F). 2. Sift the flour into the mixing bowl. 3. Add the brown sugar into the mixing bowl. 4. Crack an egg into a small bowl. Whisk lightly with a fork. 5. Add the egg into the mixing bowl.  6. Pour the buttermilk into the mixing bowl. 7. Add the olive oil into the mixing bowl. 8. Stir the mixture gently with a spoon. 9. Add the raspberries into the mixing bowl. 10. Add the white choc chips into the mixing bowl. 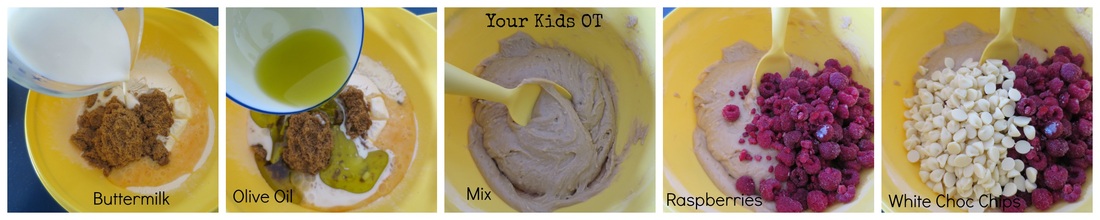 11. Stir the mixture gently until just combined. 12. Grease the muffin tray by spraying oil (or use patty pans). 13. Spoon the mixture into the muffin tray. 14. Bake for 20 minutes 15. Allow muffins to cool and enjoy! 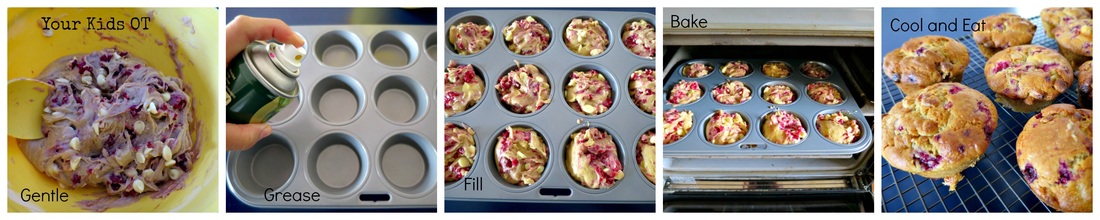 What is your favourite muffin flavour? Happy Baking!  Have you tried these kid friendly recipes?

This scone (or biscuit if you are a US reader) recipe is easy! The less handling the better to keep it light and fluffy on the inside. Dust fingers and the cookie cutter with flour before handling the doughy mixture and this will make things less sticky.
Method 1.Preheat the oven to 200°C (392°F). 2. Sift the flour into the mixing bowl. 3. Using the butter knife, make a well (hole) in the centre of the flour. 4. Pour cream into the well. 5. Pour lemonade into the well.  6. Mix gently with a knife until all ingredients are combined to form a dough. 7. Put some extra flour onto your kitchen bench top. Place the dough onto the flour. 8. Turn the dough over so it is coated in flour, gently pressing to about 4cm high. 9. Use the scone cutter to cut out the scones, re-shaping the dough gently to use up scrap sections. 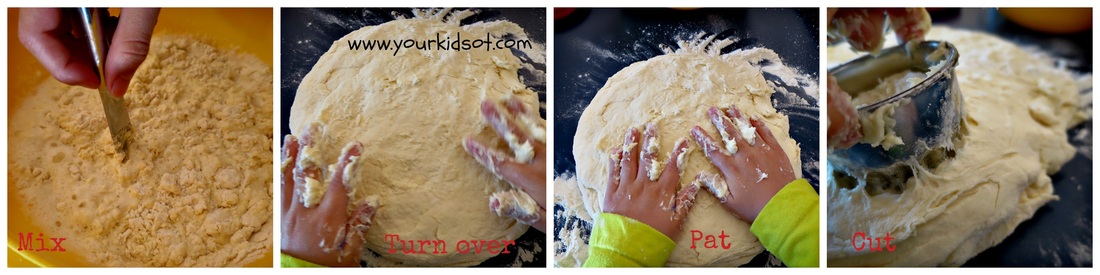 10. Place scones onto a baking tray. 11. Use a pastry brush to glaze (put on the milk). 12. Place tray in the oven. Bake for 12 minutes. 13. Cover with tea towel until ready to eat. 14. Enjoy with whipped cream and jam! 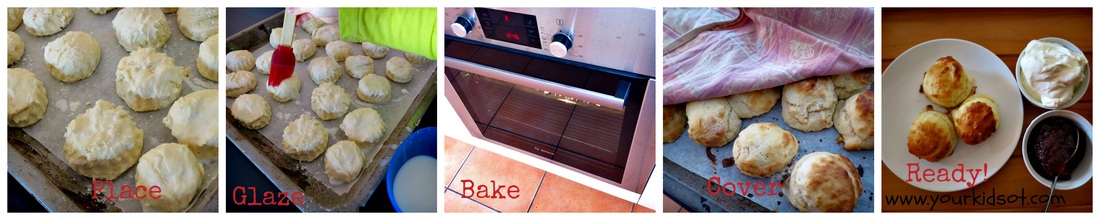 Find a photographic step by step guide to this recipe in the Your Kids OT shop. This is great for kids to use as a tool for independent cooking (with minimal help). In this recipe children may need help to turn the dough over, cut the scone, reshape the dough for cutting and using the oven. Perfect for morning tea or afternoon tea (or maybe even breakfast), these scones must be tried! The whole family will love them. Have you made lemonade scones?  Have you tried these kid-friendly recipes?

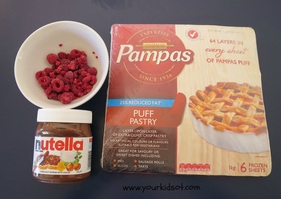
Method 1. Preheat the oven to 210°C or 410°F. 2. Put out the sheets of puff pastry on the bench top for 5 minutes (ie. thaw). 3. Spread a layer of Nutella onto the puff pastry. 4. Sprinkle the raspberries over the Nutella. 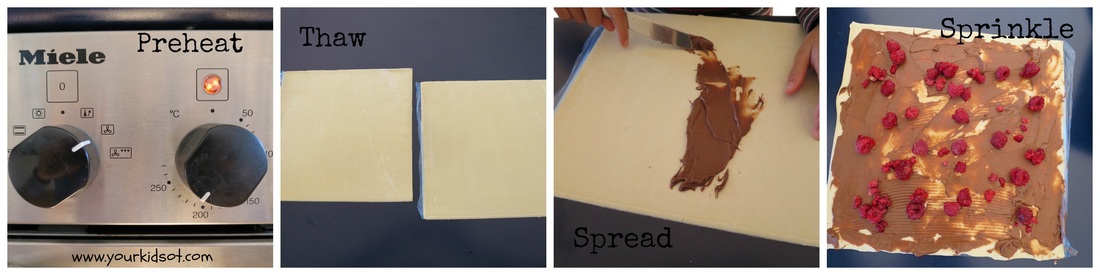 5. Roll up the puff pastry using the plastic sheet to help you (lift and push forward). 6. Cut up the puff pastry into 3cm scrolls. 7. Lay out the scrolls onto the baking tray so the scrolls face up. 8. Bake in the oven for 10 minutes until golden. 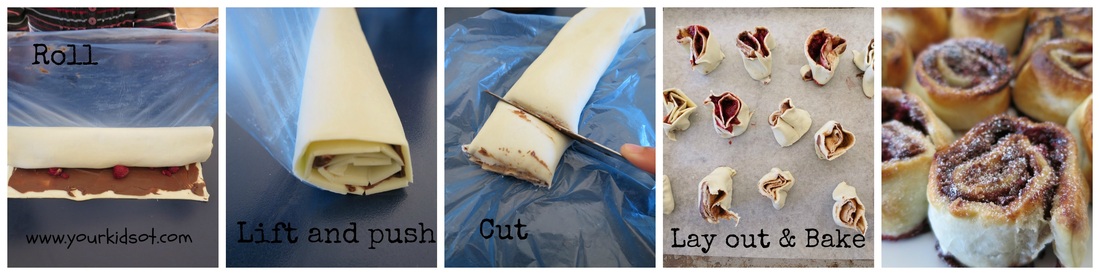 Mr 4 and Miss 7 loved helping to make this recipe! Miss 7 especially loved the rolling with the help of the plastic sheet. Everyone loved eating them {even Mr YKOT}. You will find an extended version of this recipe at the Your Kids OT shop. All recipes here have been designed for kids to do as independently as they can or for children who have a disability. Here is a preview of how the full recipe looks with bigger photographs for each step. Enjoy making and eating these delightful scrolls... Happy Baking!  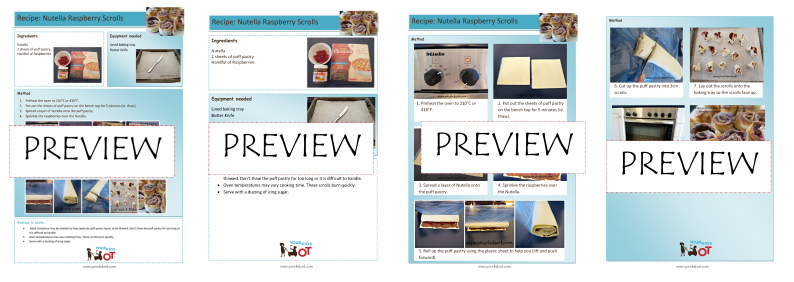 Preview of Nutella Raspberry Scroll Recipe 
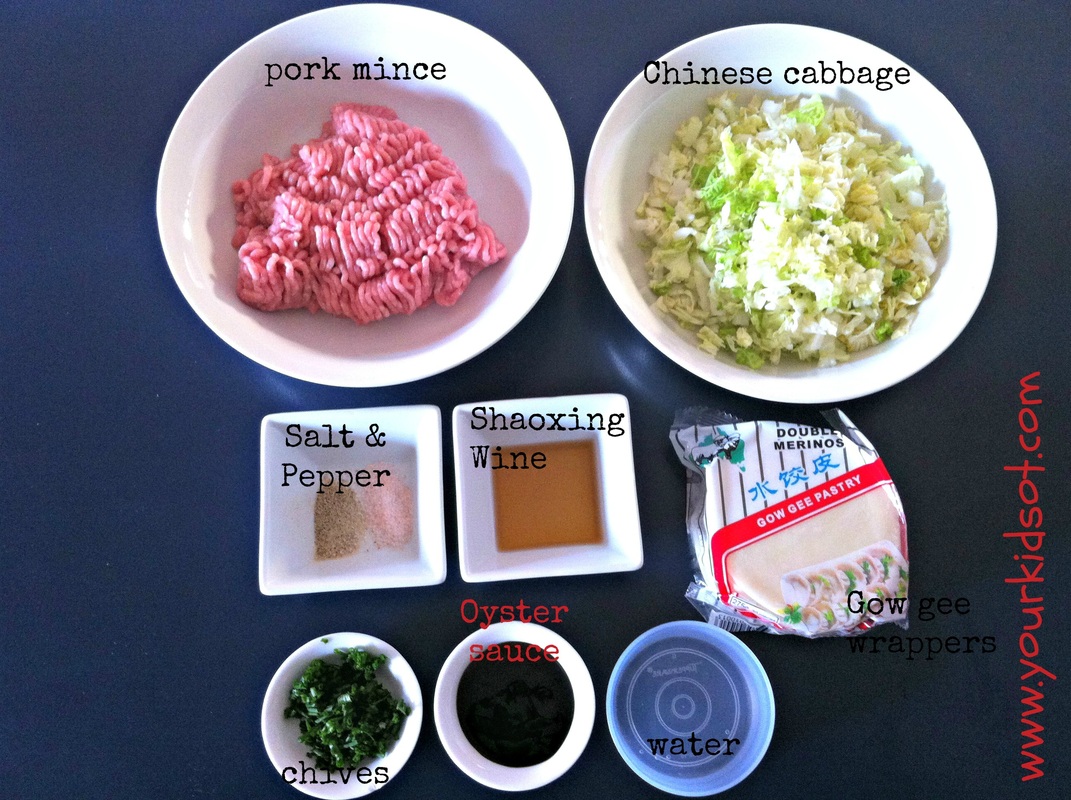
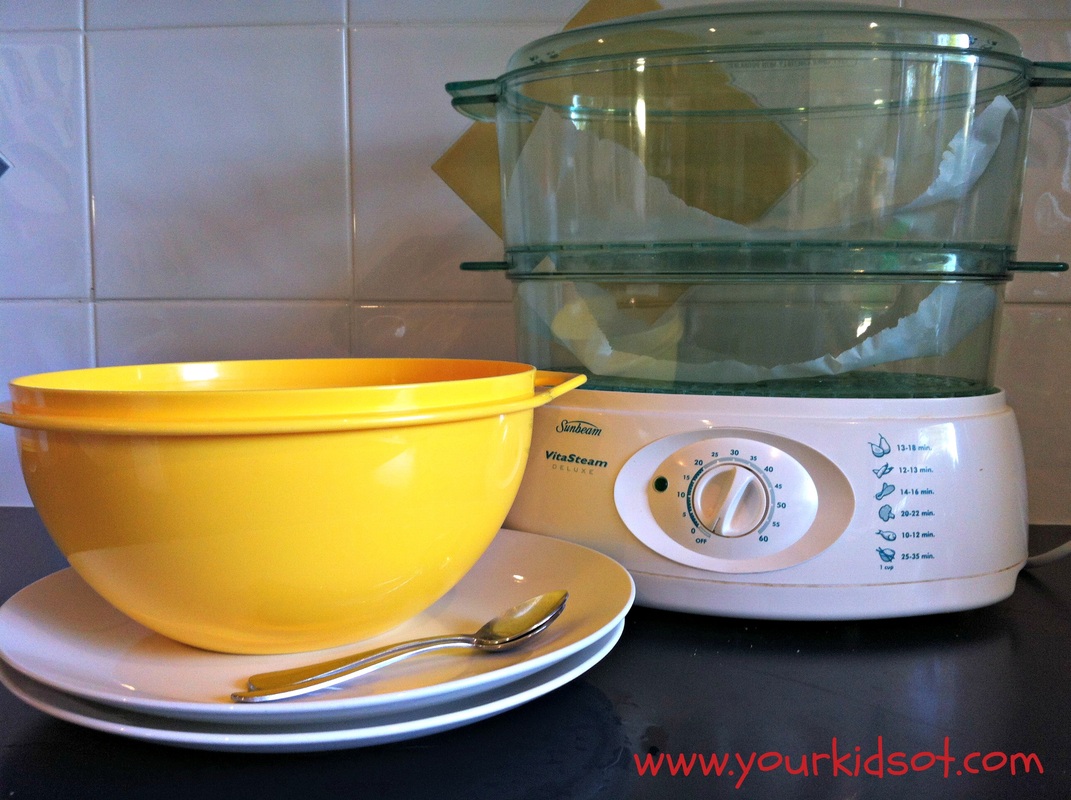
There is a little bit of preparation before starting this recipe - measuring out the ingredients and finely slicing the cabbage and chives. You will be the best judge whether your kids can help with this or not. If you can't find Shaoxing wine, just leave it out. Kids will need supervision during the "steaming" part of this recipe depending on whether you steam on a stove top, steam over or electric steamer like I did. Tongs might be helpful to remove the dumplings after cooking.
Method 1. Place pork mince, Chinese cabbage, oyster sauce, chives and Shaoxing rice wine, salt and pepper into the mixing bowl. 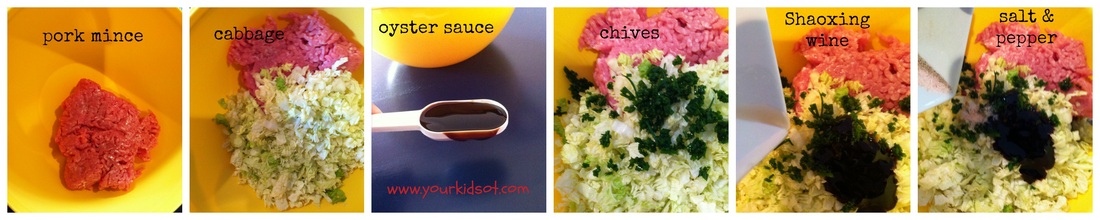 2. Mix with your hands until all ingredients are combined. Wash and dry your hands. 3. Spread out a layer of Gow gee wrappers onto a plate. 4. Place a heaped teaspoon of meat onto a wrapper. 5. Using your finger spread some water on the edge of one wrapper. 6. Fold the wrapper over covering the meat and press down. 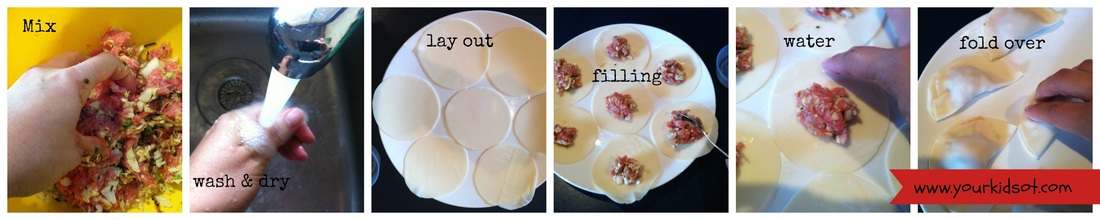 7. Press the wrapper together and pleat. (To pleat pinch the wrapper and fold over, repeat). 8. Repeat steps 3-7 until all of the filling mixture is used. 9. Steam the dumplings in a single layer for approximately 12 minutes. 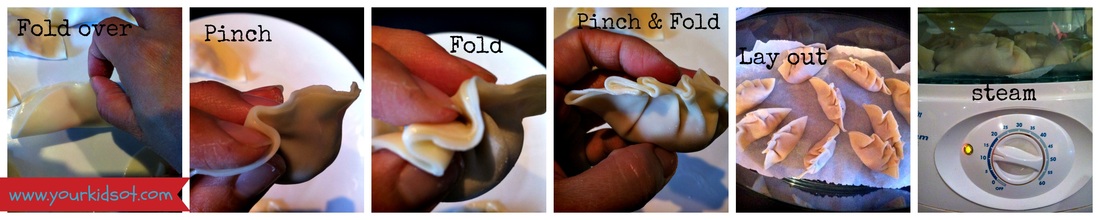 10. Serve dumplings with a dipping sauce or with a noodle soup.  Hmmm... I'm not sure why I said 2 plates but I suppose it means you can lay out more wrappers or maybe it was for the finished dumplings... You can buy ready made dumpling dipping sauce from your local Asian grocery store or supermarket. Grownups might want some chilli sauce too! You can find an extended version of this recipe with photographs for each step at the Your Kids OT shop. All recipes have been designed for kids (with adult supervision) or for children with a disability. Have you made dumplings before? Enjoy!  Looking for more recipes to get your Kids in the Kitchen? Try these...
|
AuthorHi, I'm Cindy and I am an Occupational Therapist. I enjoy working creatively with children to see them reach their potential. Read more about me here. 

SEARCH THIS SITE

Archives
June 2024
Categories
All
Popular Posts


 |


 RSS Feed
Join the YKOT e-newsletter!
Subscribe to get our latest content by email and receive
the SHAPE ROADS PRINTABLE NOW!

Success! Now check your email to confirm your subscription and receive your free printable!
Join our Mailing List!
Subscribe to get our latest content by email and receive
the SHAPE ROADS PRINTABLE NOW as a thankyou!
Success! Now check your email to confirm your subscription and receive your free printable!
Disclaimer: The information on this site is general in nature and should be used for educational and entertainment purposes. The activities are safe for most children, however, you should consult an Occupational Therapist or health professional to address specific movement, sensory or other medical conditions. This blog does not replace formal therapeutic professional advice given by a health professional or medical practitioner. Reviews and endorsements of products will only be made based on my expertise and personal opinion; and deemed worthy of such endorsement. The opinions shared in sponsored content will always be my own and not that of the advertising company or brand. Content, advertising space or posts will be clearly identified if paid, affiliated or sponsored. Affiliate links may be found throughout this website in advertising. This means that if you follow through with a purchase from these links, Your Kids OT will receive a percentage of the sale. Your Kids OT undertakes to meet the requirements of the "Social Media Policy" as published by Australian Health Practitioner Regulation Agency (AHPRA). Further information about this policy can be found here.
Find meFollow me |

|
About me
AuthorHi, I'm Cindy and I am an Occupational Therapist. I enjoy working creatively with children to see them reach their potential. Read more about me here. 
|
Copyright © 2017 Your Kid OT