|
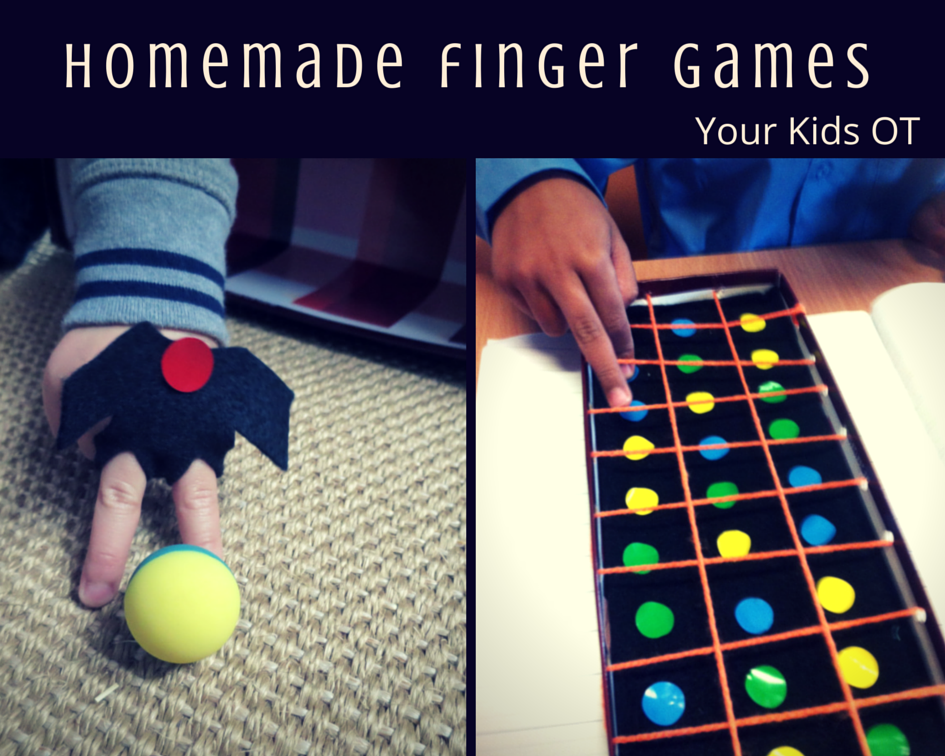
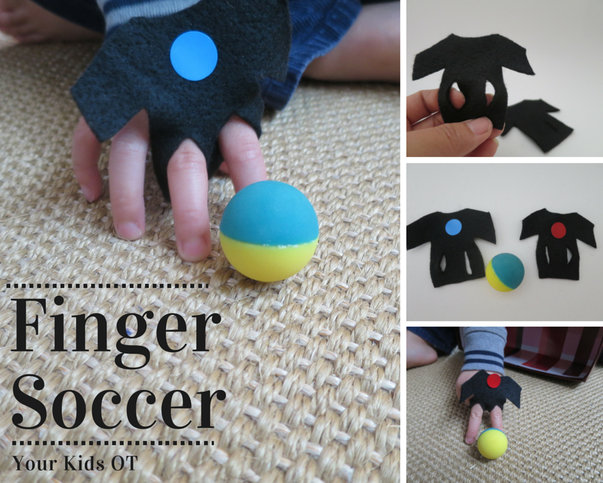
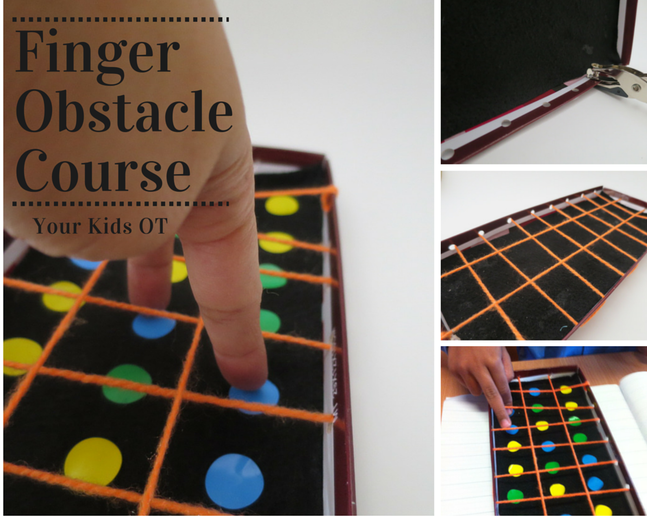
Two quick-to-make little games to play at home, preschool or in an OT session. Finger Soccer and a finger obstacle course! Finger Soccer What do you need? Black Felt Scissors Stickers Small ball What do you need to do? 1. Cut out some felt soccer shirts. 2. Cut two slits for fingers, 3. Decorate each shirt with a colour sticker and get a ball. Ready to play in less than 5 minutes! This is a fun little game that encourages finger isolation, strength and coordination. The fingers tucked underneath need to be stabilised so that the index and third fingers can be used. Fingers can "kick" the ball to another person and defend their own goal. Finger Obstacle Course What do you need? Lid from a shoe box. Felt Glue Scissors Hole Punch Wool Coloured stickers What do you need to do? 1. Cut out and glue a piece of felt to fit the shoe box lid. 2. Place holes around the lid on all four sides. 3. Secure the wool to a corner hole and weave in one direction across the lid. Then weave the wool in the opposite direction to form the squares. 4. Place colour stickers in each square so that it is either next to or diagonally opposite one of the same colour. You can nominate which fingers need to participate in the obstacle course. I get kids to either use their "pinchy fingers" (thumb and index finger) or their "walking" fingers (2nd and 3rd fingers). They have to get from one end of the lid to the other only touching a certain colour. We try to avoid touching the wool ... but that gets tricky. Just like finger soccer, this game promotes finger isolation, strength, coordination and separation of the two sides of the hand (where some fingers are used and others are stabilised). These games are really simple to make. They are great to warm up fingers ready to do other fine motor activities, handwriting or cutting. Did you read last week's article about heavy work finger activities that need no equipment and preparation? Would your child like to play finger soccer or challenge their way through an obstacle course?
You may also like:
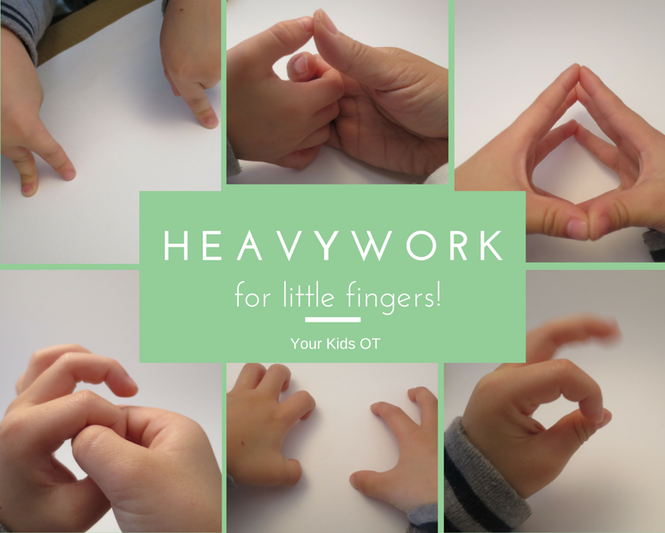
Heavy work activities refer to activities where the body has input to the muscles and joints. Heavy work activities are generally recognised as a way to help children improve attention, arousal level, body awareness, muscle tone as well as decreasing defensiveness. Heavy work activities can involve whole body movements (pushing, pulling, lifting, etc) or parts of the body.
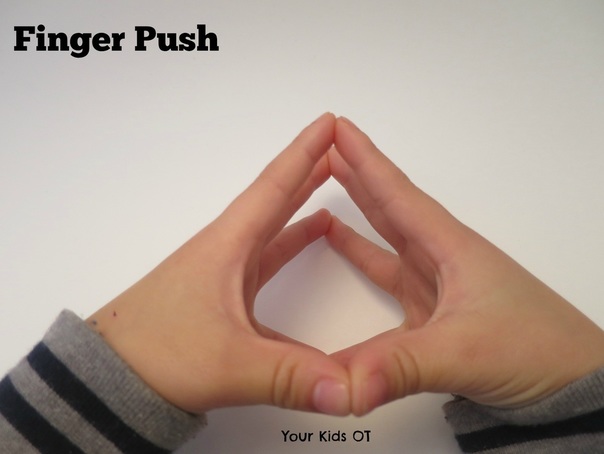
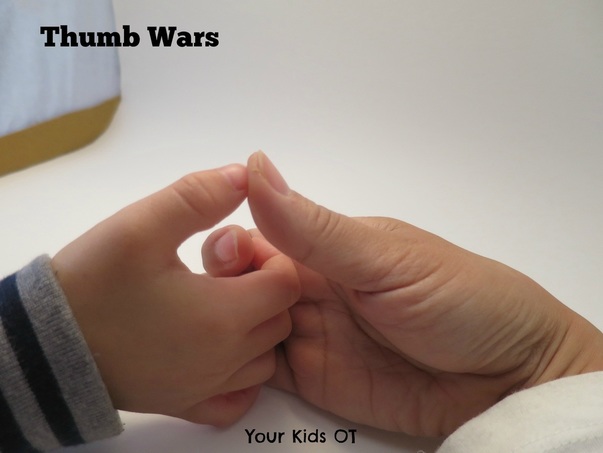
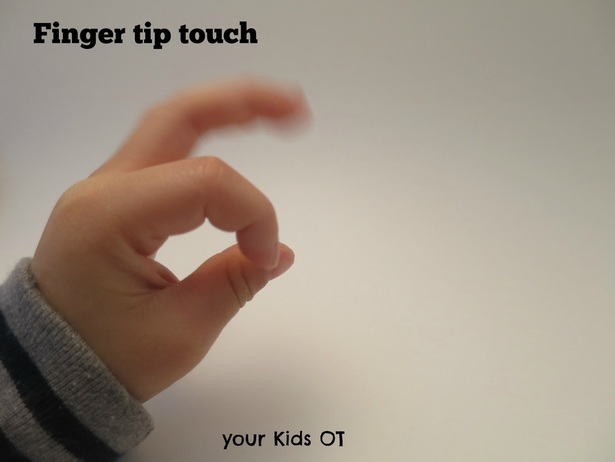
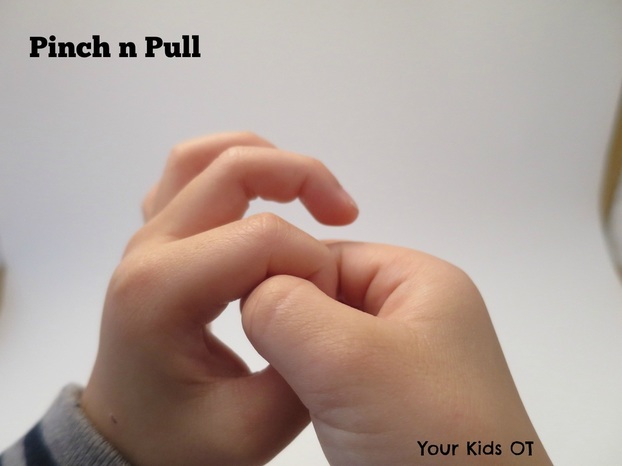
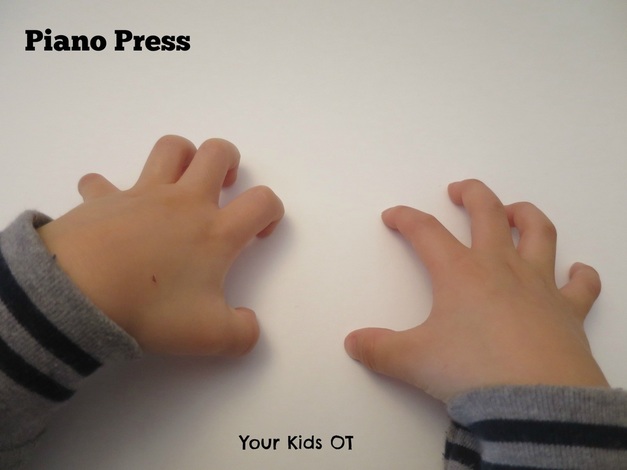
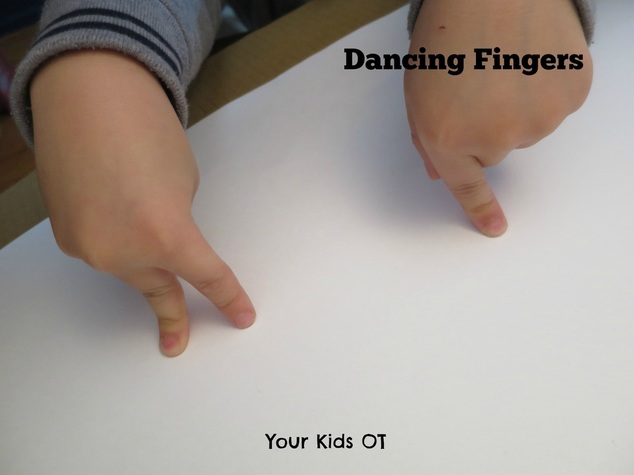
Here are some ideas for "heavy work" for fingers and do not require any equipment. These are great as finger warm-ups in the classroom, something to do in the car on the way to school or even waiting for a bus! Warming up the fingers is a good idea before they are needed for fine motor activities or tool use in the classroom. 1. Fingers push - Place each finger tip of the left hand with the matching finger tips of the right hand. Push fingers together. Do this in front, up high or even behind your back! 2. "Thumb Wars" - Get a friend to play this one. Make a fist with your right hand, lock your fingers with your friend and leave your thumbs free. Move your thumbs to opposite sides saying "I, 2, 3, 4, I declare a thumb war". Touch thumbs and try and "pin down" your friend's thumb. Don't let go of the fist hold...and maybe start with short nails! 3. Finger tip touch - Touch each finger to your thumb of one hand then the other hand. Try both hands at the same time. Try really fast and really slow. Try pressing really hard against your thumb. 4. Pinch n Pull - With one hand pinch your thumb and index finger together making a circle. Do the same with the other hand but lock the circle together with the first hand. Pull! Try this with each finger making a circle. 5. Piano Press - Curl your fingers with the tips touching the table (or your lap). "Play" the piano... a slow piece, a dramatic piece, all fingers together, one at a time... press down into the table as you play (try not to hyperextend at the joints). You could even print out a paper keyboard to aid this finger game or sing-a-long to your favourite songs. 6. Dancing Fingers - There was a "Playschool" song called "One day a hand went walking"... This reminds me of that song. Stand your index fingers and third fingers up onto a table top. They can walk, jump, run and even dance. Fingers could also cross the mid-line and come back again. A friend of mine gets her fingers to do the "can can" with coordinated bending and kicking... This article is the first in a series. Stay tune for more finger warm ups with some easy homemade props, finger friendly songs for toddlers and preschoolers as well as fine motor activities for older kids! These finger exercises are great for any age and the best thing is that they require no equipment and no preparation! Find "Heavy Work for Little Fingers" as a one page hand out in theYKOT shop! Do you have a favourite finger "warm up"?
You may also like...
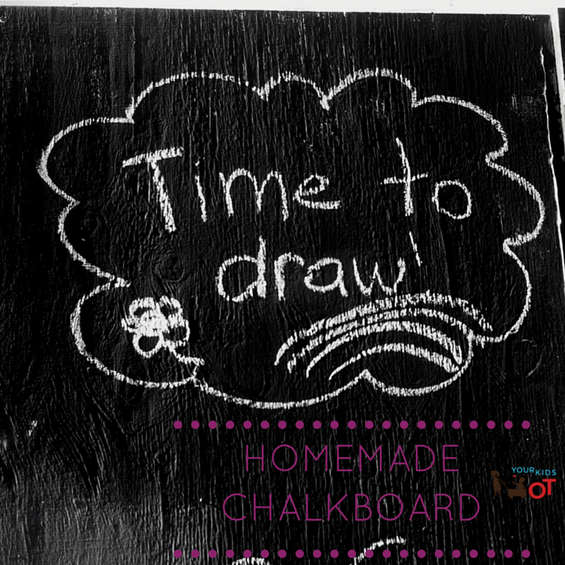
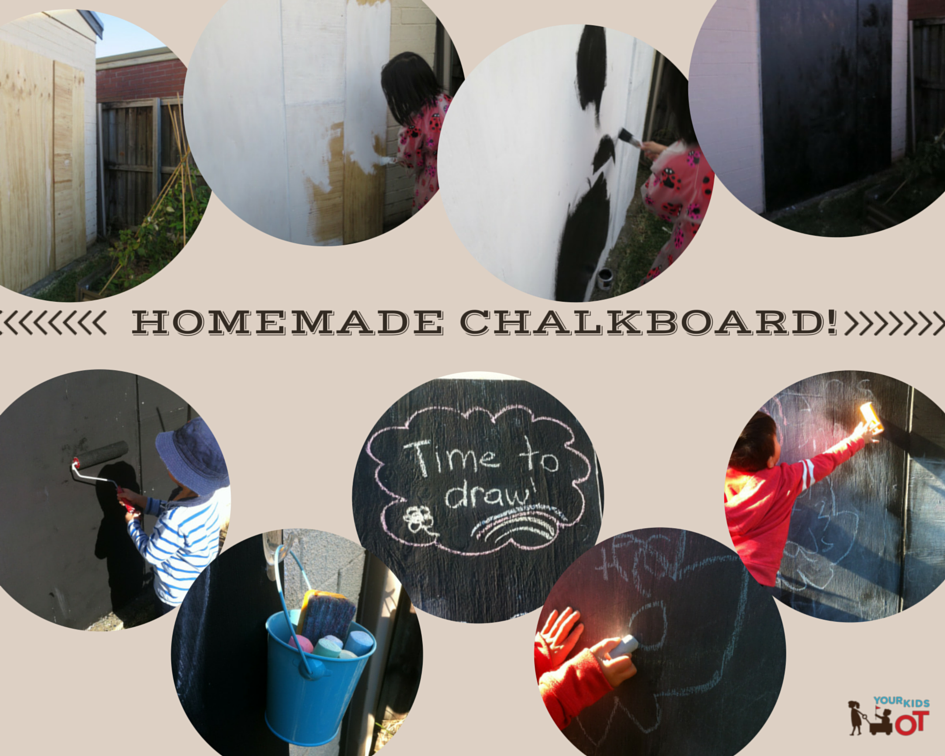
The recent wild rainy weather gave us an unexpected opportunity. On the down side, we had a part of our garage come away from the wall {with a panic to get it fixed before the rain continued to bucket}. On the up side, we had a piece of timber replaced and sealed with an opportunity to create our very own outdoor chalkboard! I've seen so many cute variations of an outdoor chalkboard on Pinterest and became excited that we could do this too! I believe we had a piece of plywood attached and sealed to the garage {so my builder tells me} that would withstand future wild weather. The position was at the back of our garage right next to an attempt at a vege patch. Not a lot of room for the kids to stand, however it was enough. If I had chosen where the hole in my garage was, I would have preferred it to be horizontal and within arm's reach for the kids...but alas I couldn't dictate that one. A chair to reach the high parts would have to suffice. The kids and I painted the board with a primer {Dulux} and two coats of chalkboard paint {White Knight}, allowing it to dry in between each coat. I was actually a little surprised at how expensive these paints were so don't expect a cheap project here. We had quite a large surface to cover {about the size of two full size doors}. The final board is so much bigger than any easel we have owned and allows multiple children to draw simultaneously! I added some clear 3M hooks to either side of the chalkboard, then hung small buckets for chalk and a duster. So cute {says me anyway}! This chalkboard has been a great activity for the kids to do on their own or with friends who come to visit. Mr almost-5 years is showing an interest in letters and drawing simple pictures. At times I will encourage him to use a "tripod" grasp with the large chalk. Drawing is such a great way for kids to develop visual motor planning and fine motor skills. It allows children to experiment with spatial awareness, developing the awareness that shapes can be recognisable when drawn a specific way. Pictures and letters can be recognised when lines and shapes are placed in certain positions. Rubbing the board out has probably as many benefits as actually drawing on the board. Using the eraser is a great whole body movement encouraging "heavy work" and feedback to the muscles and joints. Working on a vertical surface also helps to stabilise the shoulder girdle and promotes wrist extension, which are important when preparing for handwriting. This has been a great project that was simple to create. We have some chalkboard paint left over and I'm thinking what other surfaces I can paint! Do you have a place for an outdoor chalkboard? Do your kids like drawing? Have you been following Your Kids OT on Facebook and Pinterest? I share lots of great ideas, real-life stories and photos! Find Your Kids OT on Facebook and Pinterest. Here are some of the recent things I have been sharing...
Hands up if you were of a generation that when you were looking for information you would resort to a World Book Encyclopedia or Britannica? We didn't have a huge library of books in my childhood, however, I do remember these weighty books being a fountain of knowledge when needed.
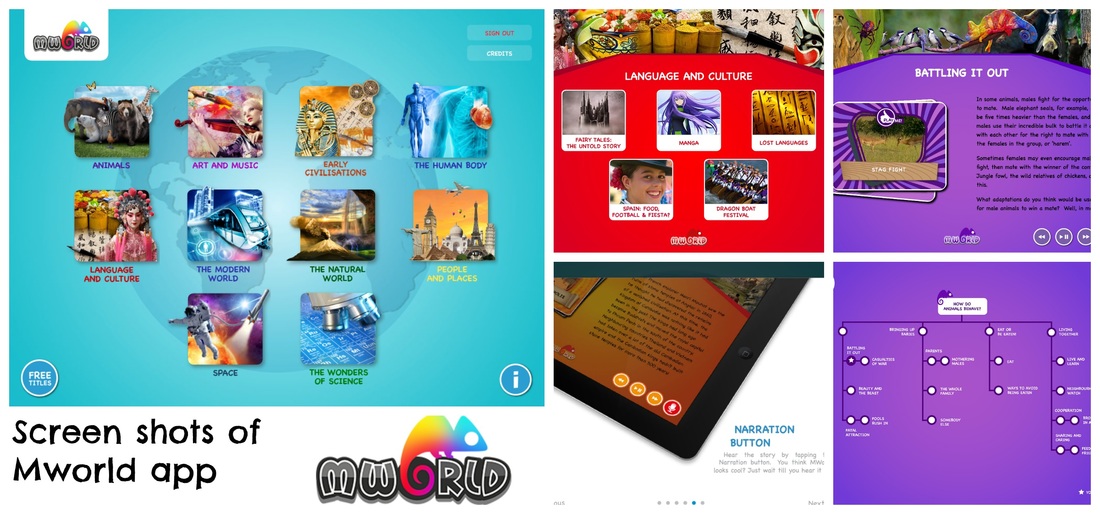
This generation of children have the priviledge of having information at their fingertips. The digital world has truly brought information that may not have been easily accessible in the past, straight to our kids. Children can explore, examine, investigate, discover and learn from their home or classroom about the incredible world we live in through this app. Monash University's "MWorld" is an app that fosters learning in our children. It was designed by a field of academics including the Dean and Deputy Dean of Education at Monash University as well as teachers, astronomers, physicists, linguists, artists, musicians, historians, archaeologists, geographers, biologists, medical researchers, engineers, volcanologists (I didn't know that was a word) and more! The "MWorld" app contains 10 subject areas (in the full paid version) including animals, art & music, early civilisations, the human body, language & culture, the modern world, the natural world, people & places, space and the wonders of science. Each subject is presented with subcategories which are mapped out for your child to explore. There is a narration option also for each subject and subcategories. Each section has incredible photography and graphics. As I explored the app, I felt a child-like curiosity to find out more, to watch the video clips, enlarge photos, play the inbuilt games and answer questions.
This app is designed for primary-school aged children (ie. 8-12 years) and is suitable for home or the classroom. I don't think that I will be using this in a therapeutic context (yet). There are features which allow children to collect points the more they answer questions.
Teachers will love the "inquiry-based learning", lesson plans and teacher's guides that show how it might map to your curriculum needs. American teachers, you can also access teacher guides mapped to the US common core state standards (CCSS). Teachers are able to download a free trial for their classrooms. Parents may also download this app for free with limited subject titles. Further titles may be purchased and continue to be developed. This app is currently available for apple devices, however it will soon be available for android as well. Miss 8 years gave "MWorld" a test run and loved it immediately! She was able to navigate through subjects of interest and explore subjects she may not have thought about before. The videos were especially appealing as were the games and ability to collect points. The app "taps into" a curious mind, fostering inquiry and discovery. A word of warning that the "Human Body" section does discuss reproduction and you may want to discuss this with your child prior to opening this subject. The navigation in this app is set to improve with the next upgrade. You will be able to go straight to the subject area by clicking it on the map. The "MWorld" app has the information of a traditional encyclopedia, the photographs of a National Geographic magazine, the narration of a David Attenborough documentary, the subject mapping of a Museum with so much more as it encourages inquiry and learning. I highly recommend this app!
For more information you can refer to the following -
MWorld website here: https://www.discovermworld.com/ Facebook: https://www.facebook.com/discover.mworld Twitter: https://twitter.com/discovermworld Instagram: https://instagram.com/discovermworld/ Download the app here - https://itunes.apple.com/au/app/discover-mworld/id809515973?mt=8. Let me know if you download this app and what you {or your children} think of it!
The "MWorld" app was gifted to me by Monash University. I received no remuneration for this post and will receive no commission from any purchases of this app. All opinions expressed are my own and based on my expertise, experience and personal opinion.
This mother's day I am so thankful for my two cheeky children and my own mother. I'm thankful for a loving family and the opportunity to be together. I think of those who are experiencing pain and sorrow this mother's day and wish there was a way to ease this pain.
Being a mother has taught me so much. It has also helped me to be a better occupational therapist (I hope). Being a mum has taught me to be realistic with home programs and homework. I am more realistic about the demands on time for families. I also asked some of my fellow therapy bloggers what motherhood has taught them. Margaret Rice from Your Therapy Source says that being a mom has taught her "understanding how hectic home life can be. Carry over activities have to be easy and part of the routine. Don't judge. Parenting is the hardest job in the world!". Tonya Murdoch Cooley from Therapy Fun Zone says that being a mom has taught her "to not judge a person's situation. Parenting is hard enough, but when you add a child with special needs it just increases the difficulty level, and everyone will be able to handle different amounts of input". Sarah Lyons from OT Potential writes about her thoughts on OT and parenting here.
A few weeks ago I went into Miss 8's classroom to help with "finger knitting". It sounded like fun! They learnt from a you tube video and most of them enjoyed it. Finger knitting is quite a complex skill involving bilateral coordination (using both hands in a coordinated way), finger isolation, manual dexterity, hand strength, visual motor planning skills not to mention some patience! Some of the kids did need more help than others to break down the task into individual steps. Overall, the class did a great job and some became experts very quickly.
Miss 8 loved it and decided she would love to knit some scarves for mother's day. I have broken down the steps for you to learn for yourself or teach to your kids! Definitely most suited to kids 8 years and older. Casting On
1. Place the yarn between your index finger and 3rd fingers with the short side behind your hand.
2. Wrap the yarn clockwise two times around your index finger. 3. Lift the bottom loop just above the top loop. 4. Lift the new bottom loop over the new top loop, then completely over your index finger. Pull the yarn to tighten the slip knot. Knitting
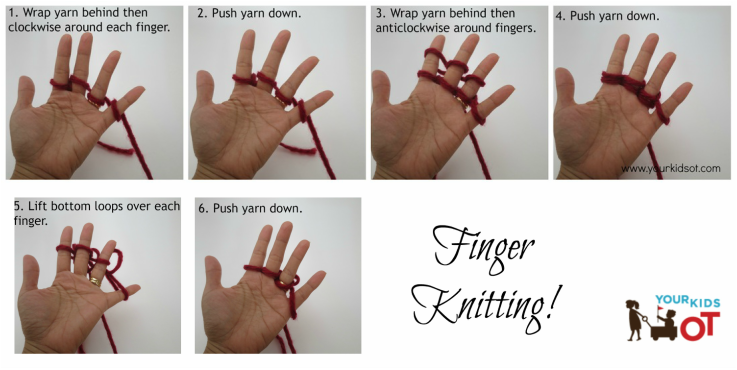
1. Wrap the yarn around the third, fourth and fifth fingers. Start behind the finger and wrap in a clockwise direction around each finger.
2. Push the yarn down. 3. Wrap yarn behind then anitclockwise around 4th, 3rd and 2nd finger. 4. Push the yarn down. 5. Lift the bottom loops over the top loop and over the 2nd, third and fourth fingers. 6. Push the yarn down on each finger. Repeat these steps until you have the length that you want. Casting off
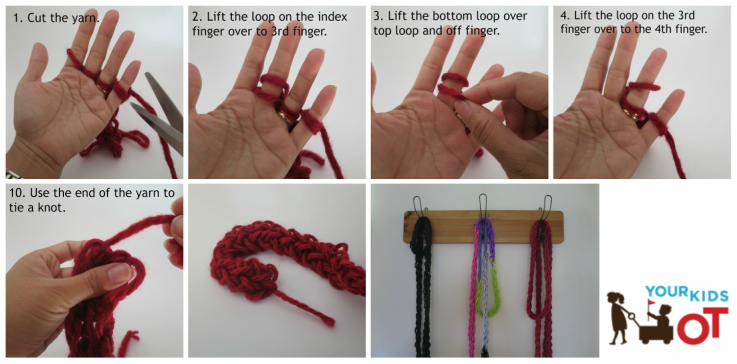
1. Cut the yarn when you have reached the length that you want.
2. Lift the loop on the index finger over to the 3rd finger. 3. Lift the bottom loop over the top loop and off the 3rd finger. 4. Lift the loop on the 3rd finger over to the 4th finger. 5. Lift the bottom loop over the top loop and off the 4th finger. 6. Lift the loop on the 4th finger over to the 5th finger. 7. Lift the bottom loop over the top loop and off the 5th finger. 9. Lift the loop carefully over the 5th finger. 10.Use the end of the yarn to tie a knot through the last loop (that you just lifted off the 5th finger). 11. Pull gently on both ends to tighten the knitting. Knitting sizes will vary according to the size of your fingers. After a few failed attempts at producing a video, I have attached a you tube video produced by Fiber Flux. Click on the title of this email to take you to a live webpage to view the video.
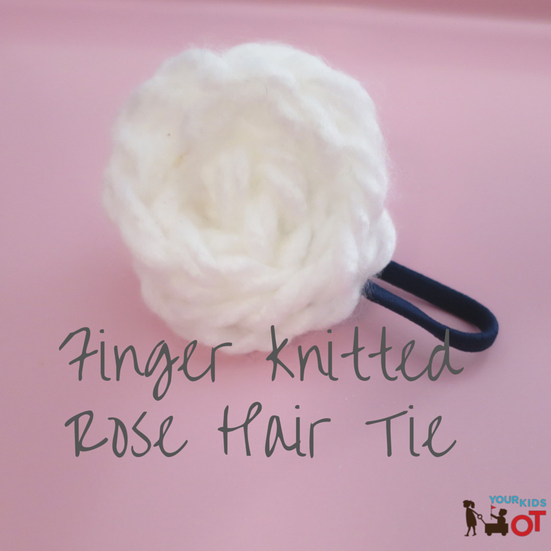
Miss 8 has been industriously making finger knitted scarves for her grandmothers, aunt, me and even her little brother. She also made a variation using just two fingers to knit. We turned these into gorgeous hair ties by wrapping them around and securing the back with a hair tie. You could add a contrasting colour in the centre and secure the centre with more yarn. They would also make gorgeous brooches or head bands.
Finger knitting is not as hard as it looks. You and your children will pick it up within an hour and have knitted an easy scarf. There is just enough time to make some for mother's day!
Have you ever tried finger knitting before? Wishing all the mothers reading this a very Happy Mother's Day!
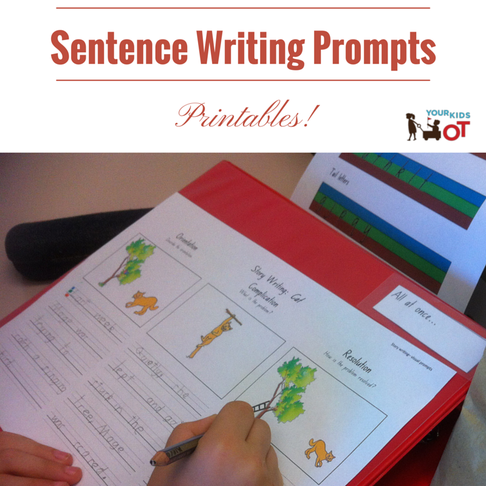
Some children benefit from visual prompts to help them to develop sentence and creative writing. The children I see may have great ideas but find it hard to start sentences. They may look at a page and just can't think of what to write. They may not know how to develop a story or become repetitive with story ideas. They may be working on "handwriting" skills and need an appropriate context to write {letter formation on it own has no context and becomes monotonous}.
I use a variety of prompts with the kids I see for OT to help them with sentence writing. I have placed some of them in the Your Kids OT shop. These are tried and tested resources that I have developed and I am slowly adding to. The printables are suitable for early writers in Kindergarten, Year 1 and 2 (ie. approximately 6 to 8 years). These printables have a small cost involved as they have taken me time to develop. Please do not distribute or take screen shots of the resources. Thanks for your support! 1. Think, Draw, Write
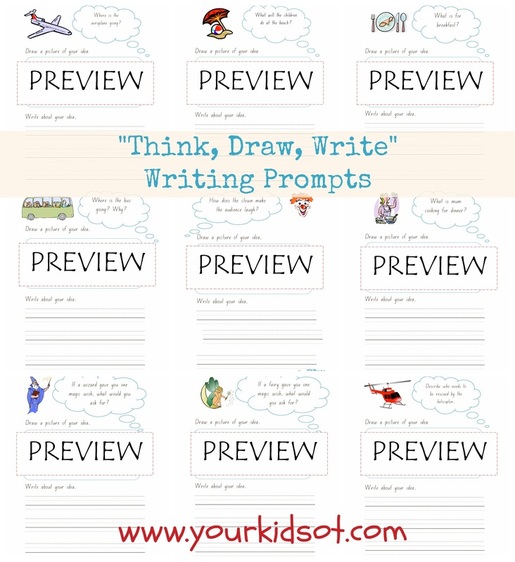
These worksheets encourage a child to use their imagination with picture and word prompts. Each page encourages your child to think, draw and to write. There is a small picture on each page with a question to prompt imagination. Prompting questions include "What is mum cooking for dinner?"
There are currently 13 different writing prompts available including areas of interest such as aeroplanes, beach, breakfast, bus ride, clown tricks, dinner, fairy wish, helicopter rescue, ladder, pirate, stuck cat, triceratops and a wizard wish. You may purchase them individually or as a special bundle (always cheaper to buy in bulk). Find these worksheets at the Your Kids OT Shop. 2. Three Part Story Writing Prompts
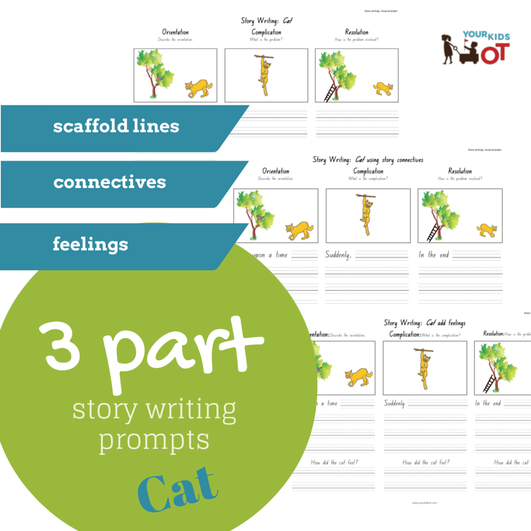
Story writing structured into three parts - Orientation, Complication and Resolution. Pictures provide a visual prompt for sentence writing. There are currently three stories availablecat,rain andpirate.
There are three pages of writing prompts:- 1. Visual prompts with scaffold lines for writing sentences. 2.Visual prompts with story connectives and scaffold lines for writing sentences. 3. Visual prompts with story connectives, scaffold lines and additional prompts about the character's feelings. How to use 1. Children within one educational setting may be provided with the same activity and given one of the three pages according to the assistance they require. 2. These sheets may be used with an individual child during a therapy session to assist with story writing. eg. During one block of therapy the therapist may concentrate on stories with connective words provided and in the next block they may concentrate on the addition of feelings. 3. At home, these writing prompts may be use to support educational and therapy goals. Find these printables at the Your Kids OT shop. 3. Story Writing Prompts
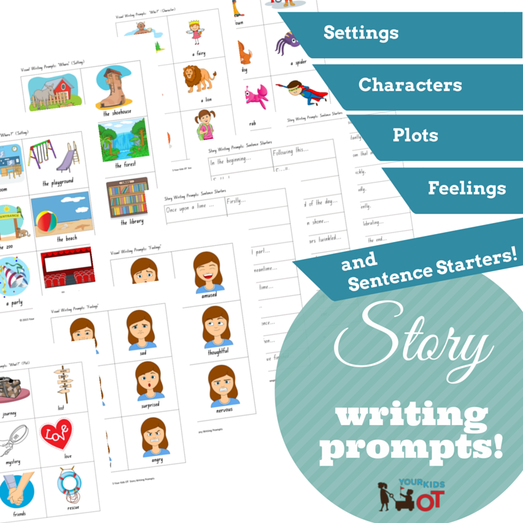
A valuable resource to encourage early writers with story writing. The visual prompts include the "where" (12 settings), "who" (12 characters), "what" (12 plots/problems), "feelings" (12) and sentence starters (58).
You can use these in sheet form or cut around the prompts. I laminate the pictures for durability. Your early writer could choose a prompt from each category to begin story writing or you can select which categories your child will be "prompted" to use. Each category may be used individually for single sentence writing. To encourage story writing development, your child may choose more than one setting, character or feeling. Sentence starters may be used with the visual prompts or separately. This package of "Story Writing Prompts" can be used in conjunction with "Story Maps" (see below). 4. Story Maps
A story map is a visual aid to the settings or the sequence of major events and actions of story characters. Story maps can be used as frameworks for storytelling or retelling, and as outlines for story writing. I wrote about story maps hereif you want to read more.
The Story Map Pack is available at the Your Kids OT shop. There is also a guide for using the story maps.
If you prefer, these resources are also available at Teachers Pay Teachers.
I use my own resources all the time and I hope you find them useful in therapy, in the classroom or home too! Let me know if you use these resources. Thanks again for your support!
You may also like:
|
AuthorHi, I'm Cindy and I am an Occupational Therapist. I enjoy working creatively with children to see them reach their potential. Read more about me here. SEARCH THIS SITE
Archives
June 2024
Categories
All
Popular Posts |
Join the YKOT e-newsletter!
Subscribe to get our latest content by email and receive
the SHAPE ROADS PRINTABLE NOW!

Success! Now check your email to confirm your subscription and receive your free printable!
Join our Mailing List!
Subscribe to get our latest content by email and receive
the SHAPE ROADS PRINTABLE NOW as a thankyou!

Success! Now check your email to confirm your subscription and receive your free printable!
Disclaimer: The information on this site is general in nature and should be used for educational and entertainment purposes. The activities are safe for most children, however, you should consult an Occupational Therapist or health professional to address specific movement, sensory or other medical conditions. This blog does not replace formal therapeutic professional advice given by a health professional or medical practitioner. Reviews and endorsements of products will only be made based on my expertise and personal opinion; and deemed worthy of such endorsement. The opinions shared in sponsored content will always be my own and not that of the advertising company or brand. Content, advertising space or posts will be clearly identified if paid, affiliated or sponsored. Affiliate links may be found throughout this website in advertising. This means that if you follow through with a purchase from these links, Your Kids OT will receive a percentage of the sale. Your Kids OT undertakes to meet the requirements of the "Social Media Policy" as published by Australian Health Practitioner Regulation Agency (AHPRA). Further information about this policy can be found here.
Find meFollow me |
About me
AuthorHi, I'm Cindy and I am an Occupational Therapist. I enjoy working creatively with children to see them reach their potential. Read more about me here. |
Copyright © 2017 Your Kid OT











 RSS Feed
