|
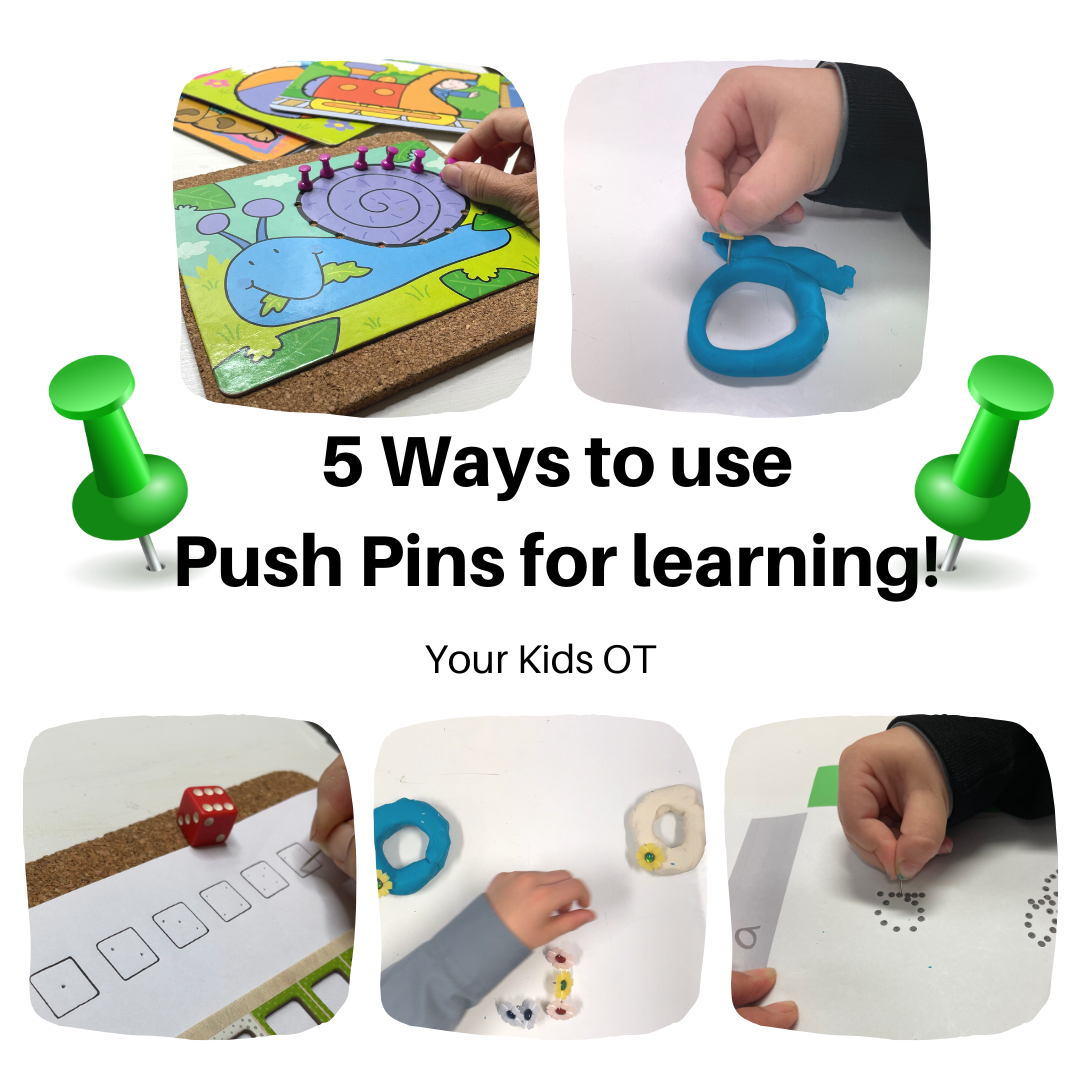
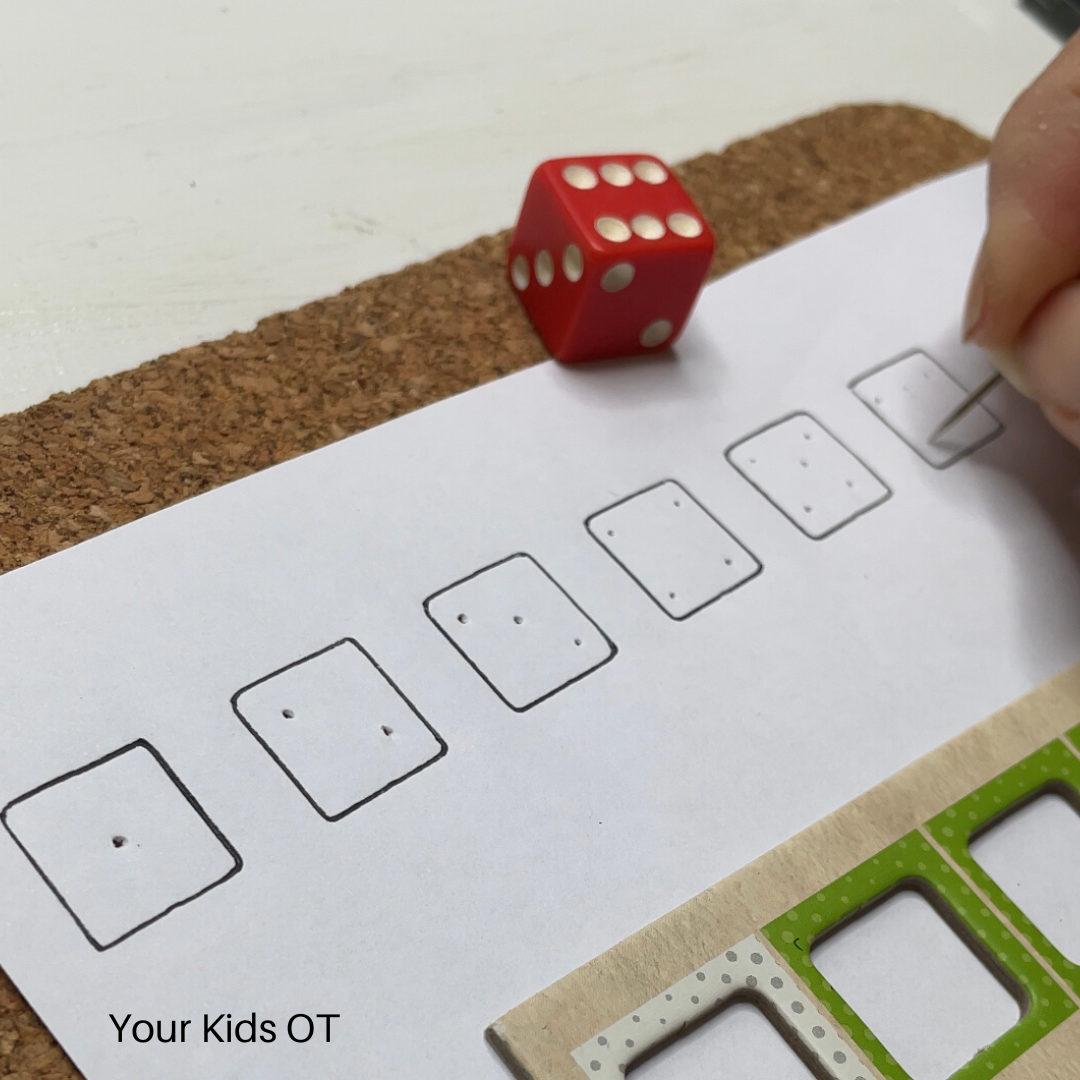
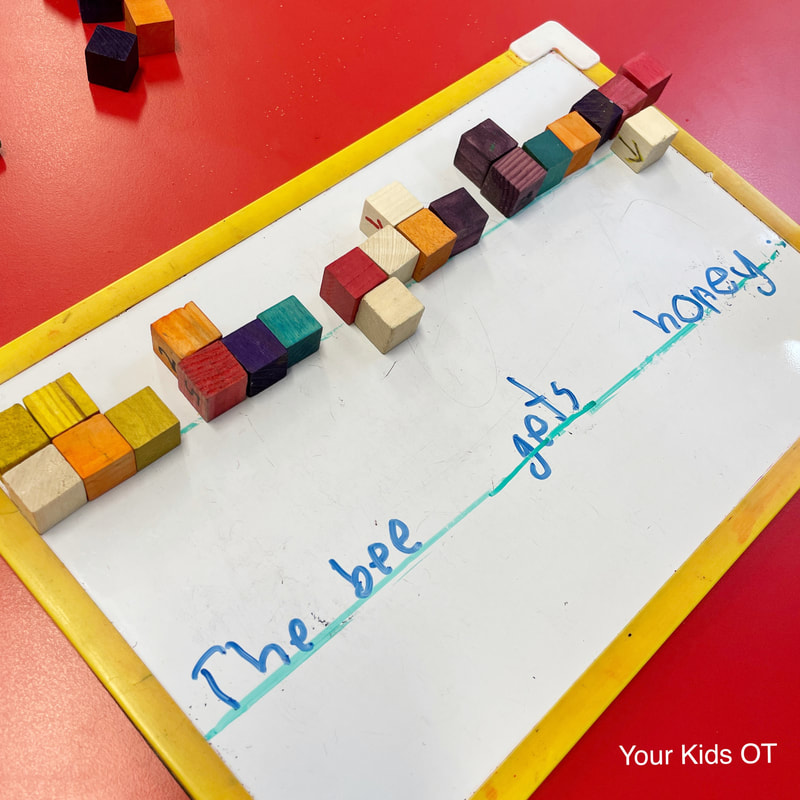
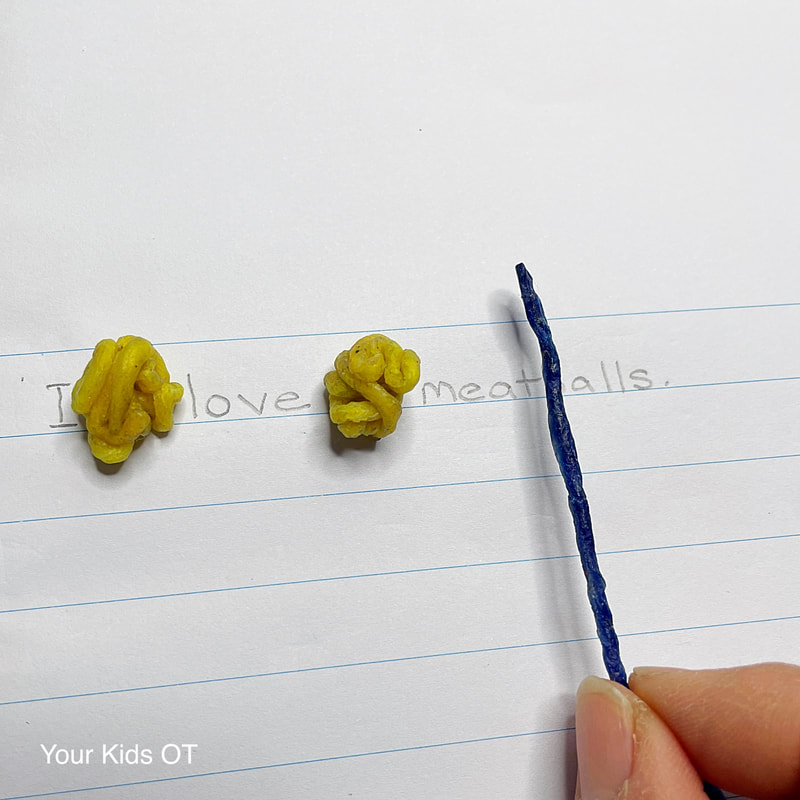
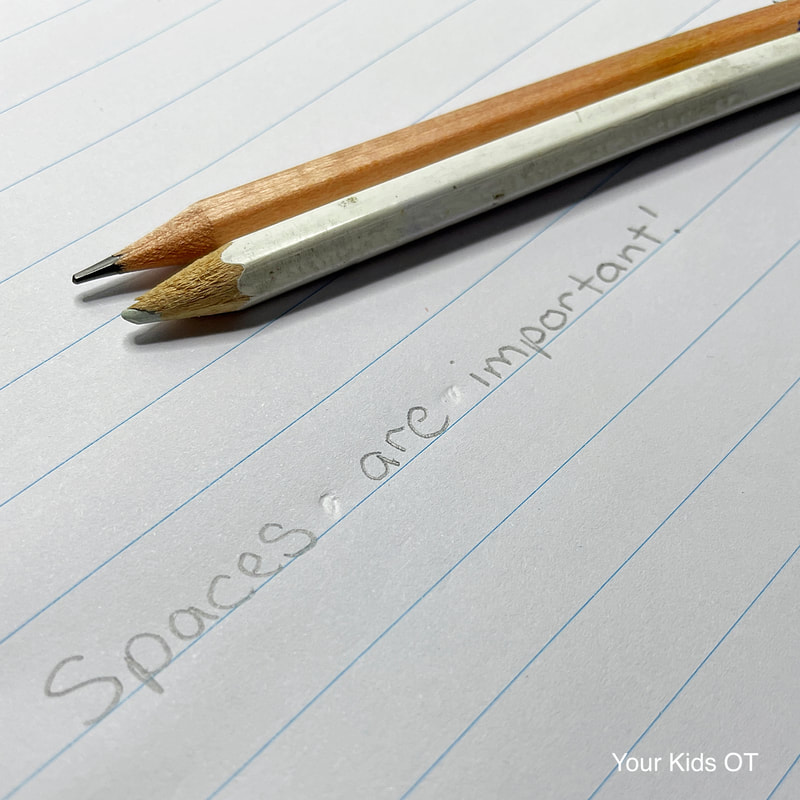
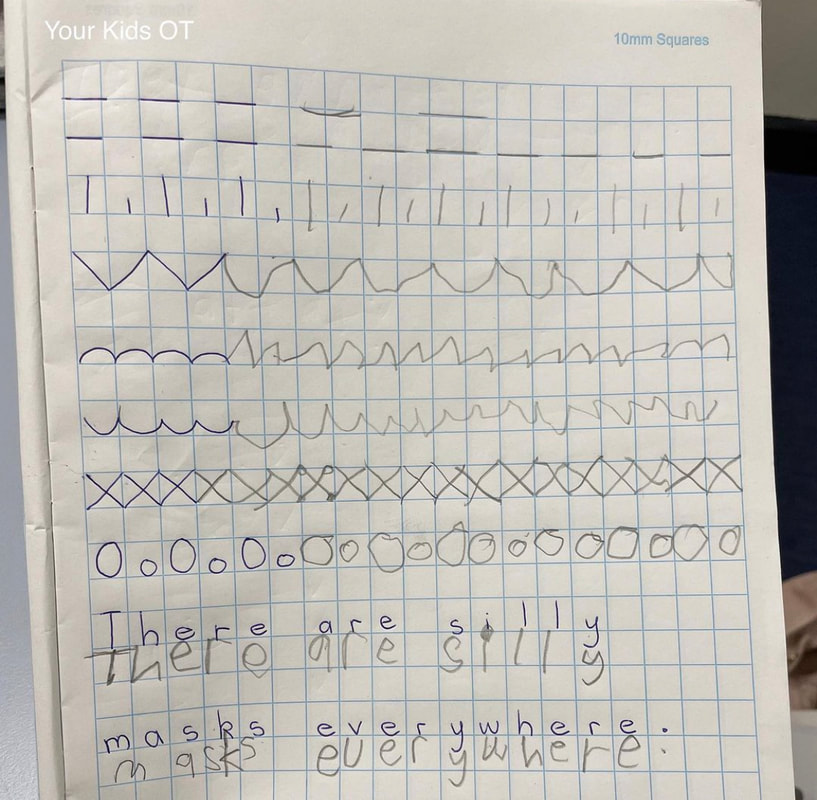
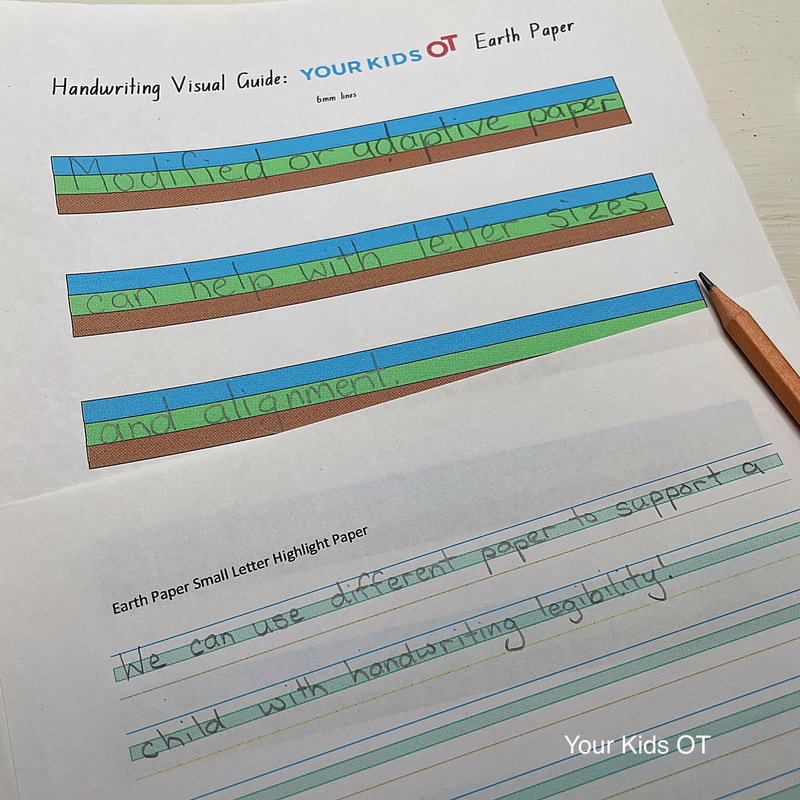
Poke poke poke. Kids love making holes! Here is a legitimate way that they can make holes and learn at the same time.... by using "push pins" (or drawing pins, depending on where you are in the world). If you have been following me here at Your Kids OT for a while, you will know that I love incorporating push pin activities into therapy session for SO many reasons. From the development of fine motor skillls, hand strength, building eye/ hand coordination to providing sensory feedback to the hand whilst learning. The fingers are provided with "'heavy work" and lots of proprioceptive information is fed back to the fingers and hands during these activities. Children are so engaged with push pin activities and they often "work hard" even when they are beginning to fatigue. Read more about the reasons for using push pins HERE. All push pin activities should be supervised closely. These activities are not suitable for those who are mouthing objects and unable to follow instructions. Recommended age for use of push pins is 4 years and older. Here are 5 ways to incorporate push pins to learning! 1. Push Pins and Lacing Cards Use a cork mat and lay a "lacing/threading" card on top. These cards already have holes in them, normally use to weave laces in and out for preschool age children. Preschool age children enjoy the novelty of placing push pins into the holes of these cards. If you don't have lacing cards, use cardboard and a hole punch to create your own pictures. 2. Push Pins and Playdough Crossing the Midline Create two playdough rings. Use push pins (I have flower ones) that are planted into playdough rings when I call out left or right. This encourages children to work on crossing the midline, left and right discrimination. These skills are important especially for those who those who shuffle along their chair when they write or make adjustments to avoid crossing the midline. Read more about crossing the midline and bilateral coordination HERE. 3. Push Pins and Playdough Letter Formation Create letters using playdough. Use a push pin to make holes in the playdough letter. Make sure you start in the correct position and move in the correct direction for writing the letter. You can work on lowercase letters, capital letters, shapes, numbers, a child's name or even words. 4. Push Pins with Paper: Pictures and Letters This activity moves a child from object-based learning to paper activities. It links physical hands-on learning with what is going on in printed form. You will need the printables from the YKOT to either create a picture or letter. We use a cork mat, laying down coloured paper and the chosen printable page. We can focus on one letter and picture; using this as a writing prompt to write a sentence. Children love to hold up their final picture to the light and see it coming through the holes. For younger children, I use the picture printable to create a drawing. For some children, I use the face emotion pictures and link this with social emotional learning. Find the printables ... * Alphabet Dot Pictures * Push Pin Poke Drawing Templates These printables are also available at the YKOT Teachers Pay Teachers Store ($US). 5. Push Pin, Die and Numbers! Numbers, maths and a "die" go hand in hand. We add a push pin to make this a very hands on learning experience. I use an old game insert with square hole to draw small square shapes. You could also just draw some squares. We can work on:- * number identification - roll the die and make holes to match * writing numbers - roll the die, make holes and write the number * before and after numbers - roll the die, make holes, then write the number before and the number after * addition and subraction - roll the die to find numbers to add or subtract, make holes to work out the answer Watch these Push Pin Activities on the You-Tube Video. What is your favourite "push pin" activity and which one will you try out?  Cindy is a registered occupational therapist practising in Sydney, Australia. She has two growing children who are a constant source of inspiration and learning. Cindy loves working creatively to help children to reach their potential, finding opportunities in everyday living and making learning fun. She is also addicted to making printables (even when they take a long time to complete). Cindy is the author of the Occupational Therapy blog Your Kids OT. Read more articles from Your Kids OT at https://www.yourkidsot.com/blog Cindy is a contributing author of the Functional Skills for Kids Therapy Team. They have together published THE HANDWRITING BOOK, THE SCISSORS SKILLS BOOK and THE TOILETING BOOK. The information on this site is general in nature. The activities are safe for most children, however, you should consult an Occupational Therapist or health professional to address specific movement, sensory or other medical conditions. Affiliate links are used throughout this website to promote recommended products. Your Kids OT receives a small commission if any purchases are made through these links. Please see my disclosure policy for more details. Amazon Store: https://www.amazon.com/shop/yourkidsot YKOT shop: https://www.yourkidsot.com/store/c1/Featured_Products.html Teachers Pay Teachers: https://www.teacherspayteachers.com/Store/Your-Kids-Ot You Tube Channel: https://www.youtube.com/channel/UCZUz_5nYEOCkj32DiOCQo4Q/featured Facebook: https://www.facebook.com/yourkidsot Instagram: https://www.instagram.com/yourkidsot/ Pinterest: https://www.pinterest.com.au/yourkidsot/ TheimportanceoftheSIZEoflettersandspacingcannotbeundervaluedwhenitcomestohandwritinglegibility. Did you get that? The importance of the size of letters and spacing can not be undervalued when it comes to handwriting legibility. The size of letters, their alignment to the writing line and having adequate spaces between words (and letters) affects how we read written information. Ideally we want all writing (letters and spacing) to be uniform but many can not achieve this (even adults)! If just one aspect of neat writing is achieved, then it does help the reader to deciper the written work. Before I give you some tips, try an experiment... Get out some ruled lined paper. Draw two horizontal lines between the printed lines, dividing the space into thirds. Make sure the lines are parallel with the spacing staying consistent. Don't turn the page and don't turn your arm. Did you find this easy or difficulty? Now ask your child to do the same. Can they draw two horizontal lines with consistent spacing? I would say that if your child has handwriting difficulties then they will want to move the page or their arm. They will have difficulty with consistent spacing and their lines will not run parrallel. This is probably (and I'm making broad generalisations) due to difficulty with visual spatial awareness, visual motor control and pencil control. There may be underlying difficulties in other areas too. Ok, so what can we do about it? 1. Sizing and spacing with blocks. I use 1cm craft blocks to represent the size of a "small letter". We use two stacked blocks above the line for a "capital letter" or "tall letter". Two blocks (one above and one below) are used to represent a "tail letter". Single words are practiced with the blocks and then sentences are made. We work on a block space between each word. We work on making short sentences with the blocks and then writing the sentence (either on a whiteboard or chalkboard). Some children may require an adult to write the sentence as a model for them to make with blocks. This is a visually engaging way to help children to develop visual spatial awareness whilst working on size and spacing. 2. Meatballs and Spaghetti. This idea has been around for a long time and encourages children to place "meatball" size spaces between words and "spaghetti" size spaces between letters. You can make this more visually obvious by using something like wikki stix or playdough to make the meatball and spaghetti. Playdough and wikki stix also afford the flexibility of making the writing line and letters of the alphabet. You can work on the size of letters and their alignment to that line. 3. White writing implements! Don't throw away the unused white crayon or white pencil. Use these to help delineate spaces between words. Have your child switch from their ordinary pencil to the white one to draw a small dot between words. For some children the action of putting down one pencil and picking up another (in any colour) will help with the motor plan to leave a gap between words. I prefer a white pencil for obvious reasons ... that it can't be obviously when we look at the overall sentence. The child is introduced to "white space" between words. If this is not enough to help your child with spacing, you may use a coloured pencil between the ordinary pencil to make a more obvious dot. 4. Grid paper. Grid paper (or boxed paper) is often used by children in mathematics or for Chinese students in writing characters. There is a reason for this... it helps visually with spacing and size! You can practice visual motor and pencil control skills with grid paper. Have your child copy patterns to see if they can continue with the same size and spacing that you have drawn. You can use the grid paper to work on letter sizes and word spacing too. Each square could represent the height of a small letter with two letters being the size of a tall letter. Alternatively, a square could be the size of tall letter and the child needs to write in half the square to create a small letter. Using the grid paper is adapable to your child's needs. In the example below, this child has difficulty with visual motor and pencil control skills. We work on these things, however the achievement for this child is having a letter in each box providing a small space between each letter and then a large space (a box) between each word. The size of the grid paper you choose will depend on the age and ability of your child. 5. Modified (or adapative) paper. There are a number of variations of modified paper on the market. From my own "Earth paper lines" to these examples here, here and here. For some children, changing the paper up is the quickest way to helping them see how letters should be sized and spaced for legibility. They can use the paper (or try a few options) to develop good writing habits. The paper is then "weaned off" so that the child can make links to ordindary paper and carry over their new found legibility. Some children will find the "carry over" and "weaning off" difficult and they benefit from a longer term use of modified paper. For some children the modified or even grid paper doesn't work! Why? Modified and grid paper requires a certain amount of visual spatial awareness and pencil control already to use it. For these children, the modified paper just highlights how difficult writing is to start with and they may need more help with noticing lines and distinguishing shapes. For example, a ruler can provide a physical boundary for the writing line so students "bump the line" (read more here). So when is a good time to work on letter sizes and spacing?? Generally when children are introduced to writing letters, formation is of key importance. The starting position, the direction and the shape of letters (and numbers). We don't worry too much about sizing and spacing as we want children to be successful and gain pencil control. For Kindergarten children (approx age 5- 6 years old) learning to write may find it easier to use their whole arm to control the pencil and may be only beginning to develop dynamic finger movements on the pencil (ie. a dynamic tripod grasp). This is why they find it easier to write large letters and words. As children move onto writing sentences and a writing line is introduced; spacing and sizing become more important. Older children (ie. 8 years and older) referred for occupational therapy with poor handwriting legibility benefit greatly from working on sizing and spacing. This is when legibility is prioritised over letter formation and we want more output (writing) on the page. Need more tips on handwriting? Make sure you read past articles HERE. You can also find more information in "THE HANDWRITING BOOK" where I am a contributing author. This e-book may now be purchased from the Your Kids OT SHOP. Which suggestion will you be trying with your child to work on sizing and spacing in handwriting?  Cindy is a registered occupational therapist practising in Sydney, Australia. She has two growing children who are a constant source of inspiration and learning. Cindy loves working creatively to help children to reach their potential, finding opportunities in everyday living and making learning fun. She is also addicted to making printables (even when they take a long time to complete). Cindy is the author of the Occupational Therapy blog Your Kids OT. Read more articles from Your Kids OT at https://www.yourkidsot.com/blog Cindy is a contributing author of the Functional Skills for Kids Therapy Team. They have together published THE HANDWRITING BOOK, THE SCISSORS SKILLS BOOK and THE TOILETING BOOK. The information on this site is general in nature. The activities are safe for most children, however, you should consult an Occupational Therapist or health professional to address specific movement, sensory or other medical conditions. Affiliate links are used throughout this website to promote recommended products. Your Kids OT receives a small commission if any purchases are made through these links. Please see my disclosure policy for more details. Amazon Store: https://www.amazon.com/shop/yourkidsot YKOT shop: https://www.yourkidsot.com/store/c1/Featured_Products.html Teachers Pay Teachers: https://www.teacherspayteachers.com/Store/Your-Kids-Ot You Tube Channel: https://www.youtube.com/channel/UCZUz_5nYEOCkj32DiOCQo4Q/featured Facebook: https://www.facebook.com/yourkidsot Instagram: https://www.instagram.com/yourkidsot/ Pinterest: https://www.pinterest.com.au/yourkidsot/ |
AuthorHi, I'm Cindy and I am an Occupational Therapist. I enjoy working creatively with children to see them reach their potential. Read more about me here. SEARCH THIS SITE
Archives
June 2024
Categories
All
Popular Posts |
Join the YKOT e-newsletter!
Subscribe to get our latest content by email and receive
the SHAPE ROADS PRINTABLE NOW!

Success! Now check your email to confirm your subscription and receive your free printable!
Join our Mailing List!
Subscribe to get our latest content by email and receive
the SHAPE ROADS PRINTABLE NOW as a thankyou!

Success! Now check your email to confirm your subscription and receive your free printable!
Disclaimer: The information on this site is general in nature and should be used for educational and entertainment purposes. The activities are safe for most children, however, you should consult an Occupational Therapist or health professional to address specific movement, sensory or other medical conditions. This blog does not replace formal therapeutic professional advice given by a health professional or medical practitioner. Reviews and endorsements of products will only be made based on my expertise and personal opinion; and deemed worthy of such endorsement. The opinions shared in sponsored content will always be my own and not that of the advertising company or brand. Content, advertising space or posts will be clearly identified if paid, affiliated or sponsored. Affiliate links may be found throughout this website in advertising. This means that if you follow through with a purchase from these links, Your Kids OT will receive a percentage of the sale. Your Kids OT undertakes to meet the requirements of the "Social Media Policy" as published by Australian Health Practitioner Regulation Agency (AHPRA). Further information about this policy can be found here.
Find meFollow me |
About me
AuthorHi, I'm Cindy and I am an Occupational Therapist. I enjoy working creatively with children to see them reach their potential. Read more about me here. |
Copyright © 2017 Your Kid OT

 RSS Feed
