
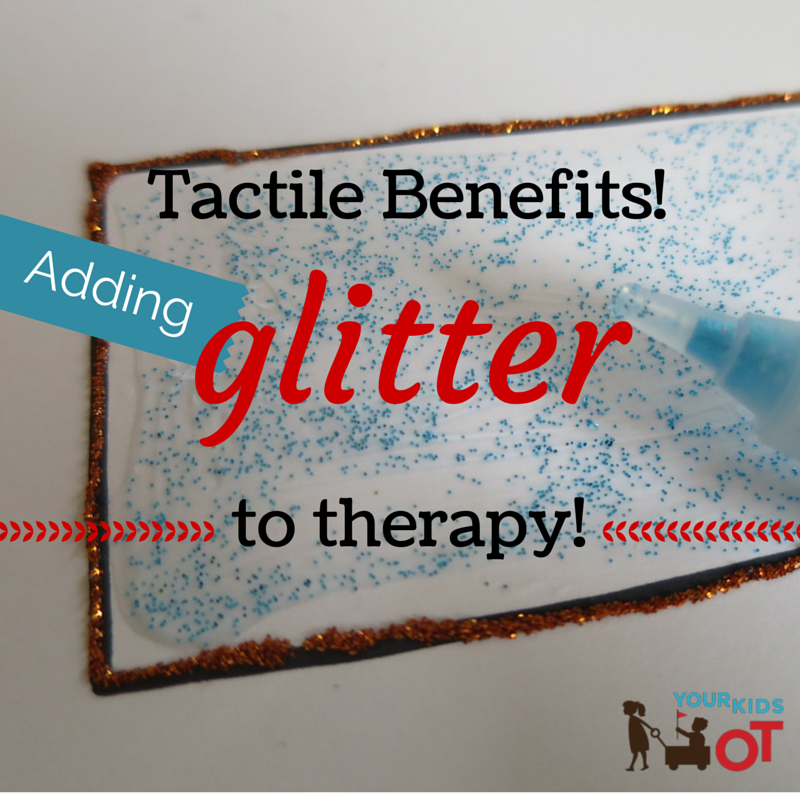

Adding some sparkle or bling in therapy sessions can provide great tactile benefits! A little bit of preparation and patience as the glue dries and you are ready for some great glitter resources!
All you need to make these resources are a packet of glitter glue pens, a marker, cardstock {this is thicker than ordinary paper} and scissors. 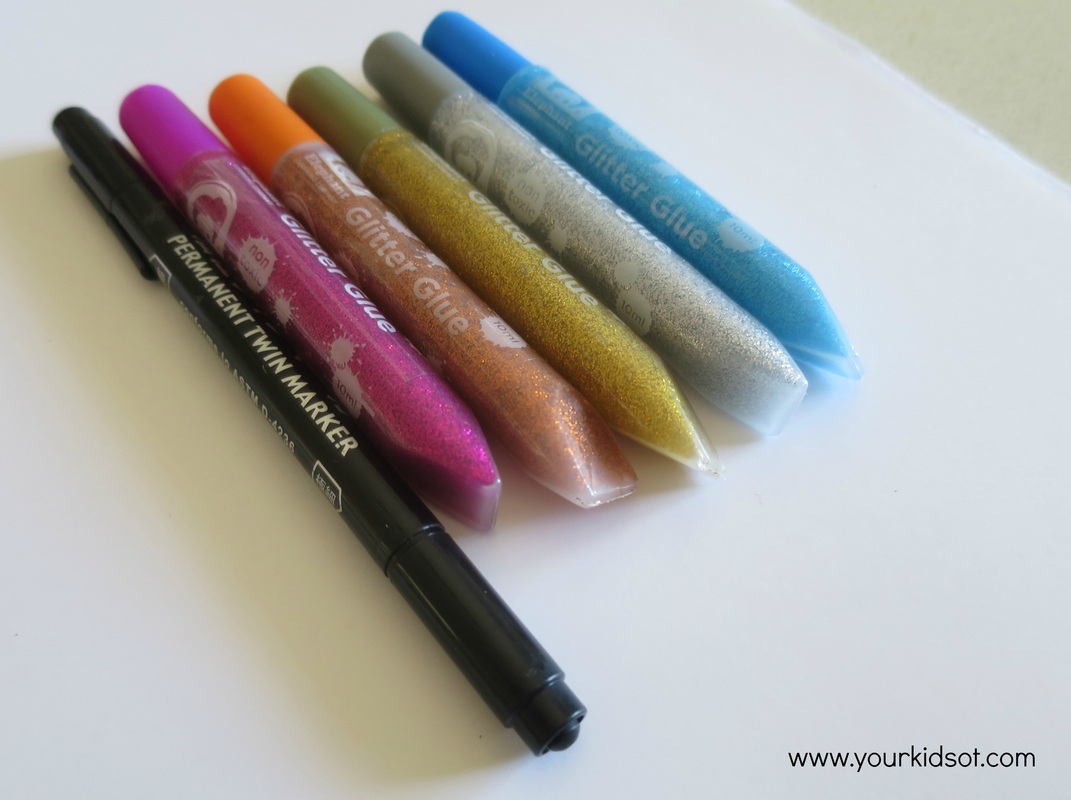
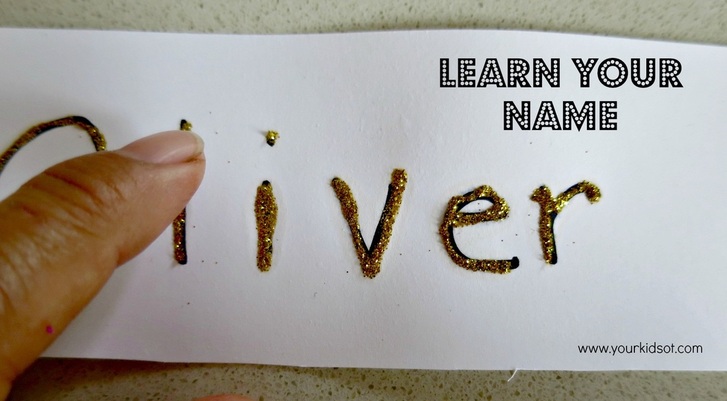
The glitter forms a raised surface with a "bumpy" texture. Encourage your child to "feel" with their fingers along the dried glitter. This provides your child with tactile information in addition to just visual information. Tactile feedback can help with learning letters, shapes, names, etc.
You could also spread the glitter out so your child can then colour over the glitter. This is excellent for those kids who have difficulty "colouring" in the lines or colouring the entire surface area they need to colour. Kids love colouring over the bumpy surface of the glitter. Here are some of the ways I add glitter to therapy sessions and sometimes my own kids benefit too! 1. Alphabet glitter - Use these cards to learn the alphabet, sort into letter families, spell your child's name, learn correct letter formation, etc. If you have used or heard of "sand paper letters", then these glitter letters can be used in the same way for a fraction of the cost. You can make these whatever size you want and do capital letters too! 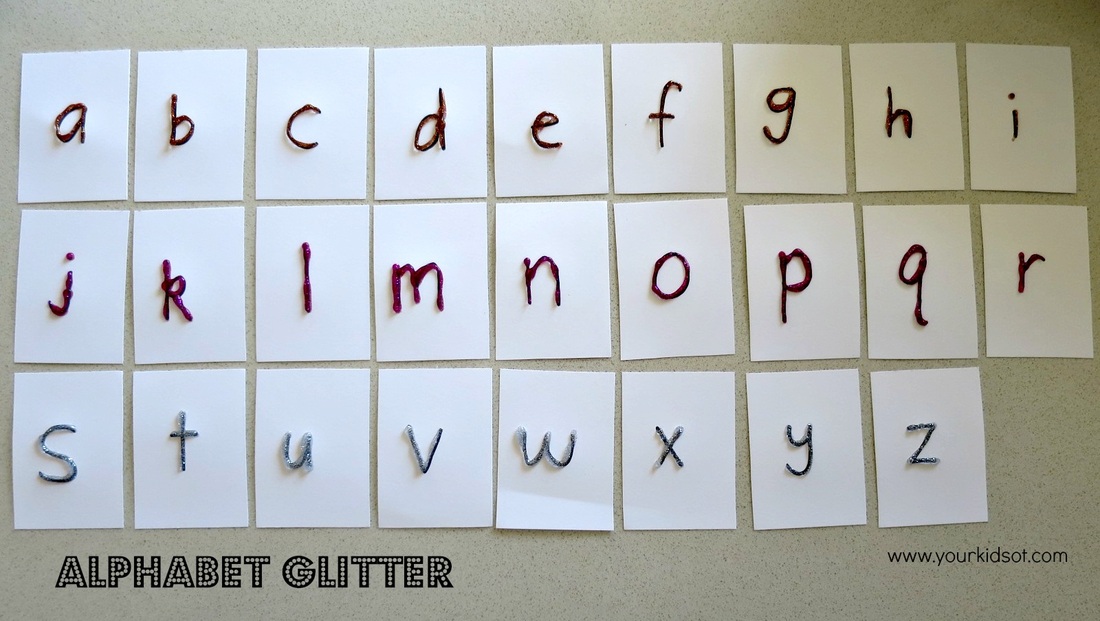

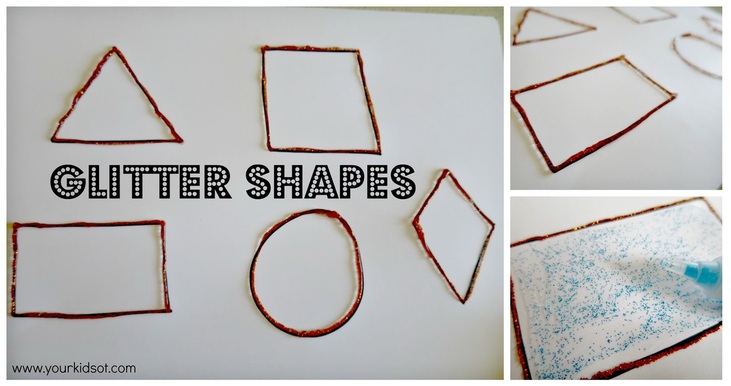
2. Glitter Shapes - Use glitter glue to outline shapes or to colour in the entire surface of the shape. Imagine colouring within these shapes and "hitting" the raised boundary. Your child will have a better understanding of where to stop colouring. Your child can also trace around the raised border to learn how many sides these shapes have as well as the names of the shapes.

3. Glitter Names - Your child will love learning the letters of their name in glitter! Trace over, write over, spell...do it again with their eyes shut! Teach left to right direction of letters and letter formation too.

4. Glitter Colouring - Do you have child who avoids colouring? Have you tried glitter colouring? Draw simple pictures {small is good} and fill with glitter glue. Spread out the glitter so that is quite thin and wait for it to dry. Don't these Easter eggs look pretty? Your kids will be happy to colour in these eggs and then the pictures may be used in a treasure hunt.
My Mr reluctant-colourer was happy to colour these, after which Miss 8 hid them in the garden for him to find. Lots of fun and bit of pencil control in there too, win-win-win, I say! 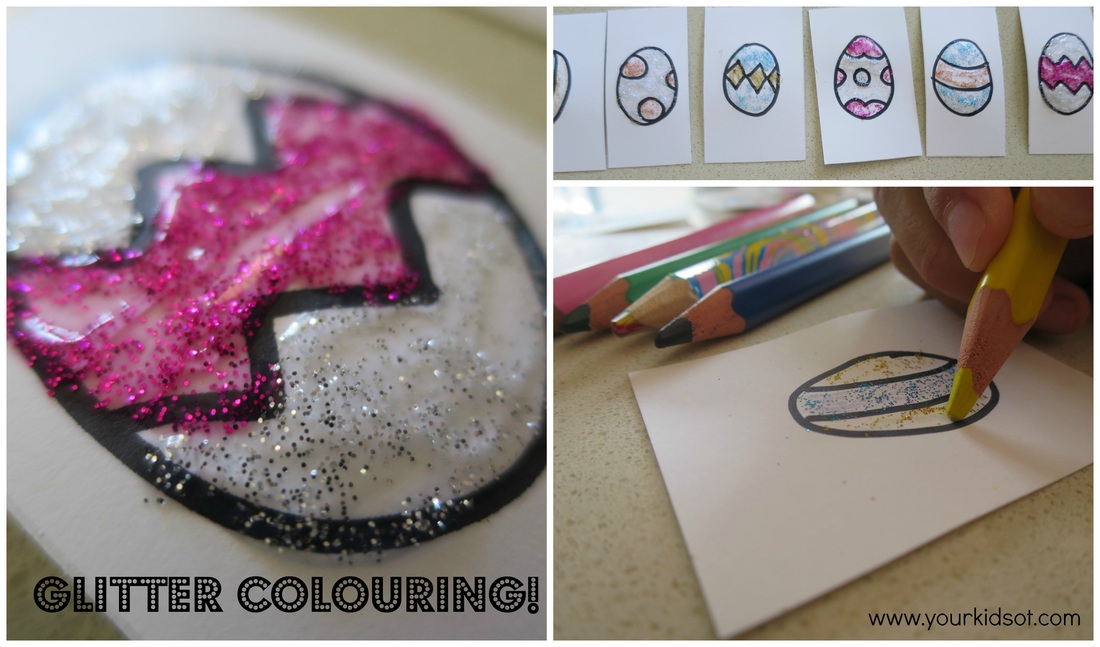

I don't usually let the kids I see for OT use the glitter glue pens as I generally see kids in school. I can't be sure there is somewhere for art to dry and that we won't make a huge mess!
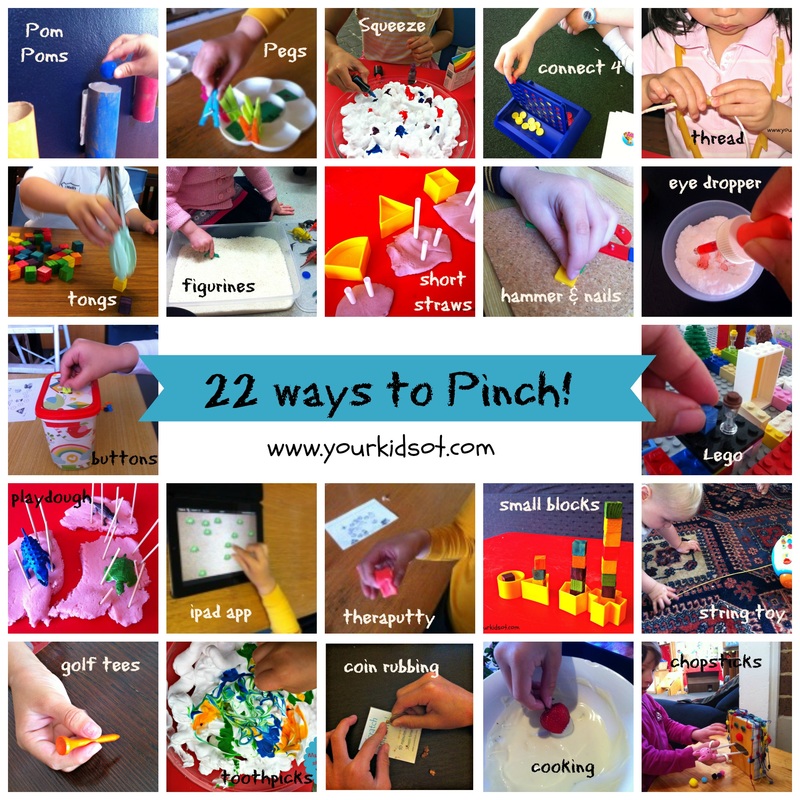
So this next activity is something I would do at home. 5. Glitter drawing - Encourage your child to draw a simple picture with a marker. Then give them the glitter glue to trace over their drawing. Squeezing the glitter glue is a great way to encourage a pincer grasp and work some intrinsic hand muscles. 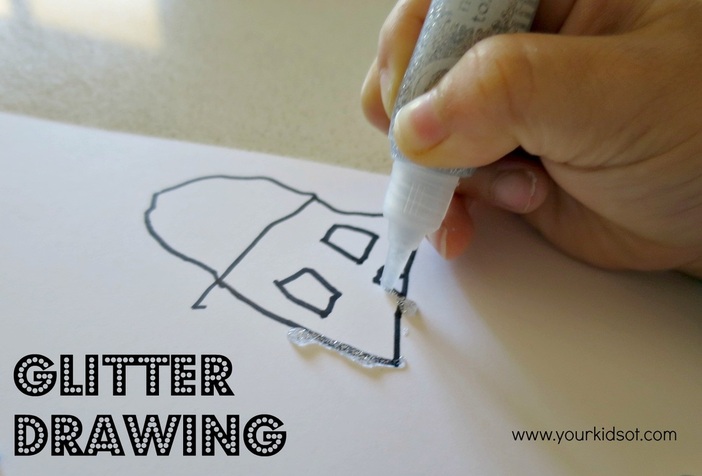

Has this inspired you to get out the glitter glue? I promise that it is isn't too messy and it doesn't actually take much time to organise. Your kids will love the effort that you have put in!
Have you used glitter to make resources for therapy, home or school? 
You may also like:
  Are you loving all the FREE printables I've been making this year?! Well it is almost Easter and I have another FREE printable for you! I am always looking for new opportunities to incorporate fluency patterns into therapy sessions. Easter Eggs are perfect! I really believe fluency and pencil control are so important for kids of all ages! You can read more about fluency patterns and get your copy of mine here! Here are 2 ways I have been using Easter eggs to incorporate fluency patterns {for kids it is all about "deocrating" their egg so you don't even have to mention "pencil control and fluency"!}... 1. Draw a picture of a large Easter egg outline. Your child can stick this picture onto a vertical surface which encourages wrist extension and shoulder stability. If you are using my fluency patterns, ask your child to trace them with their finger and draw them onto the egg with their finger. This step helps with motor memory. Your child can then use coloured textas to decorate their egg with any fluency patterns. Mr 4 is doing a great job here decorating his Easter egg with fluency patterns. He enjoyed choosing the pattern he was going to draw and where he was going to draw it. 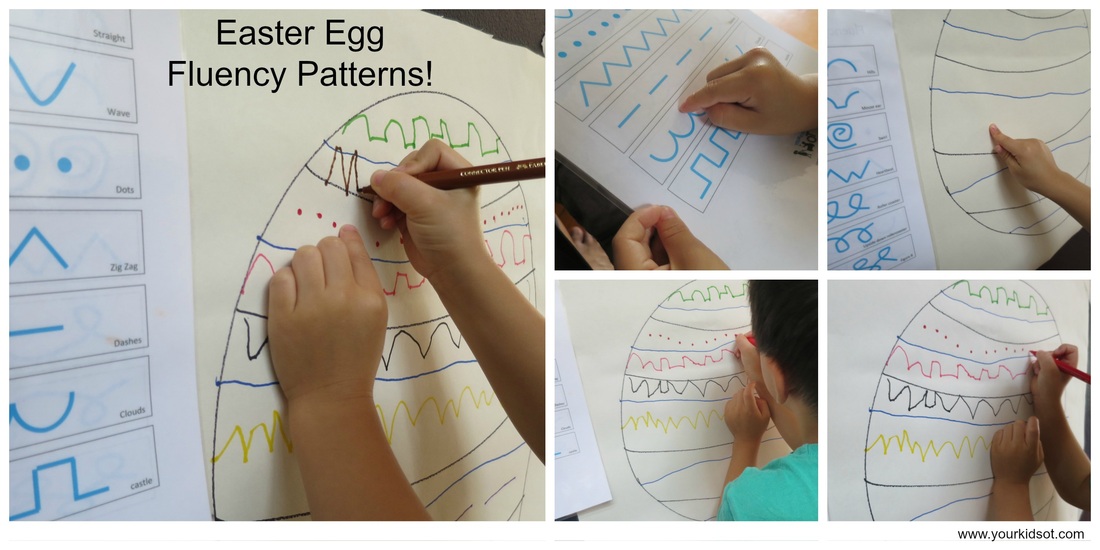  2. Easter Egg Pattern Copying {FREE printable}! This printable is a series of Easter eggs for your child to draw. There are fluency patterns and other shapes for copying. This activity is a great way to encourage spatial awareness, copying, visual motor integration, fluency and pencil control. Your child could colour in these eggs after copying the patterns and cut out the eggs too! The pictures could then be hidden in the garden or around the house in a scavenger hunt! 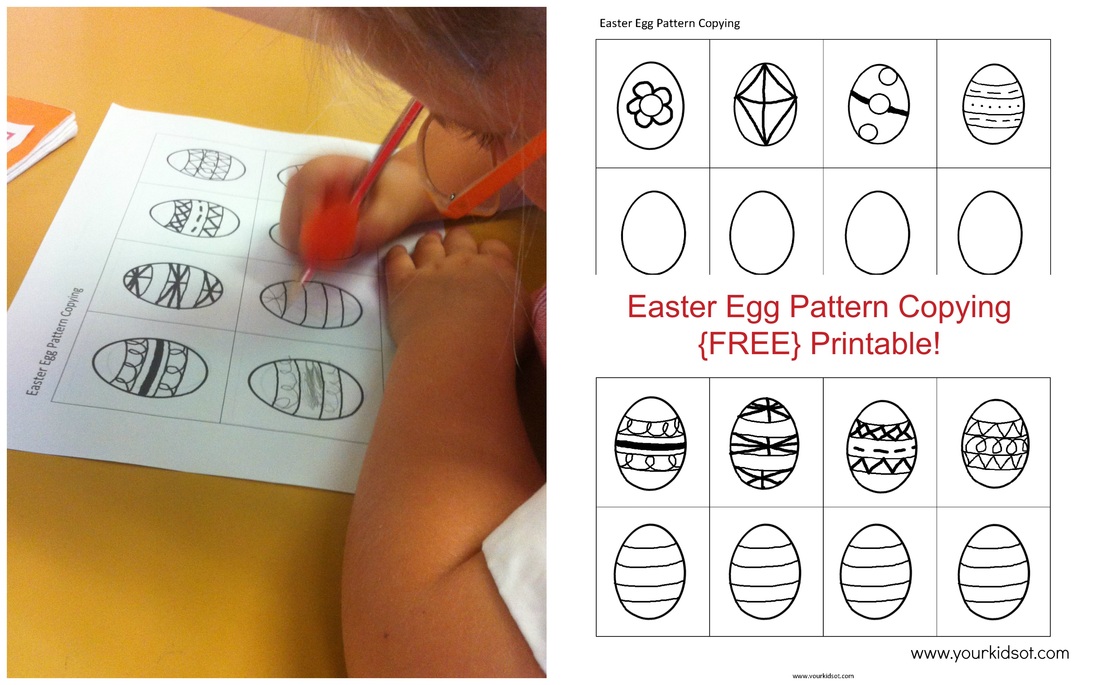  How do you incorporate fluency patterns into therapy sessions? Wishing you and your families are Happy Easter!  You may also like:
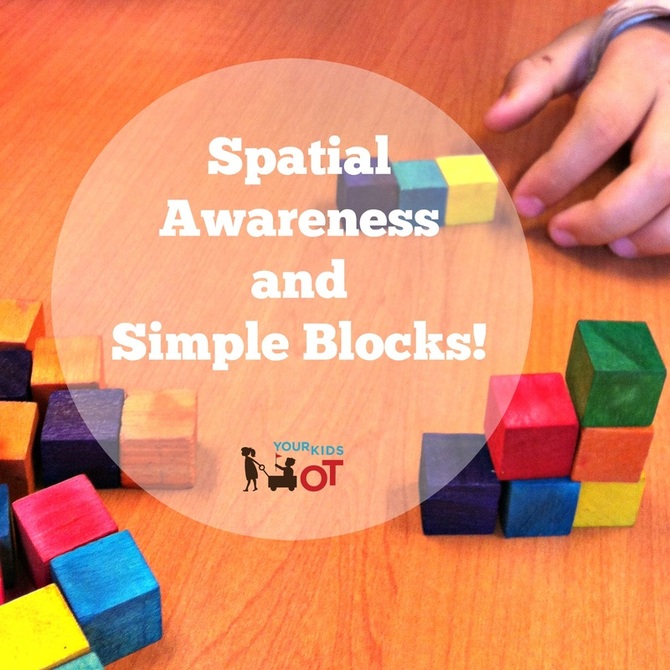  Spatial awareness is being aware of the position of our own body in relation to our environment around us. This is a fundamental skill to develop before we can then understand how other objects, shapes, other people, letters and words relate to each other and to ourselves. Spatial awareness is important for both the development of gross motor and fine motor skills. It is linked to our visual perceptual skills as we often use our eyes to judge the distance between ourselves and objects or others. Development of spatial awareness is gradual and can be observed through childhood experiences:
As children develop spatial awareness, movement and control of their body becomes more precise. They can "label" their movements with language (eg. under, over, next to) and have a better understanding of distance and direction. School-age children may demonstrate difficulty with spatial awareness in a number of ways.
Occupational Therapists can work with children of all ages who are experiencing difficulty with spatial awareness. They may use a variety of activities depending on the child's age, goals and/or disability or diagnosis. Here are some activities I have been doing with some of the school-age kids {Kindy and Yr 1} I have been seeing, who have been experiencing difficulty with spatial awareness and handwriting... using simple small blocks. 1. Block pattern copying - OT creates simple block pattern and student builds a copy using their blocks. To make it easier I provide the child with the coloured blocks they need. To make it more difficult, I ask the student to close their eyes whilst I'm building so they can not see the process. 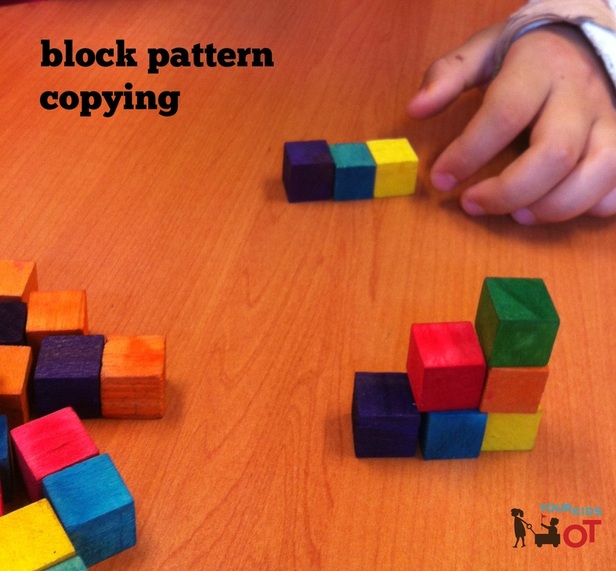  2. Block pattern copying from picture - OT draws on a whiteboard the block pattern or has a printed pattern sheet. Student builds block pattern from the picture. To make this more difficult, I place the model on the desk horizontally rather than vertically as seen in these photos. To make this easier, the students can place the blocks directly on the pattern sheet covering the matching box. 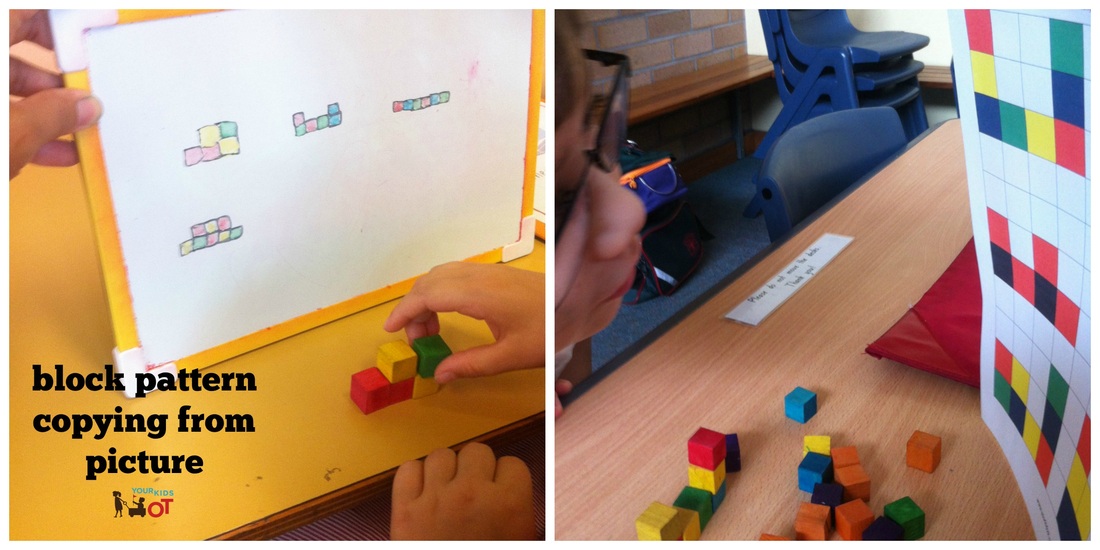  3. Block pattern drawing - OT builds a block pattern and student draws it by colouring a grid. To make this easier, the paper could be placed on a vertical surface next to the blocks. 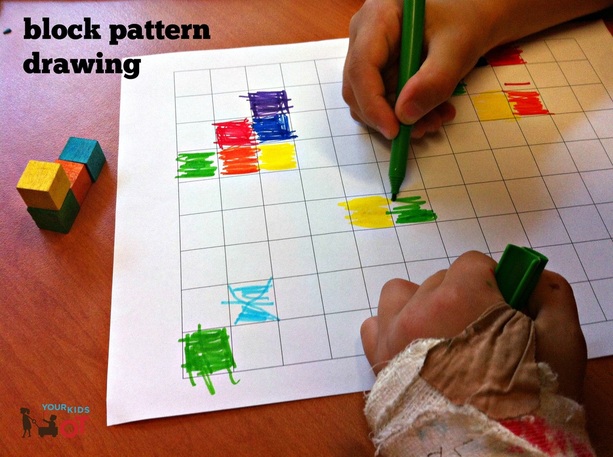  Whilst these activities seem simple, for children struggling with spatial awareness...they can be difficult. You may need to help students to notice what coloured blocks are "next to", "on top", "between" or "below" others. Some children will have difficulty when things are presented in a different orientation to where it is reproduced. These children may have difficulty copying from a whiteboard onto paper in front of them. Do you have a set of blocks in your therapy bag? What is your "go to" activity for working on spatial awareness?  You may also like:
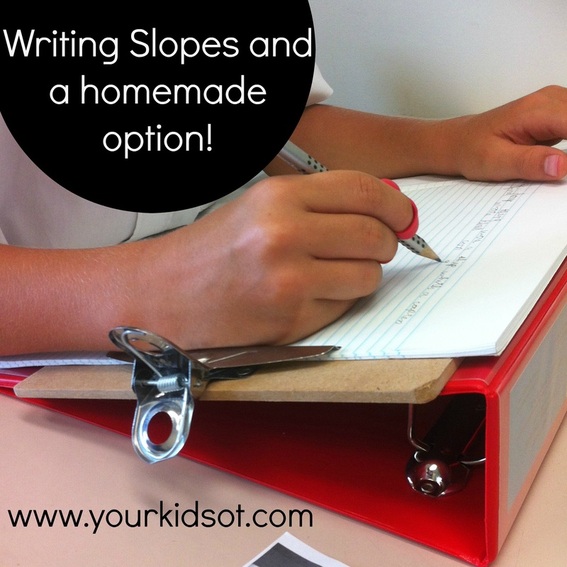  Using a sloped desk is nothing new! Victorian school classrooms had desks like the one below. These school desks were designed with a slight slope to help the child to write comfortably (no comment about the fixed chair being too far from the table). 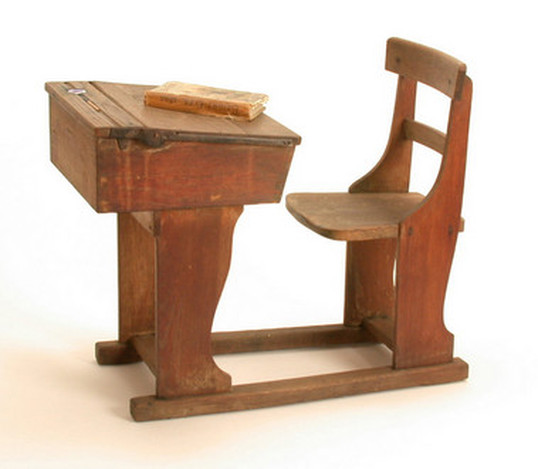 Image found at http://www.objectlessons.org/ The designers of these school desks understood some of the ergonomics of writing. The slope encourages good posture for the student bringing the work closer to look at. The slope provides support to the child's wrist {in slight extension) and forearm to encourage fluent writing {imagine what the "pencil grip" of a quill may have been!}. There are many products on the market now with "slopes" to encourage the same things the school children of the Victorian era experienced. These are available to both adults and children, for writing and computer keyboards and tablets. Here are a few writing slope options. 1. Windmill Desk Top Writing Slope $49.95 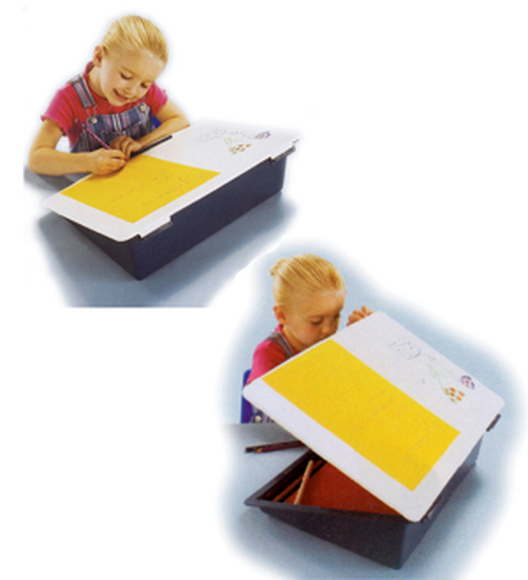 Windmill Desk Top Writing Slope 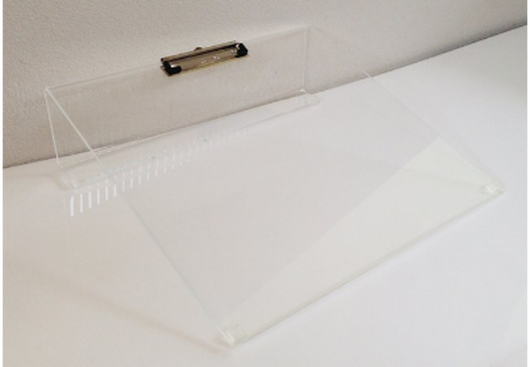 Pencil Grips Plus Perspex Writing Slope Board 3. Make your own using 3 easy items.
Simply assemble and you are ready to use it! This is definitely an economical way to make a slope board and is perfect for those wanting to try out a slope board before paying for a longer term item. This homemade version cost me less than $15. 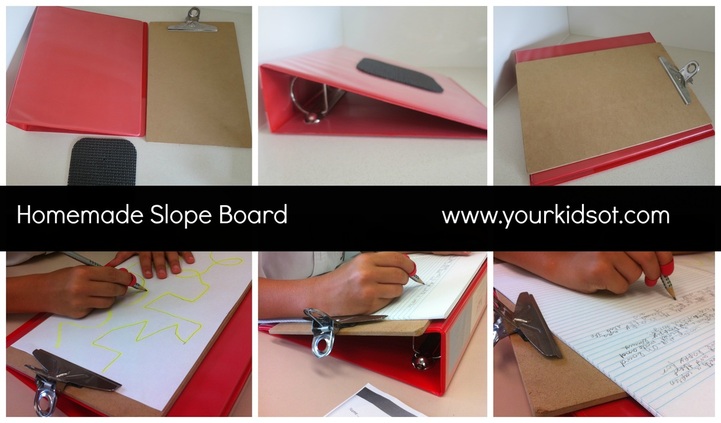  Does your child hold their head too close to their work? Does your child "hook" their wrist when writing? Does your child rotate their arm when holding a pencil? Does your child tend to move their arm as a whole unit rather than using the "skilled side" of their hand? Your child may benefit from writing on a vertical surface (such as a whiteboard) or using a slope board to support their wrist and forearm. Have you tried a slope board? Have you tried making your own?  Note: I have not received any renumeration for the products in this article. You may also like:
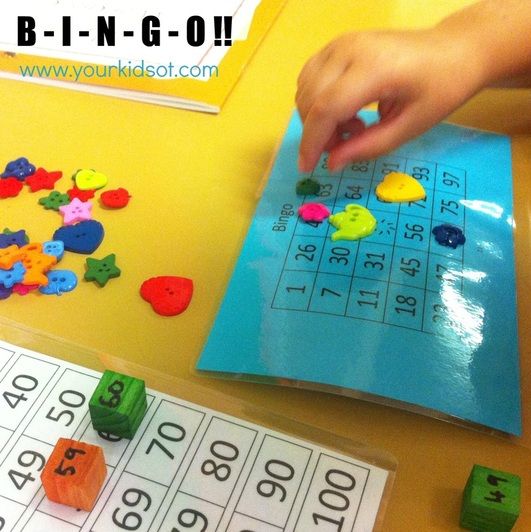  I've been playing a lot of BINGO with the kids I'm seeing for OT in this past week. It is such a great game where we can work on so many goals simultaneously. I also like using the same game for a number of children in the same week as it means I don't need to empty out my therapy bag completely each time I see a new child {any other OTs do this?}. I have created a simple FREE printable BINGO game which you can download from the YKOT shop. This includes 6 "boards" and 1 call sheet. I printed the "boards" onto different coloured paper which just makes it more interesting when playing with multiple children. I then laminated all the sheets for durability. You will need to supply your own numbers and counters. I wrote our numbers on small wooden blocks purchased from a discount variety shop {or was it Spotlight - sorry can't remember which} and use novelty buttons {which I did purchase from Spotlight} as the counters. I keep the whole thing in a cotton zippered bag which is also used to keep the numbers for calling out. 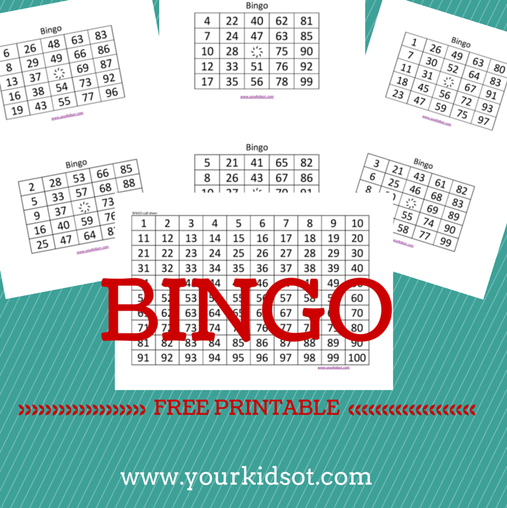  Here is why I love BINGO: * It is fun! There is an element or surprise as you don't know which numbers will be selected {or at least I don't make it obvious when I'm picking the numbers to move the game along}. * Number recognition - Recognising and naming the numbers called. We can also discuss the number before and the number after and other number patterns. * Visual scanning - Looking and scanning an individual board for a matching number or the "caller" scanning the hundred board to match the number. * Fine motor skills - I use small blocks and novelty buttons, encouraging a pincer grasp. * End point - The game is finished when one player has a row {horizontal or vertical) of numbers covered. The star in the middle of the board is a "wild" which can be any number. Having an end point is important for kids who benefit from clear boundaries and structured play. * Handwriting - I often ask the kids I see to write down their "winning numbers" so we also include a handwriting component to their game. * Social skills - Children may take turns to be the "caller". Some children have difficulty "losing" and "waiting for their numbers to be called". * Individual or Group - You can play this with one child or a whole classroom! You may need to create a few more boards for a classroom or you may have a group of children collectively doing one board. * Pencil control - Instead of using counters {or buttons} you could use a dry-erase marker and ask children to draw a cross over the number called. Make sure you laminate your boards first so they can then be wiped clean and used again! 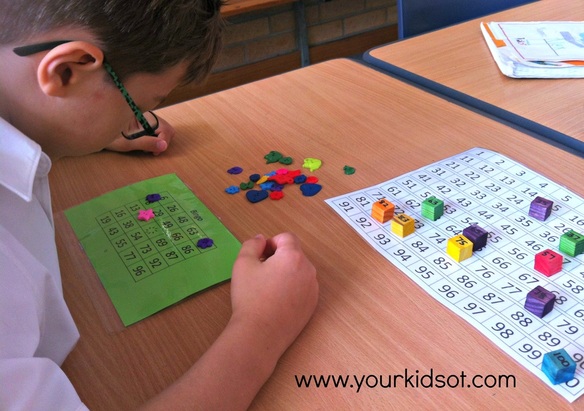  You may also like:
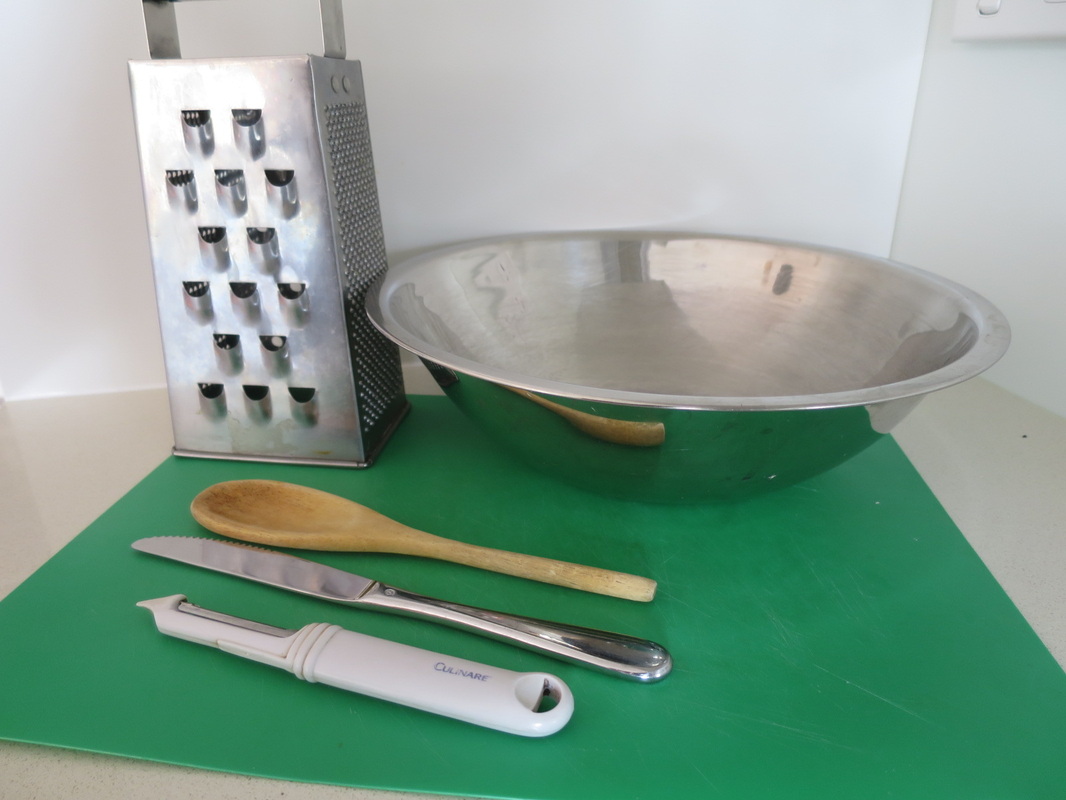
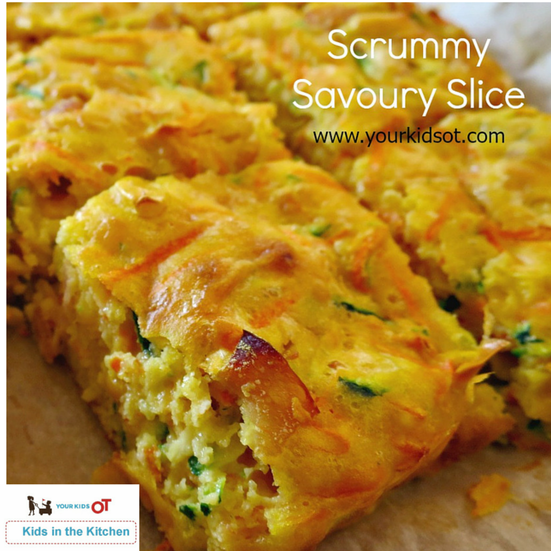  Packed full of veges, this slice can be made in one bowl. We have been eating variations of this slice since my kids were toddlers and it continues to make a regular appearance in their school lunch boxes. It is a great alternative to sandwiches. You can easily put these into individual muffin or friand tins for a different shape ... but I have to say I'm not fond of washing these up after! This a great recipe to get the kids into the kitchen and involved with helping. The zuchinni and carrot ends may be cut with a butter knife as well as the ham. Grating the veges and cheese is a bit trickier and maybe best left to older kids or the grown up in charge. You could also do this in a food processor or using a mandolin. We do most of the grating straight into the mixing bowl saving time!
Method 1. Preheat the oven to 180° C (356°F). 2. Peel the carrot, cut off one end and grate the carrot into the mixing bowl. 3. Rinse the zuchinni, cut off one end and grate the zuchinni into the mixing bowl. 4. Grate the cheese into the mixing bowl. 5. Slice up the ham into small pieces and add to the mixing bowl. 6. Add the corn into the mixing bowl. 7. Add the flour, milk and eggs to the mixing bowl. 8. Stir all the ingredients until well combined. 9. Line a baking tray with baking paper. 10. Pour the mixture into the baking tray and flatten with a wooden spoon. 11. Bake in the oven for 20 minutes. 12. Remove and cool in tray. 13. Slice and serve! 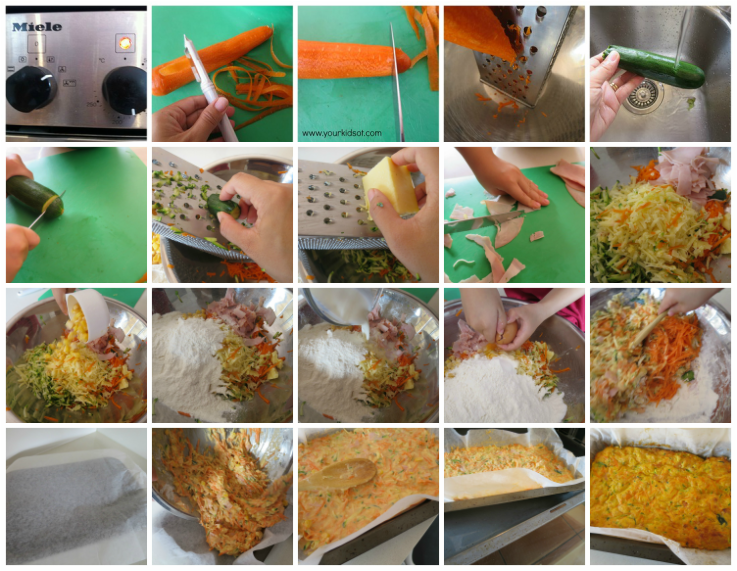 This scrummy savoury slice is also perfect for a picnic lunch or dinner! {We have friends who shared this particular slice with us at a lovely picnic dinner and it was a hit!} You can double the recipe and freeze in slices or individual muffin portions. This defrosts easily and then makes school lunches even easier. What's your favourite non-sandwich addition to the school lunch box?  You may also like...
|
AuthorHi, I'm Cindy and I am an Occupational Therapist. I enjoy working creatively with children to see them reach their potential. Read more about me here. 
SEARCH THIS SITE

Archives
June 2024
Categories
All
Popular Posts

 |


 RSS Feed
Join the YKOT e-newsletter!
Subscribe to get our latest content by email and receive
the SHAPE ROADS PRINTABLE NOW!

Success! Now check your email to confirm your subscription and receive your free printable!
Join our Mailing List!
Subscribe to get our latest content by email and receive
the SHAPE ROADS PRINTABLE NOW as a thankyou!
Success! Now check your email to confirm your subscription and receive your free printable!
Disclaimer: The information on this site is general in nature and should be used for educational and entertainment purposes. The activities are safe for most children, however, you should consult an Occupational Therapist or health professional to address specific movement, sensory or other medical conditions. This blog does not replace formal therapeutic professional advice given by a health professional or medical practitioner. Reviews and endorsements of products will only be made based on my expertise and personal opinion; and deemed worthy of such endorsement. The opinions shared in sponsored content will always be my own and not that of the advertising company or brand. Content, advertising space or posts will be clearly identified if paid, affiliated or sponsored. Affiliate links may be found throughout this website in advertising. This means that if you follow through with a purchase from these links, Your Kids OT will receive a percentage of the sale. Your Kids OT undertakes to meet the requirements of the "Social Media Policy" as published by Australian Health Practitioner Regulation Agency (AHPRA). Further information about this policy can be found here.
Find meFollow me |

|
About me
AuthorHi, I'm Cindy and I am an Occupational Therapist. I enjoy working creatively with children to see them reach their potential. Read more about me here. 
|
Copyright © 2017 Your Kid OT