
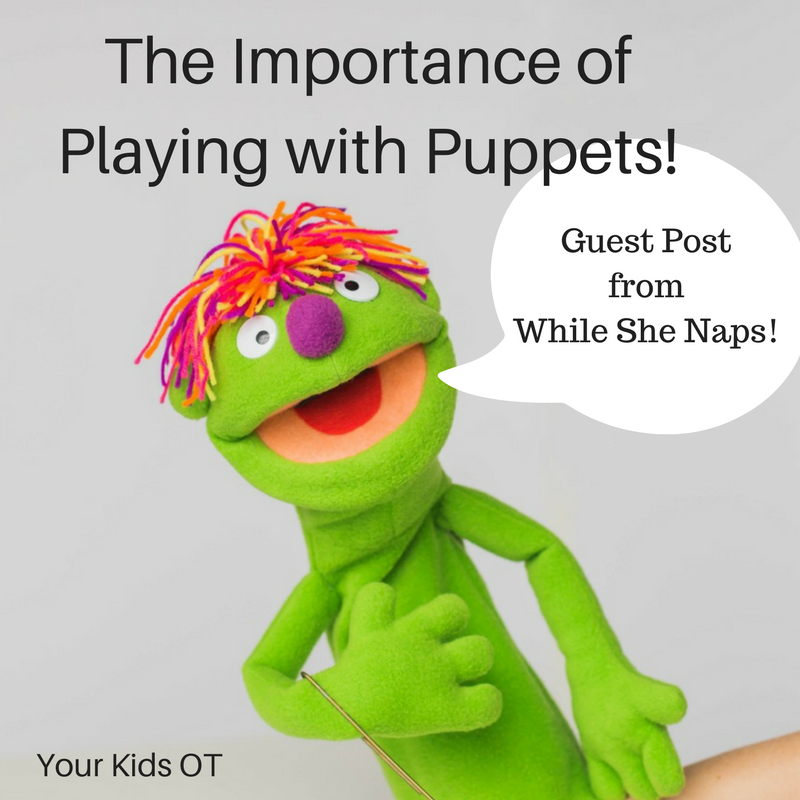
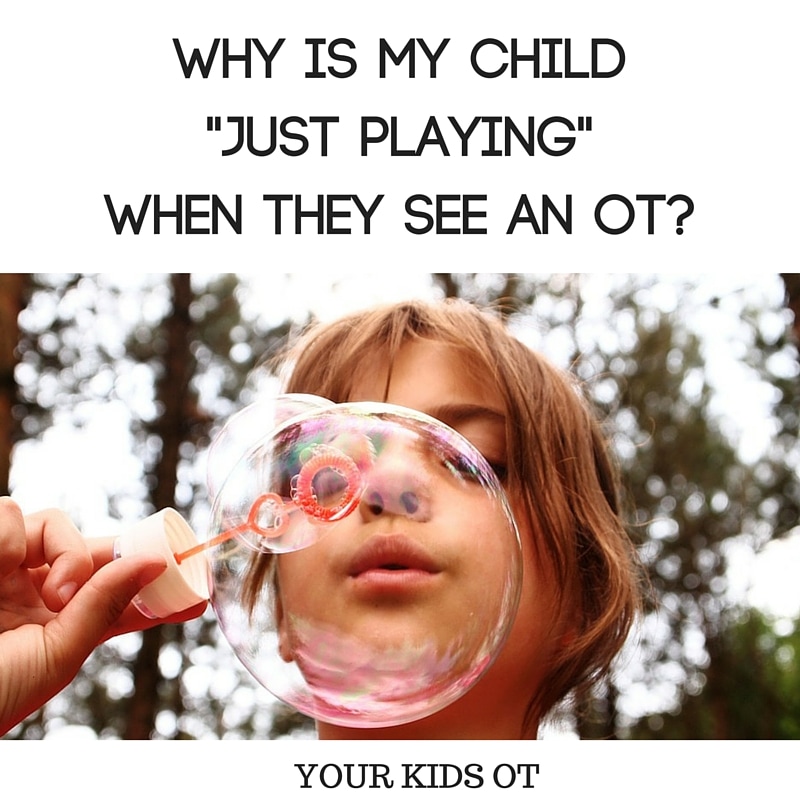
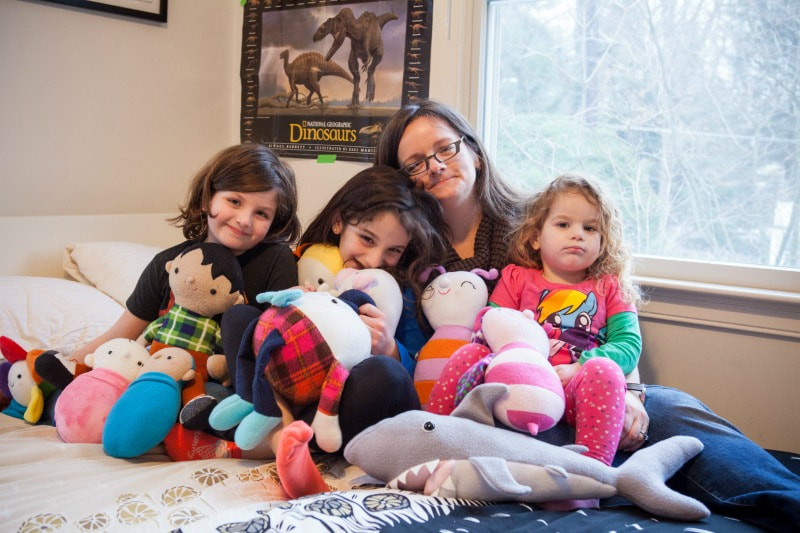
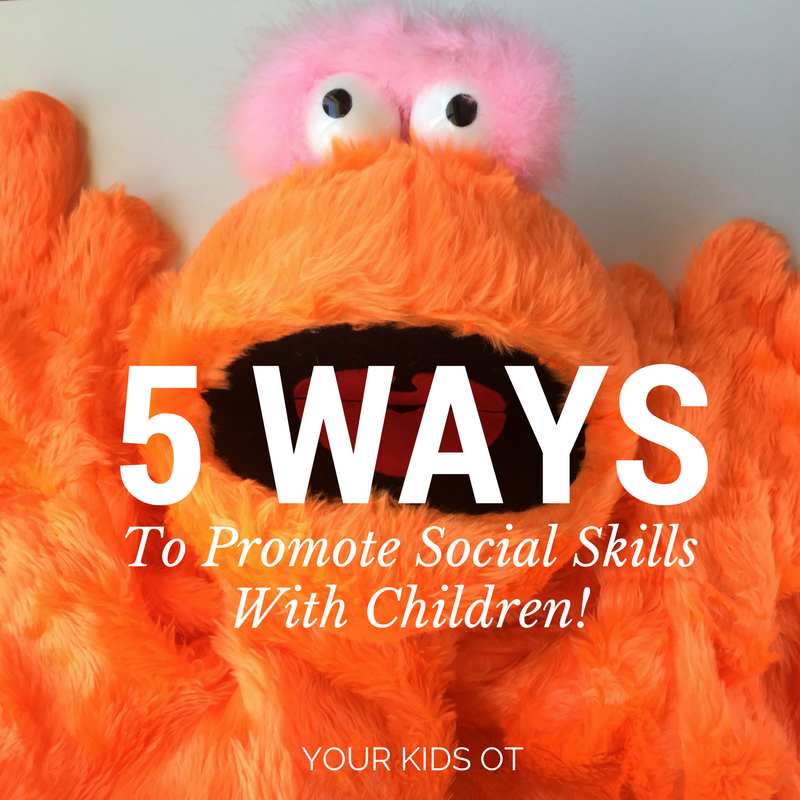
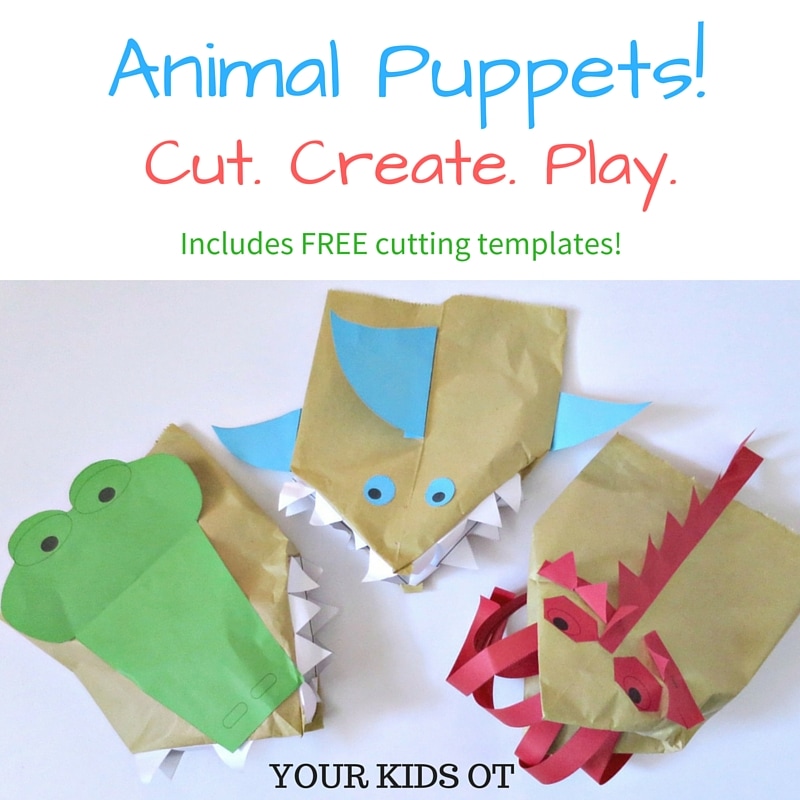
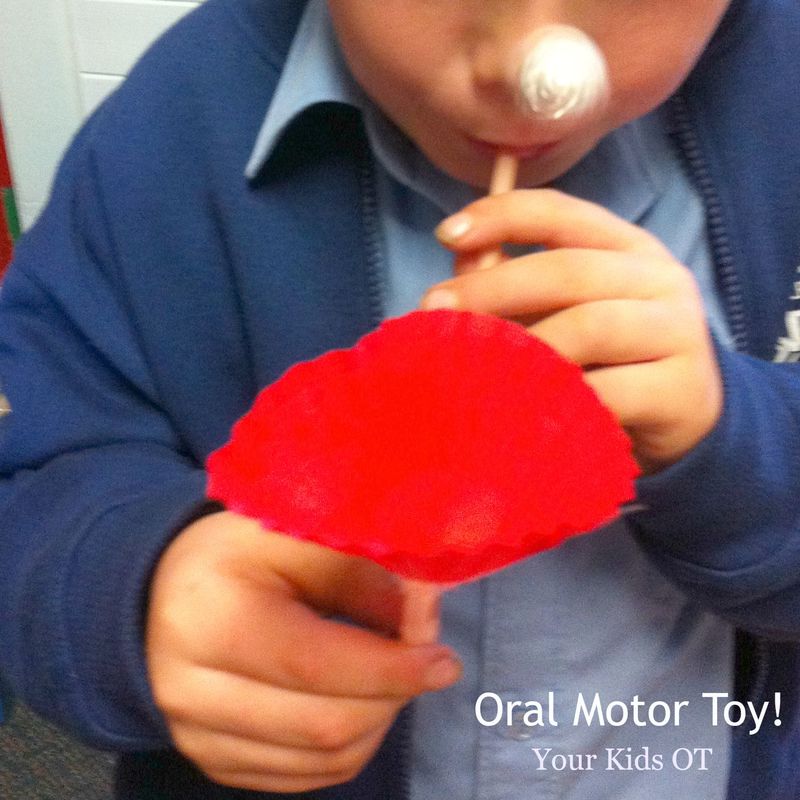
 I love puppets! Kids love puppets! They provide such a great way to engage kids; capturing both their attention and their imagination. Even when kids eventually realize there is a person behind (or under or holding) a puppet, the intrigue and affection is still there. Today I'm introducing guest blogger Abby Glassenberg, puppet designer extraordinaire, and blogger from While She Naps! Can you see from the title how awesome her puppets are?! Abby has some great ideas (and therapeutic reasons) for using puppets in play and for therapy sessions. She also has some awesome ideas for making your own puppets! I'm looking forward to trying out her pattern to make my own. I would love to see your puppet if you make one! Thank you Abby for contributing today! Puppets can play a special role in a therapy session, a classroom, or at home with your family. When we slide our hand inside a puppet and begin to make it talk we can suddenly be anyone we want. Through a puppet we can express thoughts that would be too difficult to say out loud otherwise. A puppet can be angry, or sad, or frustrated about a situation and express those emotions fully without worrying about the consequences. When we play with puppets we give ourselves permission to talk about complicated situations and to be silly too. If you don't already have puppets in your toy box of toolbox it's worth buying a few at a toy store or making your own. As a teacher and mother of three girls, one of whom has special needs, I love having puppets available in my arsenal. I also like to make toys for my children to use. As a sewing designer, I realized that there was a need for an open-mouthed, expressive puppet that was easy for moms and therapists to sew themselves. This realization led me to create the Chit Chat Puppet Pattern for people just like me who want to create a special puppet to use with the children in their lives. It's a simple-to-sew pattern that allows you to easily make custom puppets that fit your particular needs. The wonderful thing about puppets is that they are a representation of a living being so puppets can get away with things that people can't. Puppets allow us to experience a fantasy and that's such a valuable thing for a child. 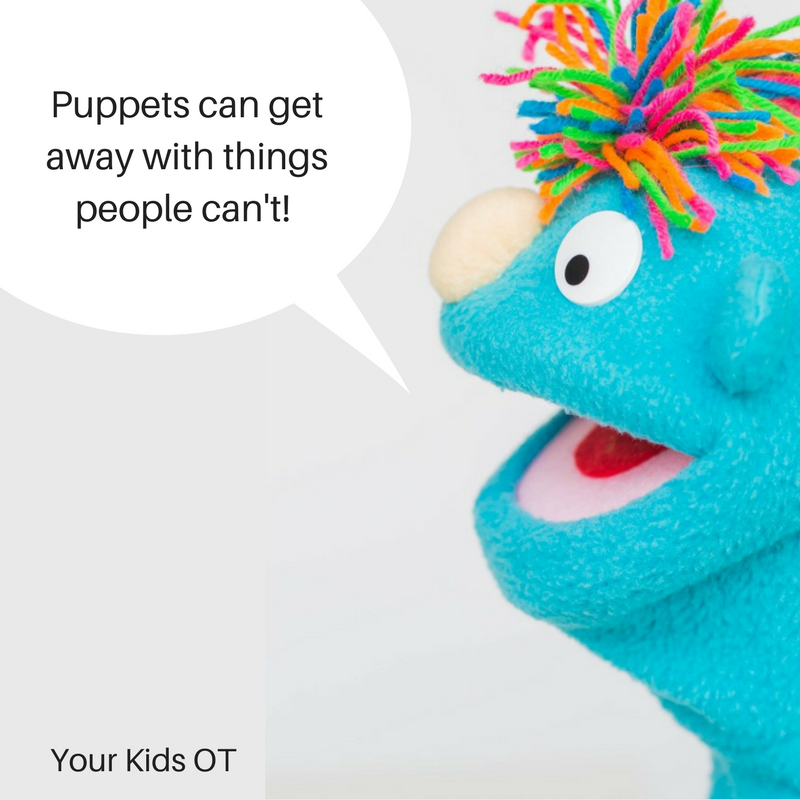 One approach to playing with puppets is to use a visually neutral puppet that's neither a boy nor a girl and doesn't have many identifying characteristics. This means that the puppet doesn't resemble anyone and can be anyone. A child can project whatever they want onto the puppet, rather than feeling constrained by the puppet's features. Another approach is to buy or create a variety of puppet characters, including a predator puppet and a friendly puppet. Distinct characters allow you and the child to act out scenarios together, and you can even switch roles to try out different resolutions to the stories you're acting out together. One way to begin puppet play is to by presenting a puppet that has a problem that's an exaggerated version of one the child is actually facing. For example, of the child is struggling with accepting a new baby into the family, the puppet can wish that the new baby would disappear and it could be the only child once again. In this scenario the puppet is just like the child, only more so. This experience give the child an opportunity to unburden themselves of thoughts they were previously afraid to openly express such as wishing a baby would disappear.  You can also present a situation similar to the one that the child needs help resolving and use the puppet to model new behavior patterns and rehears coping strategies. Possible situations that are suited for this kind of play would be winning and losing at games, turn taking, greeting people and active listening. To encourage the child to problem solve and to create a bond with the puppet, suggest that they be the puppet's helper. Can the child help the puppet accept that it's lost at a board game? or teach the puppet to greet a friend appropriately? Of course playing with puppets doesn't always have to have a serious aim. Putting on a silly show with a puppet is a fun way to spend time together enjoying an open ended, creative activity. It's definitely okay to just have fun with your puppet! There are lots of puppets that are simple to make together with children. Try a paper bag puppet, a clothespin puppet or a sock puppet to get started. And of course, there are many commercially available puppets you can buy at the store. if you'd like to create a unique puppet to use with your child or with your students. however. I encourage you to try my Chit Chat Puppet pattern. It's intended for people with all levels of sewing experience and will allow you to create an array of unique, high quality puppets you can use for years to come.
Read more articles from Your Kids OT at https://www.yourkidsot.com/blog The information on this site is general in nature. The activities are safe for most children, however, you should consult an Occupational Therapist or health professional to address specific movement, sensory or other medical conditions. You may also like:
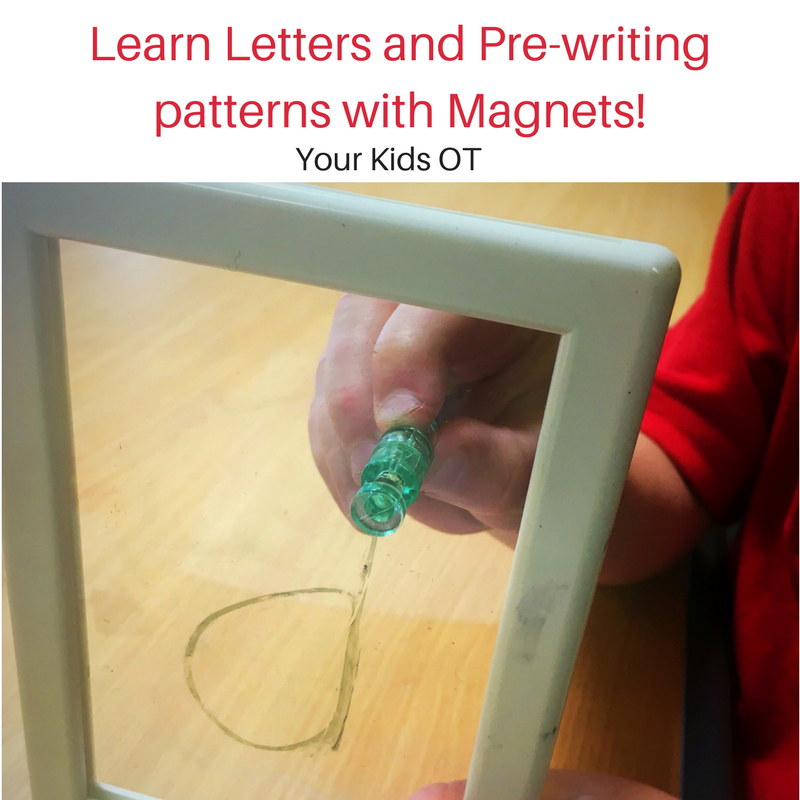
Magnets are so fascinating for kids! How do they work? What makes them attract or repel something?
Using the fascination children have with magnets ... I created a fun way to learn pre-writing patterns and learn letters too! What do you need? * two-sided plastic frame (I use this frame from IKEA and took out one of the plastic sheets) * magnets * whiteboard markers (and eraser) * felt/glue (optional) The felt and glue are optional. I added a small piece of felt to my magnets to prevent scratching the plastic frame. What do you need to do?
I hope you enjoy this video showing you what you need and what you need to do to learn pre-writing patterns and letters with magnets!
Note: The last time I included a video in my blog post, my loyal newsletter subscribers couldn't see it! Please also find the video available on You Tube at this link !
Why I love this activity!
This activity has so many great benefits! * Pincer grasp - Encourage your child to hold the magnet between their thumb and index finger. * Separation of the two sides of the hand - Encourage your child to tuck away their 3rd, 4th and 5th fingers. * Wrist Extension - As this frame is vertical; your child's hand will naturally be placed in a position of wrist extension. * Bilateral coordination - Encourage your child to use their dominant hand to hold and move the magnet, whilst using the non-dominant hand to hold the frame. * Visual Tracking - Your child should naturally watch the magnet as it traces the pattern, shape or letter. If they can't track visually - check out my variation below! * Shape and letter formation - Use this activity to teach pattern, shape and letter formation as your child will "feel" their hand moving in space as each letter is formed (spatial awareness). This learning through movement is called "kinesthetic" learning. Children can also learn the planning involved with forming patterns, letters and shapes. You may want to add a verbal element so that your child may repeat this to help with understanding the steps involved. The verbal prompt may also help them to plan when they form these patterns, shapes and letters on their own. The development of these skills are so important for handwriting on paper! This activity provides an excellent way to build "handwriting" skills without having your child "just write" for practice. It provides multi-sensory learning, is "novel" and fun! It is really quick to set up (once you gather your supplies). It is also transportable ... perfect for the mobile therapist! 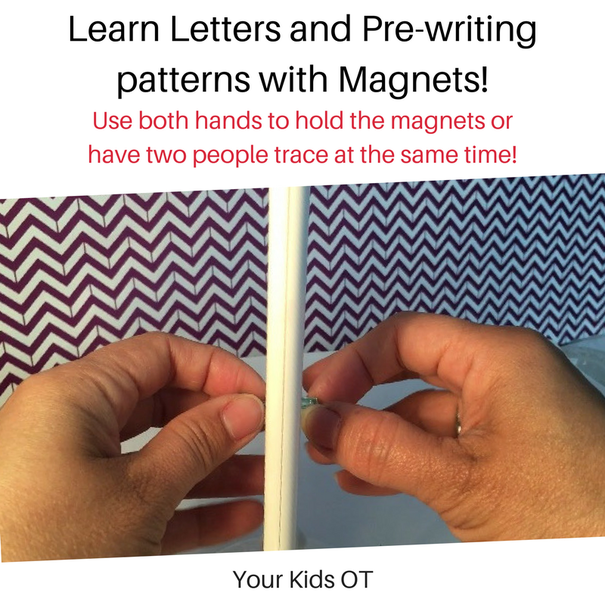
Variations
For more activities to promote the development of fine motor skills; see this page with a list of my articles on this subject! Does your child love magnets? Do you have an IKEA nearby? I would love to hear if you make any further variations to this activity idea!
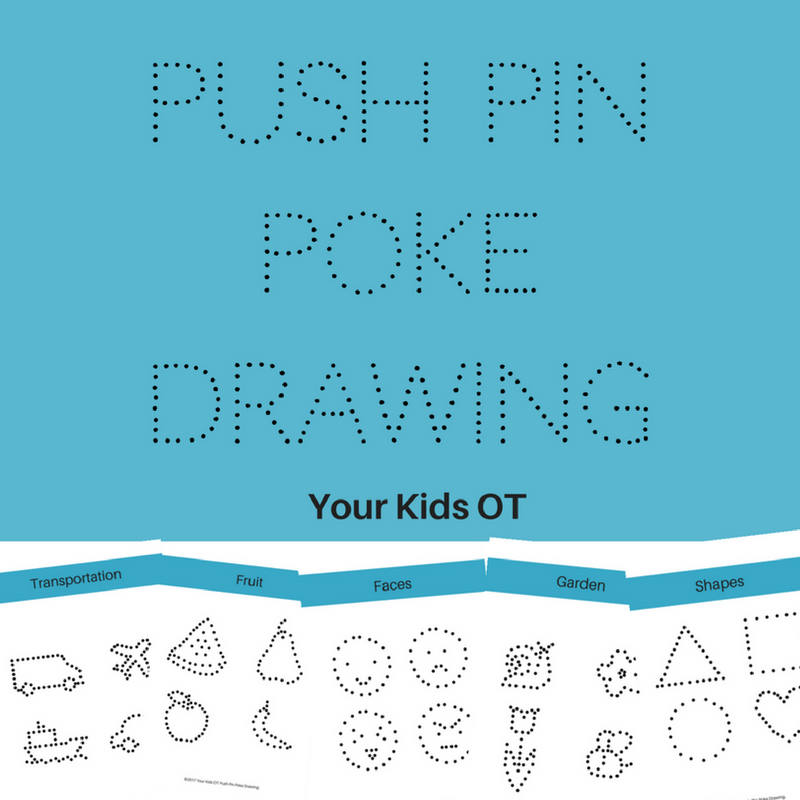 Push pins! You may have some handy for your bulletin board but have you used them to draw? OTs love to use "push pins" as a tool for fine motor skill development, especially for encouraging a pincer grasp! Read on to the find out all the great therapeutic benefits of this activity. But first, what do you need to do?! 1. Get your templates at the Your Kids OT shop! Print them off. 2. Put a piece of paper over a cork mat. 3. Place the chosen template page over both the paper and cork mat. 4. Use a push pin to poke small holes onto the template page. Use the non-dominant hand to support the pages so that it doesn't move. Encourage your child to pinch the push pin so that they are not squeezing too hard. They need to apply just enough pressure to poke a small hole (not too hard otherwise the push pin stays in the cork mat). 5. When all the holes for the picture have been "poked", hold the paper up to see the picture. Kids love to see their created picture and many of my OT kids have place their pictures on their bedroom windows as art! 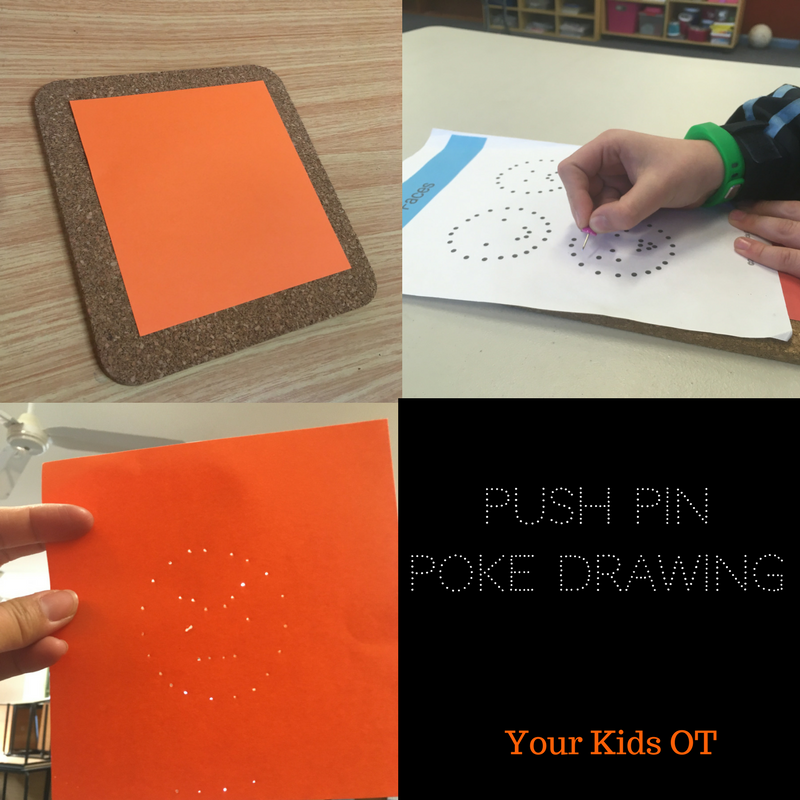 Therapeutic benefits! There are so many skills that can be achieved with "push pin poke drawing"!
All these skills are needed for complex hand tasks such as writing, drawing and cutting. They are important "pre-writing" skills and can help with the development of an efficient functional pencil grasp as well as helping with the fluent control of the pencil needed for writing. Did you read my recent article about my favourite fine motor toys needed for pencil grasp and handwriting? This activity is suitable for a wide range of ages. I have used this with preschool-age children (about 4 years of age) and primary school-age children. They have all loved it! Supervision of the "push pin" is advisable so it may not work in a whole-class environment. You could try toothpicks or bamboo skewers instead! 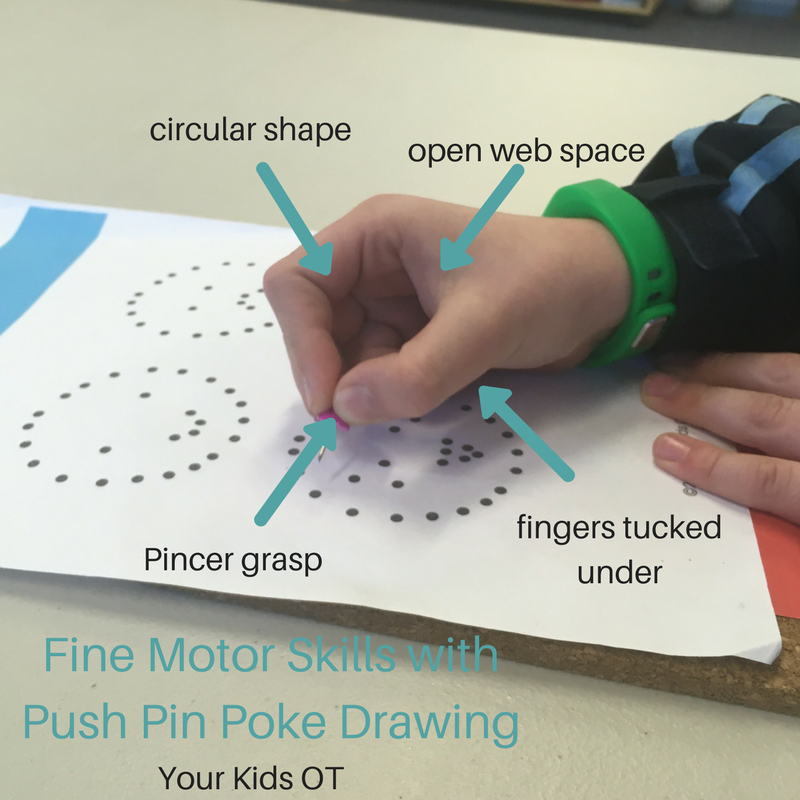 This activity is so much FUN! Don't take my word for it, you will have to try it out! Don't forget to get your templates from the Your Kids OT shop! Also available from Teachers Pay Teachers. Have you tried "push pin poke drawing?! 
You may also like:
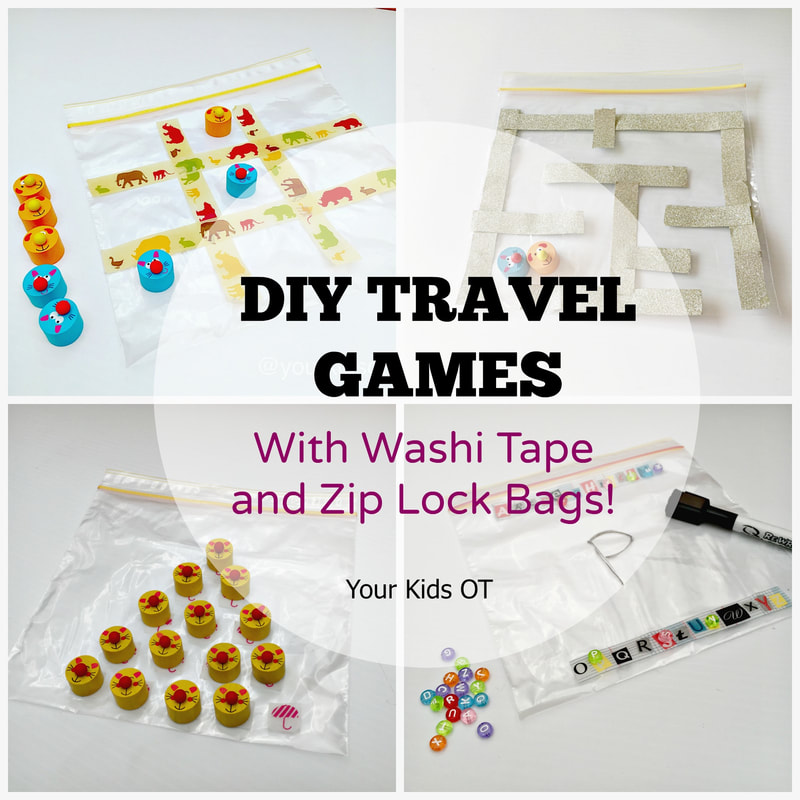 Ever struggled to entertain your kids on a long haul flight or doctor's waiting room? or maybe you are a mobile therapist looking for new ideas that are light and easy to carry?! Here are some quick easy DIY travel games that you can make with your favourite washi tape and some zip lock bags to keep your kids entertained and learning at the same time! The surface of the zip lock bag is the playing surface and all the small parts can be stored in the bag after playing! So neat and convenient, ready for travel! 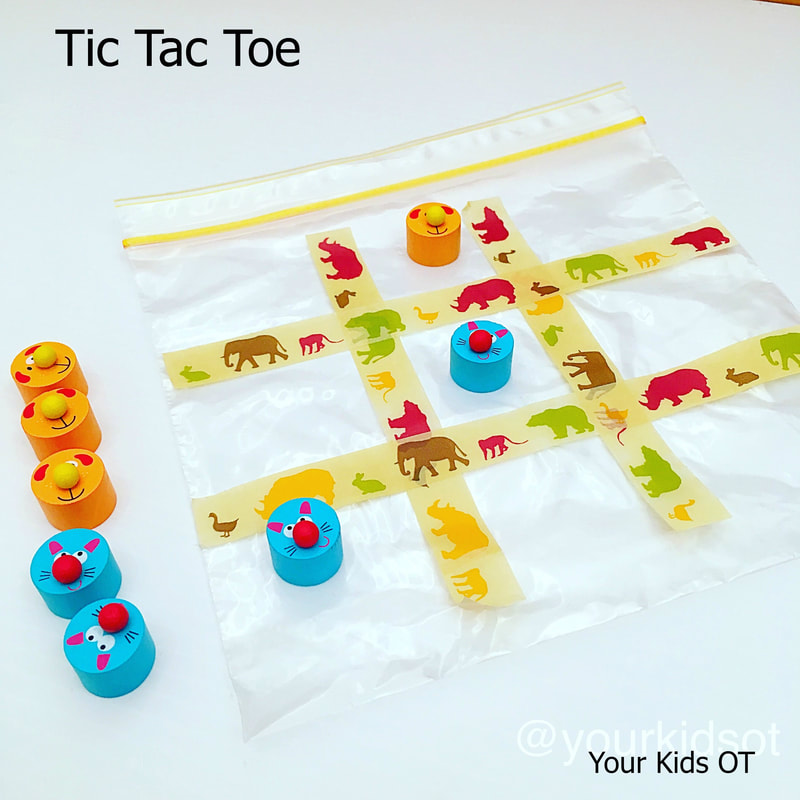 1. Tic Tac Toe (or noughts and crosses). You will need a zip lock bag, 4 strips of washi tape and 8 small counters (four of each type). Simply lay your washi tape strips to form the tic tac toe board and you are ready to play! Can't get any easier than that! My cute counters came from an old game we weren't using anymore, however you could use small pebbles, buttons, pom poms or any other "loose parts". Tic tac toe is such a great game for kids to work on motor planning and turn taking. You can encourage a pincer grip with the counters too! 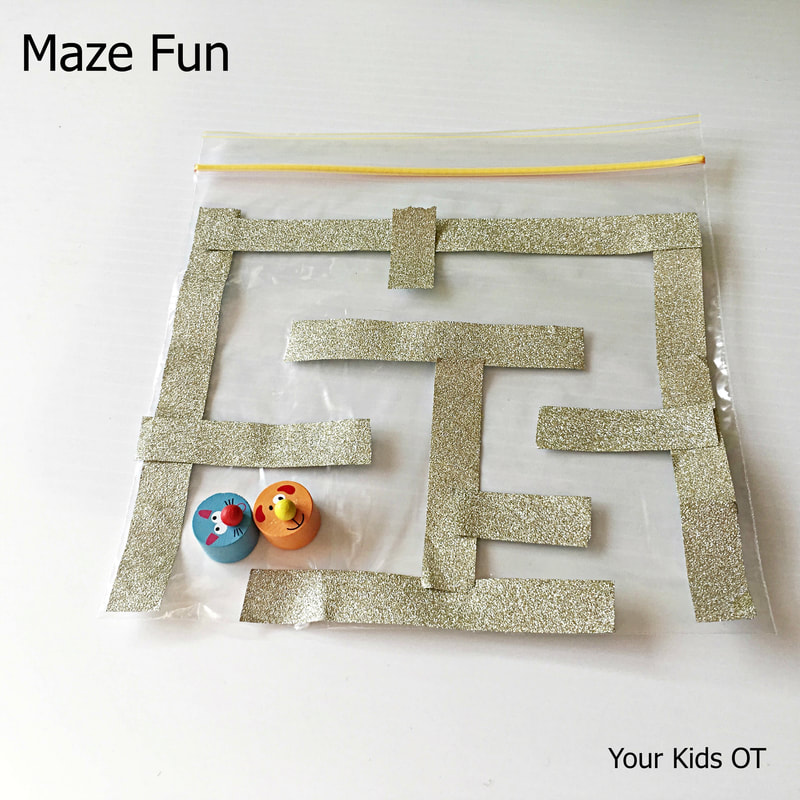 2. Maze Fun You will need a zip lock bag, washi tape cut into strips and some counters. Design a maze on your zip lock bag using washi tape. You could make one like the one I have made or you could make a shape or a road too. The best thing about washi tape is that is repositional. Change the maze after you play! If you have an older child, they may be able to come up with their own design. You could use counters to go through the maze or you could make the washi tape the path to follow. Draw some black lines down the middle of your tape and you have a road for a little car to drive down. Draw some line across the washi tape and you can easily create train tracks! Mazes are such a great way for kids to work on visual motor planning and tracking. They can work on problem solving too if the maze is too hard for them. And you guessed it, encourage a pincer grasp with the counters or loose parts that you use! 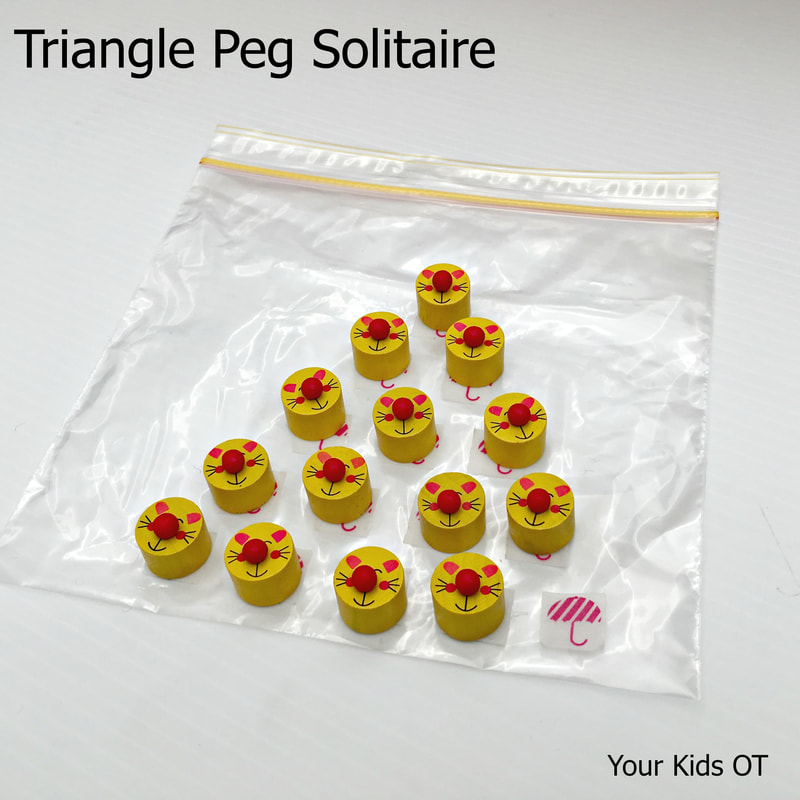 3. Triangle Peg Solitaire You will need a zip lock bag, 15 small squares of washi tape and 14 counters. Start this game by assembling the counters like the photo above with the bottom right hand square empty. To play the game, you may move a counter to "jump over" one other counter onto an empty square. Pick any counter next to continuing "jumping over". Play ends when you can't move (ie. you don't have a counter to jump over). The aim of the game is to have the least counters left over. This game is perfect for older kids who may be challenged to one counter left after making all moves. This game will be addictive, as your child will want to try again to beat the number of counters they have remaining. It is a good problem solving and visual planning game (whilst working on that pincer grasp). 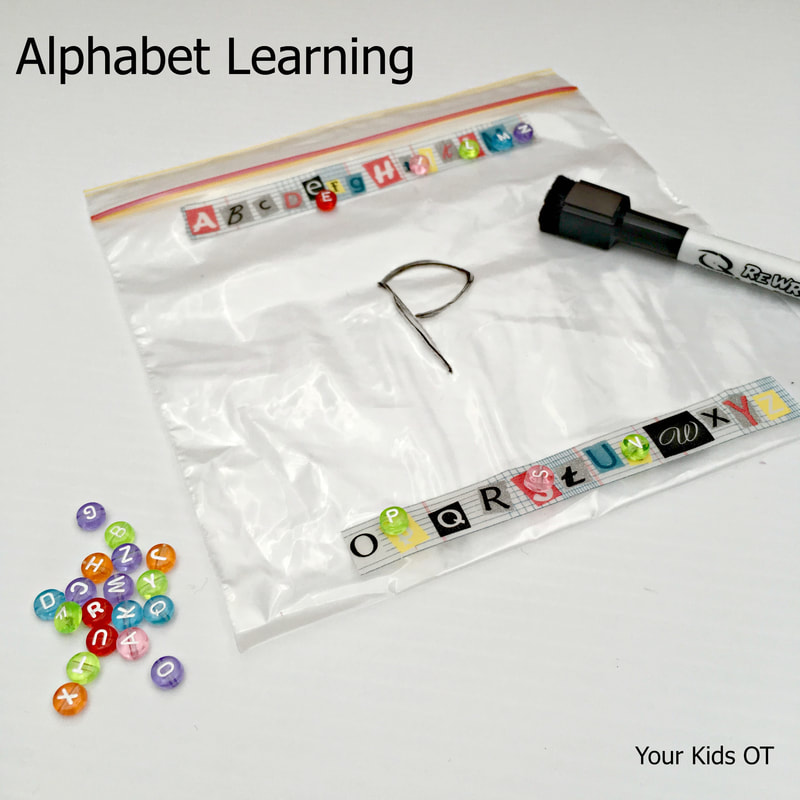 4. Alphabet Learning. You will need a zip lock bag, alphabet washi tape (or write on plain washi tape with permanent marker), alphabet beads, whiteboard marker and eraser. Alphabet beads are easy to find in hobby or craft stores or you may even find them in your local discount (dollar) store. Have your child match the beads to the washi tape for alphabet recognition and learning alphabetical order. You could also put in a small tub of playdough so that the beads could be pushed into the playdough. Use a whiteboard marker to write the letters on the zip lock bag and have an eraser (or a tissue will work) to rub out the letter. Change it up and use lower case letters, numbers or spell out sight words or spelling words! The benefits of this activity are self explanatory! Educational with a touch of fine motor manipulation! Yes you guessed it, this also works on pincer grasp but you can also work on pencil grasp and letter formation too! Do you want to see these games in action? Watch this video I put together (be kind as I'm still learning about video editing!). If you are reading this in your email, please click on the title of this blog so that you watch this video via your internet browser! Looking for more amazing travel games? Today. I'm linking up with some of OT blogging friends to bring you more! Make sure you check out their ideas and follow them too!
Let me know if you try out my DIY travel games made with washi tape and zip lock bags! No crafting experience required! Happy playing! 
You may also like:
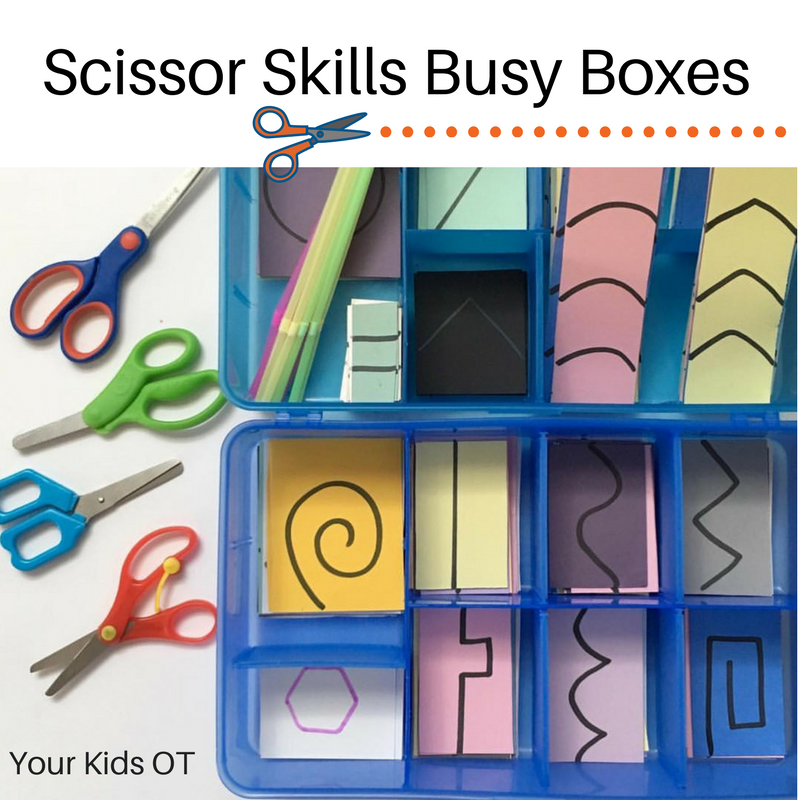
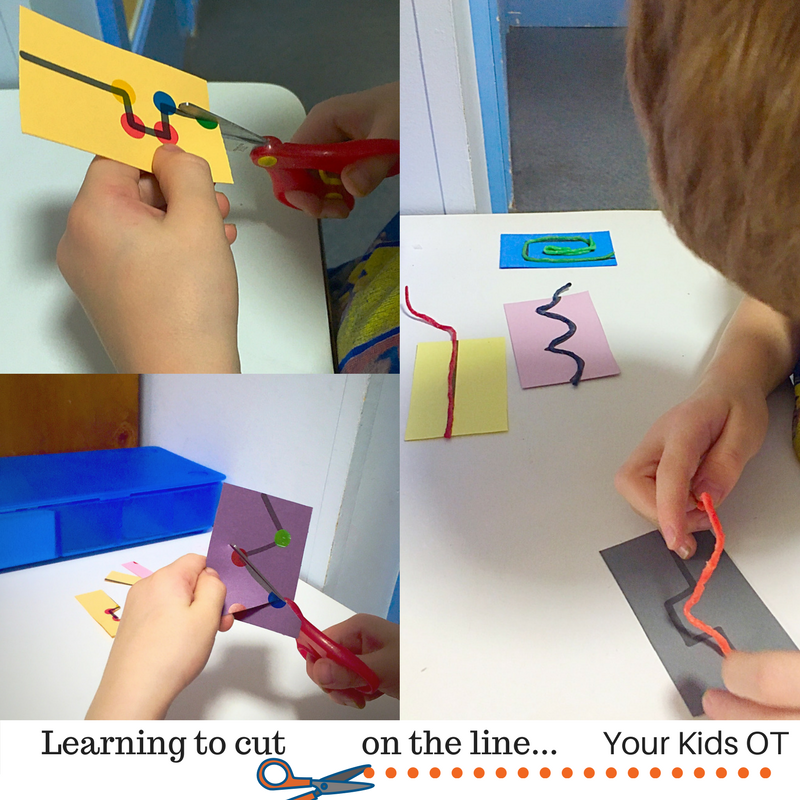
Cutting, laminating, photo copying, lesson planning .... do you do your preparation in the school holidays?
Teachers and OTs (or an other therapists for that matter)... we have a problem! We never quite "switch off"! We are always looking or listening out for a great idea that we can implement with the kids we see. Even on holidays... I notice ramps and think about access, I notice toys in shops and think how I could use that or I watch kids play and guess how old they are! Yep, I have a problem! Last year we were quarantined at home during one school holidays due to illness (gastro from memory). To make the most of this time, I made these scissor skills busy boxes! I knew that they would come in handy once the illness had passed and I was back at work! These boxes are perfect for home, preschool or in an OT tool kit! Yes they take a little while to set up but they are worth it! I sourced theseplastic boxes years ago from IKEA Australia and love that they have little compartments which can be adjusted in size. They also have a lid making them ideal to move around from place to place! I set up two types of boxes but you could use a combination of craft and cutting strips. The cutting strips were made from scrapbooking paper. This is a little thicker than normal writing paper and easier for little hands to hold and to cut (as it doesn't flop around as much and require too much stability with the non-dominant hand). In the cutting strip box, I wanted to have a range of developmental stages including shorter strips, thicker lines, thinner lines, curves, straight lines, corners and more! Read more about developmental stages over at MamaOT. If you are making this box for home, you may want to consider where your child is at developmentally before starting! 
A craft box is a great way to encourage those who are just starting out with scissors! Present a range of things to cut such as straws, crepe paper, wrapping paper, tissue paper, wool, ribbon, twine, tinsel, etc! Encourage your child's creativity with some glue to stick down all the things they cut!
These scissor skills busy boxes will appeal to your child if they already interested in cutting or they love experimenting with craft supplies! However, there are some children who are just...not..interested...in...cutting! These are the kids who are referred to OTs because of poor fine motor skills, poor hand strength and poor postural control. Sometimes these children have difficulty with cutting because they have not yet established a hand preference or have poor bilateral coordination (see here for more information). Here are some tips for using the scissor skills busy boxes!
Please tell me that I'm not the only one who has trouble "switching off"! Perhaps this is a subconscious reason I started this blog, so that I could record ideas and observations!
Have you got a "busy box" for scissor skill practice? What have you included in your box?

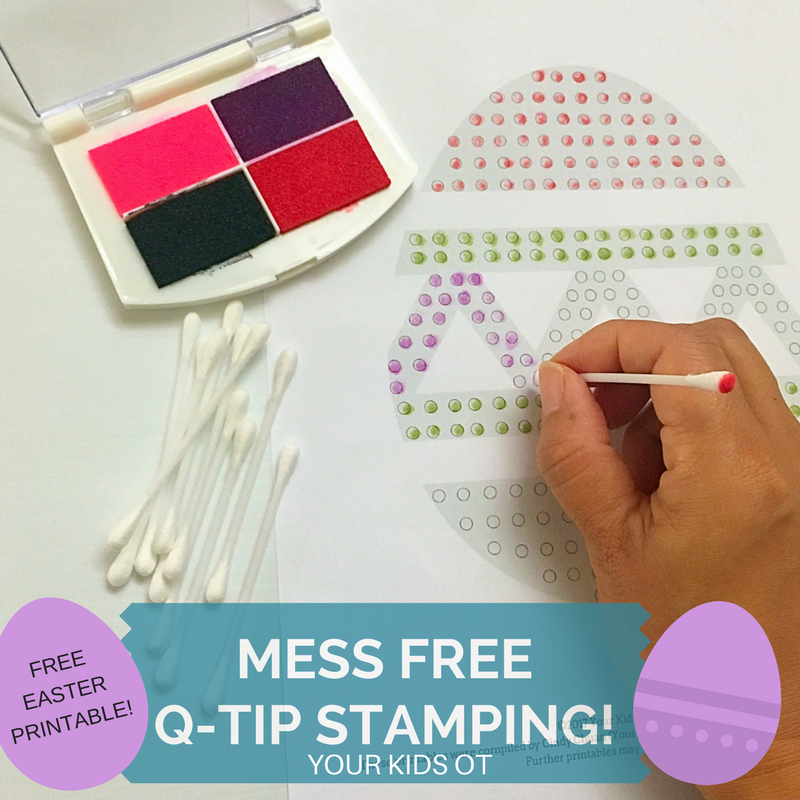
MESS FREE? ✔
EASILY TRANSPORTED? ✔ FUN AND ENGAGING? ✔ MORE THAN ONE THERAPY GOAL? ✔ This activity ticks all the right boxes for a mobile occupational therapist! Have you heard of Q-tip painting? (Q-tips are also called "cotton tips" in Australia and are usually found in the personal care section of a supermarket). Q-tip painting has been quite popular in the last few years with Q-tips used as paint brushes dipping into paint and making "spots" onto various printables available. Last year, I put together my Q-tips and my ink pads... creating Q-tip stamping! It was a hit with my kids; providing the same fun engaging activity without the MESS! This is why I love Q-tip stamping!
This is an activity that would well in a classroom, at home or in an OT session! You could shrink down the pages and turn them into a card or display the finished pictures!
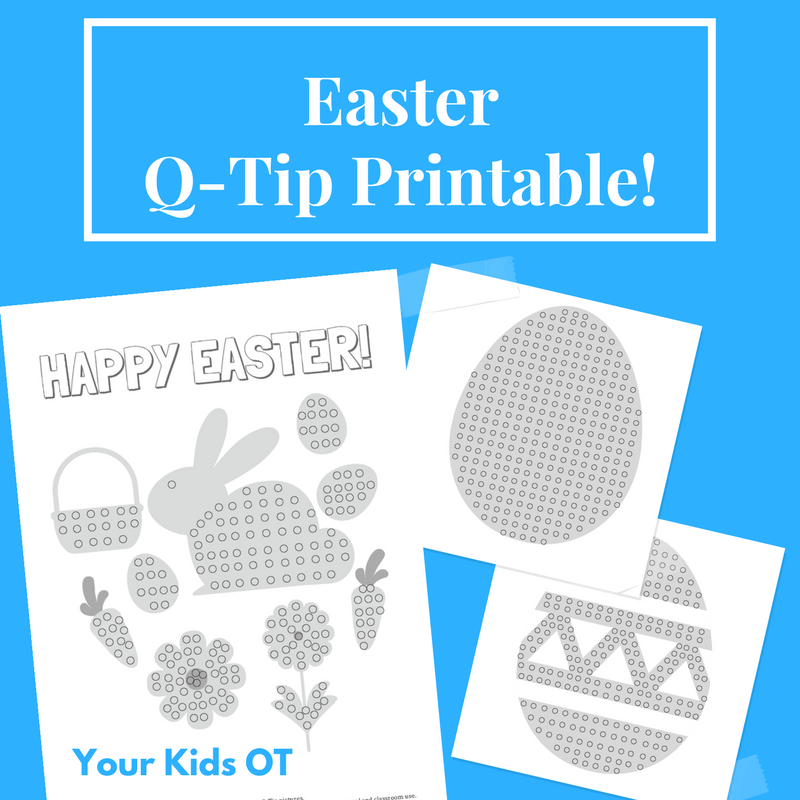
Have you tried Q-tip STAMPING before? Do you have other mess-free activities that you use in therapy sessions? If you try this activity for yourself, I would love to see it! Tag #yourkidsot on Instagram or email me at [email protected] Don't forget to download yourFREE EASTER Q-TIP PRINTABLE HERE! 
You may also like:
Do you fidget?
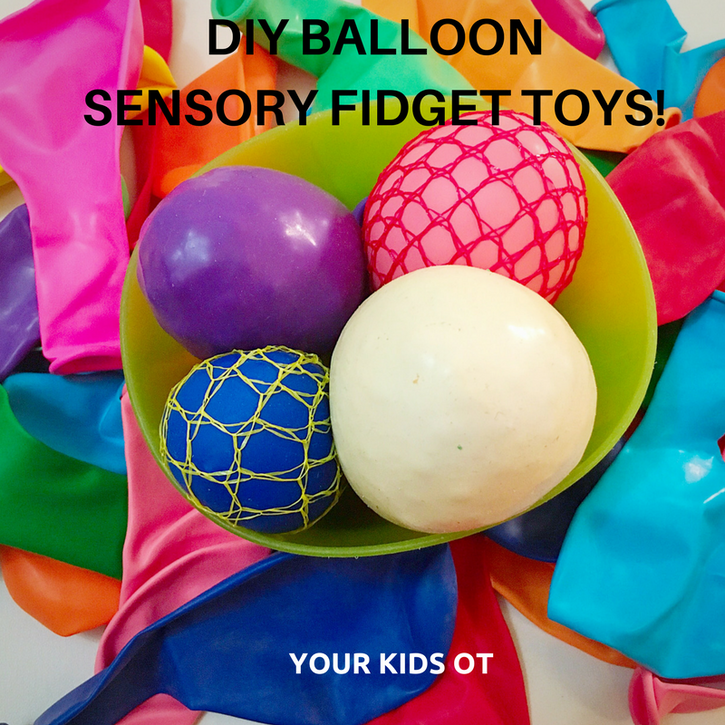
Do you chew your pencil, tap on a table, tap your foot, move in your seat, twirl your hair? Fidgeting is a movement that you may not even be aware of until someone points it out to you. People (both children and adults) may fidget whilst they are concentrating on a conversation, listening to a teacher or watching TV (just some examples). Some children with sensory seeking behavior need ways to intentionally fidget so that they can obtain the proprioceptive input to help their bodies regulate and calm down. Have you seen balloon fidget toys before? I have been wanting to make these for a long time and have finally made them! They are so awesome to squish and squeeze! There are lots of recipes on the internet, but I found two really simple (and dare I say fool-proof) ones that I have "tweaked" for you to try! Water Beads Balloon Fidget What you will need: 1. Balloon 2. Water beads (fully grown) 3. Funnel What to do: 1. Give your balloon a stretch and blow into it (just to stretch it). 2. Deflate your balloon and attach to the end of the funnel. 3. Push the water beads into the funnel and into the balloon. You may need to move them down the neck of the balloon with your fingers. 4. Fill your balloon to the desired size then tie a knot to secure them. 5. Squeeze! Your kids will love scooping water beads to put into the funnel, then pushing the water beads into the funnel with their fingers. The perfect finger isolation activity! Note: Inspiration for these balloon fidgets came from Karina Garcia's You Tube channel. She uses transparent balloons which are so cool! 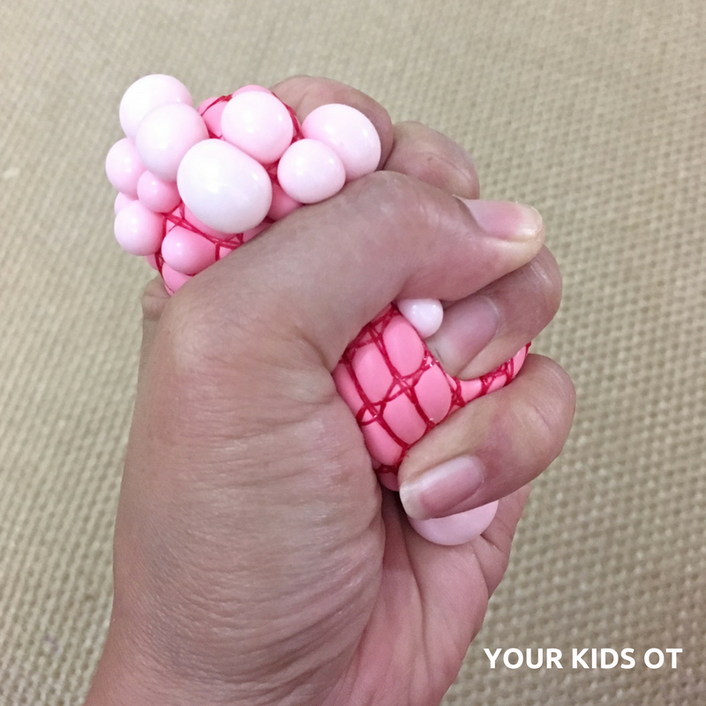
Baking Soda and Conditioner Balloon Fidget
What you will need: 1. Baking Soda (aka. bicarbonate soda) 2. Hair conditioner 3. Balloon 4. Plastic fork or spoon 5. Funnel 6. Bowl 7. Elastic Band 8. Netting from fruit or vegetables 9. Matches or lighter What to do: 1. Pour your baking soda (I used 300 g to make 2) into a bowl. 2. Slowly add a little hair conditioner to the baking soda and mix together with the spoon. Continue to add the hair conditioner and mix until you get a sloppy thick icing consistency (see video for consistency). 3. Give your balloon a stretch and blow into it (just to stretch it). 4. Deflate your balloon and attach to the end of the funnel. 5. Push the baking soda mixture into the funnel and down into the balloon. You may need a plastic fork or spoon to help push it down. 6. Fill your balloon to the desired size then tie a knot to secure them. 7. Cut some fruit/vegetable netting to the desired size. Singe the ends of the net with a lighted match just to stop any fraying. 8. Secure the netting over the balloon with a rubber band. 9. Squeeze and play! Your kids will love helping you mix the baking soda and hair conditioner together. You could play with this as "cloud dough" until you are ready to fill the balloons. Make sure you get a reasonably wet consistency for to put into the balloons (it will still work if you don't but you might not get the bubbles popping out of the net). Once ready to play, your kids (and any adults around) will love squeezing these over and over again! Note: Inspiration for these balloon fidgets came fromAira Tan's You Tube Video. Have a look at my video to retrace the steps and see how squishy they are!
Use of these balloon fidget toys should always be supervised especially over time with the wear and tear of the balloon. The length of time each balloon will last, will depend on the quality of the balloon and how often it is played with. You could try adding a second balloon over the first to provide some longevity. These balloon fidgets are not suitable for children who are mouthing toys and objects. They are also not suitable for children under 12 months of age.
These balloon fidgets provide sensory input for a child who needs to fidget. They also make great ways to warm up your child's hands ready for writing or cutting. They are perfect little stress balls and they are also heaps of FUN! I love these balloon fidgets! I hope you do too! Have you made a balloon fidget yet? Let me know if you try one of these! Don't forget to share this article with your friends and family if you think they will like these balloon fidgets too! Thanks, 
You may also like:

Wow, what a lovely craft!
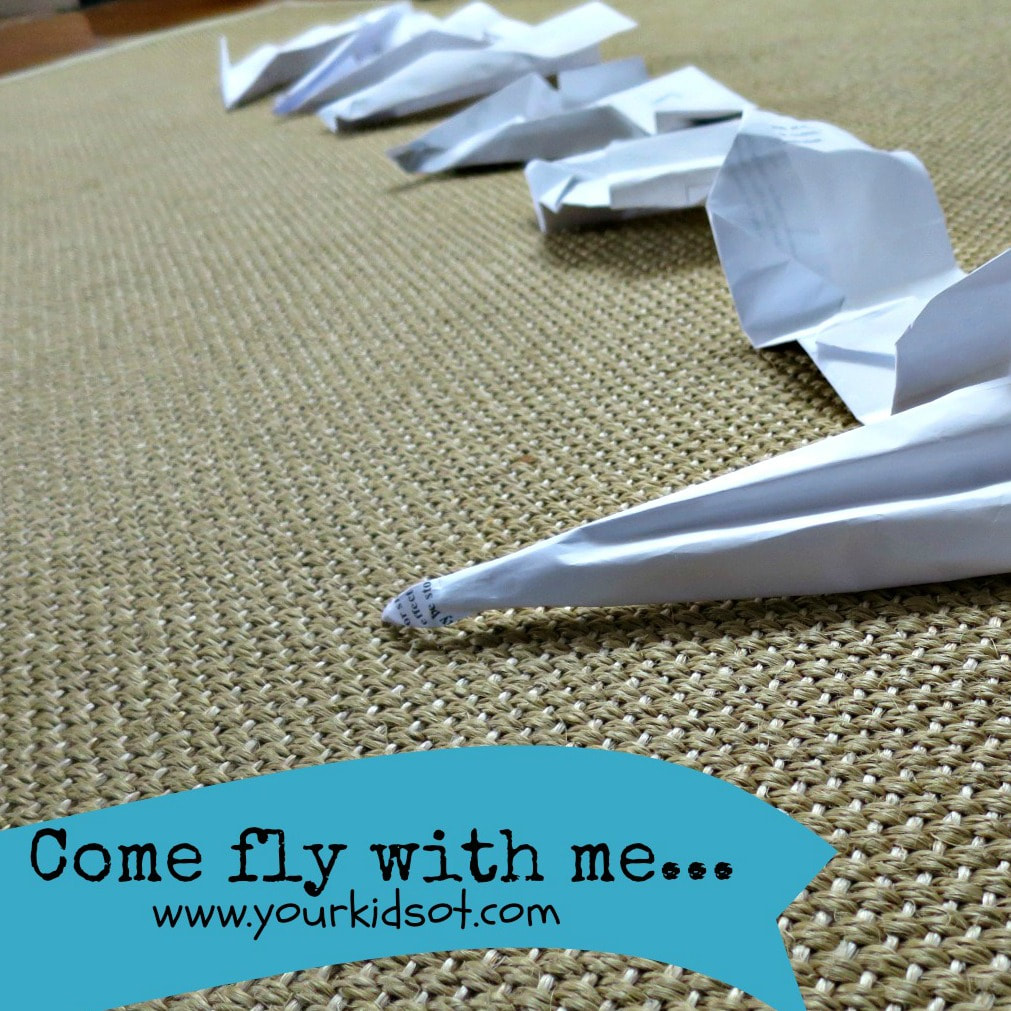
The craft had a photo of Miss 4 years on an elf body, with paper concertina arms and legs. Did you make that (Miss 4 years)? Um no, I did the folding! The sheepish teacher admits to me. This situation greets me more often than not and it prompted me to write this post. With school resuming in Australia very soon, this article is for teachers! If you see your teacher "guilty" of these things maybe you can prompt them with "why"? Also note, when I say "teachers", I'm also talking to OTs and parents who may also be "guilty" of these things! 1. Teachers PLEASE don't do the craft FOR your kids! This is my top gripe with preschool and school teachers. Kids do not need or want insta-worthy craft! Parent's don't want to see YOUR crafting skills (even if does make the classroom look beautiful). Kids need opportunities to snip, cut, rip, glue, fold and to make mistakes! They need to have craft opportunities where they can learn about spatial relationships (even it means legs are coming out of heads, arms are different lengths and tongues don't curl properly). Painting outside the lines means they can work out where things are in relationship with themselves. Manipulating glue stick lids or squeezing the PVA glue are opportunities for fine motor and hand strength development. Early opportunities for snipping and cutting will lead to smoother cutting and better manipulation of the paper with practise. Folding those paper planes and flying them, kids will learn that more accurate folds make better planes and should practise these fine motor skills. Rolling, tearing and scrunching paper are so important for bilateral coordination and fine motor development. At home, provide lots of craft materials for your kids to create, experiment and learn! You may not be "crafty" yourself or even like the finished product that your child produces (lets be honest here)... but it is not actually always about the finished product. Allow your child to work through the process. Need some ideas? Check out my "homemade arts of craft section". Each craft here is designed to be done by kids (with minimal help from adults). 2. Teachers PLEASE don't sharpen pencils for your kids! I'm sure this is a time saving thing, but teachers why not provide ordinary pencil sharpeners in the classroom?! They don't even make a mess as they have little containers to catch the shavings. I don't mean to be patronizing but I would love to see more pencil sharpeners in preschool classrooms especially. What an easy natural way to work on bilateral coordination and fine motor manipulation. So much of the "turning" action when sharpening a pencil is made by the thumb and index working together. What a perfect "pre-writing" activity! If your child is using their whole hand to turn the pencil, encourage them to do this with the thumb and index finger - it may take practise! As OTs we come up with exciting and creative ways to work on these skills, however such a simple thing as sharpening pencils regularly will help your kids to develop these skills! I may be including "pencil sharpening" as homework this year for my OT kids! Make sure you encourage your child to do this at home too! You will be surprised with how quickly your child might say "my hand is tired" as they are not used to using these muscles. 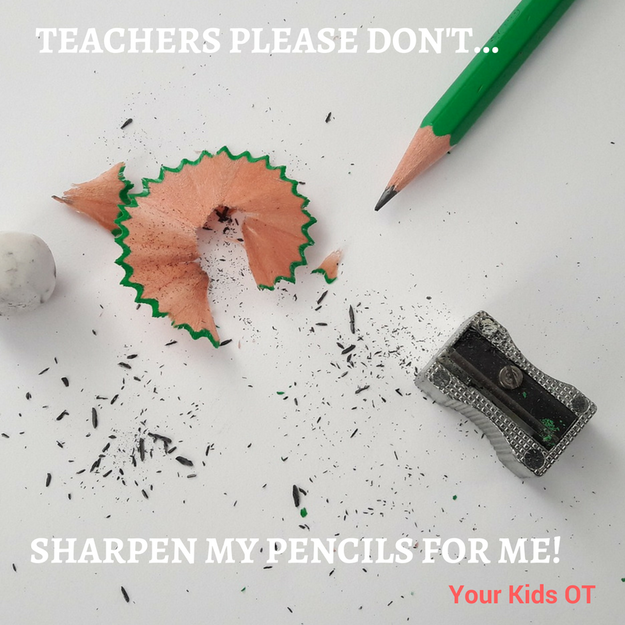
3. Teachers please don't expect good handwriting if your child is sitting in a plastic garden chair!
It has been a few years now since I worked in a school where the standard chair for students was a cheap plastic garden chair with arms rests. These chairs were horrible for posture at a desk. The arm rests did not allow the chair to go under the tables, the child was either sitting back in a slouched position or sitting right on the edge at the front of the chair so they could rest their arms on the table. The chairs easily tipped and were difficult to move in and out of the table. Other schools may not be as bad with the chairs provided, however I do want to remind you that posture is important. Children should be able to comfortably place both feet on the ground and the table should be slightly higher than their bent elbows without elevating their shoulders. Children should also have enough space so they are not "on top of" the child sitting next to them. Check your tables and chairs at home too! Check where your child may be doing any "table top" work. The dining table may be a great option but often kids have their legs dangling and their arms are uncomfortable as shoulders are elevated so that they can reach. Small children may work better at a coffee table whilst sitting on an ottoman or cushion. You may want to invest in an adjustable table and chair that grow with your child. You will find out the importance of posture and gross motor skills in "THE HANDWRITING BOOK" which is currently being launched! Apply the launch week discount code: HANDWRITINGHELP1 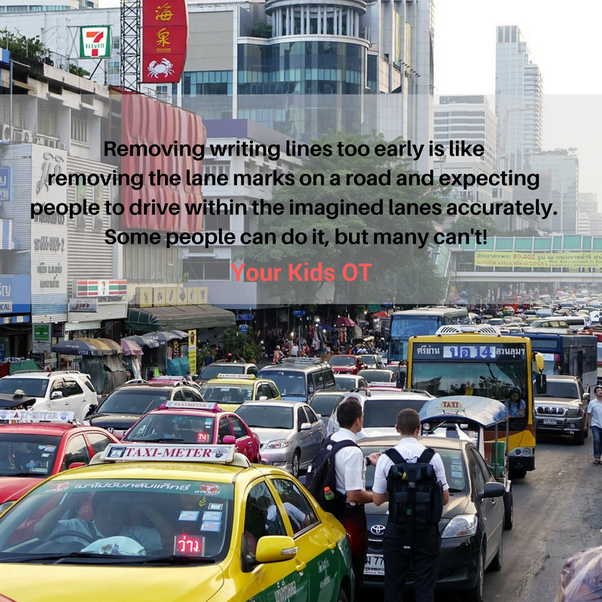
4. Teachers please don't take away writing lines too early!
Removing writing lines too early is like removing the lane marks on a road and expecting people to drive within the imagined lanes accurately. Some people can do it, but many can't! (OK - A slight exaggeration but you get the picture!) Writing on lines provides children with a visual guide as to how to position letters. They can work out the size of letters and how they are positioned in relation to each other within a word and a sentence. When you remove the lines, kids need to be able to visualize how tall letters need to be and even how to write in a straight "line". Yes they need to know how to visualize this themselves - but at what age? Often when I see children in year 1 or 2 or even older who have handwriting legibility difficulties, I need to give them the "lines" back to help with the visual spatial and organisational skills. I use my "earth paper" to provide a strong visual guide and then we work back to needing less lines. You could also use grid paper to help with organisation and spacing. 5. Teachers please don't punish kids by making them sit still or keeping by them in from recess or lunch. Research shows that kids need opportunities for movement, exercise and fresh air. The American Academy of Pediatrics (2012) make the following recommendations about the need for recess.
In conclusion the AAP state "recess should be considered a child’s personal time, and it should not be withheld for academic or punitive reasons". Any teachers, OTs or parents guilty of some of these things? I love working with my "teacher" friends and colleagues! I count many teachers as very good personal friends! Please don't take this article personally. I did have a good chuckle with the teacher I mentioned in my introductory story! She "knows" where I stand with letting kids do the "craft"! Let's go "BACK TO SCHOOL" in 2017 with a fresh look at how we "help" our children with their development and learning! 
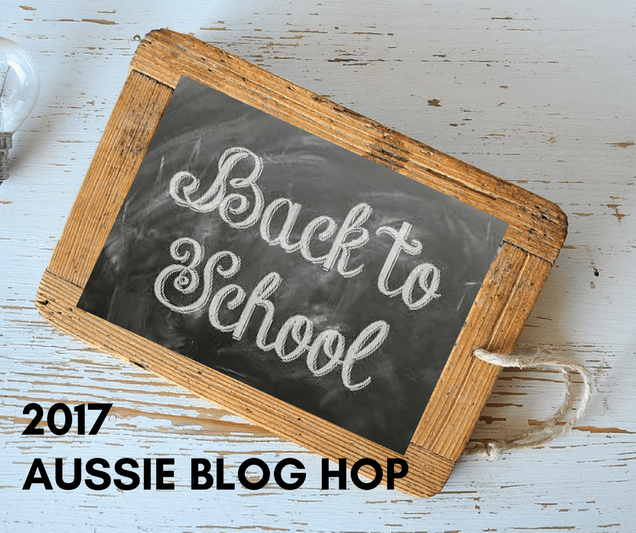
This article is part of the 2017 Aussie Back to School Blog Hop!
Read the "back to school" articles here by some wonderful Australian Bloggers! You will find out how the first time school mums are feeling, tips for special needs parents, great lunch box ideas as well as suggestions for those who don't like crunch and sip! Teachers Please Don’t! | Your Kids OT Advice For First Time School Mums From Seasoned Mums and Teachers | The Multitasking Woman 10 simple ways to make school lunches more fun | Kidgredients Teacher Types Top Tips for Going Back to School | Teacher Types Maintaining a Play Filled Routine throughout the School Term | Kids Play Space 5 Must Have Items for Starting Day Care | My Bored Toddler Handling Crunch and Sip with Fussy Kids | Play With Food How to share your child’s special needs with their new teacher | My Home Truths 16 things the school holidays have taught me | Eenie Meenie Miney Mum The Most Important Skills Your Child Needs for School | The Happy Me Shop 101 Sandwich Filling Ideas for Kids | Create Bake Make
Reference:
The Crucial Role of Recess in School. (2012). Pediatrics, 131(1), 183-188. doi:10.1542/peds.2012-2993 
APPLY THE LAUNCH WEEK DISCOUNT CODE: HANDWRITINGHELP1
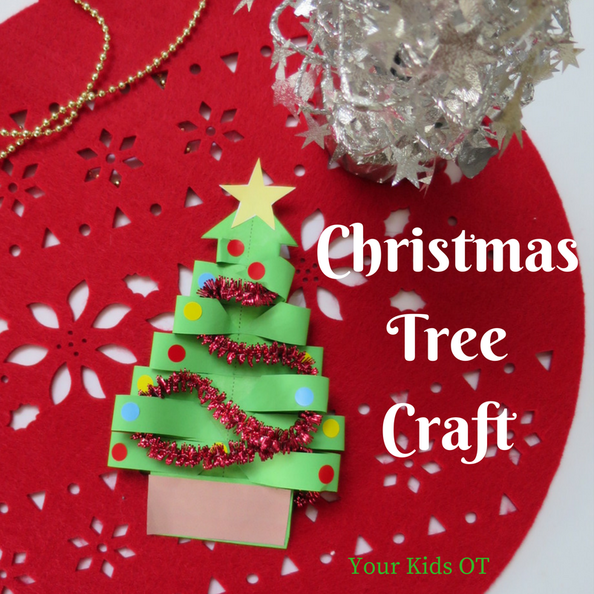
One month until Christmas and it is time to put up the decorations!
Only a few more OT sessions before we stop for the year! Are you in Christmas-mode yet? My facebook news feed has started to have more and more options to celebrate this festive season! Recently, I came across this "DIY PAPER CHRISTMAS TREE" idea by Krokotak! I thought it was wonderful but wanted to make it a little more structured for my kids who find it difficult to cut without a line to follow. This little craft will work on a number of skills whilst having fun! There will be scissor skills, fine motor manipulation, left and right bilateral coordination skills as well as planning and sequencing skills! 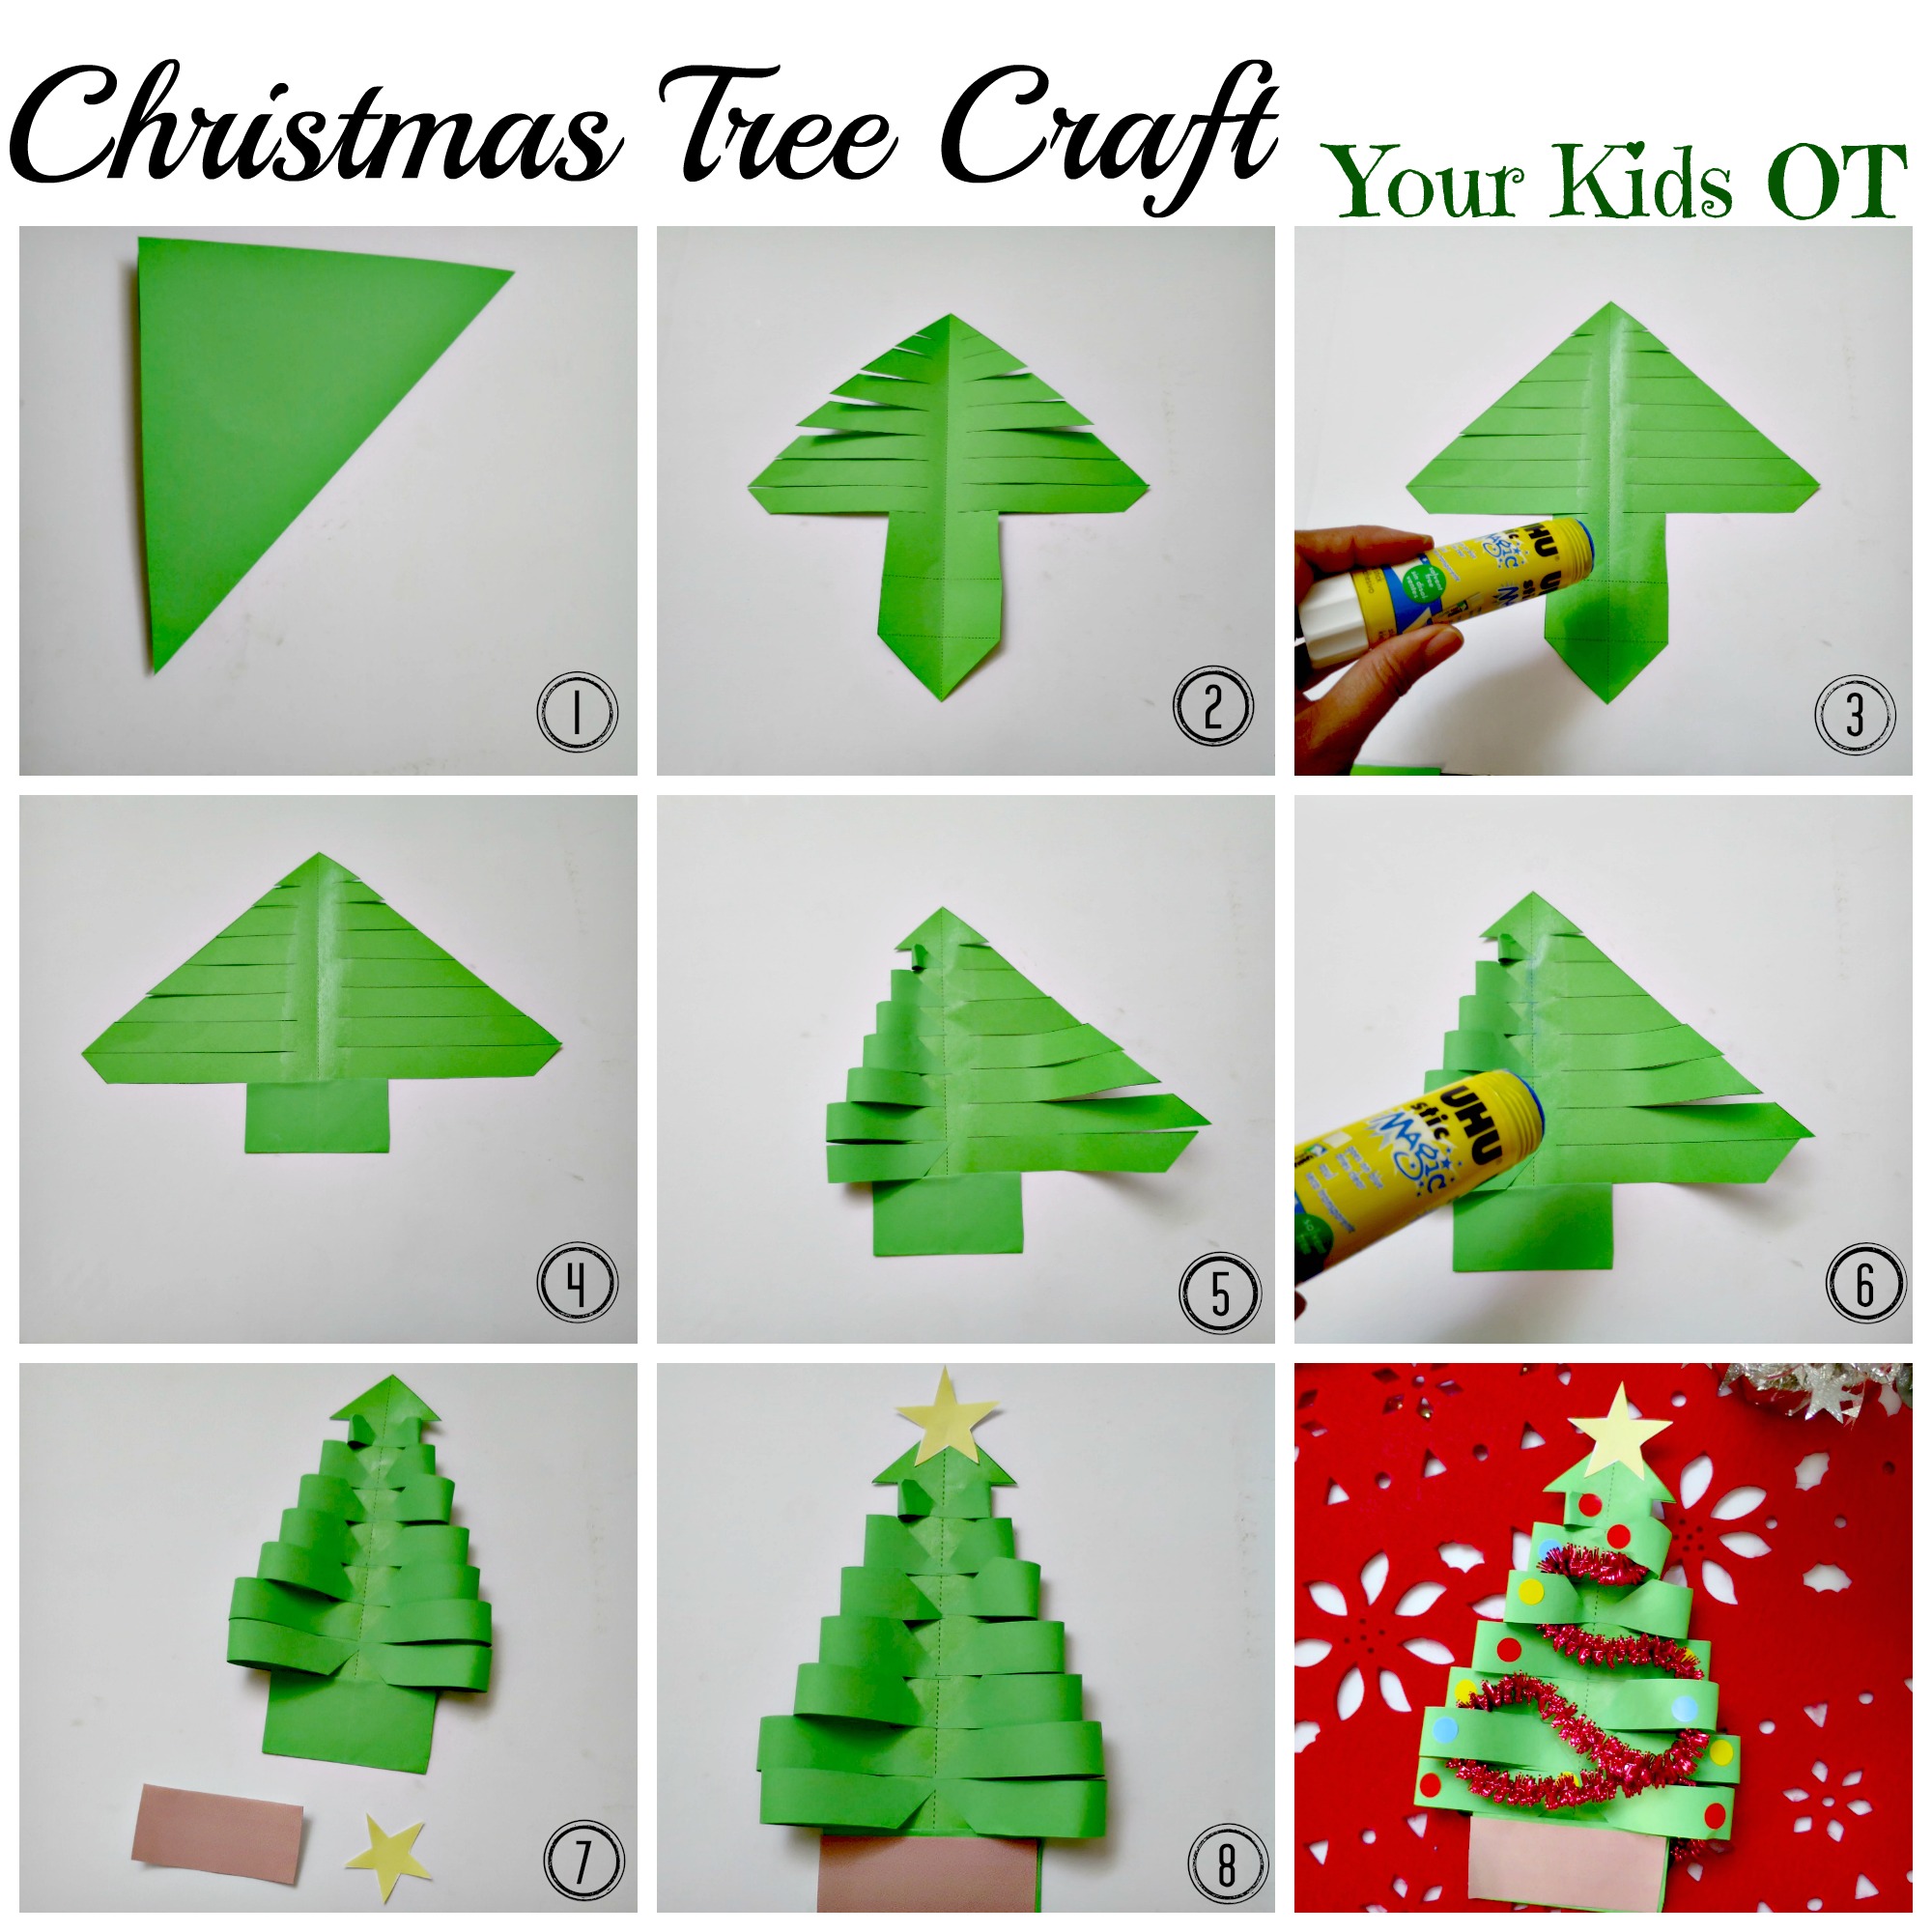
What you will need:
Instructions:
This is an adorable tree that you could hang up in the classroom. You could also add a string to hang it is an ornament on your real Christmas tree! Don't forget to print out theFREE template so you can start creating this tree with your kids! I would love to see your creations if you try this at home. Tag @yourkidsot on Instagram or Facebook! I can't wait to see your trees! 
You may also like:
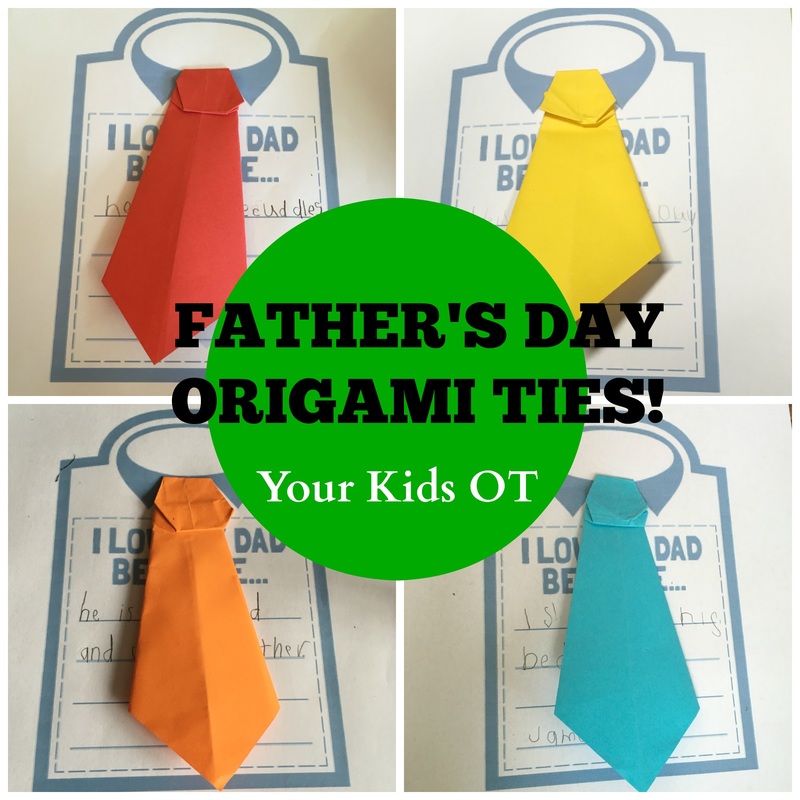
It is almost Father's Day here in Australia! We have been making origami ties and combining it with sentence writing in OT this week!
I love using origami in OT sessions as we can work on a range of skills including fine motor manipulation, bilateral coordination, sequencing steps, organisation and planning. It can be really difficult for those who have never done paper folding and do not understand how to get the edge to meet with another edge. I always suggest to parents to make paper planes at home! This is the easiest and fun way to practise paper folding skills! You can find some step-by-step paper plane instructions HERE. With something a little more complicated like this tie, I model each step for the kids to do and help them to line up the paper. I found this writing prompt "I love my dad because" from Beauty and Bedlam. I resized the original printable so that I could place it on one A4 page and have large lines for writing. You could also make it smaller and turn it into a card for Father's day. WHAT KIDS SAY! It is always amusing to read what kids write about their family! Here are some of the responses that the kids have written this week... I love my dad because he cuddles me. (Andrew, 6 yrs) I love my dad because he is my dad and we play together. (Michael, 7 yrs) I love my dad because I sleep in his bed. (James, 5 yrs) I love my dad because we play basketball together. (Will, 6 yrs) I love my dad because we build things together. (Will, 10 yrs) I love my dad because he is a little bit nice. (Benjamin, 5 yrs) I love my dad because he helps me not to get in trouble with mum. (Finn, 6 yrs) I love my dad because he looks after me. (Oliver, 5 yrs). 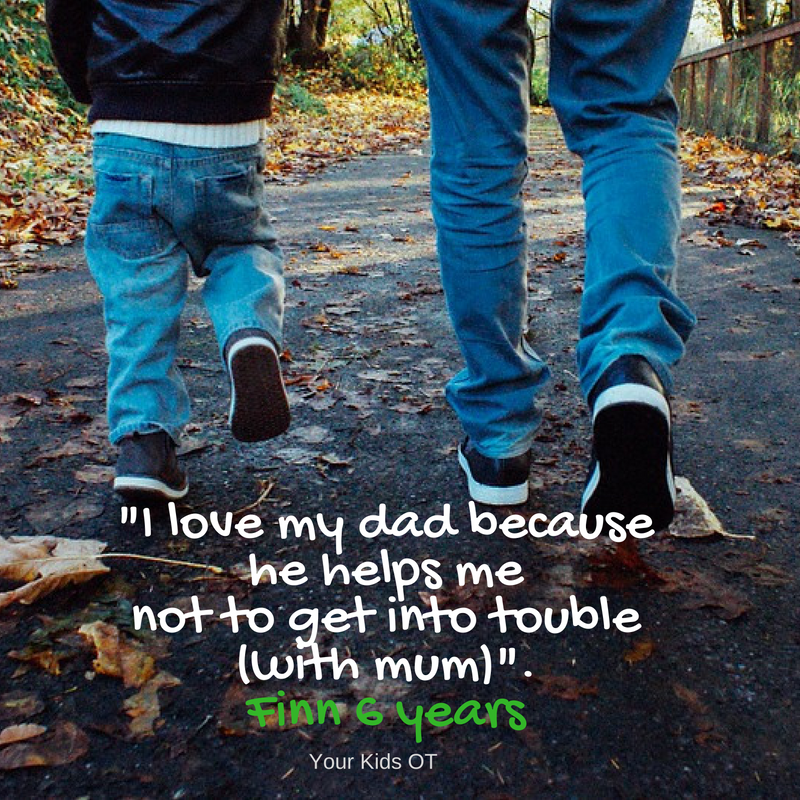
Wishing any fathers reading this a very Happy Father's Day!

You may also like:
|
AuthorHi, I'm Cindy and I am an Occupational Therapist. I enjoy working creatively with children to see them reach their potential. Read more about me here. 
SEARCH THIS SITE

Archives
June 2024
Categories
All
Popular Posts

 |


 RSS Feed
%22%20%3A%20Your%20Kids%20OT)
Join the YKOT e-newsletter!
Subscribe to get our latest content by email and receive
the SHAPE ROADS PRINTABLE NOW!

Success! Now check your email to confirm your subscription and receive your free printable!
Join our Mailing List!
Subscribe to get our latest content by email and receive
the SHAPE ROADS PRINTABLE NOW as a thankyou!
Success! Now check your email to confirm your subscription and receive your free printable!
Disclaimer: The information on this site is general in nature and should be used for educational and entertainment purposes. The activities are safe for most children, however, you should consult an Occupational Therapist or health professional to address specific movement, sensory or other medical conditions. This blog does not replace formal therapeutic professional advice given by a health professional or medical practitioner. Reviews and endorsements of products will only be made based on my expertise and personal opinion; and deemed worthy of such endorsement. The opinions shared in sponsored content will always be my own and not that of the advertising company or brand. Content, advertising space or posts will be clearly identified if paid, affiliated or sponsored. Affiliate links may be found throughout this website in advertising. This means that if you follow through with a purchase from these links, Your Kids OT will receive a percentage of the sale. Your Kids OT undertakes to meet the requirements of the "Social Media Policy" as published by Australian Health Practitioner Regulation Agency (AHPRA). Further information about this policy can be found here.
Find meFollow me |

|
About me
AuthorHi, I'm Cindy and I am an Occupational Therapist. I enjoy working creatively with children to see them reach their potential. Read more about me here. 
|
Copyright © 2017 Your Kid OT