
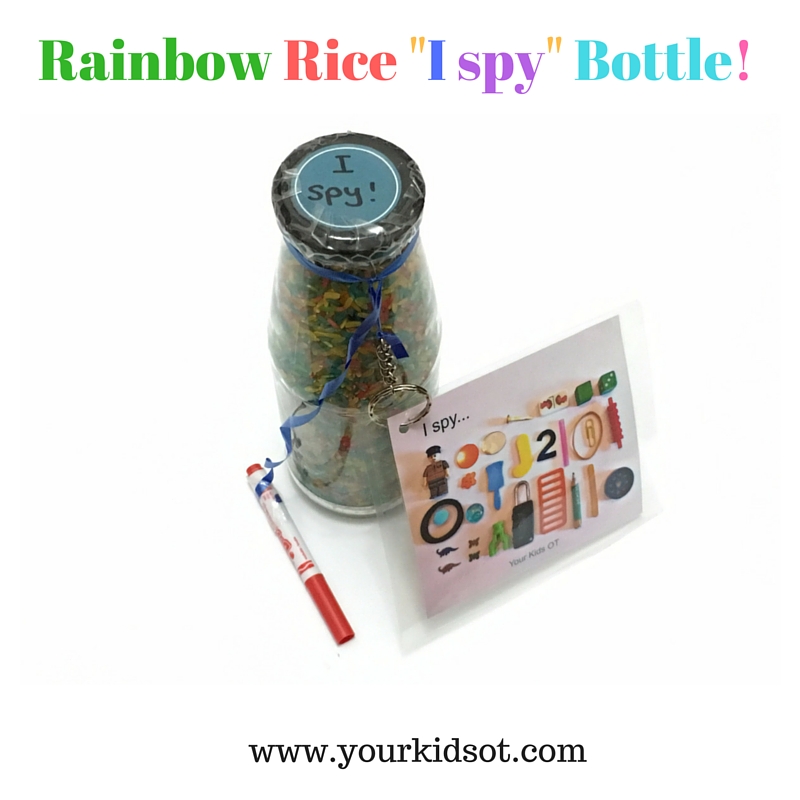
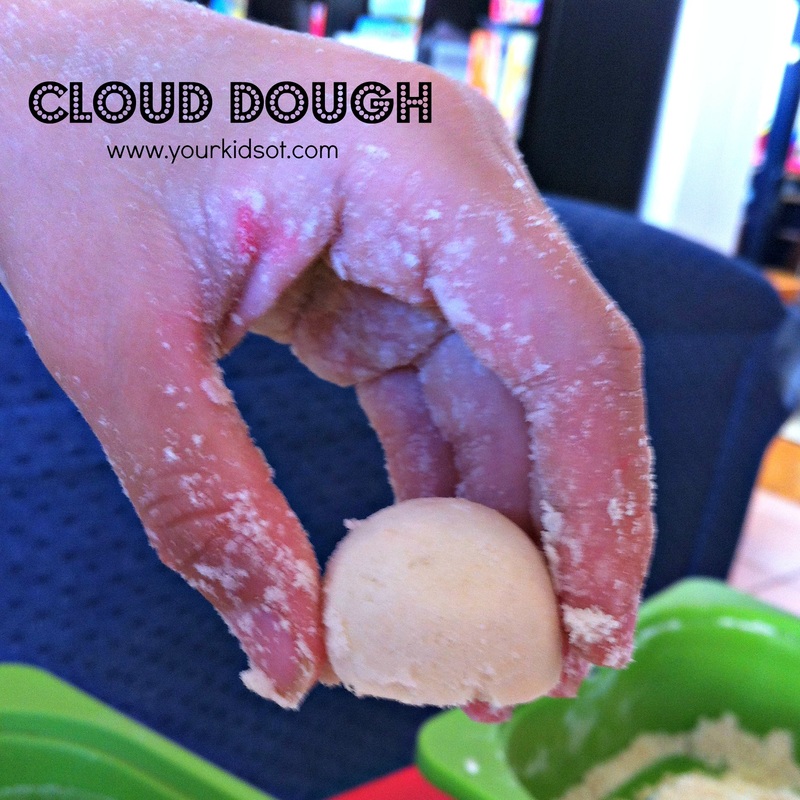
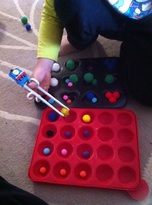
Rainbow "coloured" rice is a great addition to a "sensory bin"! There are heaps of tutorials on-line to teach you how to colour rice. I used a really simple method ... I added a cup of rice to a plastic container and a few drops of food colouring. I shook the container until all the rice was covered with food colouring, then lay the rice out on baking paper to dry. Our rice took less than 24 hours to dry (drying time will depend on the weather and the amount of food colouring used). You may notice we have a few lentils in our rice mix (already mixed in when we used the rice in a sensory bin). I didn't bother with vinegar or alcohol and did not have a problem with the colour transferring onto our hands. I found that my cheap supermarket food colouring worked better than may gel colours as this was more "blobby".
Combining our coloured rice with some small items, we made a beautiful "I spy" bottle! I took a photo of our treasures and laminated a print out before Mr 6 enjoyed pouring the rice into a funnel and hiding the treasures. Once filled, I sealed the lid and attached the laminated page with a dry-erase marker. Super-easy craft! Watch our fun video to see how we made the I spy bottle - You Tube Link!
We made this "I spy" bottle to use as a travel toy. It is a fun way to work on visual memory and visual discrimination skills. I'm looking forward to trying it out with my OT kids this term.
For younger children, you may choose a clear plastic bottle rather than glass. For older kids you could choose very small similar items to place in your bottle ... you can make this really difficult! When we have finished with this bottle, I can pour the contents out into a sensory bin for further play! It will make a great treasure hunt to explore with busy fingers as well. Have you made an "I spy" bottle? What is your favourite thing to hide? 
Cindy is a registered Occupational Therapist practising in Sydney Australia. She has two young children who are a constant source of inspiration and learning. Cindy loves working creatively to help children to reach their potential, finding opportunities in everyday living and making learning fun. Cindy is the author of the Occupational Therapy blog Your Kids OT.
You may also like:


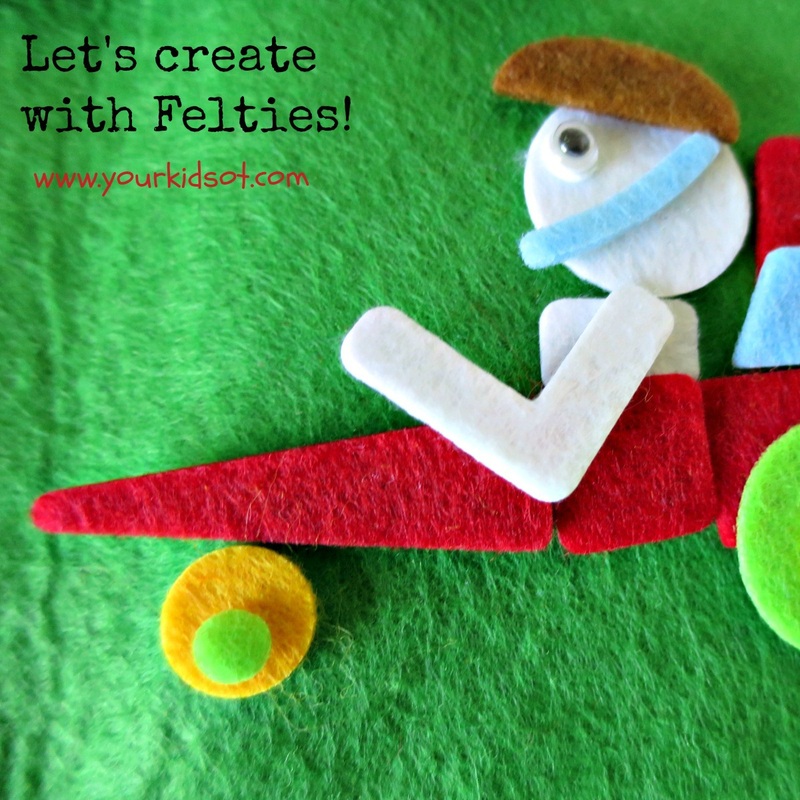
We love paper plane making! Making planes seems to appeal to both boys and girls and wide range of ages. Just take out some paper at a weekend BBQ and you will have the big kids (ie. adults) involved in who can design and create the plane that can fly the furthest!
You may have read my post two years ago about paper planes where I showed you how to make the "acrobatic" plane. Read it HERE if you missed it! Paper plane making is really a wonderful way to work on fine motor manipulation, visual planning and sequencing skills. I use paper planes in therapy sessions to work on these things as well as using it as a writing prompt. You may prompt your kids with "Where is the plane going?", "Who is on the plane?", "What type of plane is this and what does it carry?", "What will the plane need to fly?". "What can the people do on the plane during the flight?" or "What can the pilot see during the flight?" This time I have step by step instructions for you to make TWO more super planes! Find the instructions below and download your FREE COPY of the instructions as aPDF file HERE. I hope these planes bring you and your kids hours of entertainment! Let me know if you try them out! 
The "Flying "W" Plane.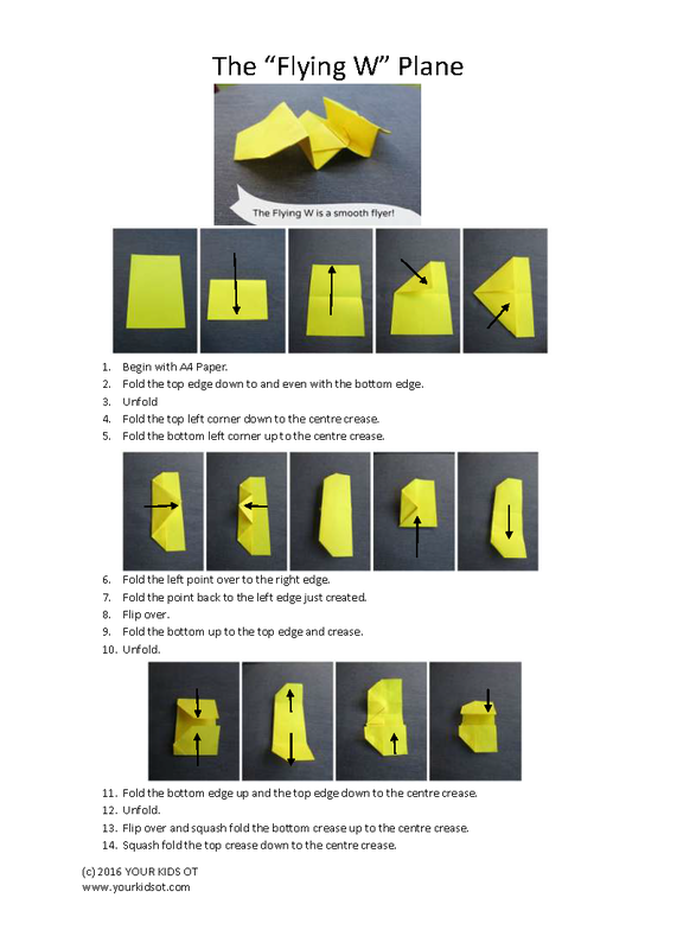

The "Javelin".

You may also like:
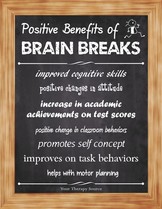
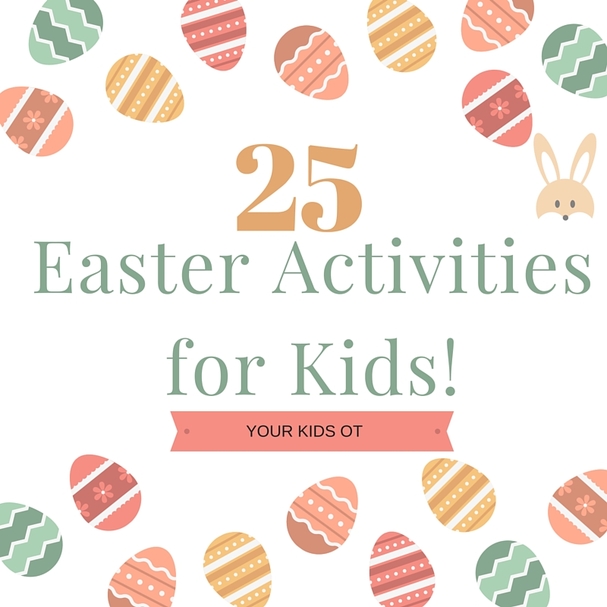 aster activities are super fun to do with your kids! Here is an amazing selection to suit kids of all ages and abilities! GROSS MOTOR GAMES 1.. Lucky Egg Exercise Game by Your Therapy Source. 2. 10 Games to Play with Plastic Easter Eggs by Growing Play. 3. Easter Egg Hunt for Motor Skills by Starfish Therapies. 4. Bunny Hop Gross Motor Game by Tools to Grow. 5. Easter Themed Brain Breaks by Pink Oatmeal NUMBERS AND SIGHT WORDS 6. Egg-cellent Activities by Mrs Wheeler's First Grade 7. Craft Words Family Eggs via BuzzFeed Life VISUAL PERCEPTUAL SKILLS 8. Easter Egg Pattern Copying with FREE Printable by Your Kids OT 9. Easter Bunny Themed I-Spy Game with FREE Printable by And Next Comes L 10. Easter Tot School by Hart 2 Hart. 11. Easter Spot the Difference by Activity Village UK (free printables) 12. Teaching Symmetry to Kindergarten Kids by Hub Pages 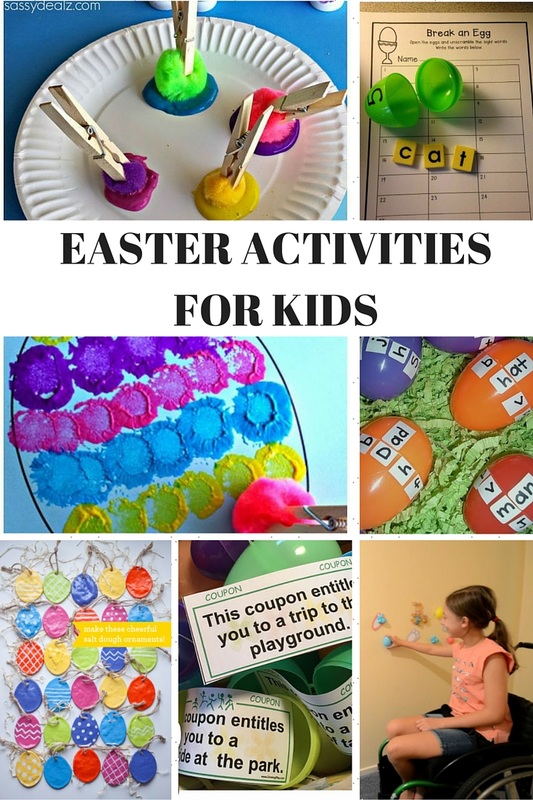 CRAFT 13. Sensory Craft inspired by the Sydney Royal Easter Show by Your Kids OT 14. Glitter Colouring Easter Eggs by Your Kids OT 15. Easter Egg Dyeing (attempt)! aka Sensory Play by Your Kids OT 16. Pom Pom Painting Easter Egg Craft for Kids by Crafting Morning 17. DIY Salt Dough Eggs by Design Mom 18. Easter Baskets for Kids (paper mache) by Red Ted Art FINE MOTOR and SCISSOR SKILLS ACTIVITIES 19. Spring Time Eggs by Your Therapy Source 20. Easter Pattern Activity by Made by Teachers 21. Lace and Trace Peeps Printable by Our Thrifty Ideas 22. Bunny Tong Scissor Skills Activity by Sugar Aunts 23. Q-Tip Painted Easter Eggs by No Time for Flash Cards FUN REWARDS 24. Easter Basket Coupons by Growing Play. 25. Easter Fun for Kids with Special Needs by Have Wheelchair Will Travel What's your favourite Easter activity?  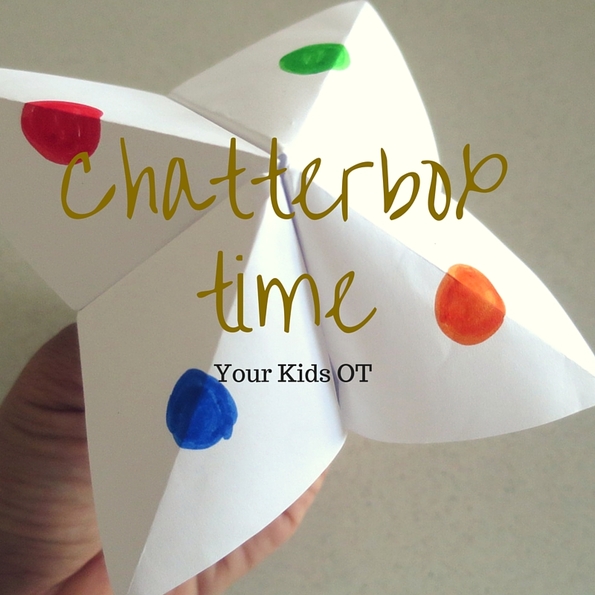

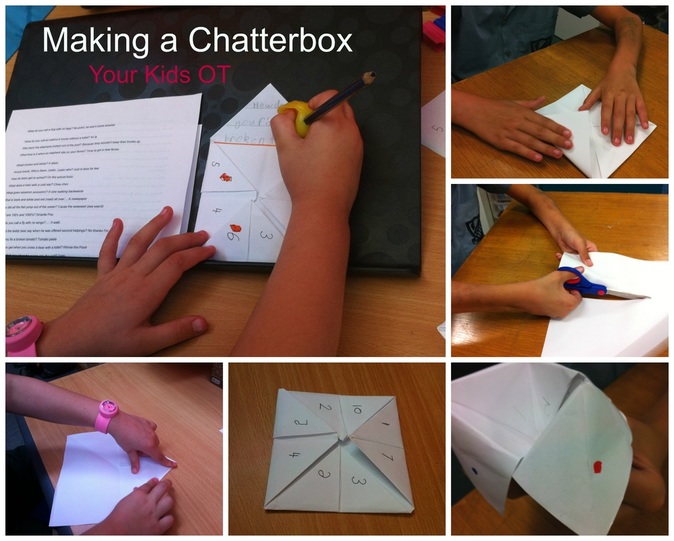
Chatterbox Time! Kids all love to make and play with chatterboxes! I remember making them when I was a child, did you? Last week, I made these with some of the kids I see for therapy and it was the perfect activity to work on a range of skills.
If you haven't made one for a while, this is how you fold your chatterbox. Start with an A4 size piece of paper and make sure you press down each fold neatly. The neater the folding the better the chatterbox will work in the end. 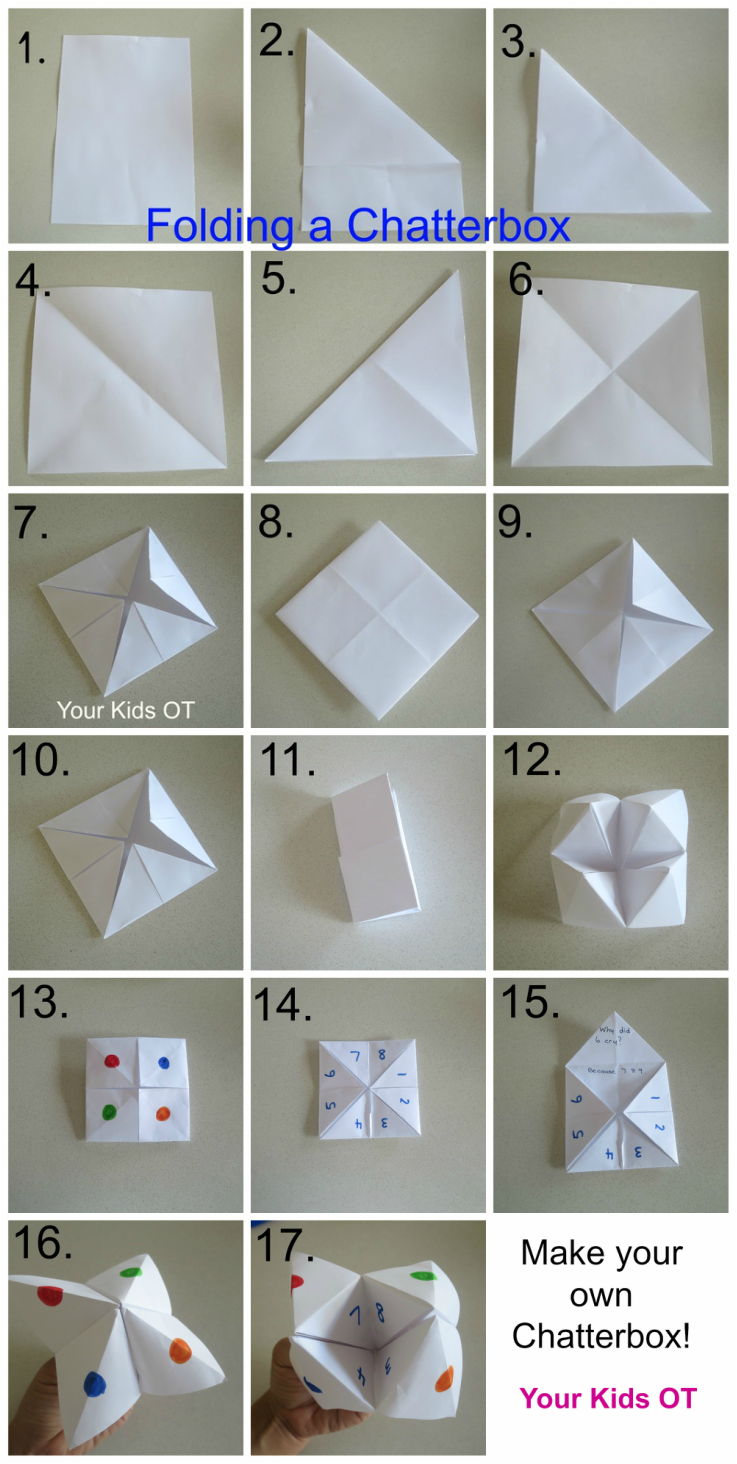

1. Start with an A4 piece of paper. (You could also start with a square piece of paper and skip to step 4.) 2. Fold down one corner so your triangle lines up with the side. 3. Cut off the section under the triangle. 4. Open out your triangle so you can see your square. 5. Fold down another corner creating a triangle. 6. Open out your square so you can see the two folded diagonal lines. 7. Bring each corner into the middle, pressing down on the fold. 8. Flip over your square. 9. Bring each new corner into the middle, pressing down on the fold. 10. Almost there! 11. Fold along the horizontal middle line, open and fold along the vertical middle line, open. (This will held with the movement of the chatterbox when playing.) 12. Put your fingers in the "open square" parts of each quarter. Your chatterbox is now ready to decorate! 13. Add a coloured dot to each square. (We also wrote the colour name for those kids who needed a reference to spell the colours when playing.) 14. Flip over your square and write a number in each triangle section. Try to have odd/even numbers to help later with playing. 15. Open out each double triangle to write a question/joke. Write the answer in the bottom half. (If your child has small legible writing you may be able to fit in a question/joke in each small triangle.) 16 and 17. Ready to play. Use your thumb and index fingers on both hands to open and close the chatterbox. We had a great time making these in OT last week. Here are some of the skills we worked on:
Whilst I had a double-sided page of jokes for the kid's to choose from, these were the clear favourites!
Have you made a chatterbox recently? What's your favourite kids joke? 
You may also like...
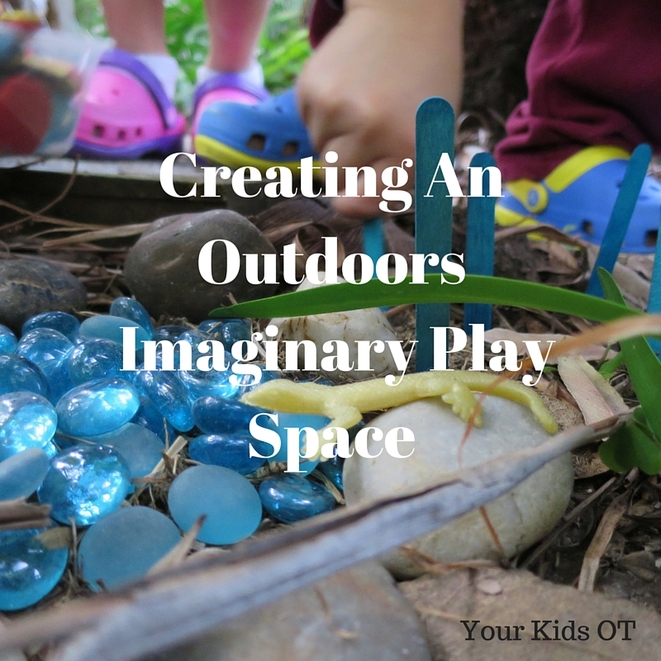

Spring just shouts "send the kids outside to play"! I am always looking for ways to foster imaginative pretend play so we created an imaginary play space in our backyard with a few items we found around our house and yard.
Whilst there is a place for construction play (eg. blocks, lego, etc), fine motor activities (eg. craft, beads, eye droppers, etc), gross motor activities (eg. skipping, hopping, jumping, etc), sensory play (eg. playdough, slime, water beads), structured games (eg. uno, board games, etc) ... imaginary pretend play is important for a broad range of child development. "Pretend play is strongly linked to language, narrative language, abstract thought, problem solving, logical sequential thought, creation of stories, social competence with peers, understanding a social situation, integration of emotional, social and cognitive skills, and the ability to play with others in the role of a ‘player’." (Karen Stagnitti- Children need to play!) In my words, pretend play is important for school readiness with the development of skills for talking, listening, writing, reading as well as interaction with adults and other children. It provides a safe environment to explore and experiment with ideas and opinions. 

Mr 5 and Miss almost-9 years helped me to create the imaginary play space. We used a section of the garden that is usually not "explored". I placed bricks as stepping stones around the trees and plants, then handed over to the kids to create the space with coloured stones (leftover from this project), chalk, craft sticks and stretchy lizards. Mr 5 also used his digger and spade to do some rearranging of the dirt and leaves.
Once the space was "created", Mr 5 and Miss almost-9 years set about playing in the space. The stretchy lizards became the characters living in their new "homes". There were lots of adventures over several days as they explored, found food, visited each other, played in their ponds, etc. Lizards may not be popular with your kids...you could create homes for fairies, elves, dragons, dinosaurs, snakes or whatever may interest your child. If you don't have a patch of garden you could create a play space using a tray, a large plastic box, an old tyre, some empty garden pots or some old kitchen pans. When Miss almost-9 yrs was younger we created a fairy garden in a tray, birds nests and "soups" collecting things around the garden to make these creations. Sometimes kids need just a little prompting to foster their imagination and play! Do your kids like imaginary play? Have you created imaginary play spaces outdoors? 
Apologies to slow replies to emails and comments. I'm going on vacation tomorrow for two weeks! I will pop up on FB now and again (because I can't help myself)!

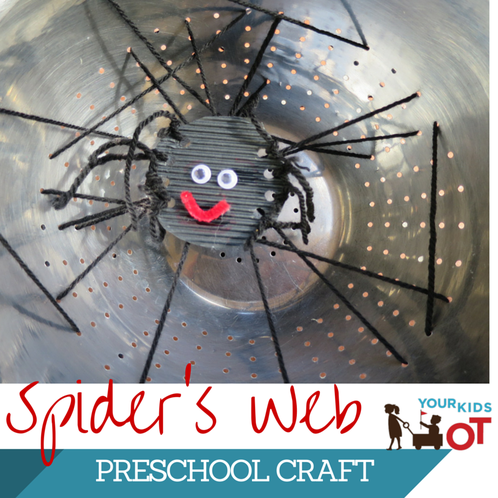

Incy Wincy spider climbed up ...in this case the spider's web... with a few supplies, your preschooler can make their own spider and web!
What do you need?
What do you need to do? For the WEB...
For the SPIDER...
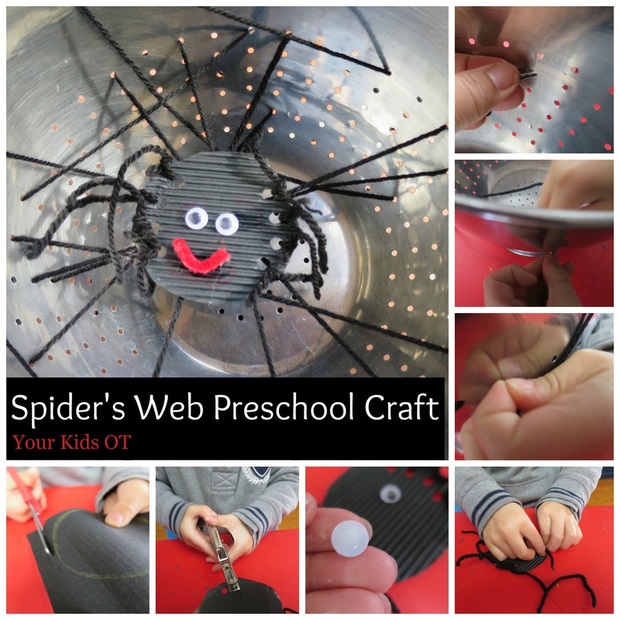

This craft activity is a wonderful way to encourage your preschooler with their fine motor skill development. Involve them in pinching, poking and pulling. Encourage them to use both hands when poking and pulling out the wool. Poking the wool into the colander hole with one hand and pulling out the wool with the other hand is a great way to encourage bilateral coordination. This "Pinch Poke Pull" motion is similar to buttoning up shirts where the button is pinched and poked through a hole with one hand and the other hand pinches the button and pulls it through.
Encourage your preschooler to cut out the circle and punch the holes {the hole punch was a little too hard for my Mr 5}. They can also help to glue the eyes and mouth. Tying the spider's legs is also tricky for little fingers. Mr 5 has been tying up his dressing gown for several months now and we talked about the spider's legs being similar to tying up his dressing gown {only smaller}. This skill is so important when it comes to later learning how to tie shoe laces. You could skip this step completely and sticky tape the legs onto the spider's body if tying the wool is too difficult. 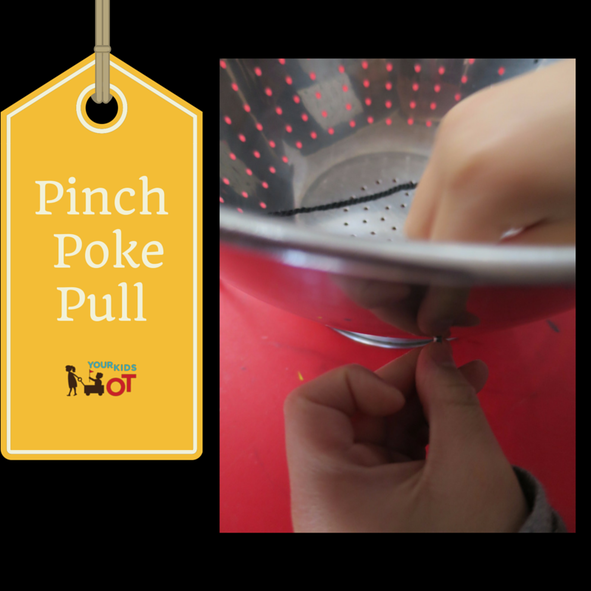

This spider's web craft is all about the process and not the final product. You can remove the sticky tape, wind up the wool and store it with the spider to do the threading over again. If you want a craft to keep, you could place some holes in a paper plate for the wool to be threaded through. Stick the spider to it when the web is finished. Do you have a preschooler who might enjoy this spider's web activity? 
You may also like:

Breathing can help children {and adults} to regulate their bodies. Breath may affect posture and and behaviour will always be exhibited when a child has difficulty breathing. Some children benefit from quiet, resistive suck and blow activities such as blowing bubbles in slime, sucking up soup through a straw and blowing balloons. Some children benefit from easy-to-blow big noise toys. Other children benefit from oral motor toys which encourage breath to be graded such as a harmonica.**
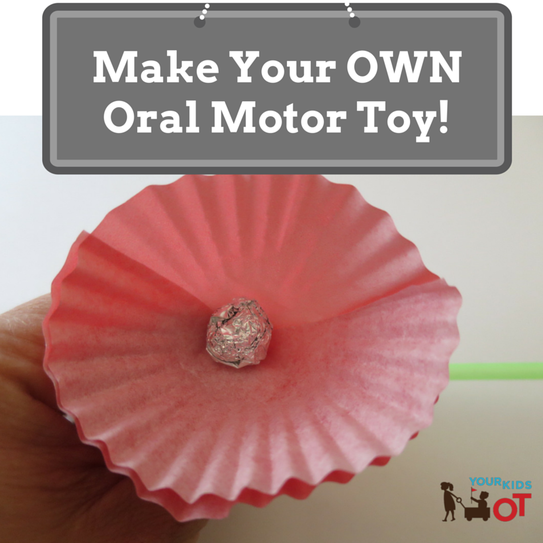
My favourite oral-motor toy are these animal eye-poppers you see below. Children need to grade their breath so that the eye balls hover just above the eye sockets. This appeals on so many levels to kids {and big kids too}! 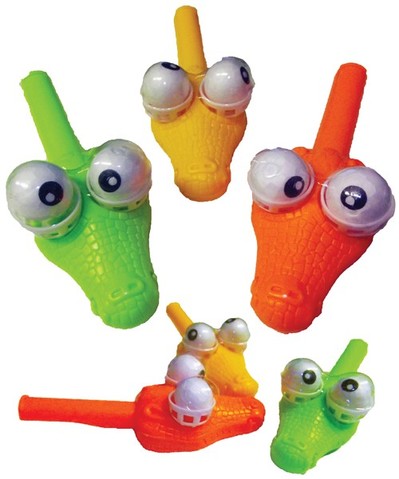
Animal Eye Poppers available from Sensory Tools
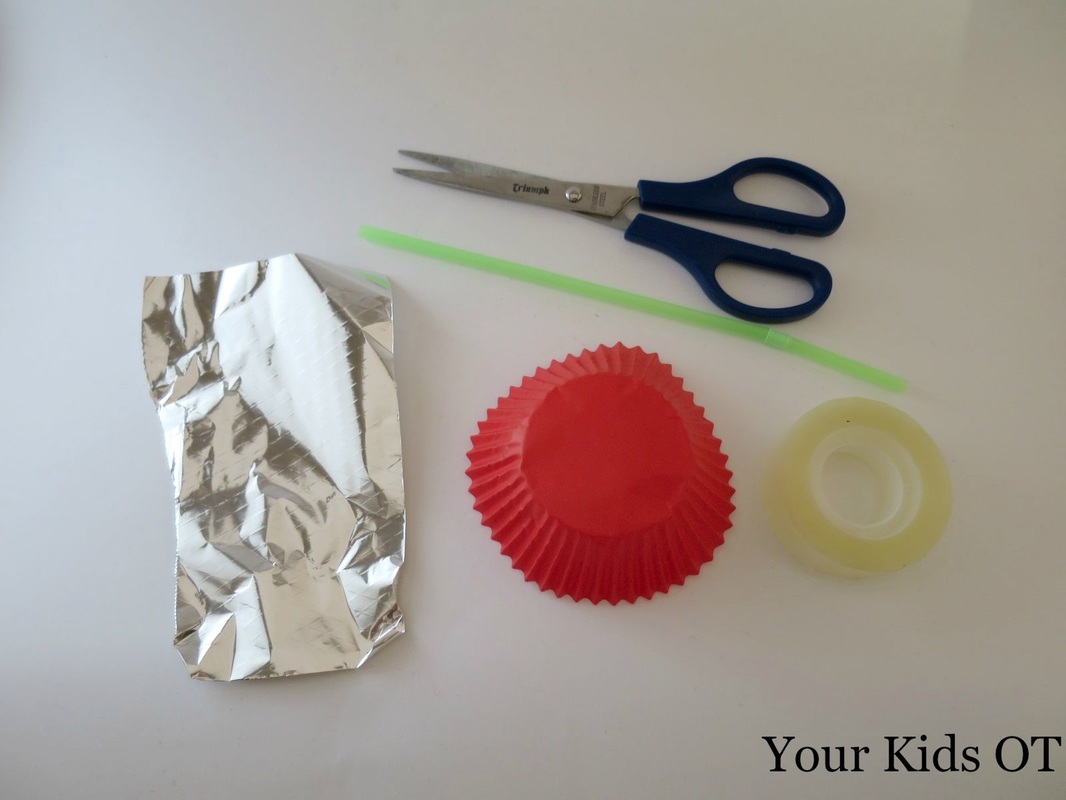
The dilemma as a therapist is not being able to use oral motor toys easily between children. Obviously there are hygiene considerations! It is too expensive to buy one for each child I see. When I saw the idea to make your own oral motor toy on Pinterest, I couldn't wait to make it with my OT kids! I have made a few adjustments to the original instructions to encourage some fine motor and visual motor skills in making the toy.
What do you need to do?
1. Cut the small section of the bendy straw in half. 2. Cut the "cut off" piece of straw in half. 3. Place the two small pieces of straw on the foil. 4. Scrunch up the foil, covering the straw pieces, into a small ball. {The small pieces of straw add volume, however keep the ball light}. 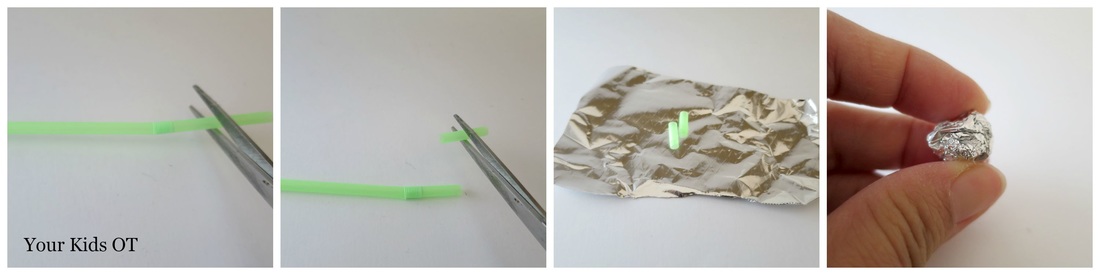
5. Fold the patty pan in half and press down the fold.
6. Fold the patty pan in half again and press down the fold. 7. Open up the patty pan and cut along one fold stopping at the centre. 8. Make a funnel shape with your patty pan and secure with sticky tape. 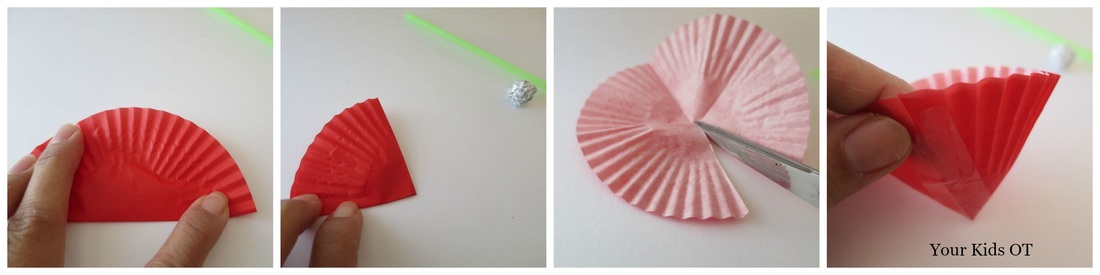
9. Make a small cut a the bottom of the funnel shape (enough for the straw to poke through). 10. Place the small section of the straw through the hole in the patty pan. Try to have a minimal amount of straw poking through. 11. Secure the straw with sticky tape. 12. Stretch out the "bendy" section of the straw and you are ready to blow! 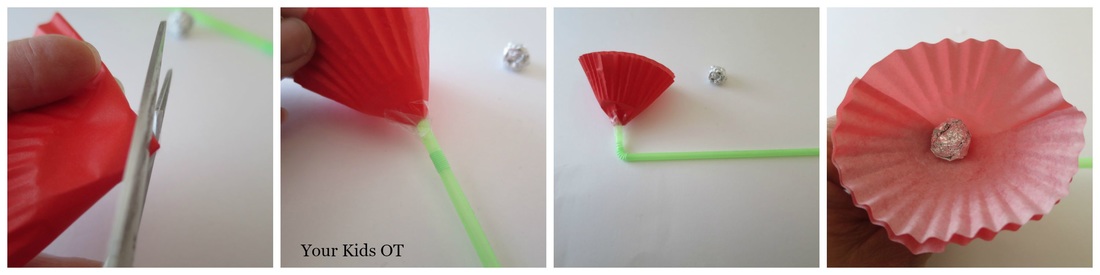
I have been doing this activity with my 1st and 2nd graders at school. I bring the supplies in a small zip lock bag and encourage them to follow the steps. Most of them have needed help with creating the funnel and securing the straw. They have all enjoyed blowing into the straw attempting to grade their breath to keep the ball floating. It takes practise! Mr L shows you in this video how it is done! {If you are reading this in an email, you may need to press the title of this article and view it in an online browser} We can use respiration as a tool to regulate our heart rate and to support attention and focus.** This oral motor toy encourages an aligned postural position to facilitate controlled breathing. As children attempt to float the ball above the straw, their breath is graded and controlled. 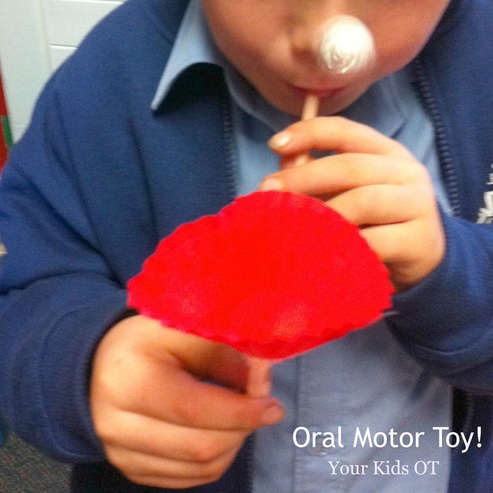

Click to set custom HTML
What is your favourite oral motor toy? Have you made one? 
Note: This article does NOT contain affiliate links. All opinions expressed about products in this article are my own. I have not received any remuneration for this article.
** Gen Jereb's "The Traffic Jam in My Brain" presented 10th April, 2015.
You may also like:
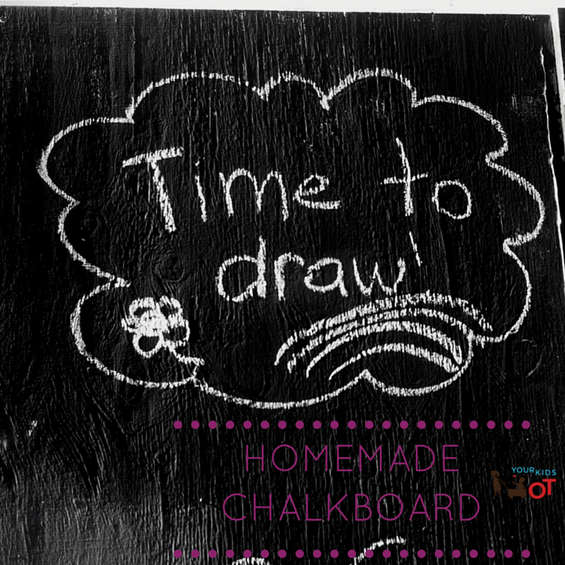 The recent wild rainy weather gave us an unexpected opportunity. On the down side, we had a part of our garage come away from the wall {with a panic to get it fixed before the rain continued to bucket}. On the up side, we had a piece of timber replaced and sealed with an opportunity to create our very own outdoor chalkboard! I've seen so many cute variations of an outdoor chalkboard on Pinterest and became excited that we could do this too! I believe we had a piece of plywood attached and sealed to the garage {so my builder tells me} that would withstand future wild weather. The position was at the back of our garage right next to an attempt at a vege patch. Not a lot of room for the kids to stand, however it was enough. If I had chosen where the hole in my garage was, I would have preferred it to be horizontal and within arm's reach for the kids...but alas I couldn't dictate that one. A chair to reach the high parts would have to suffice. The kids and I painted the board with a primer {Dulux} and two coats of chalkboard paint {White Knight}, allowing it to dry in between each coat. I was actually a little surprised at how expensive these paints were so don't expect a cheap project here. We had quite a large surface to cover {about the size of two full size doors}. The final board is so much bigger than any easel we have owned and allows multiple children to draw simultaneously! I added some clear 3M hooks to either side of the chalkboard, then hung small buckets for chalk and a duster. So cute {says me anyway}! 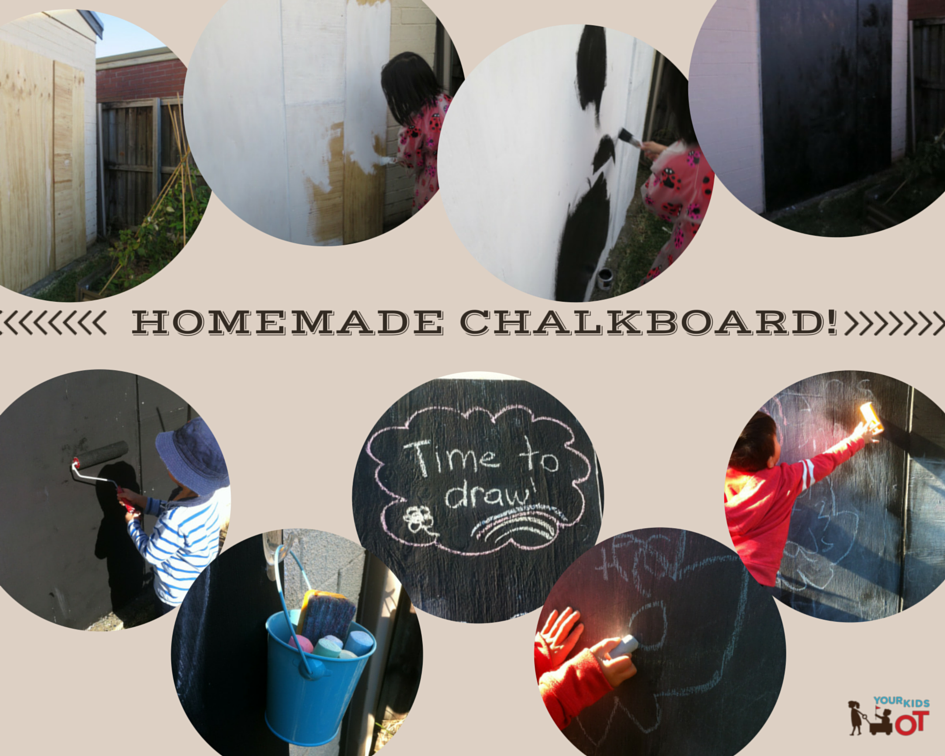 This chalkboard has been a great activity for the kids to do on their own or with friends who come to visit. Mr almost-5 years is showing an interest in letters and drawing simple pictures. At times I will encourage him to use a "tripod" grasp with the large chalk. Drawing is such a great way for kids to develop visual motor planning and fine motor skills. It allows children to experiment with spatial awareness, developing the awareness that shapes can be recognisable when drawn a specific way. Pictures and letters can be recognised when lines and shapes are placed in certain positions. Rubbing the board out has probably as many benefits as actually drawing on the board. Using the eraser is a great whole body movement encouraging "heavy work" and feedback to the muscles and joints. Working on a vertical surface also helps to stabilise the shoulder girdle and promotes wrist extension, which are important when preparing for handwriting. This has been a great project that was simple to create. We have some chalkboard paint left over and I'm thinking what other surfaces I can paint! Do you have a place for an outdoor chalkboard? Do your kids like drawing?  Have you been following Your Kids OT on Facebook and Pinterest? I share lots of great ideas, real-life stories and photos! Find Your Kids OT on Facebook and Pinterest. Here are some of the recent things I have been sharing...

This mother's day I am so thankful for my two cheeky children and my own mother. I'm thankful for a loving family and the opportunity to be together. I think of those who are experiencing pain and sorrow this mother's day and wish there was a way to ease this pain.
Being a mother has taught me so much. It has also helped me to be a better occupational therapist (I hope). Being a mum has taught me to be realistic with home programs and homework. I am more realistic about the demands on time for families. I also asked some of my fellow therapy bloggers what motherhood has taught them. Margaret Rice from Your Therapy Source says that being a mom has taught her "understanding how hectic home life can be. Carry over activities have to be easy and part of the routine. Don't judge. Parenting is the hardest job in the world!". Tonya Murdoch Cooley from Therapy Fun Zone says that being a mom has taught her "to not judge a person's situation. Parenting is hard enough, but when you add a child with special needs it just increases the difficulty level, and everyone will be able to handle different amounts of input". Sarah Lyons from OT Potential writes about her thoughts on OT and parenting here. 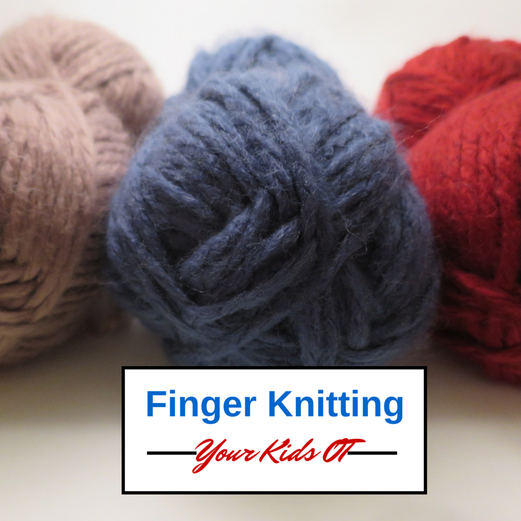

A few weeks ago I went into Miss 8's classroom to help with "finger knitting". It sounded like fun! They learnt from a you tube video and most of them enjoyed it. Finger knitting is quite a complex skill involving bilateral coordination (using both hands in a coordinated way), finger isolation, manual dexterity, hand strength, visual motor planning skills not to mention some patience! Some of the kids did need more help than others to break down the task into individual steps. Overall, the class did a great job and some became experts very quickly.
Miss 8 loved it and decided she would love to knit some scarves for mother's day. I have broken down the steps for you to learn for yourself or teach to your kids! Definitely most suited to kids 8 years and older. Casting On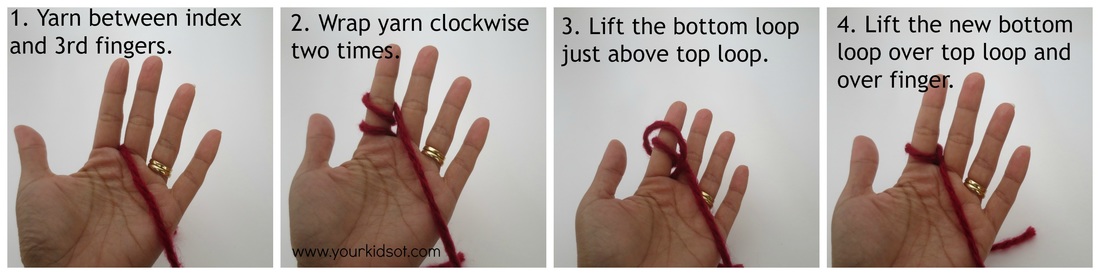
1. Place the yarn between your index finger and 3rd fingers with the short side behind your hand.
2. Wrap the yarn clockwise two times around your index finger. 3. Lift the bottom loop just above the top loop. 4. Lift the new bottom loop over the new top loop, then completely over your index finger. Pull the yarn to tighten the slip knot. Knitting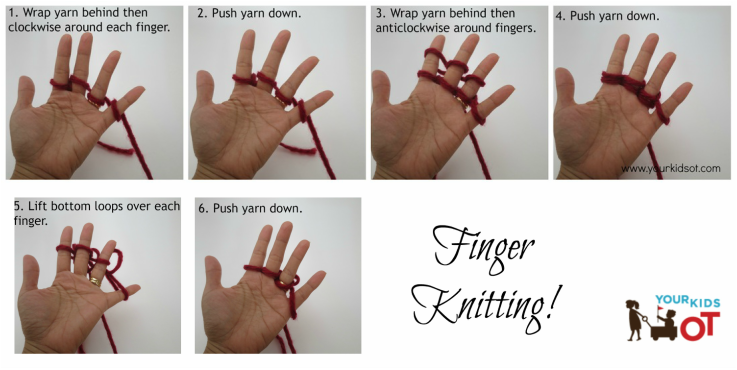
1. Wrap the yarn around the third, fourth and fifth fingers. Start behind the finger and wrap in a clockwise direction around each finger.
2. Push the yarn down. 3. Wrap yarn behind then anitclockwise around 4th, 3rd and 2nd finger. 4. Push the yarn down. 5. Lift the bottom loops over the top loop and over the 2nd, third and fourth fingers. 6. Push the yarn down on each finger. Repeat these steps until you have the length that you want. Casting off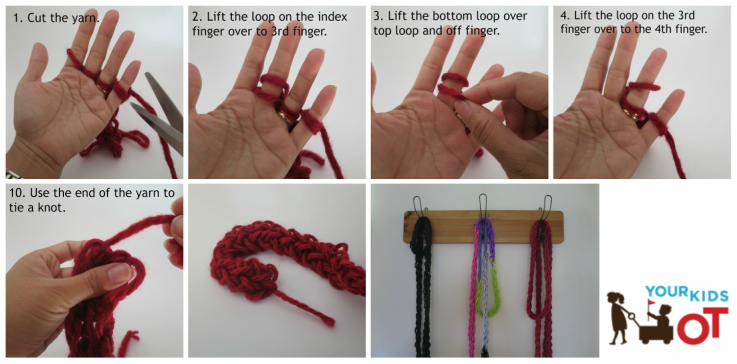
1. Cut the yarn when you have reached the length that you want.
2. Lift the loop on the index finger over to the 3rd finger. 3. Lift the bottom loop over the top loop and off the 3rd finger. 4. Lift the loop on the 3rd finger over to the 4th finger. 5. Lift the bottom loop over the top loop and off the 4th finger. 6. Lift the loop on the 4th finger over to the 5th finger. 7. Lift the bottom loop over the top loop and off the 5th finger. 9. Lift the loop carefully over the 5th finger. 10.Use the end of the yarn to tie a knot through the last loop (that you just lifted off the 5th finger). 11. Pull gently on both ends to tighten the knitting. Knitting sizes will vary according to the size of your fingers. After a few failed attempts at producing a video, I have attached a you tube video produced by Fiber Flux. Click on the title of this email to take you to a live webpage to view the video.
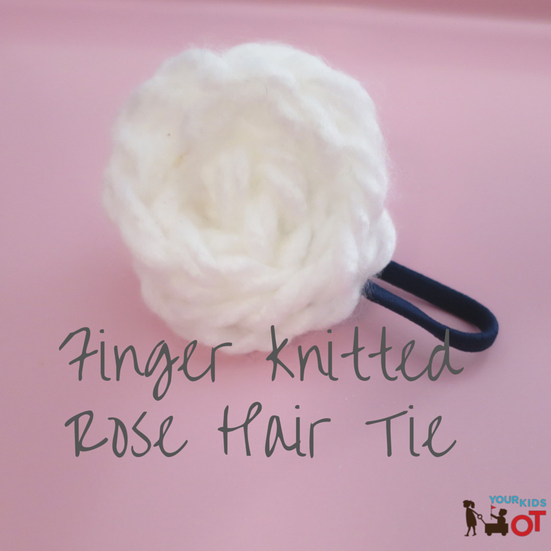
Miss 8 has been industriously making finger knitted scarves for her grandmothers, aunt, me and even her little brother. She also made a variation using just two fingers to knit. We turned these into gorgeous hair ties by wrapping them around and securing the back with a hair tie. You could add a contrasting colour in the centre and secure the centre with more yarn. They would also make gorgeous brooches or head bands.

Finger knitting is not as hard as it looks. You and your children will pick it up within an hour and have knitted an easy scarf. There is just enough time to make some for mother's day!
Have you ever tried finger knitting before? Wishing all the mothers reading this a very Happy Mother's Day! 
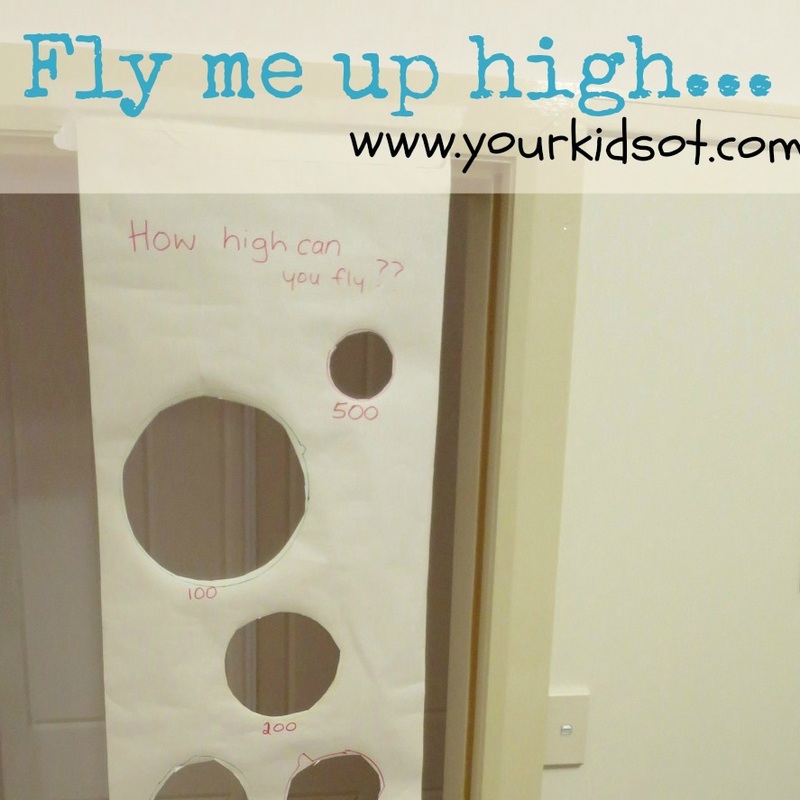
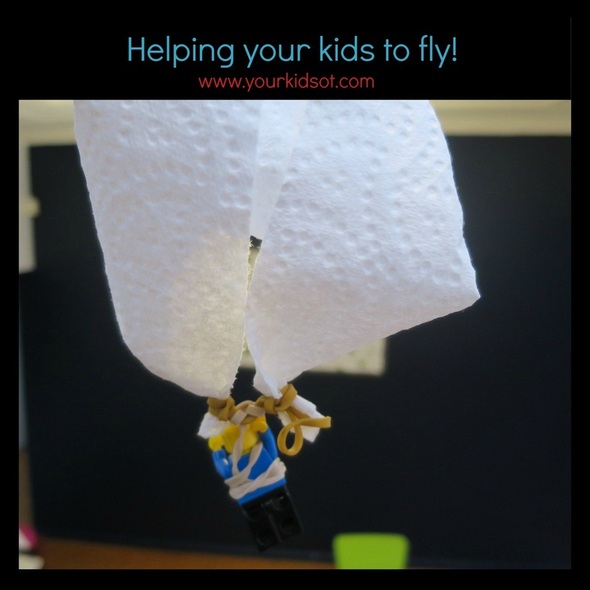  It doesn't pay to give your kids all the answers. Sometimes they need to figure things out on their own... to come up with their own ideas, to manipulate, to problem solve, to try and fail and to try again. Activities like these help your kids to develop skills for life, skills to help them "fly" and "flourish" in so many situations in life. When a child's tower of blocks fall over, helping your child to overcome the frustration can be more difficult that the motor skills needed to build the tower in the first place. When your child can't figure out how puzzle pieces connect together, helping them with strategies {such as finding the side pieces or looking at how pictures can join to make a whole} is more helpful than giving them the answer. When your child can't organise themselves to get ready for school, helping them to question what they need rather than telling them what is missing is more beneficial in the long term. Whilst sending your child off for "free play" to do, play, experiment on their own is important...you can also set up situations where they can apply these skills. Here is a simple activity to set up with your school age child. In our house we call them "challenges" {reminiscent of the Lego Challenges we did last year} but you could call it a science experiment if that has a better ring to it with your kids. The Challenge: Build something that can fly using any or all of these items.
Miss 8 and I experimented with several strategies to help Lego person to fly {essentially building a parachute}. We looked at want could slow down the fall, what makes it fast, what makes it spin, how we could make it lighter, the affect of adding holes, ...etc. We talked about surface area, gravity and air resistance... Mr 4.5 wanted to help too and loved dropping the creations down the stairs. 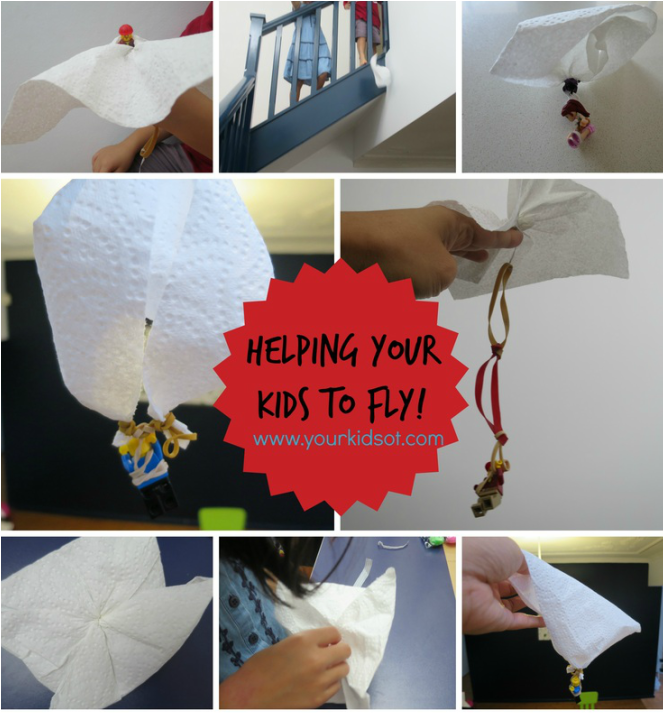  I won't tell you what worked for us as that is not the point! Try this activity with your kids and see what they come up with! I would love to see your creations! Send a photo to [email protected] How do you help your kids to fly?  You may also like...
|
AuthorHi, I'm Cindy and I am an Occupational Therapist. I enjoy working creatively with children to see them reach their potential. Read more about me here. 
SEARCH THIS SITE

Archives
June 2024
Categories
All
Popular Posts

 |


 RSS Feed
Join the YKOT e-newsletter!
Subscribe to get our latest content by email and receive
the SHAPE ROADS PRINTABLE NOW!

Success! Now check your email to confirm your subscription and receive your free printable!
Join our Mailing List!
Subscribe to get our latest content by email and receive
the SHAPE ROADS PRINTABLE NOW as a thankyou!
Success! Now check your email to confirm your subscription and receive your free printable!
Disclaimer: The information on this site is general in nature and should be used for educational and entertainment purposes. The activities are safe for most children, however, you should consult an Occupational Therapist or health professional to address specific movement, sensory or other medical conditions. This blog does not replace formal therapeutic professional advice given by a health professional or medical practitioner. Reviews and endorsements of products will only be made based on my expertise and personal opinion; and deemed worthy of such endorsement. The opinions shared in sponsored content will always be my own and not that of the advertising company or brand. Content, advertising space or posts will be clearly identified if paid, affiliated or sponsored. Affiliate links may be found throughout this website in advertising. This means that if you follow through with a purchase from these links, Your Kids OT will receive a percentage of the sale. Your Kids OT undertakes to meet the requirements of the "Social Media Policy" as published by Australian Health Practitioner Regulation Agency (AHPRA). Further information about this policy can be found here.
Find meFollow me |

|
About me
AuthorHi, I'm Cindy and I am an Occupational Therapist. I enjoy working creatively with children to see them reach their potential. Read more about me here. 
|
Copyright © 2017 Your Kid OT