
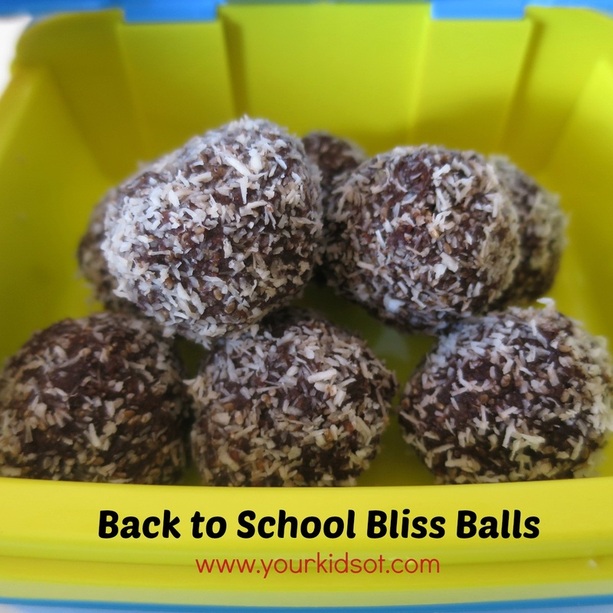
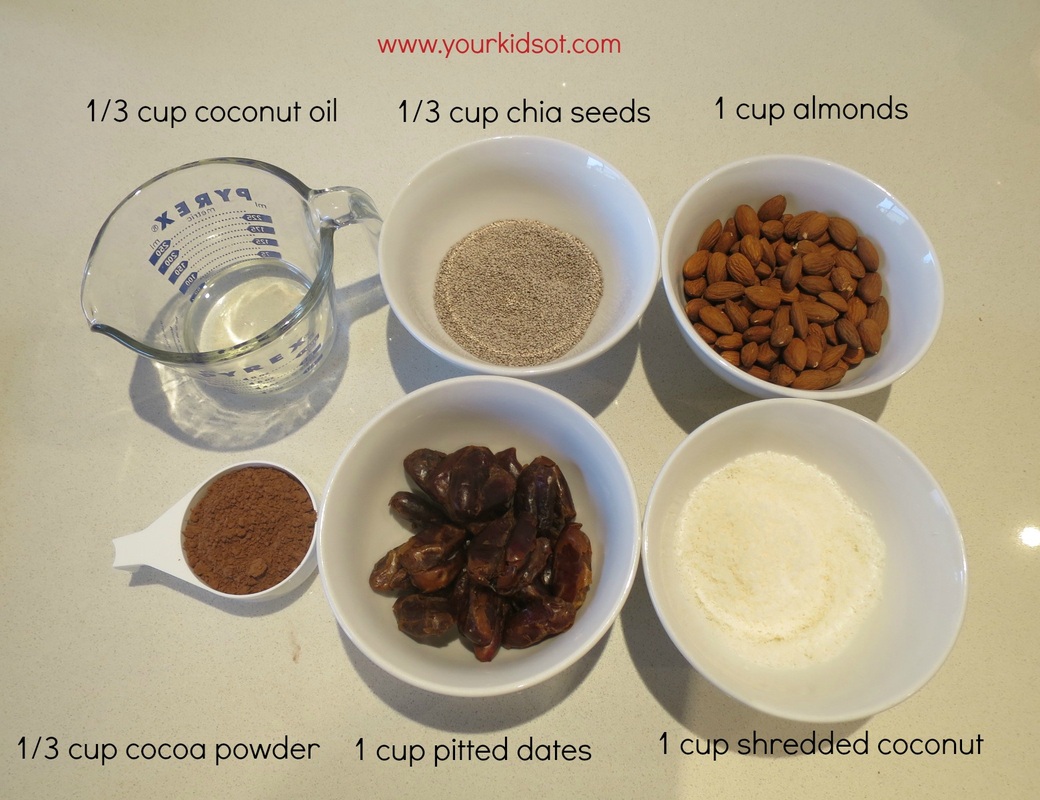
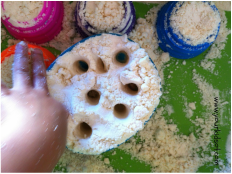
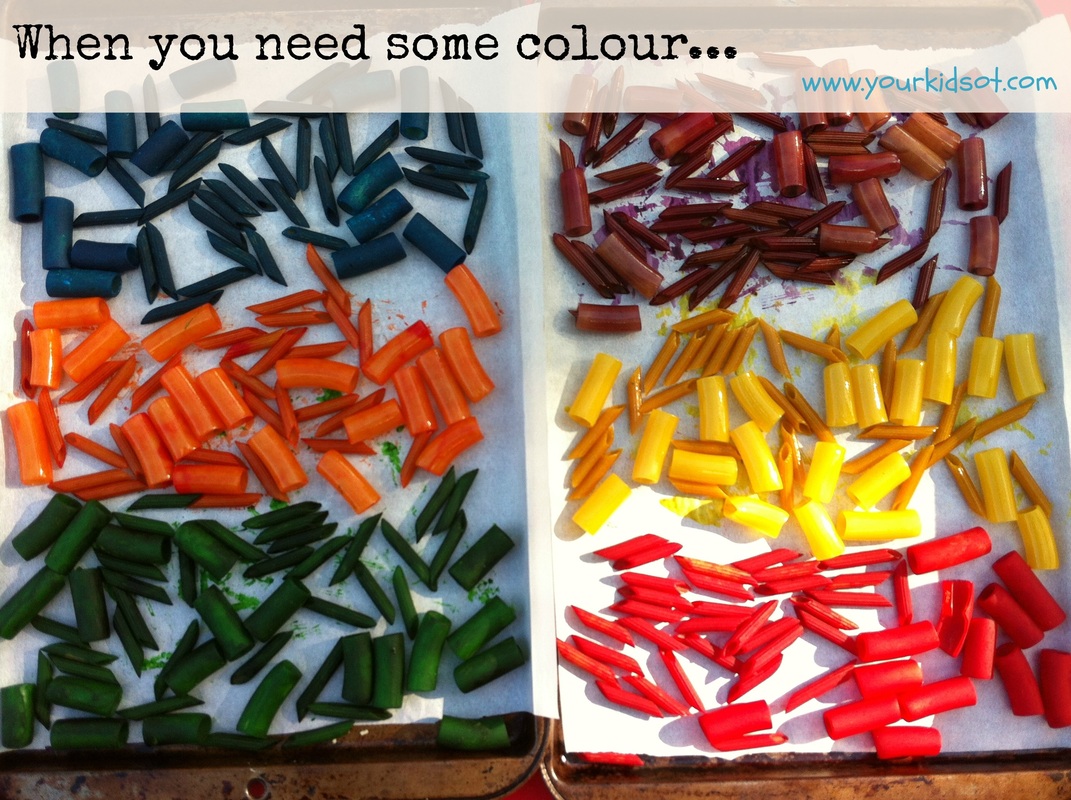
  Happy Australia Day! I hope you are celebrating the day with friends and family! We live in such a beautiful amazing country with stunning beaches, glorious weather, heavenly food and a community who love and support one another ... free to speak, vote, worship and live. A big congratulations to those on the Australian of the Years Honour Roll. Four Australian women who have worked to help those in domestic violence situations, with literacy and learning difficulties, the deaf and poor. Well deserved and truly inspirational. Australian of the Year 2015 Rosie Batty - Domestic Violence Campaigner Senior Australian of the Year 2015 Jackie French - Author Young Australian of the Year 2015 Drisana Levitzke-Gray - Deaf advocate Australia's Local Hero 2015 Juliette Wright - Social entrepreneur  Australian of the Year (Rosie Batty), Senior Australian of the Year (Jackie French), Young Australian of the Year (Drisana Levitzke-Gray), Australia's Local Hero 2015 (Juliette Wright). Australia Day also marks the last day of the school holidays for us. Back to school tomorrow which brings its own excitement and anticipation for the year ahead. Here is a quick and easy recipe that is healthy for school lunch boxes. I'm jumping on the "bliss ball" bandwagon that has been so popular in the last year. Here is a version that hopefully the kids will happily eat, looks like a lamington ball but is packed with healthy goodness. We made 25 bliss balls with this recipe.
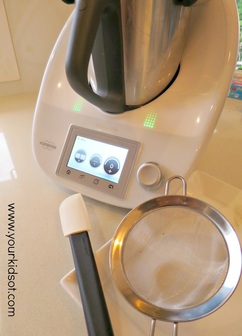
Method 1. Cover the dates with tap water and soak for 15 minutes. 2. Pour the dates into the sieve to drain off the water. 3. Place the almonds, cocoa, coconut oil, 1/2 cup shredded coconut and chia seeds into the Thermomix (or food processor). 4. In the Thermomix blitz for 20 seconds on speed 7 (or blitz in the food processor until all combined). 5. Scrape down the sides of the Thermomix (or food processor) with a spatula. 6. Add dates to the mixture. 7. In the Thermomix blitz for 10 seconds on speed 7 (or blitz in the food processor until the dates are incorporated). 8. Place 1/2 cup of shredded coconut on a plate. 9. Roll the mixture into balls. 10. Cover the balls with coconut. 11. Store in an airtight container in the fridge until ready to eat. 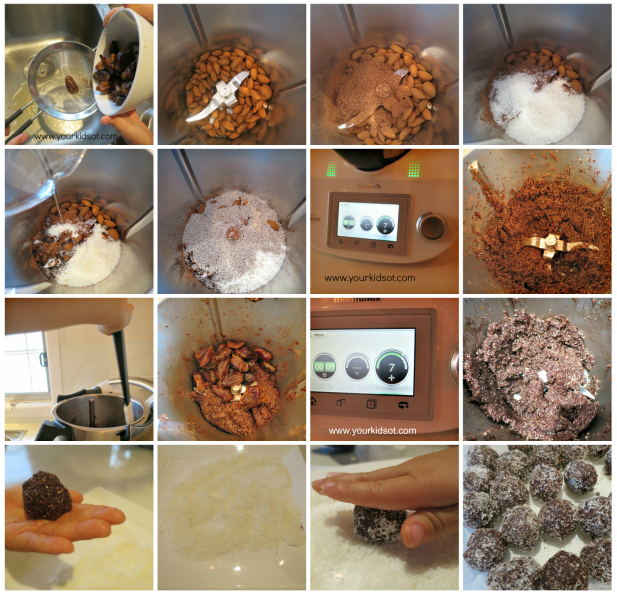 Your kids will love measuring, pouring scraping and rolling to make this recipe. You may find it easier to tip out the finished mixture prior to rolling it into balls avoiding those sharp blades. Mr 4 enjoyed helping with all aspects of this recipe, although operating the Thermomix was a little difficult for him. He especially enjoyed rolling the balls in the coconut! Note: Don't forget to check if you have a "nut free policy" at school! You may have to keep these for afternoon tea if you do! 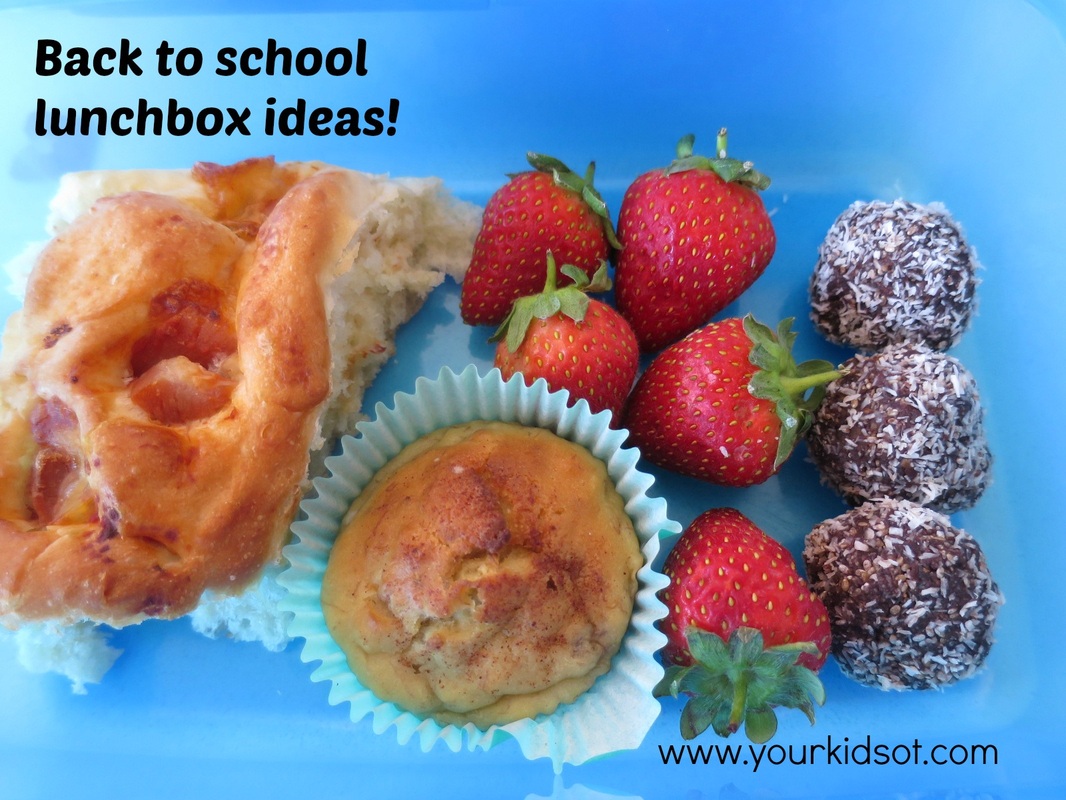  How are you feeling about the start of the new school year? What do your kids like in their lunchbox?  You may also like...
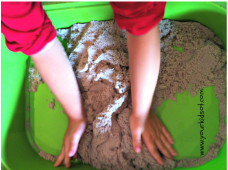
  We love summer holidays! The beautiful warm days drawing us all outdoors with the beach and pool calling. We can't always go to the beach and pool so here is an alternative to water play in the backyard.
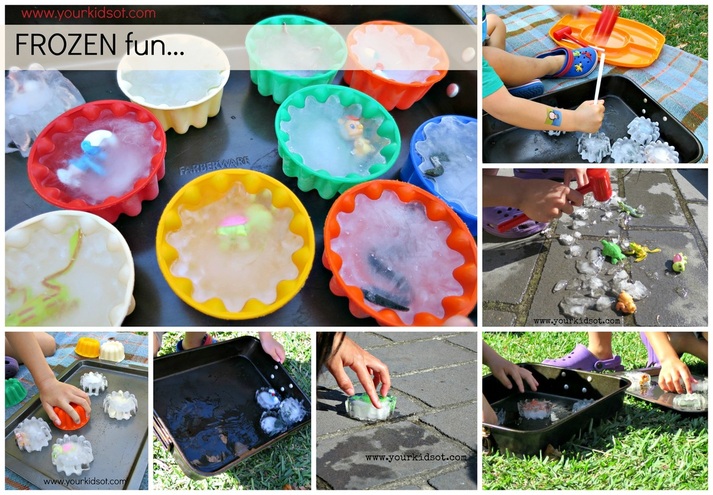 Mr 4 and Miss 8 enjoyed playing with the ice. Our containers were small so they did not have to do much to melt the ice in the hot sun. The kids discovered that it was easier to smash the ice with hammers after they had started to melt. I could talk about the benefits of ice play... a science experiment, language, imaginary play {rescuing the figurines} and sensory exploration. In this case though, this ice play is pure summer fun in action! Ice fun is great for all ages. Toddlers could play with ice cubes without the figurines. Older kids will love freezing huge blocks of ice and experiment with different ways to crack and melt the ice. You could add some big bowls or buckets of water to the play for extra fun. Do your kids love playing with ice?  You may also enjoy these activities...
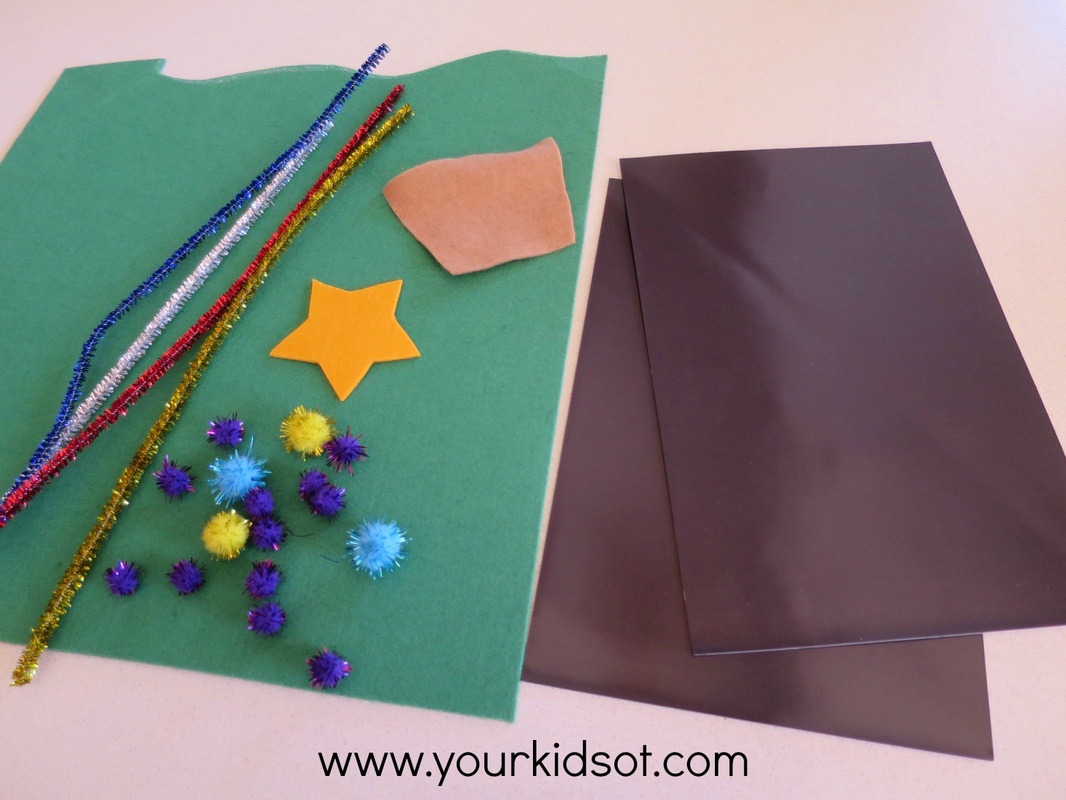
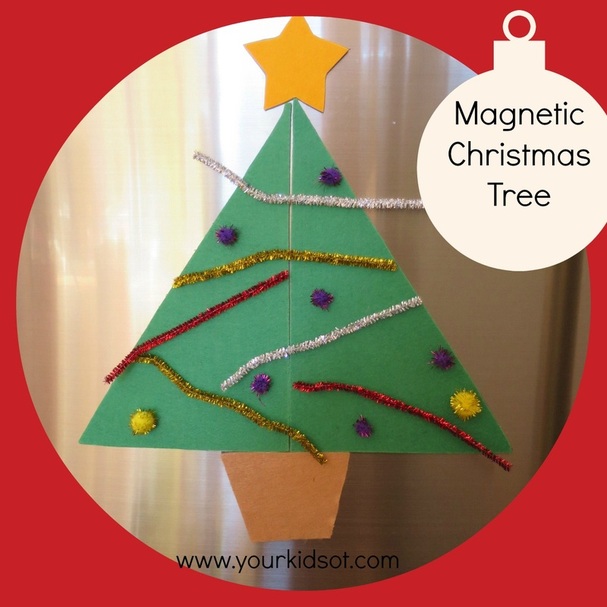  Make your own magnetic Christmas tree to keep your toddlers and preschoolers busy whilst you are in the kitchen. This Christmas tree activity is perfect for your fridge door! A few simple craft supplies and just a few minutes to prepare.
What do you need to do? Cut out two large green triangles, a tree base and a star. Stick the felt onto the photo-magnets and cut around the shapes again. 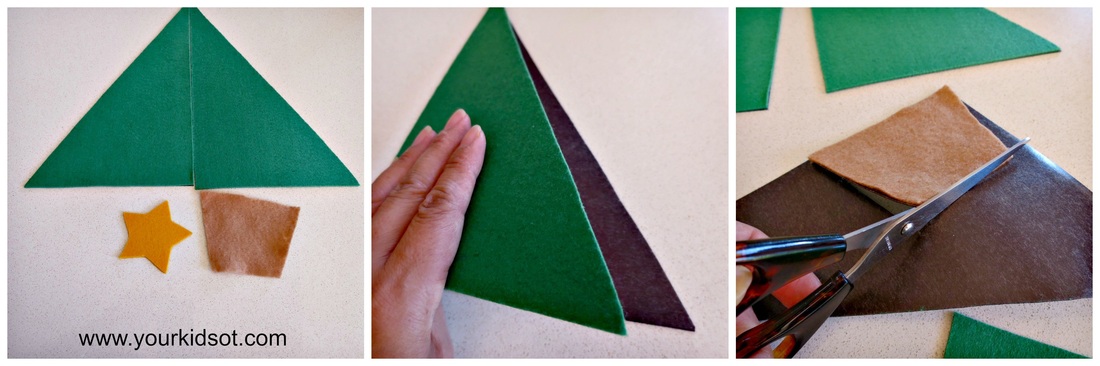  You may also like to cut the pipe cleaners in half. Assemble the felt magnetic pieces, pom poms and pipe cleaners onto a plastic plate and this activity is ready! This is a no-mess activity that your toddlers and preschoolers can do independently. They may need assistance initially with the tree shape or alternatively you could place the tree on for them and they can decorate. They will enjoy putting the pom poms and pipe cleaners where-ever they want to. They will also enjoy taking them off and doing it all over again! Picking up the pom poms and pipe cleaners encourage a pincer grasp. A little visual motor planning and organisation is subtly required to position the tree, star, base and spread out the pom poms and pipe cleaners to fit on the tree. The best thing about this activity is there is no right or wrong way to decorate a tree! Older children may also like to help their younger siblings to decorate the tree. 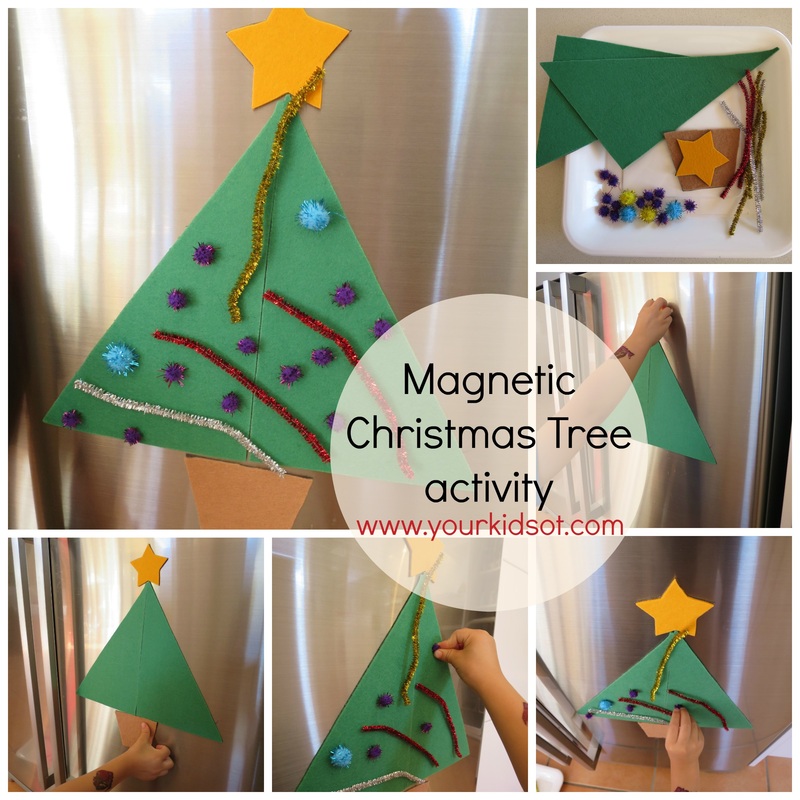  Your toddler or preschooler will love this festive activity! What else do your little kids like to do whilst you are in the kitchen?  You may also like...
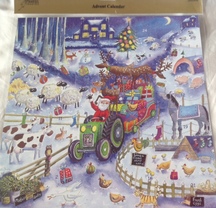
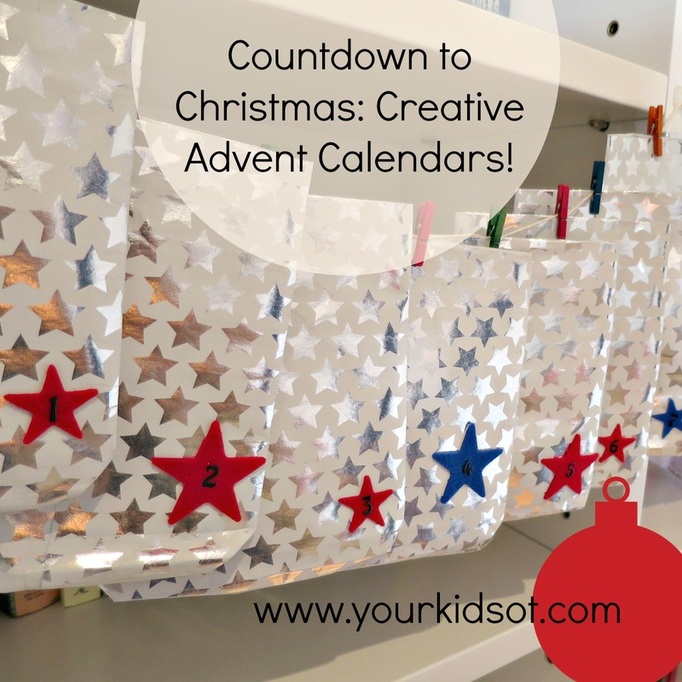  It is beginning to look a lot like Christmas everywhere you go! With family birthdays and a wedding anniversary all wrapped up in November, I can start looking forward to Christmas! Have you put up your tree? We usually put the tree up on the first of December, however we started early this year! We needed a little cheering up after a sad start to the weekend {death of beloved pet guinea pigs}. Welcome to Your Kids OT's Countdown to Christmas! You will find some fabulous Christmas crafts, activities and cooking here over the next few weeks. I hope you love them as much as I have loved putting them together. When you are counting down to Christmas, there is no better way of doing this with your kids than to use an advent calendar. This is a visual tool that helps kids to see in a physical way how many days there are until Christmas. The concept of time can be so difficult to understand for kids as they grasp how long is one hour, one day, one week.... We have used a number of different calendars over the years, favouring those with no food treats. Here are some new and old ones we are using this year... (1) Nativity advent calender - This is an old favourite we have been using for a number of years. The nativity scene was purchased from Phoenix Trading and comes with 24 numbered little picture pieces that can be added to the scene. I made the silver bags from Christmas wrapping paper, attached a star sticker and number to each bag, pegging the bag to a piece of string. Each little bag contains a picture for the nativity scene and an instruction card which goes through the Christmas story of the birth of Jesus in small sections and one or two prompt questions. Some instructions cards include words to a Christmas carol or song. My kids love the anticipation of "what's next" in the bag of the day. We take turns to put the pictures in the calendar. It is a lovely little routine that helps us to "countdown to Christmas"! 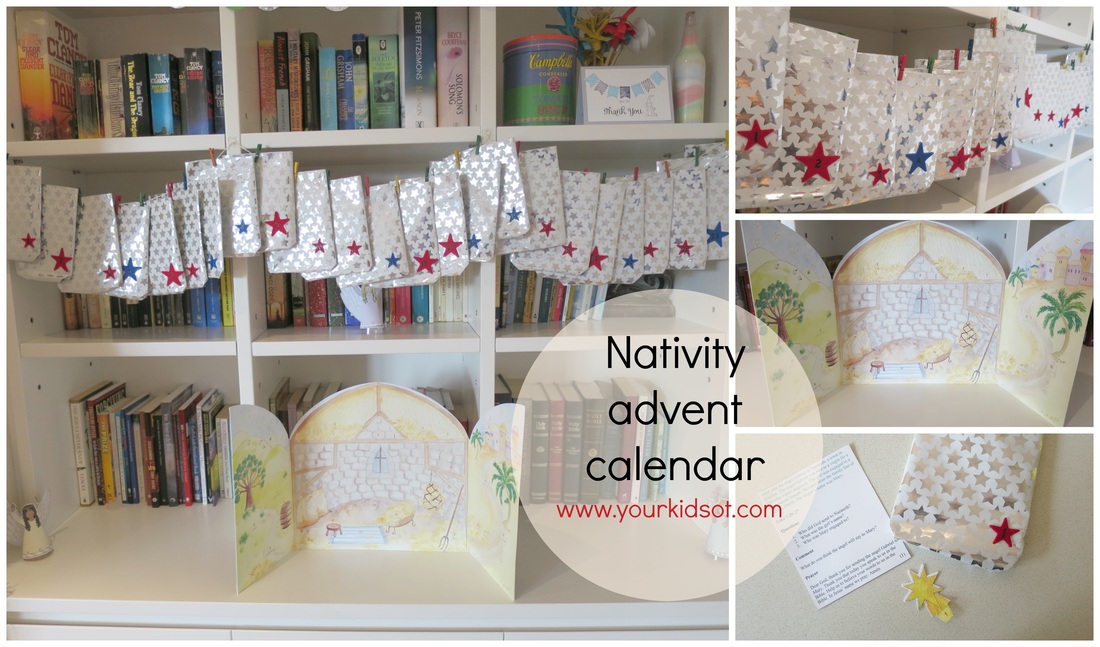  (2). We were recently given a different advent calendar from a friend which happens to also be by Phoenix Trading (as a personal gift and not for the blog). My children can't wait to open the windows and doors of this gorgeous gingerbread house advent calendar.   (3) If you have been following Your Kids OT, you will know of our Lego Challenge earlier in the year. If you missed it you can find the "wrap up" here. Well we couldn't go past Christmas without one last challenge.... to build a Christmas Tree Advent calendar. The original idea was found here. We built a white Christmas tree and placed number stickers on our small Lego "ornament" pieces. In case you are wondering that is an "angel" that was built for the top of the tree. 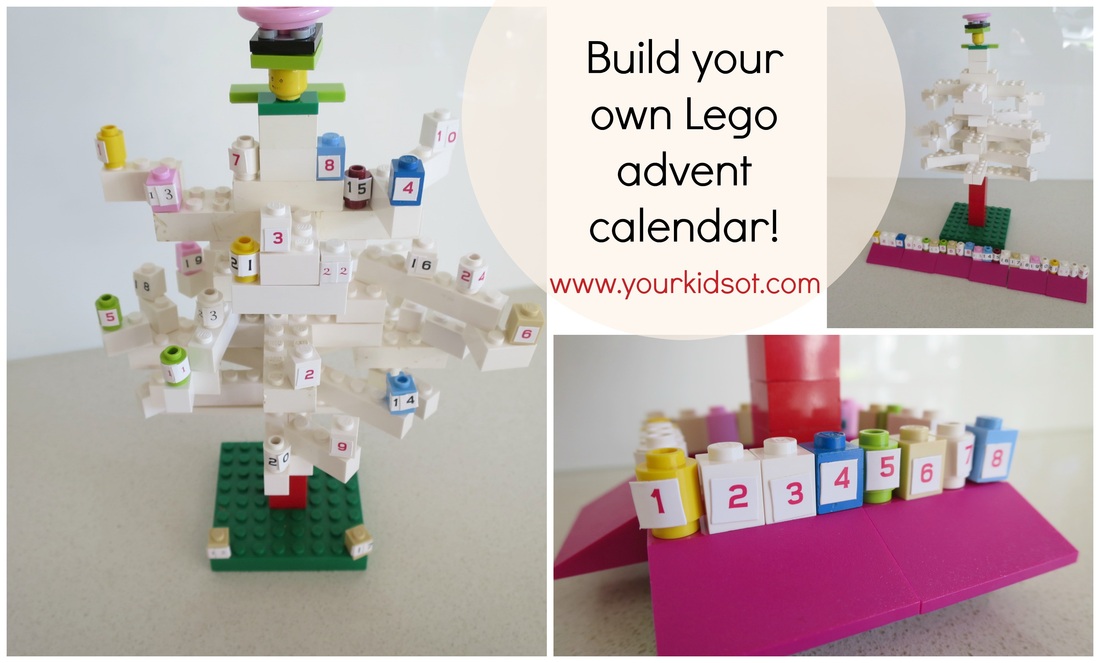  Advent calendars are such fun! Did you like the Phoenix Trading advent calendars seen here? You have a chance to win ONE Phoenix Trading Advent Calendar for your family but be quick! Entries will close this Thursday 27th November at 12:00am. This is a game of skill and will require you to like Your Kids OT on Facebook and answer "What is the most creative way you have or would like to countdown to Christmas?". Entries only open to Australian residents. See below to enter and for further terms and conditions. Find fabulous Christmas cards, birthday cards, wrapping paper and much more at Phoenix Trading. I can't wait to hear "What is the most creative way you have or would like to countdown to Christmas?"  Note: I have not received remuneration or compensation from Phoenix Trading. I have been gifted the following advent calendar for this giveaway. All comments and opinions are my own. Win this fantastic Phoenix Trading Advent Calendar!
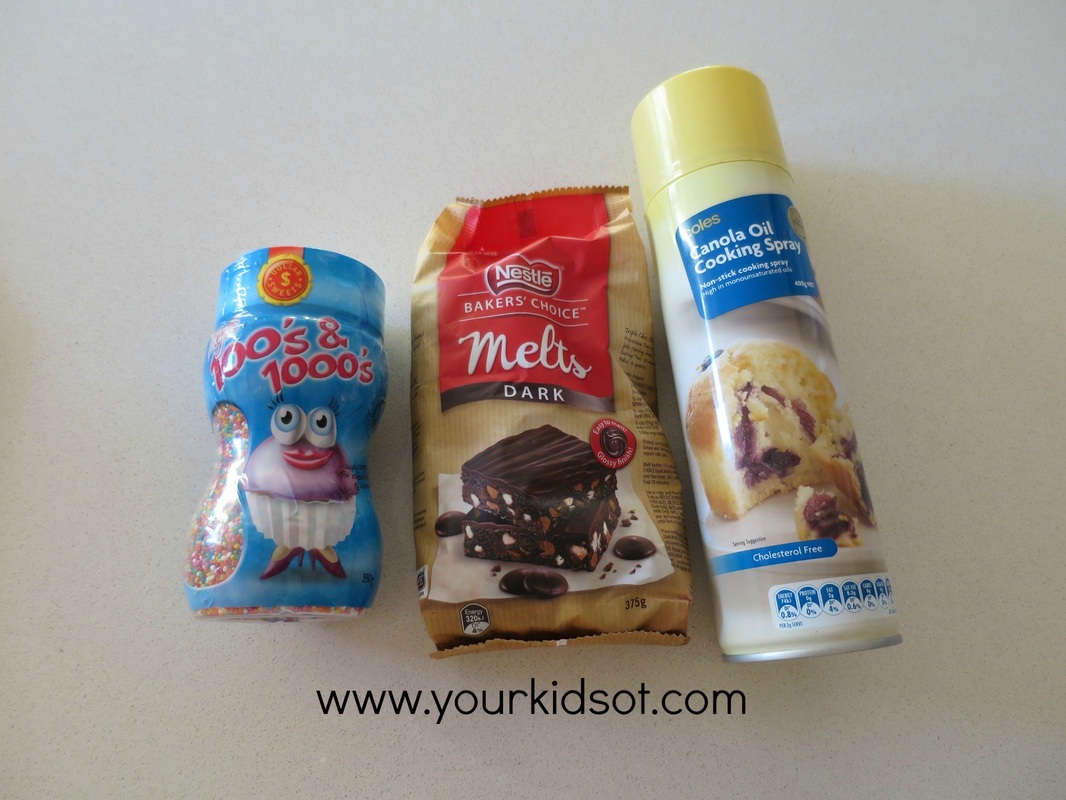
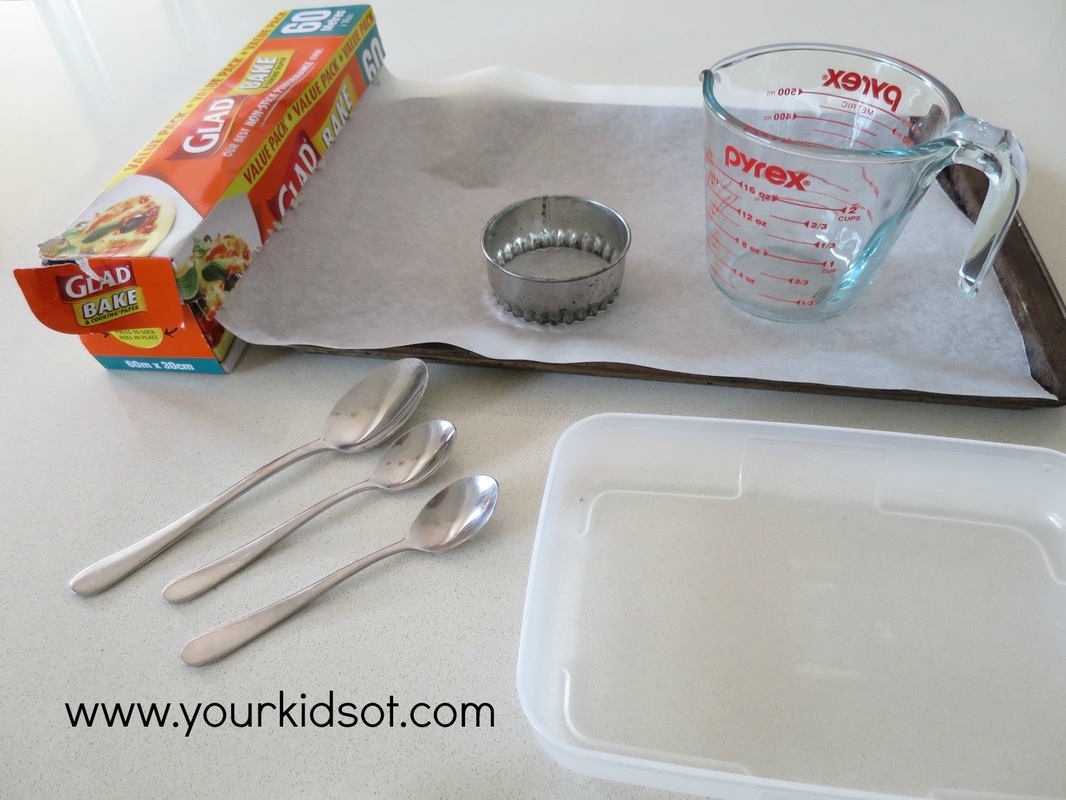
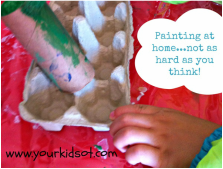
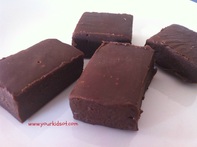
  Did you grow up with chocolate freckles as a kid? Chocolate covered in a sea of hundreds and thousands...well now you can make your own {any size you want}! I mentioned in a previous post that we made a couple of things for Miss 8's party favour bags. Well here is the sweet addition to the bag!
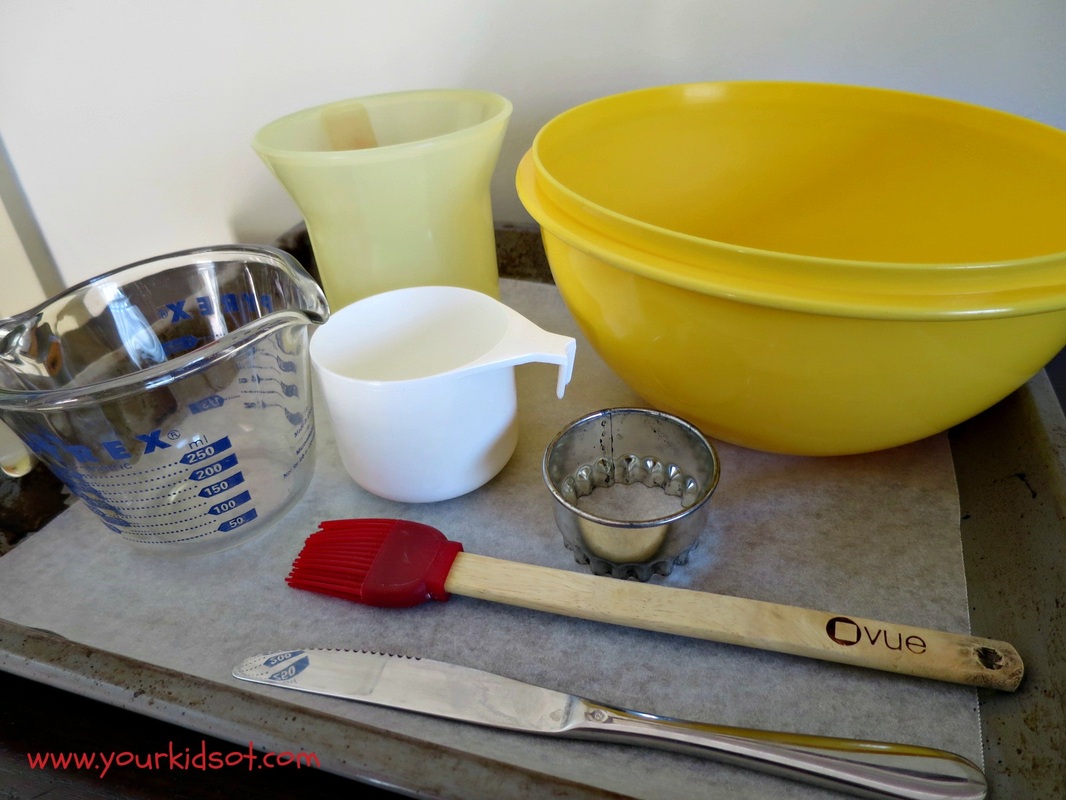
Method 1. Place the chocolate melts into the microwave safe jug. 2. Heat the chocolate for 1 1/2 minutes. 3. Stir the chocolate until smooth. 4. Oil the cookie cutter (use whatever you want for a desirable size). 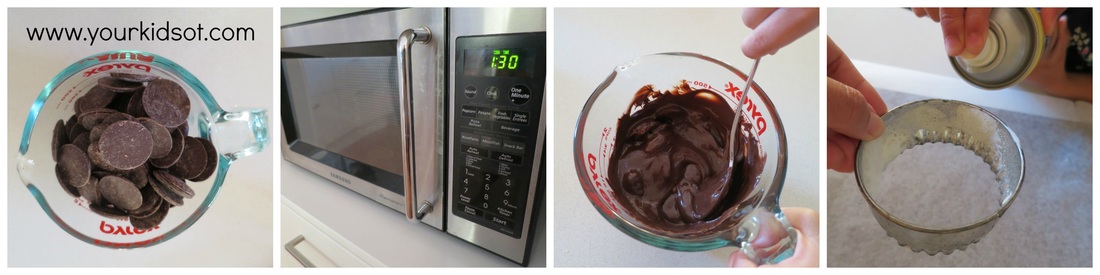 5. Pour the chocolate into the cookie cutter or spoon out the chocolate. Remove the cutter once you get the shape you want. 6. Flatten and smooth out the chocolate. 7. Pour some 100s and 1000s into a plastic container or bowl. 8. Spoon a generous amount of 100s and 1000s over the chocolate circle. 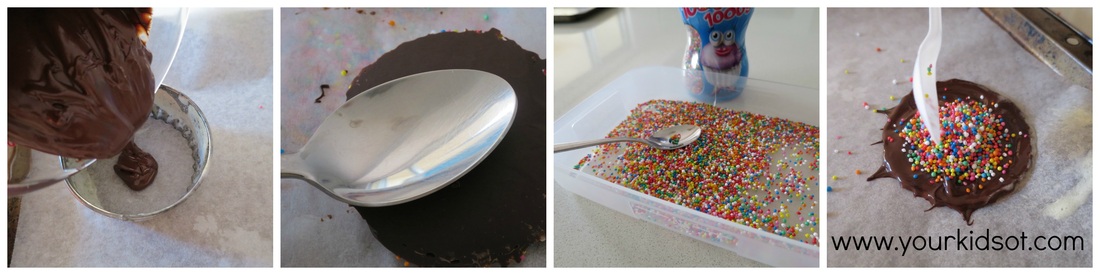 9. Repeat steps 5 through to 9 until you use up all the chocolate. 10.Place in the fridge to set. {The time will vary depending on how thick your chocolate is.} 11.Shake off excess 100s and 1000s. 12.Store in an airtight container away from direct sunlight. 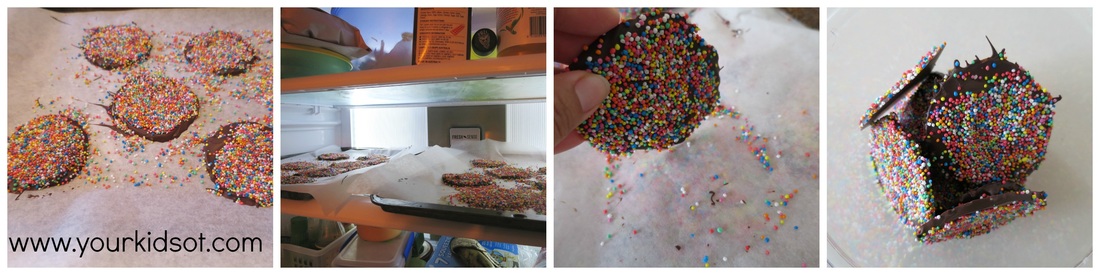 The kids and I were really pleased with how these turned out. I was a bit wary of them pouring and spreading the chocolate, so I did those parts. {Must have been in a don't-mess-up-my-kitchen sort of mood. Do you have those days?} The kids especially loved generously sprinkling over the 100s and 1000s. You could definitely use white or milk chocolate instead of dark.   These homemade chocolate freckles would make a lovely gift or something sweet for the school cake stall. Do you like chocolate freckles?
You may also like making...
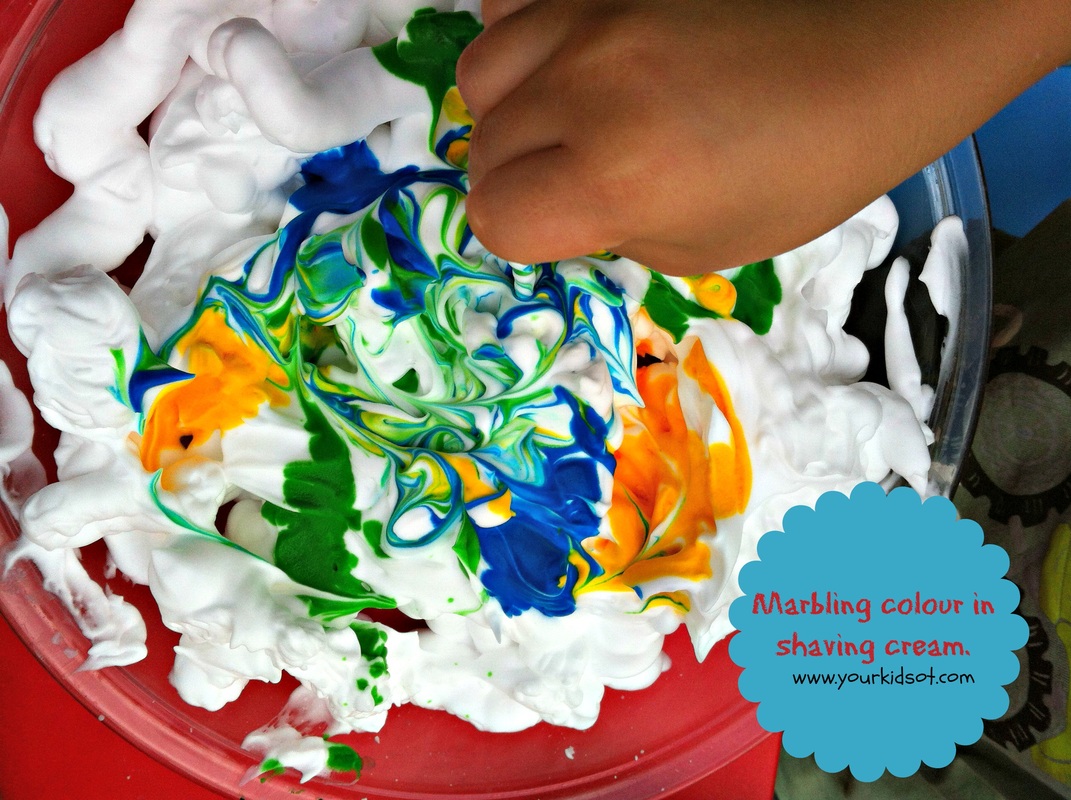
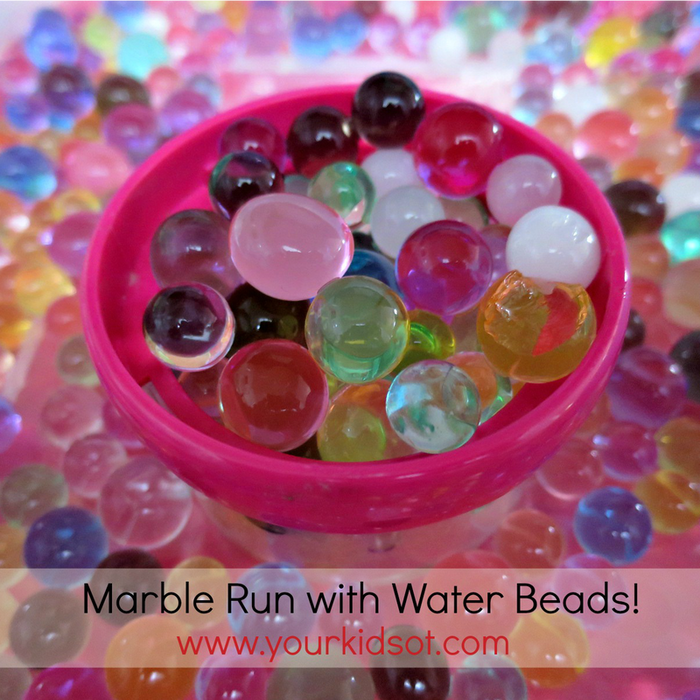  Water beads or water marbles are these amazing little super-absorbent polymers. They have traditionally been used by florists in flower arranging but in the last few years "water beads" have become THE must-have material for sensory play. Edible water beads (aka tapioca pearls) have also surfaced as the new "must-have". If you haven't seen these water beads before. Here is a collage of how they work. Place the beads (which are super tiny) into a large bowl or container. Add 6 cups of water and watch them grow for 6 hours. Drain away any excess water. You can play with them before that time but they will continue to grow if more water is added. They grow to 150 times their original size. Amazing for kids of all ages to watch (not for the whole 6 hours). 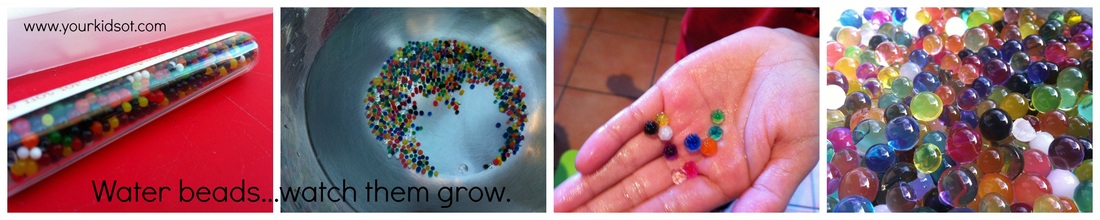  The water beads become firm balls which are bouncy and slippery. You can also allow the beads to dry out and re-use them by adding water to the beads again. There are plenty of activities you can do with water beads. The water beads are great in a large tray or container as a sensory material. Kids will love scooping, pouring, sorting, mixing and stirring. 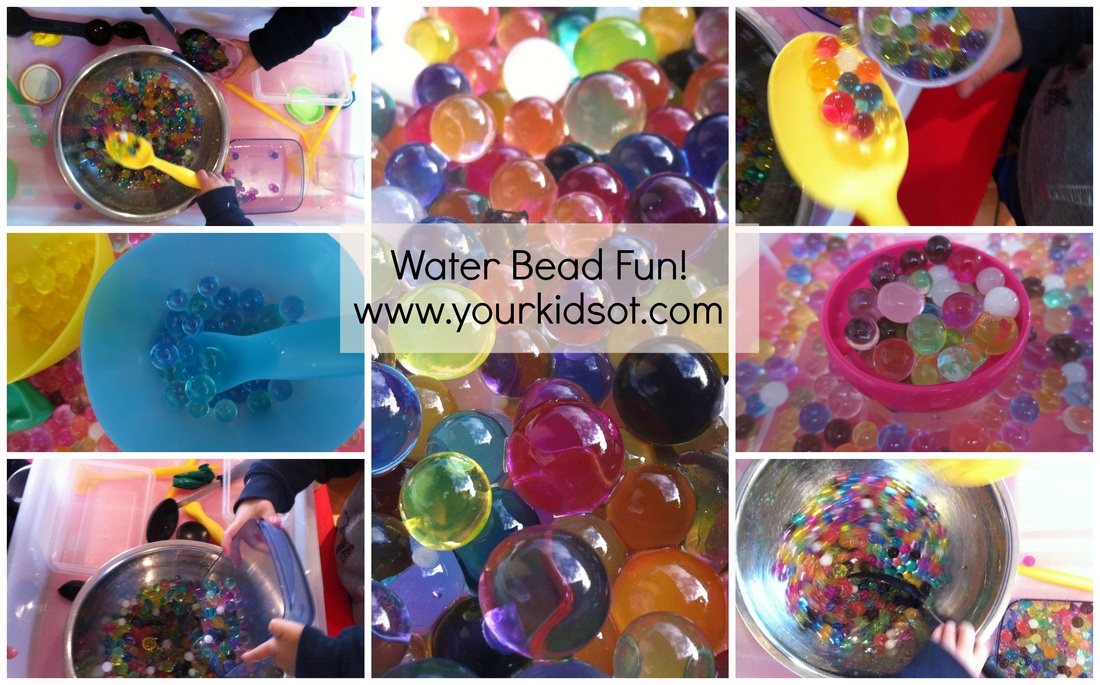  We have also built a simple marble run for water bead races using household rolls, plastic containers and lots of masking tape! Despite how "homemade" it looks, both Mr 4 and Miss almost-8 enjoy racing the beads and watching them go from top to bottom. 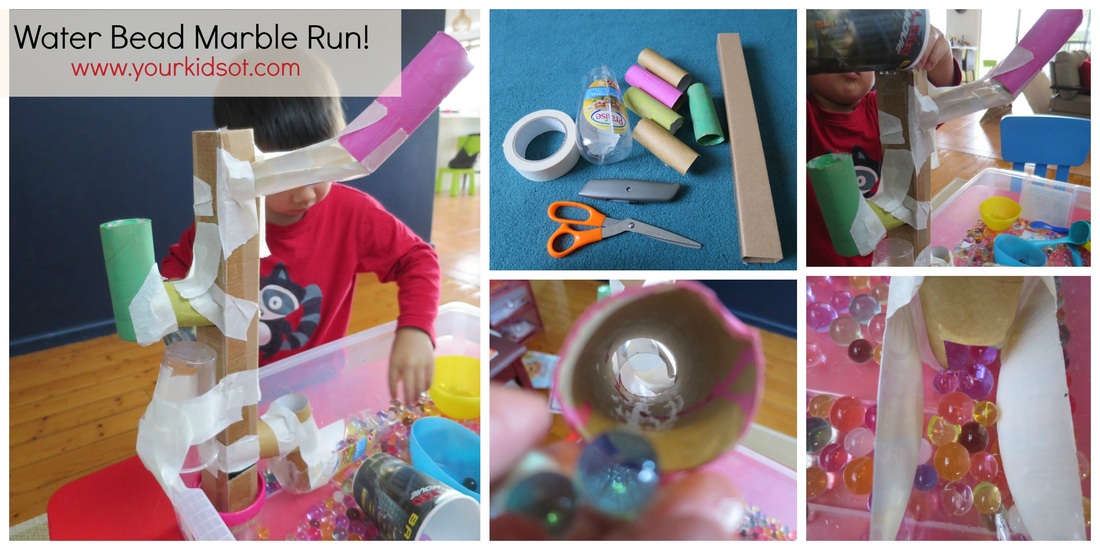  The water beads have also found themselves in bath play where they are like treasure to be sought and scooped. Combined with some shaving cream and ice-cream creations were made. 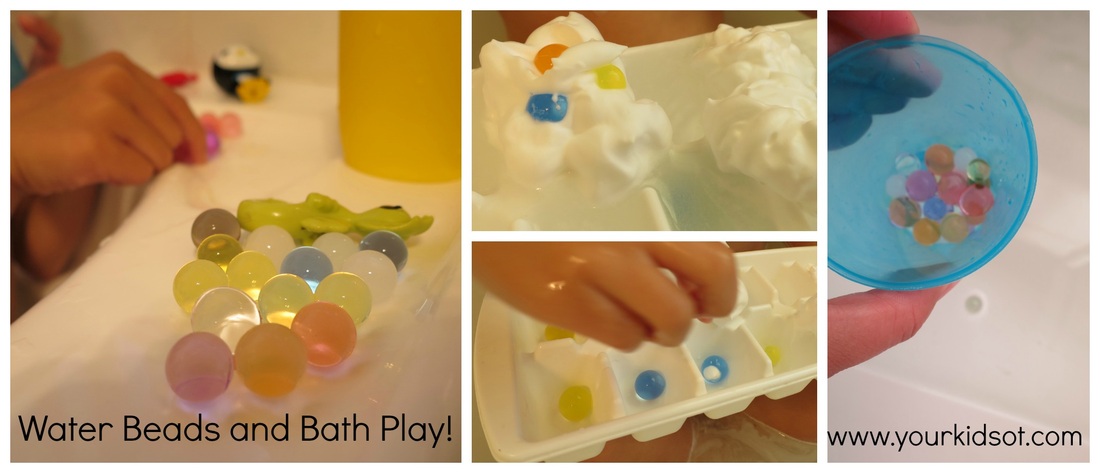  Have your kids played with water beads? What do they enjoy doing with them?  These water beads were given to our family as a gift and were originally purchased from an Australian Company (Nic-Nac). This is not a sponsored post and I have not received remuneration for the comments made here. You may also like more sensory play...
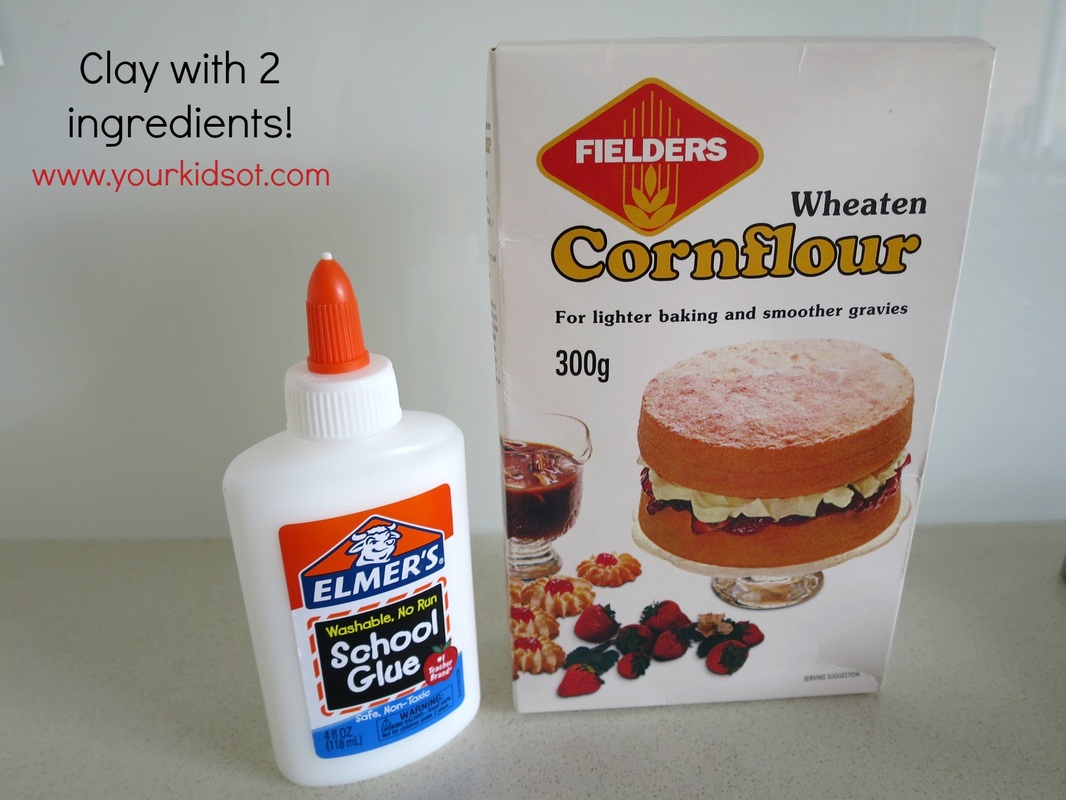
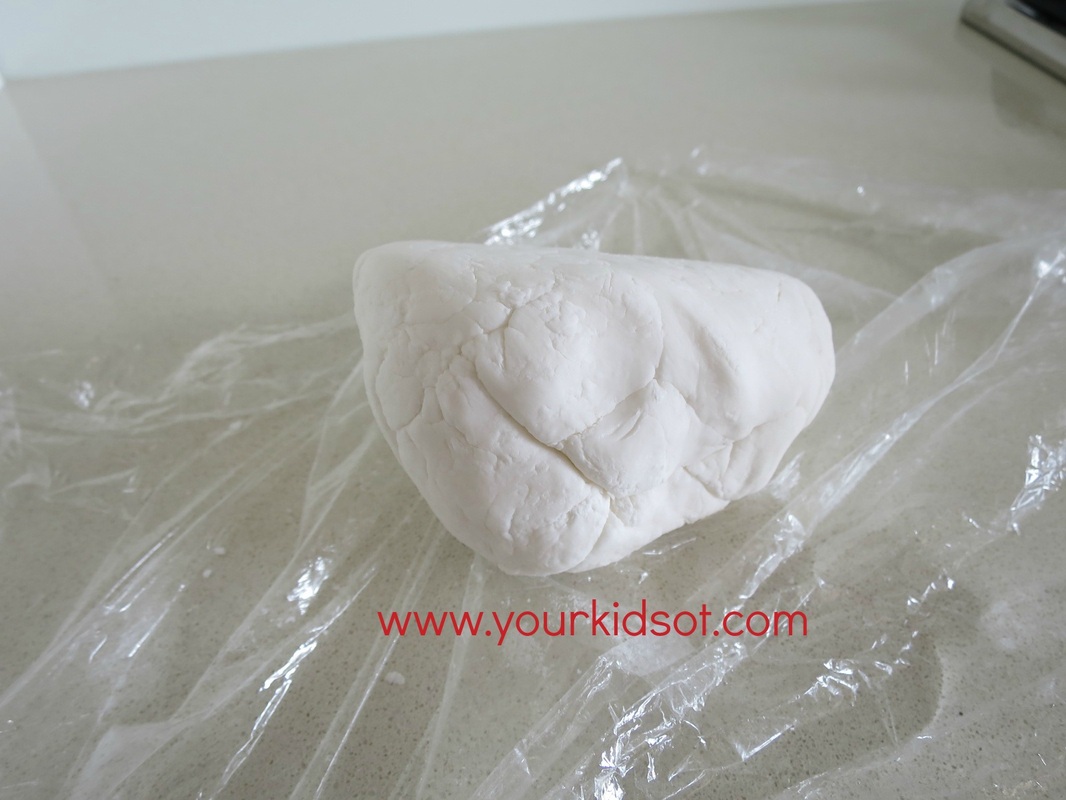
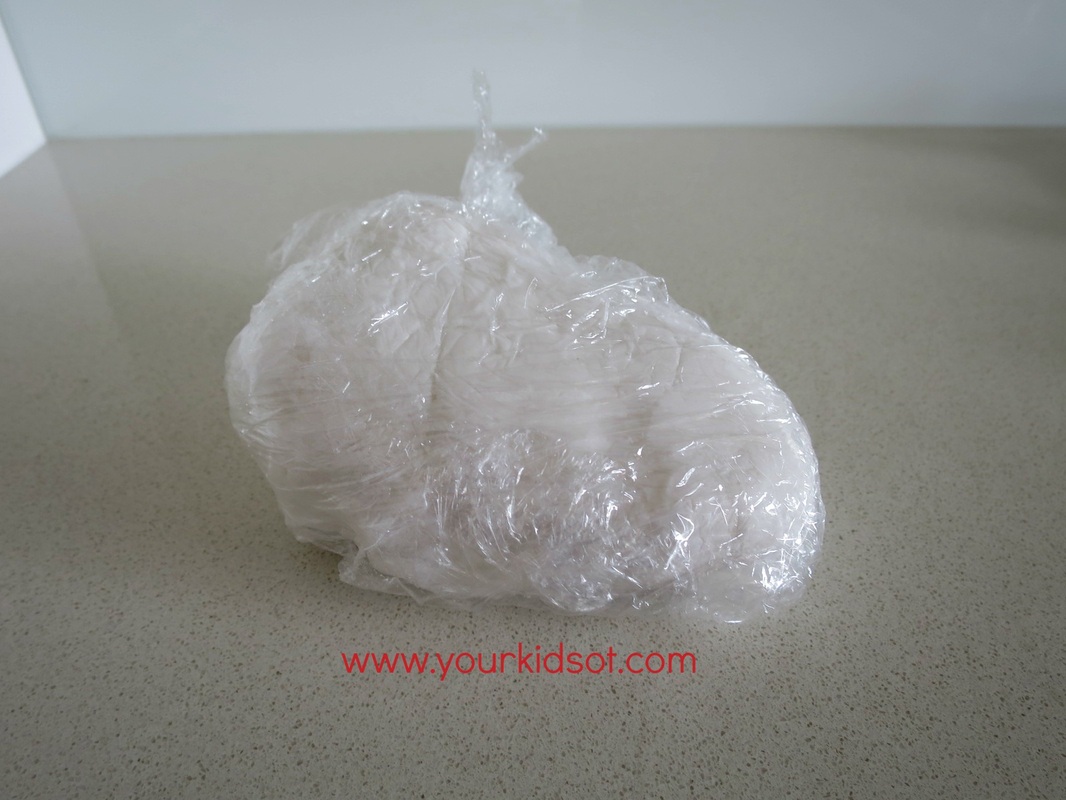
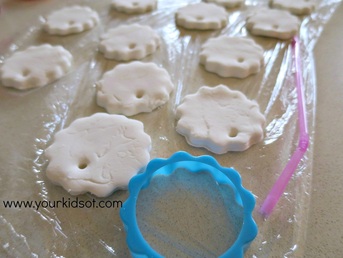
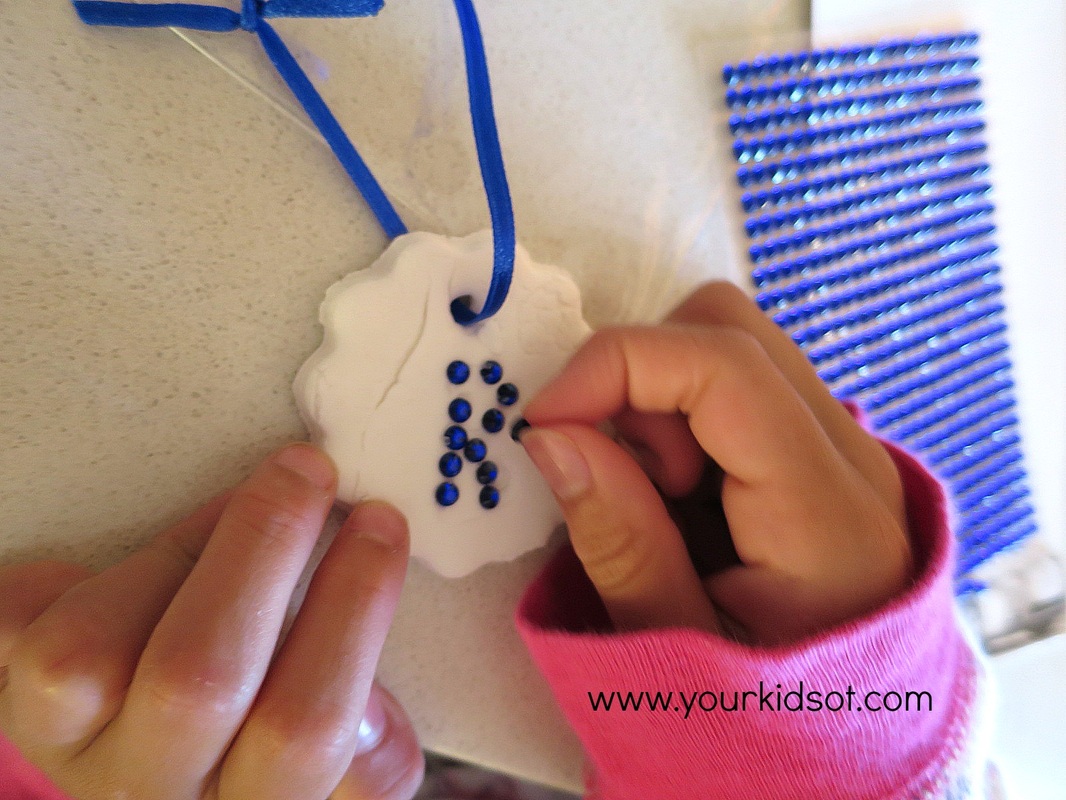
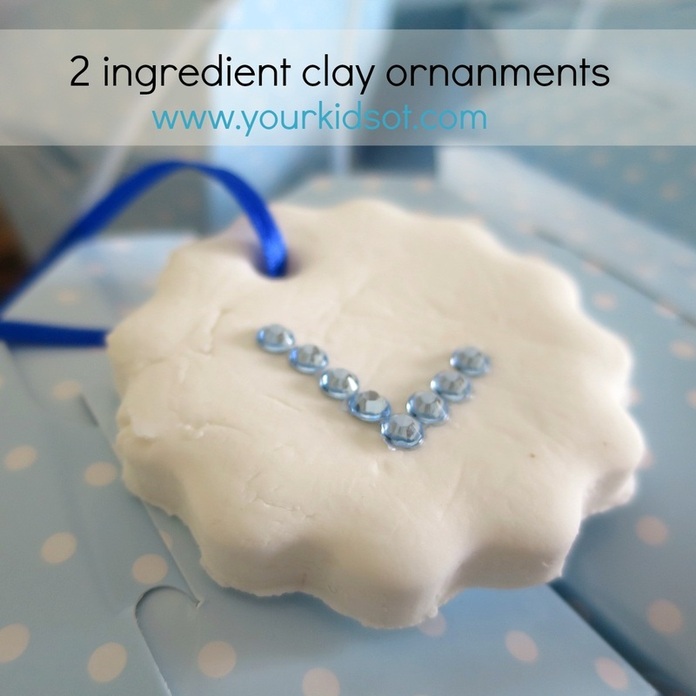  Miss 7 is almost 8 years old! I can hardly believe how quickly the years have passed. Each birthday brings back a flood of memories of the day she was born ... at a tiny 2.2 kg. We decided to make a couple of things to put in the birthday party favour bags this year. We hope these will last longer than the sweets! We made these lovely clay ornaments which we thought Miss almost-8's friends could hang on their Christmas tree or just decorate their bedrooms. I found this great 2 ingredient clay recipe from Paging Fun Mums. There is no baking required as the clay air dries.
Miss almost-8 really enjoyed every step of making these ornaments. They were simple to make and I think it is nice for the "birthday girl" to give something back to her guests as a small momento of their friendship. We hope her friends like them! 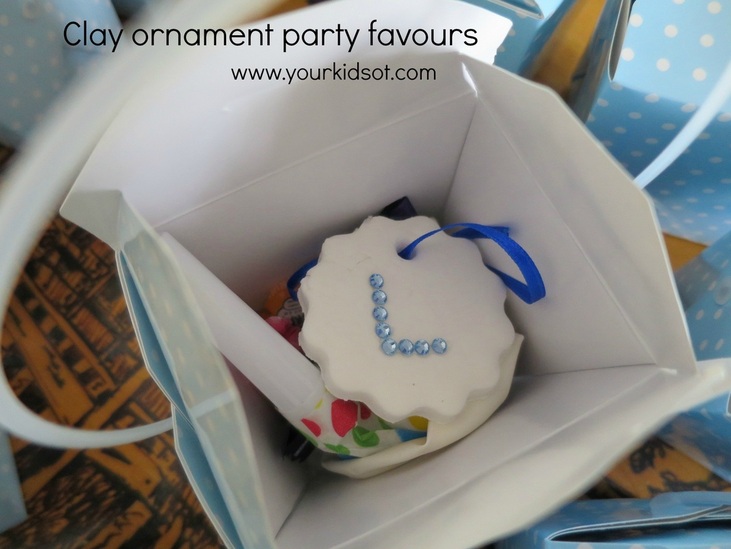  We are looking forward to making more of these ornaments closer to Christmas! Do you like making things for your kids party bags? What are you going to make with this clay?   You may also like these crafts...
 
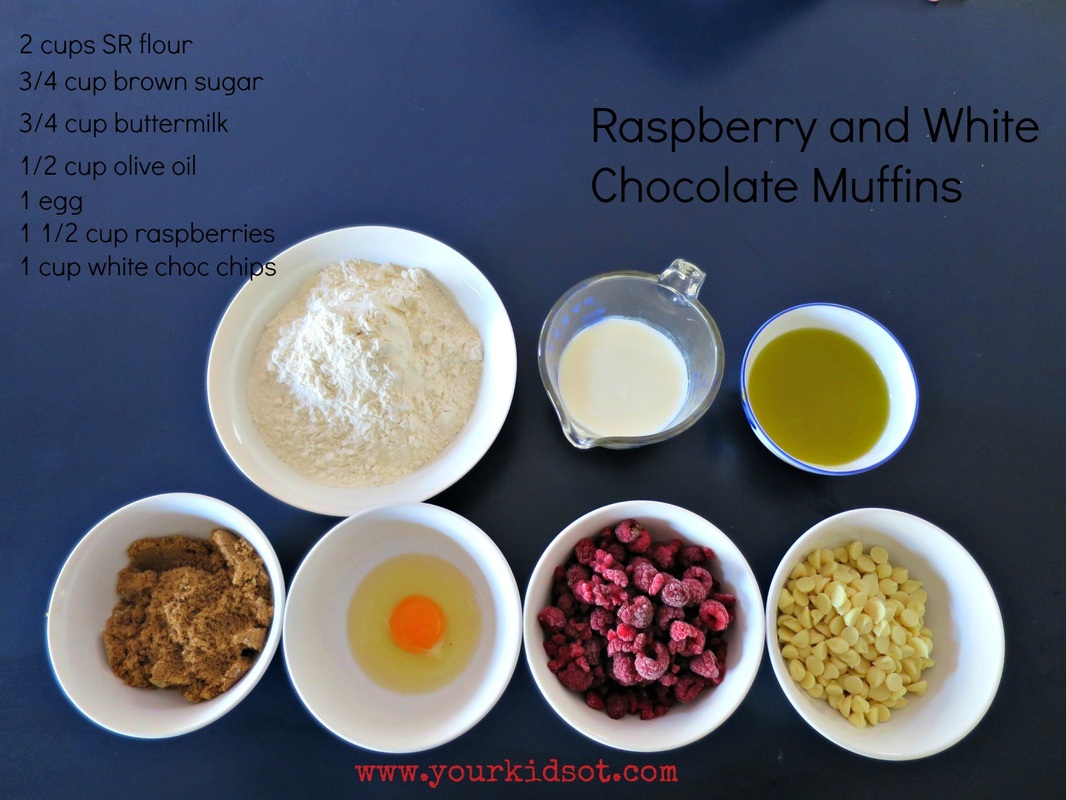
Method 1. Preheat the oven to 180° C (356°F). 2. Sift the flour into the mixing bowl. 3. Add the brown sugar into the mixing bowl. 4. Crack an egg into a small bowl. Whisk lightly with a fork. 5. Add the egg into the mixing bowl.  6. Pour the buttermilk into the mixing bowl. 7. Add the olive oil into the mixing bowl. 8. Stir the mixture gently with a spoon. 9. Add the raspberries into the mixing bowl. 10. Add the white choc chips into the mixing bowl. 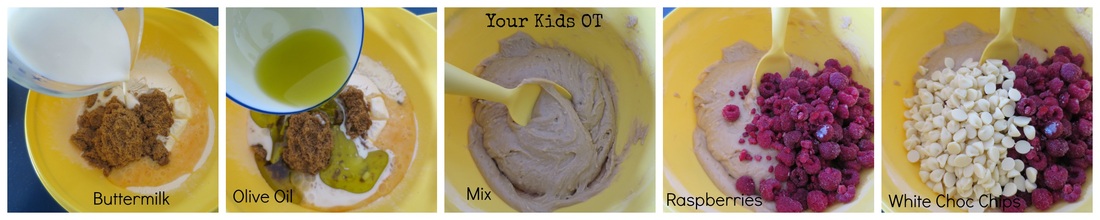 11. Stir the mixture gently until just combined. 12. Grease the muffin tray by spraying oil (or use patty pans). 13. Spoon the mixture into the muffin tray. 14. Bake for 20 minutes 15. Allow muffins to cool and enjoy! 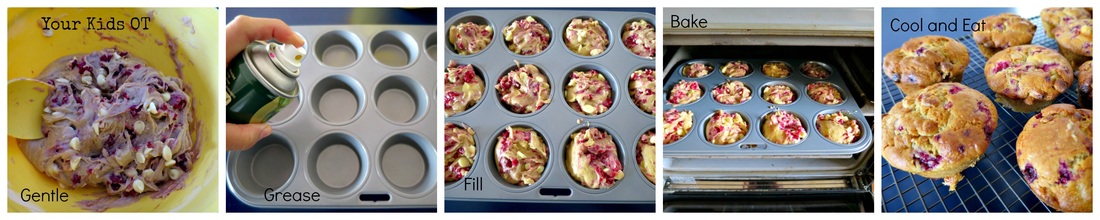 What is your favourite muffin flavour? Happy Baking!  Have you tried these kid friendly recipes?
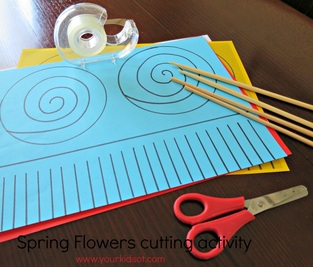
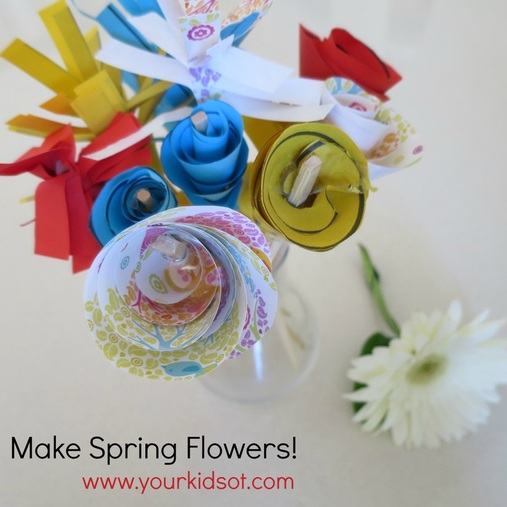  “Spring is the time of year when it is summer in the sun and winter in the shade.” ― Charles Dickens, Great Expectations Spring is a season of new life and an array of blooms in the garden. Whilst our spring seems to be on hold this week with unseasonal thunderstorms...this cutting and rolling craft is a perfect indoor activity for your kids learning to use scissors!
What do you need to do? There are 2 different flowers in the vase above. 1) To make the spiky variety, you can draw the fringe on the edge of the paper ready for cutting. 2) Cut along the lines to make a fringe. 3) Stick the chopstick to one end of the fringe. 4) Roll the paper up as tightly as possible. 5) Stick down the end of the paper. 6) Holding the chopstick, peel down the fringe (turning the chopstick as you go) to make the flower. 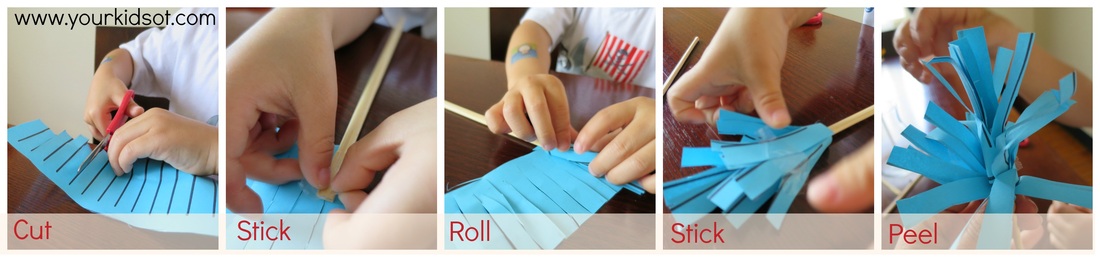 1) To make the curled variety, you can draw a spiral shape. 2) Cut along the lines of the spiral. 3) Stick the chopstick onto the outer end of the spiral with the stick pointing towards the centre of the spiral. 4) Roll the paper up as tightly as possible. 5) Allow the spiral to unravel a little to get nice flower shape. 6) Stick down the end of the paper. 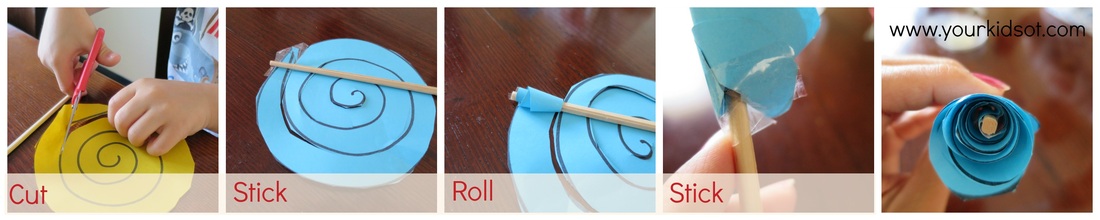 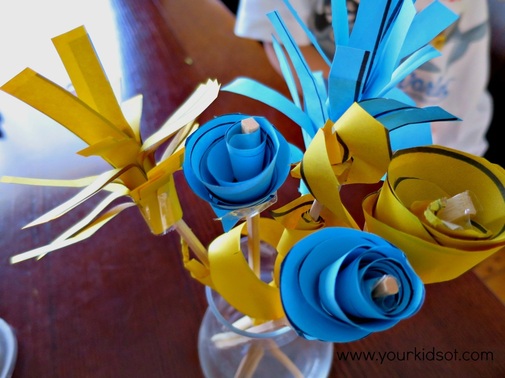 Mr 4 had a great time making these flowers. Each step required Mr 4 to use both his hands at the same time (bilateral coordination). He has always loved cutting and this activity allowed Mr 4 to practise his eye-hand coordination skills in staying on the line and manipulation skills when turning the paper around during cutting. The flowers will of course look better if you draw your lines in pencil rather than a thick texta as I have done here. Some children will require a thick dark line to provide a strong visual guide for cutting. Mr 4 needed some help when rolling the paper (especially when we were trying to figure out the best way to roll the spiral). This photo shows you one he did independently! 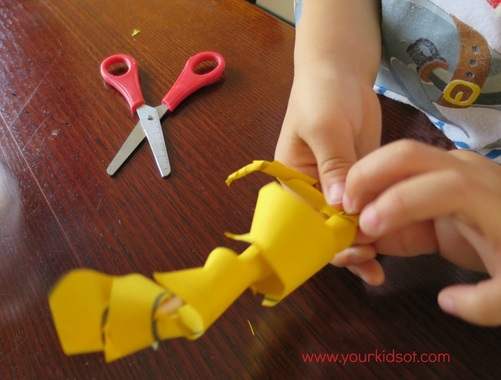 Miss almost-8 came home after school and on finding the vase of flowers wanted to make some too. She made the flowers using patterned craft paper which look great. I have seen "grown ups" do this craft on several sites on the net with some stunning affects in a variety of paper. I especially loved one I saw using vintage paper which was amazing. This craft is not about a perfect stunning posy... but rather an opportunity for your kids to get busy with their hands and have an end result. Can you make a "bunch of flowers" to give to a grandparent or teacher this weekend?  You may also like to try...

This scone (or biscuit if you are a US reader) recipe is easy! The less handling the better to keep it light and fluffy on the inside. Dust fingers and the cookie cutter with flour before handling the doughy mixture and this will make things less sticky.
Method 1.Preheat the oven to 200°C (392°F). 2. Sift the flour into the mixing bowl. 3. Using the butter knife, make a well (hole) in the centre of the flour. 4. Pour cream into the well. 5. Pour lemonade into the well.  6. Mix gently with a knife until all ingredients are combined to form a dough. 7. Put some extra flour onto your kitchen bench top. Place the dough onto the flour. 8. Turn the dough over so it is coated in flour, gently pressing to about 4cm high. 9. Use the scone cutter to cut out the scones, re-shaping the dough gently to use up scrap sections. 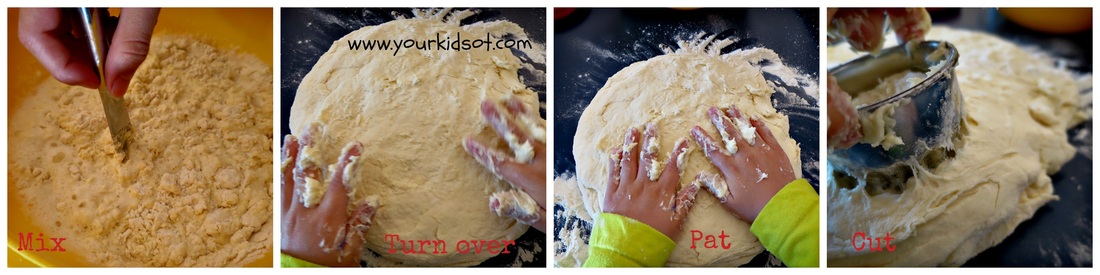 10. Place scones onto a baking tray. 11. Use a pastry brush to glaze (put on the milk). 12. Place tray in the oven. Bake for 12 minutes. 13. Cover with tea towel until ready to eat. 14. Enjoy with whipped cream and jam! 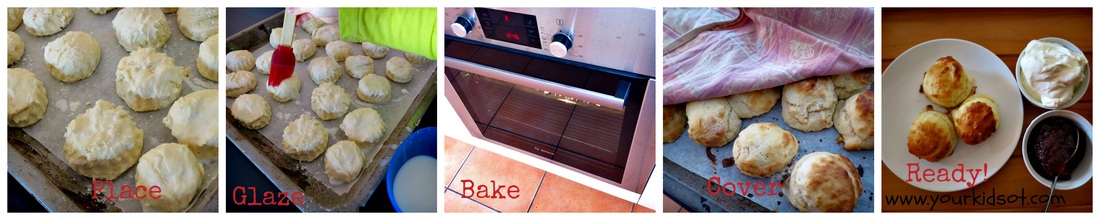 Find a photographic step by step guide to this recipe in the Your Kids OT shop. This is great for kids to use as a tool for independent cooking (with minimal help). In this recipe children may need help to turn the dough over, cut the scone, reshape the dough for cutting and using the oven. Perfect for morning tea or afternoon tea (or maybe even breakfast), these scones must be tried! The whole family will love them. Have you made lemonade scones?  Have you tried these kid-friendly recipes?
|
AuthorHi, I'm Cindy and I am an Occupational Therapist. I enjoy working creatively with children to see them reach their potential. Read more about me here. 

SEARCH THIS SITE

Archives
June 2024
Categories
All
Popular Posts

 |


 RSS Feed
Join the YKOT e-newsletter!
Subscribe to get our latest content by email and receive
the SHAPE ROADS PRINTABLE NOW!

Success! Now check your email to confirm your subscription and receive your free printable!
Join our Mailing List!
Subscribe to get our latest content by email and receive
the SHAPE ROADS PRINTABLE NOW as a thankyou!
Success! Now check your email to confirm your subscription and receive your free printable!
Disclaimer: The information on this site is general in nature and should be used for educational and entertainment purposes. The activities are safe for most children, however, you should consult an Occupational Therapist or health professional to address specific movement, sensory or other medical conditions. This blog does not replace formal therapeutic professional advice given by a health professional or medical practitioner. Reviews and endorsements of products will only be made based on my expertise and personal opinion; and deemed worthy of such endorsement. The opinions shared in sponsored content will always be my own and not that of the advertising company or brand. Content, advertising space or posts will be clearly identified if paid, affiliated or sponsored. Affiliate links may be found throughout this website in advertising. This means that if you follow through with a purchase from these links, Your Kids OT will receive a percentage of the sale. Your Kids OT undertakes to meet the requirements of the "Social Media Policy" as published by Australian Health Practitioner Regulation Agency (AHPRA). Further information about this policy can be found here.
Find meFollow me |

|
About me
AuthorHi, I'm Cindy and I am an Occupational Therapist. I enjoy working creatively with children to see them reach their potential. Read more about me here. 
|
Copyright © 2017 Your Kid OT