
Affiliate links are used throughout this website to promote products I love and recommend. I receive a commission if any purchases are made through these links. Please see my disclosure policy for more details
What a treat! It was like Christmas for me!
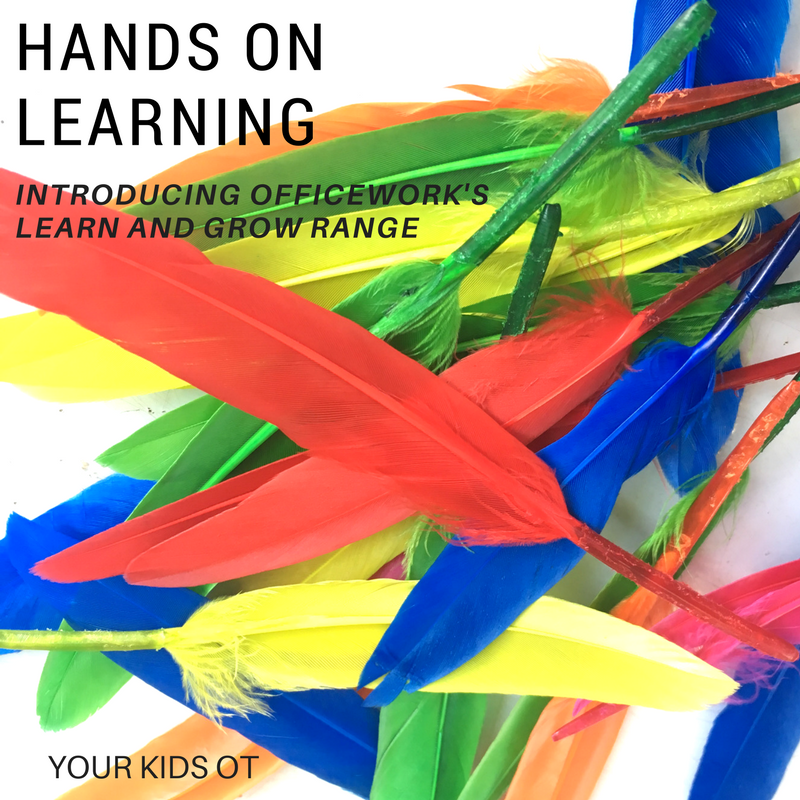
I love a good stationery shop! There is something about office supplies and equipment to help keep me organised that is so exciting! OK before you think... what a sad woman... hear me out! Together with my children, I recently attended Officework's Sydney launch of their new "Learn and Grow" range and it is more than you would expect in terms of office supplies and equipment! What an exciting range of products on offer at Officeworks for children to help them to Learn and Grow. There are over 4000 products in the range and include puzzles, games, chore charts, stickers, posters as well as arts and craft supplies. The Learn and Grow range includes trusted brands such as Ravensburger puzzles, Playdoh, Orchard games, Melissa and Doug, Crayola and more! It also includes a range of Officeworks home brand supplies. One of the best things is the affordability of the products. 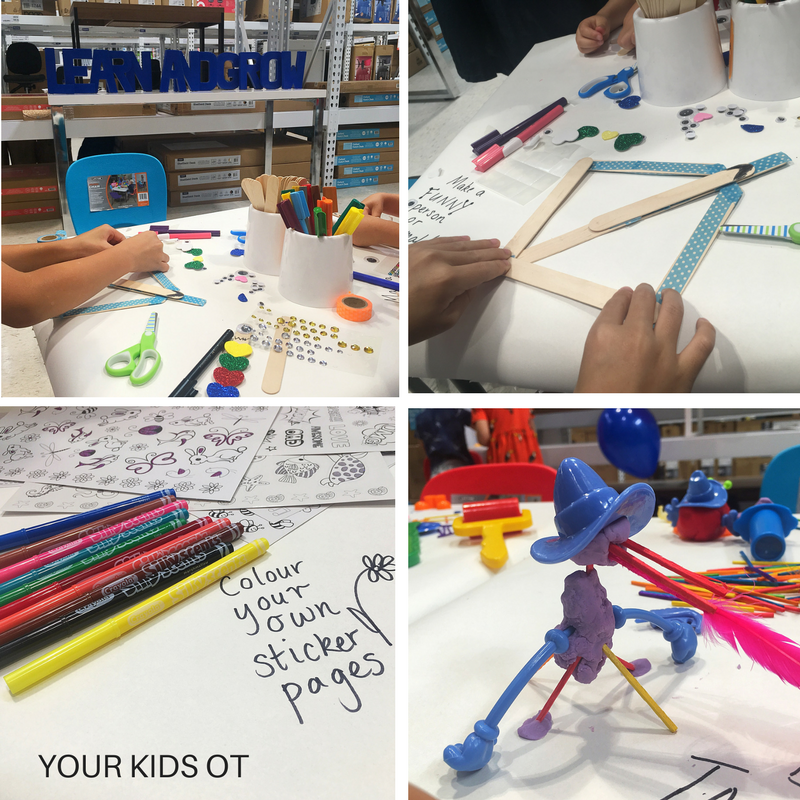
We received an awesome "goodie box" from Officeworks to introduce us to the Learn and Grow range. It is wonderful to see children dive straight into their creative ideas when they get their hands on supplies. At the launch Mr 7 made a "bow", lots of "feathered arrows" and a holster to hold those arrows (see the photos above as he began crafting the "bow"). Miss 11 years was keen to get crafting as soon as we got home with our "goodie box". Her choice picks were the large pad of paper, textas fluoro dough and modelling clay.
The only problem with the "goodie box" was keeping some of the supplies for myself and my OT kids! Here is one way that we put some of the Officework's supplies into action. Using spice jars, I added some googly eyes, a foam nose and foam mouth (one is actually the letter "G" on the side). My little OT friend helped to unscrew the lid and add "feathers" as hair by poking them into the holes. Whilst a fun colourful activity, there were lots of therapeutic benefits that we were addressing too! We worked on crossing the midline and bilateral coordination (read more about this here), fine motor skills and a pincer grasp. 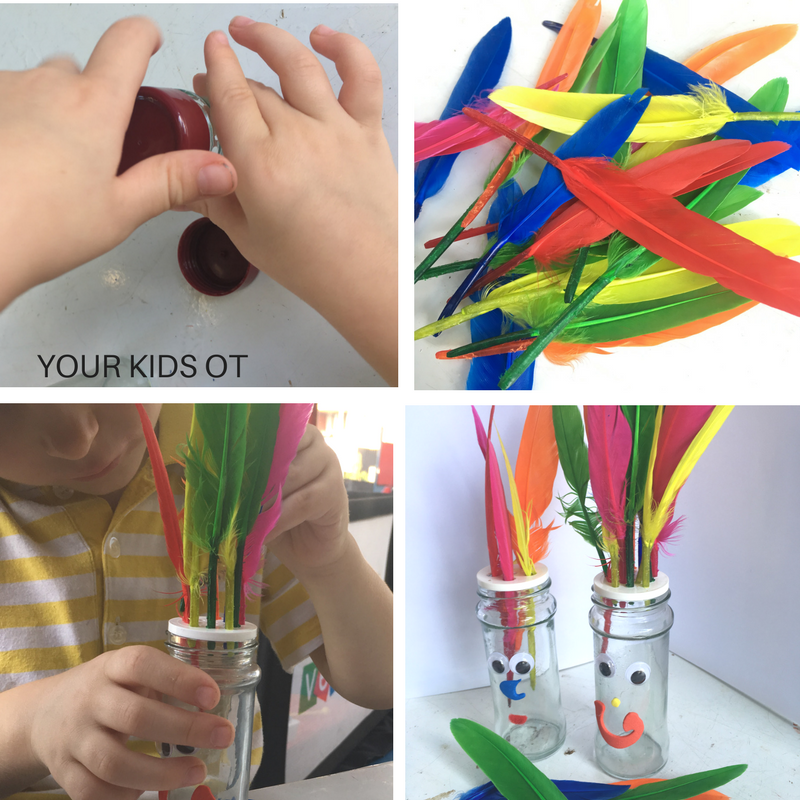
This vibrant number peg puzzle (by Melissa and Doug) was another way we worked on a pincer grasp. Hiding under the numbers were pictures to help with number identification and counting. We used pom poms to continue working on a pincer grasp and crossing the midline too.
Later I added an extra level of difficulty by asking this child to hold onto a pom pom with his third/fourth and fifth fingers whilst using his thumb and index finger to pick up the pom poms. This skill is called the separation (or disassociation) of the two sides of the hand is an important fine motor skill for handwriting, scissors, buttoning and other functional tasks (read more about this here). 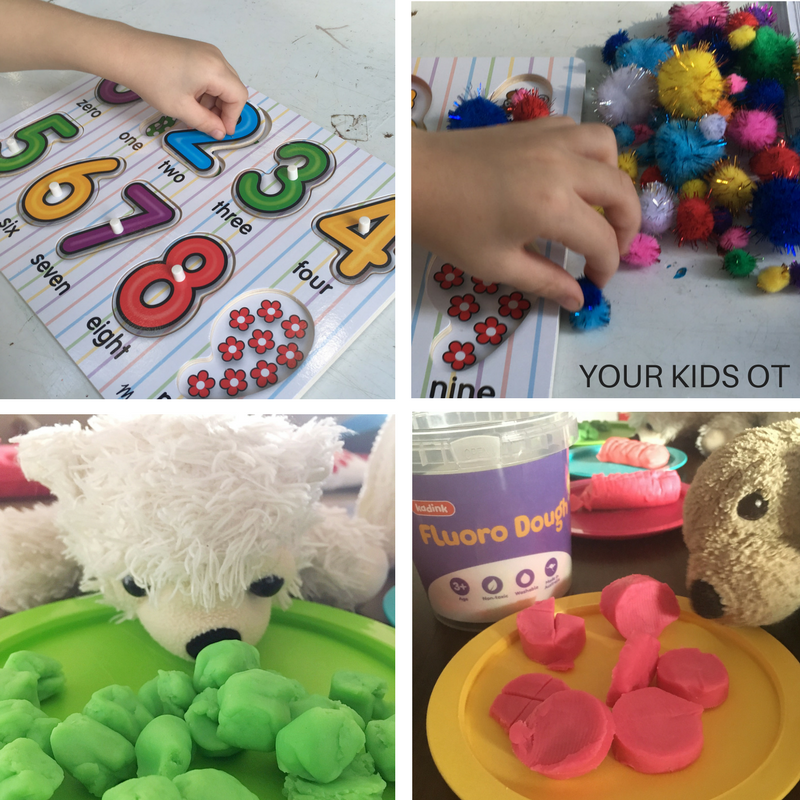
Playdoh and any other "dough" materials are such a wonderful sensory tool for hands on learning. It is so versatile and can be used for forming into shapes, letters and in pretend play. You can use playdough to encourage hand strength, fine motor skill development, sensory exploration, finger isolation, bilateral coordination and more! Find more ways to use "play dough" here.
I was truly impressed with the range of products available in the Officeworks Learn and Grow range. I've been a long time fan of the Officework's "smelly" stickers and my OT kids expect these each time I see them (unfortunately none of these in my goodie box). The scent is really strong and brings back memories of "scratch and sniff" stickers that I remember receiving as a child. Find the "Learn and Grow" range in stores or online atOfficeworks (delivery within Australia only). There are so many opportunities for "hands on learning" waiting for your kids. What is your child's favourite way to learn? Am I the only one who likes browsing an office supply store? 
Disclosure: I was gifted products from the Officeworks Learn and Grow range for the purposes of a review. Reviews and endorsements of products will only be made based on my expertise and personal opinion; and deemed worthy of such endorsement. The opinions shared in sponsored content will always be my own and not that of the advertising company or brand.
You may also like:
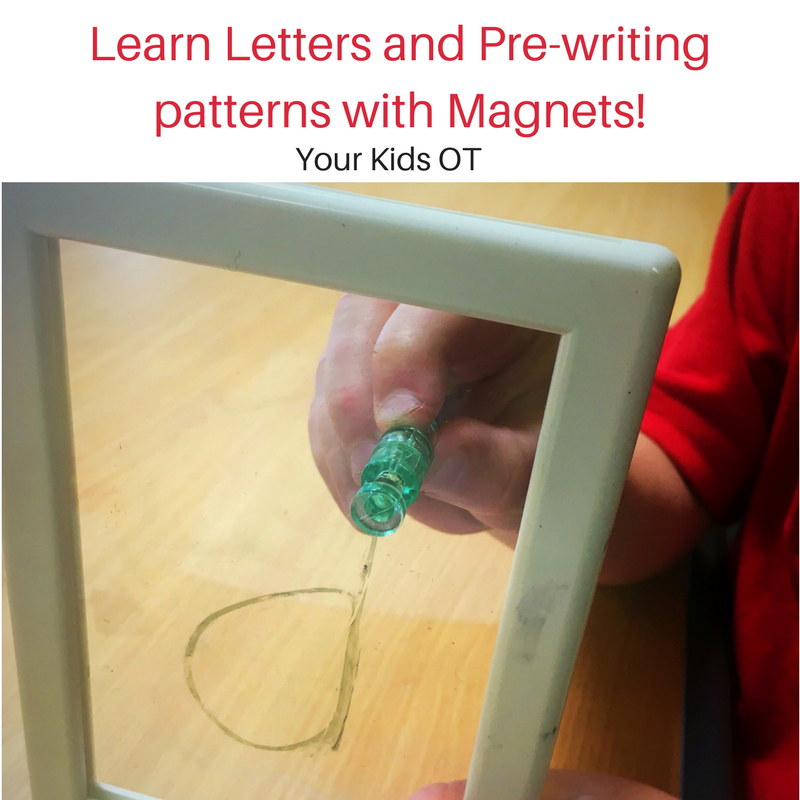
Magnets are so fascinating for kids! How do they work? What makes them attract or repel something?
Using the fascination children have with magnets ... I created a fun way to learn pre-writing patterns and learn letters too! What do you need? * two-sided plastic frame (I use this frame from IKEA and took out one of the plastic sheets) * magnets * whiteboard markers (and eraser) * felt/glue (optional) The felt and glue are optional. I added a small piece of felt to my magnets to prevent scratching the plastic frame. What do you need to do?
I hope you enjoy this video showing you what you need and what you need to do to learn pre-writing patterns and letters with magnets!
Note: The last time I included a video in my blog post, my loyal newsletter subscribers couldn't see it! Please also find the video available on You Tube at this link !
Why I love this activity!
This activity has so many great benefits! * Pincer grasp - Encourage your child to hold the magnet between their thumb and index finger. * Separation of the two sides of the hand - Encourage your child to tuck away their 3rd, 4th and 5th fingers. * Wrist Extension - As this frame is vertical; your child's hand will naturally be placed in a position of wrist extension. * Bilateral coordination - Encourage your child to use their dominant hand to hold and move the magnet, whilst using the non-dominant hand to hold the frame. * Visual Tracking - Your child should naturally watch the magnet as it traces the pattern, shape or letter. If they can't track visually - check out my variation below! * Shape and letter formation - Use this activity to teach pattern, shape and letter formation as your child will "feel" their hand moving in space as each letter is formed (spatial awareness). This learning through movement is called "kinesthetic" learning. Children can also learn the planning involved with forming patterns, letters and shapes. You may want to add a verbal element so that your child may repeat this to help with understanding the steps involved. The verbal prompt may also help them to plan when they form these patterns, shapes and letters on their own. The development of these skills are so important for handwriting on paper! This activity provides an excellent way to build "handwriting" skills without having your child "just write" for practice. It provides multi-sensory learning, is "novel" and fun! It is really quick to set up (once you gather your supplies). It is also transportable ... perfect for the mobile therapist! 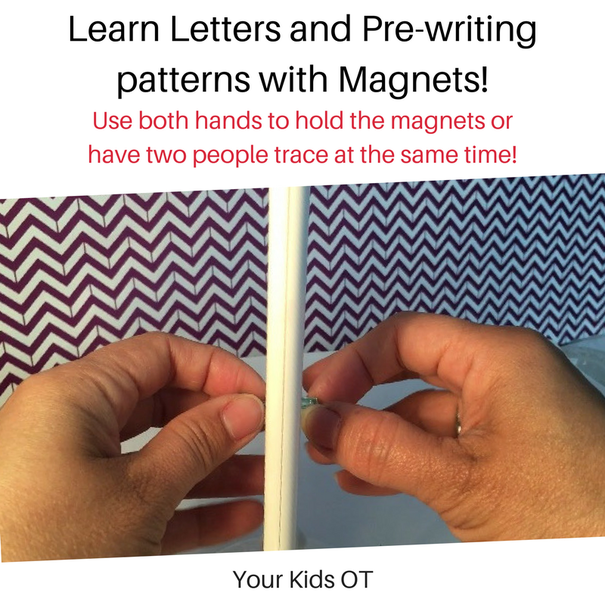
Variations
For more activities to promote the development of fine motor skills; see this page with a list of my articles on this subject! Does your child love magnets? Do you have an IKEA nearby? I would love to hear if you make any further variations to this activity idea!
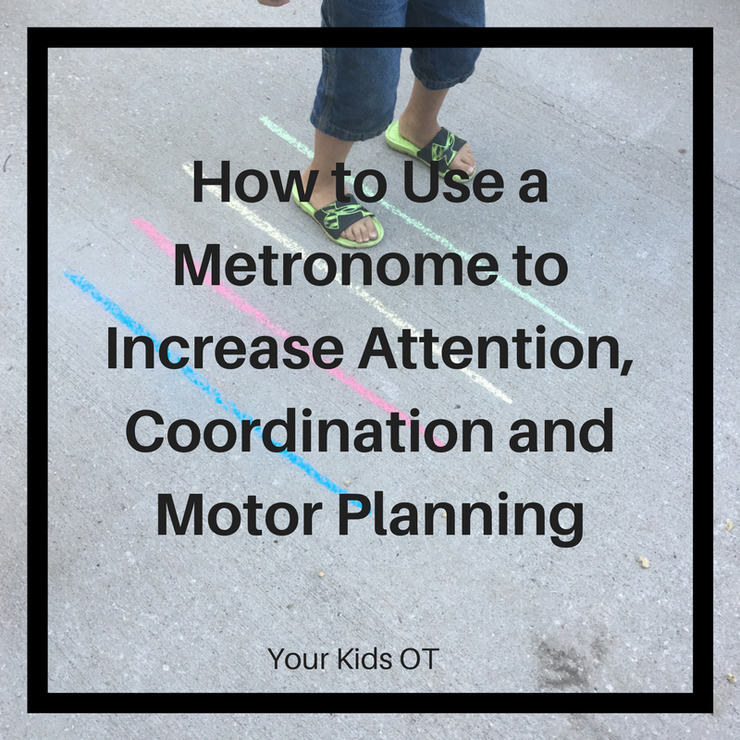
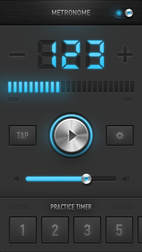
How to Use a Metronome to Increase Attention, Coordination and Motor Planning {Guest Post}31/7/2017
 What a privilege to have another guest blogger with us today at Your Kids OT! I feel like I am a student constantly learning from others and love reading what other OTs are doing in their practice! Today on the blog, I would like to introduce Casey who is an occupational therapist whom I "met" on Instagram! She shares so many creative ideas! Today, Casey shares with us "how to use a metronome to increase attention, coordination and motor planning". Be sure to follow the links through to her you-tube videos which provide a great demonstration of her activity suggestions here! Have you used a metronome in your OT practice? Have you considered using it in the classroom or at home?
The metronome creates a beat. This beat can be utilized at various speeds providing auditory input for the neurological system to process. Creating a sensorimotor activity that uses the beat (clapping on beat, stomping a foot on beat, bouncing a ball against the wall on beat) causes the brain to process and communicate messages between multiple senses It makes the brain process all of the messages passing through to get in rhythm! Think about listening to a teacher, taking notes, while maintaining posture in a chair. Or listening to your coach tell you how to adjust your stance, while holding bat in proper position in the batter's box and readying yourself for the next pitch. Multiple avenues of brain communication are needed to complete these tasks in congruence. What better way to exercise the attention, focus and motor needed to do this than to add some rhythmic auditory input. 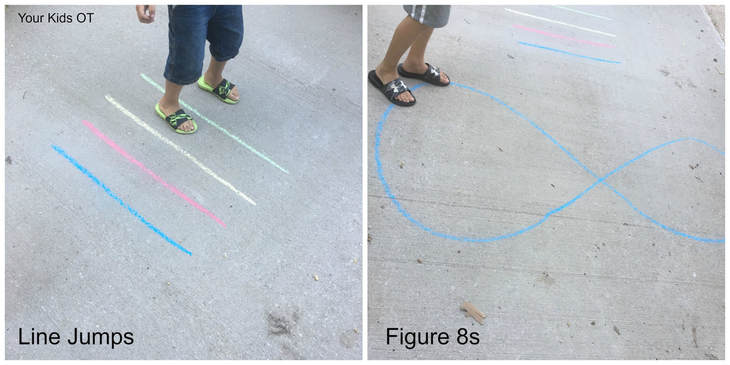 Here are some examples:
 What I love about this - is it is so easy to implement! This is not just an idea for therapists! Parents, teachers, paras... anyone working with kids YOU can try this too. I love implementing these activities for brain gym/brain breaks to stimulate the body and brain! They would be great activities to do during the school day or before homework! I hope this inspires you and gives you a fresh idea to implement in your home school or therapy session! Ready to Grow - Casey
You may also like:

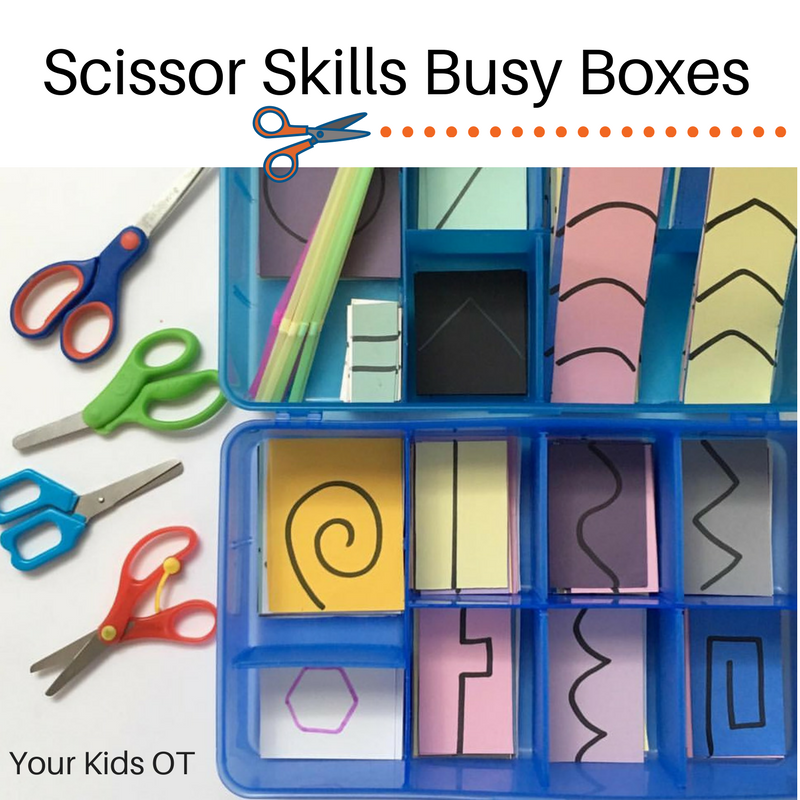
Cutting, laminating, photo copying, lesson planning .... do you do your preparation in the school holidays?
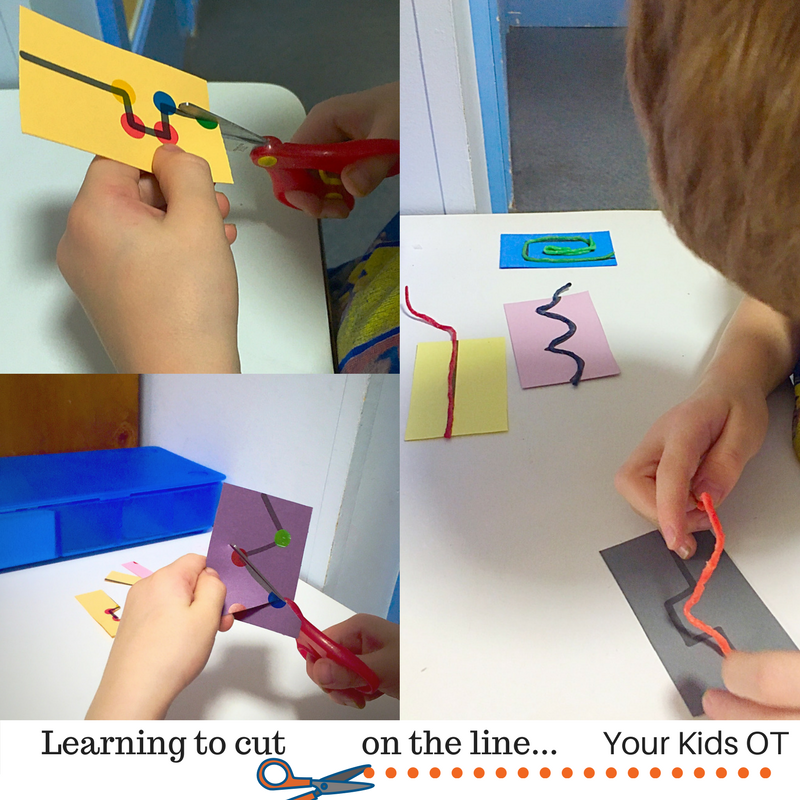
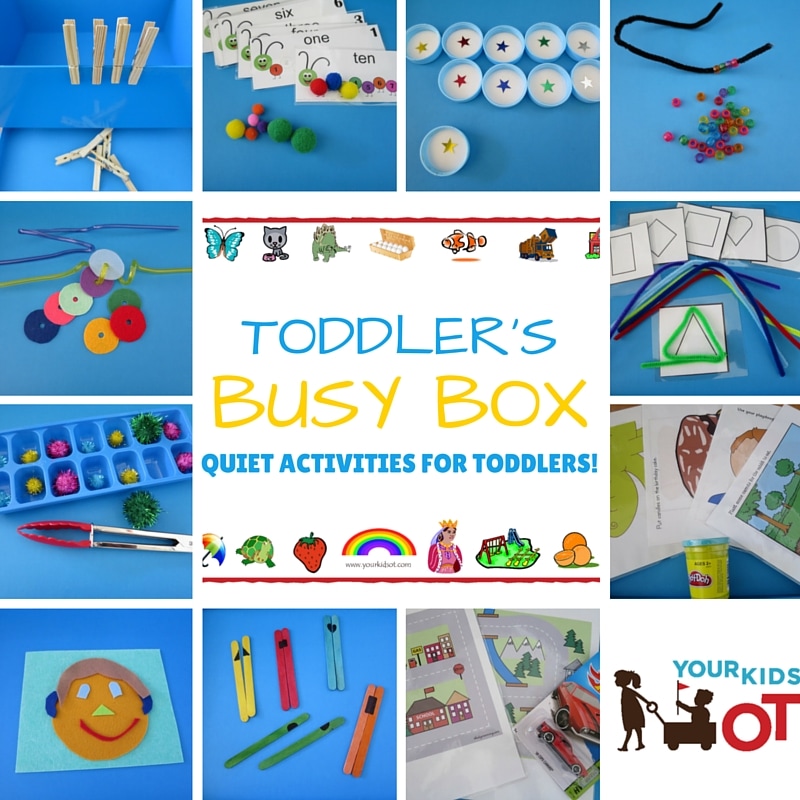
Teachers and OTs (or an other therapists for that matter)... we have a problem! We never quite "switch off"! We are always looking or listening out for a great idea that we can implement with the kids we see. Even on holidays... I notice ramps and think about access, I notice toys in shops and think how I could use that or I watch kids play and guess how old they are! Yep, I have a problem! Last year we were quarantined at home during one school holidays due to illness (gastro from memory). To make the most of this time, I made these scissor skills busy boxes! I knew that they would come in handy once the illness had passed and I was back at work! These boxes are perfect for home, preschool or in an OT tool kit! Yes they take a little while to set up but they are worth it! I sourced theseplastic boxes years ago from IKEA Australia and love that they have little compartments which can be adjusted in size. They also have a lid making them ideal to move around from place to place! I set up two types of boxes but you could use a combination of craft and cutting strips. The cutting strips were made from scrapbooking paper. This is a little thicker than normal writing paper and easier for little hands to hold and to cut (as it doesn't flop around as much and require too much stability with the non-dominant hand). In the cutting strip box, I wanted to have a range of developmental stages including shorter strips, thicker lines, thinner lines, curves, straight lines, corners and more! Read more about developmental stages over at MamaOT. If you are making this box for home, you may want to consider where your child is at developmentally before starting! 
A craft box is a great way to encourage those who are just starting out with scissors! Present a range of things to cut such as straws, crepe paper, wrapping paper, tissue paper, wool, ribbon, twine, tinsel, etc! Encourage your child's creativity with some glue to stick down all the things they cut!
These scissor skills busy boxes will appeal to your child if they already interested in cutting or they love experimenting with craft supplies! However, there are some children who are just...not..interested...in...cutting! These are the kids who are referred to OTs because of poor fine motor skills, poor hand strength and poor postural control. Sometimes these children have difficulty with cutting because they have not yet established a hand preference or have poor bilateral coordination (see here for more information). Here are some tips for using the scissor skills busy boxes!
Please tell me that I'm not the only one who has trouble "switching off"! Perhaps this is a subconscious reason I started this blog, so that I could record ideas and observations!
Have you got a "busy box" for scissor skill practice? What have you included in your box?

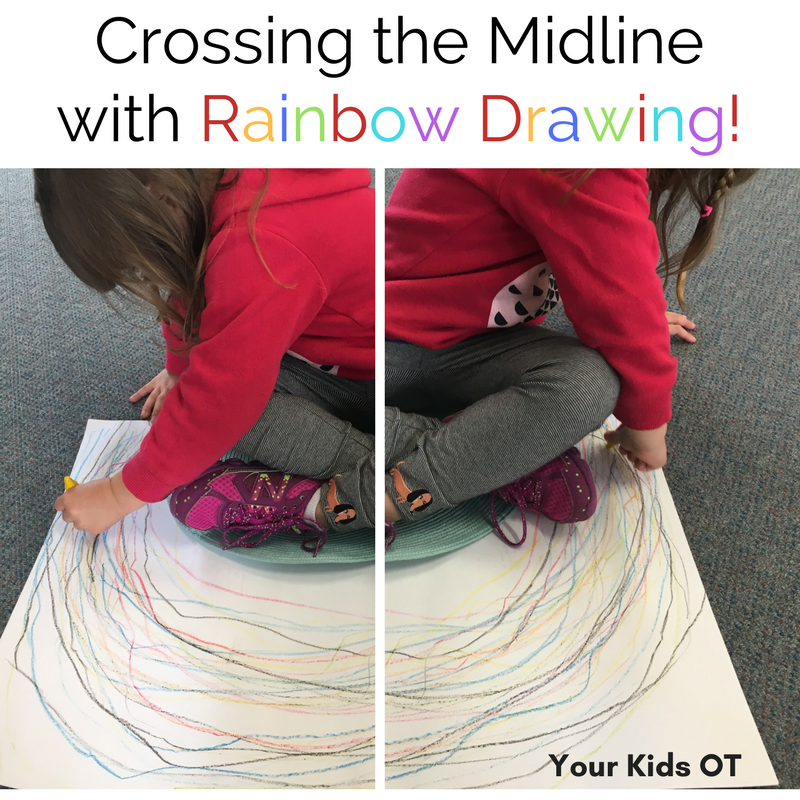
Everyone loves rainbows!
The colours of a rainbow can brighten a cloudy sky. I often feel like breaking into song ... "Somewhere over the rainbow...." Rainbows are everywhere in preschool and school craft activities and projects. This is a special one as we look at how the whole body works in crossing the midline. The "midline" is the imaginary line which can be drawn from your head to your toes through your belly button, dividing your body left from right. Some children have difficulties integrating the left and right sides of their body. They may adjust by moving their work to one side, shifting their body position on a chair or neglecting to use one side of their bodies. Read more about crossing the midline and bilateral coordination HERE. When encouraging "crossing the midline", we look at a child's ability to rotate at the trunk to use their right hand in the sphere of the "left side of the body" and their left hand in the sphere of the "right side of the body". 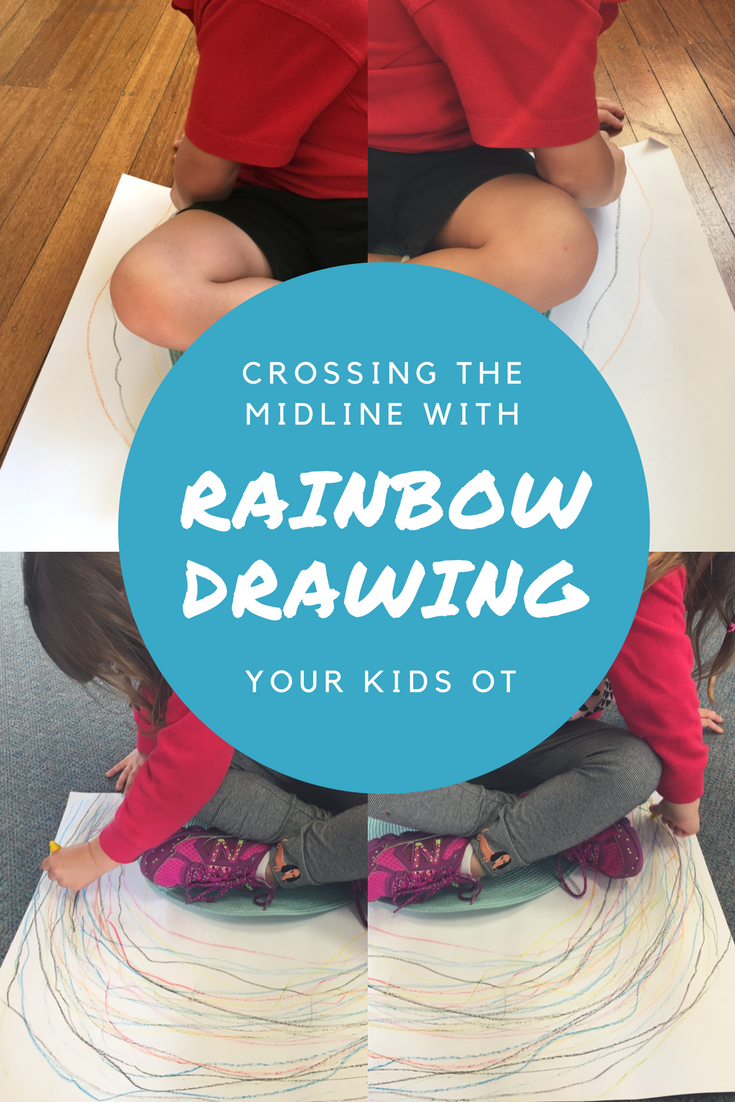
What to do:
1. Set up this simple rainbow drawing with a large piece of paper or cardboard. 2. Have your child sit cross legged in the centre. 3. Give your child a crayon or texta and ask them to reach across their body to start the rainbow. (ie. using the right hand, cross over to the left side and vice versa for the left hand). 4. Repeat this with multiple colours and in both directions (it is up to you if you want this rainbow to reflect the "real" colours"). Once the rainbow is completed, I also had my kids "drive along" the rainbow. I encouraged them to take a car with their right hand, cross over to the left side of the body and drive it back on the rainbow to the right. Sometimes we then pass the car behind the child's back and at other times, the car did a U-turn and drove back along the rainbow (with the alternate arm pushing it). 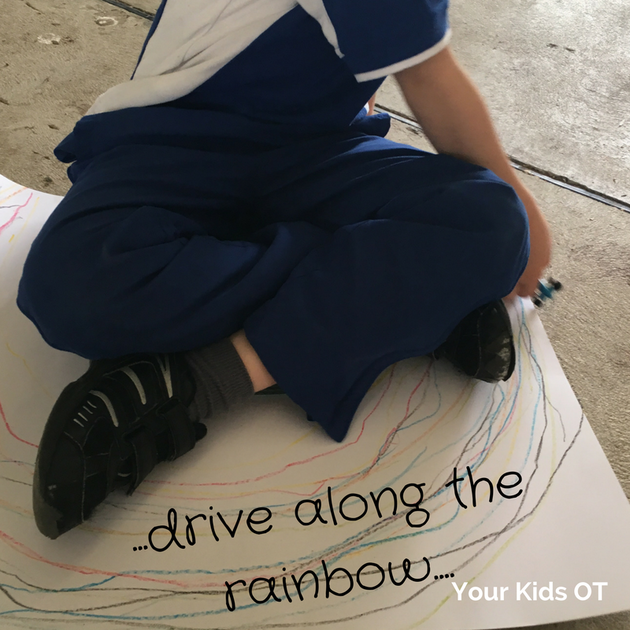
Do your kids love drawing rainbows? Do you ever break into song (even in your head)?
What is your favourite "crossing the midline" activity? 
You may also like:

Affiliate links are used throughout this website to promote products I love and recommend. I receive a commission if any purchases are made through these links. Please see my disclosure policy for more details.
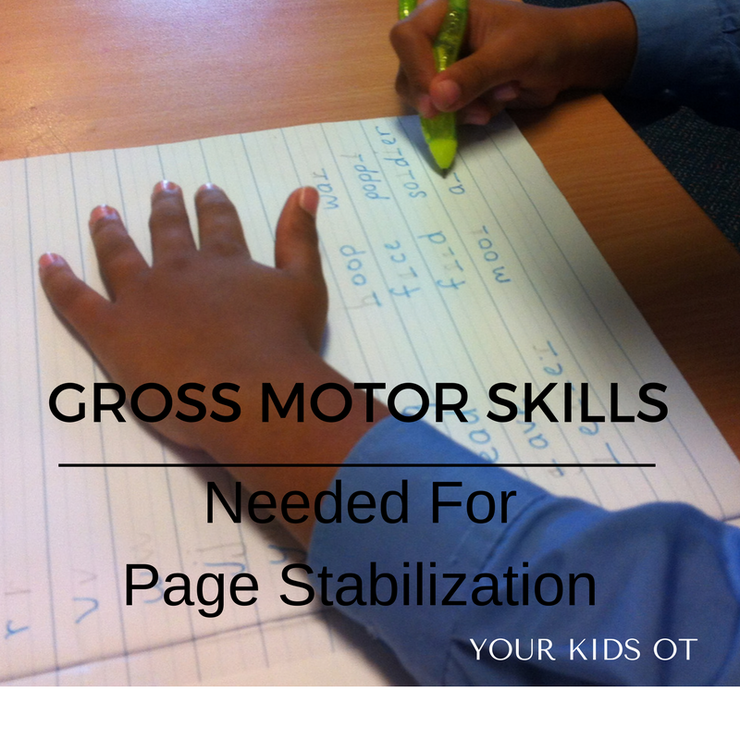
Put your left hand on the page and have your right hand do the "writing".
Hold the page not your head. Don't let your page wiggle! Do these phrases sound familiar to you? There are some kids who can't seem to hold their page still on the table. The paper flies off the table, moves as it is being written on or even gets crumpled under their hand. This makes drawing and writing really tricky! Ideally at the table, children use their dominant hand to hold a writing implement and use their non-dominant hand to stabilize the page they are working on. They provide just enough pressure so that the page does not move. The dominant forearm also rests on the page with their fingers and hands controlling the pencil. Did you know that the ability to stabilize a page on the table may be due to core muscle weakness, poor bilateral coordination and poor shoulder stability? How??? Core Muscle Weakness Core muscles can be considered "as the sturdy central link in the chain connecting your upper and lower body".* Core muscles describe both the muscles which assist with stability as well as those which enable trunk movement. ** What you might see in the classroom:
Core muscle strength can be developed through a wide range of activities. Organized sports such as swimming, basketball, gymnastics etc will assist with fitness and regular strengthening activities. Children can also develop core muscle strength through traditional exercises such as sit ups, push ups, holding a plank position, squats to stands, etc. Through play activities, children can build core strength without realising it. These might include using a hula hoop, pushing heavy wagons, crawling through tunnels, climbing on ropes, jumping on a trampoline, pulling a sibling on a towel, an obstacle course of pillows, relays in the yard picking up various objects to carry, riding a bike, etc. Bilateral coordination Bilateral coordination/integration is the ability to use both sides of the body at the same time in a coordinated way. What you might see in the classroom:
Read more aboutbilateral coordination HERE or obtain a copy of the bilateral integration reference sheet with over 50 activity suggestions HERE ! 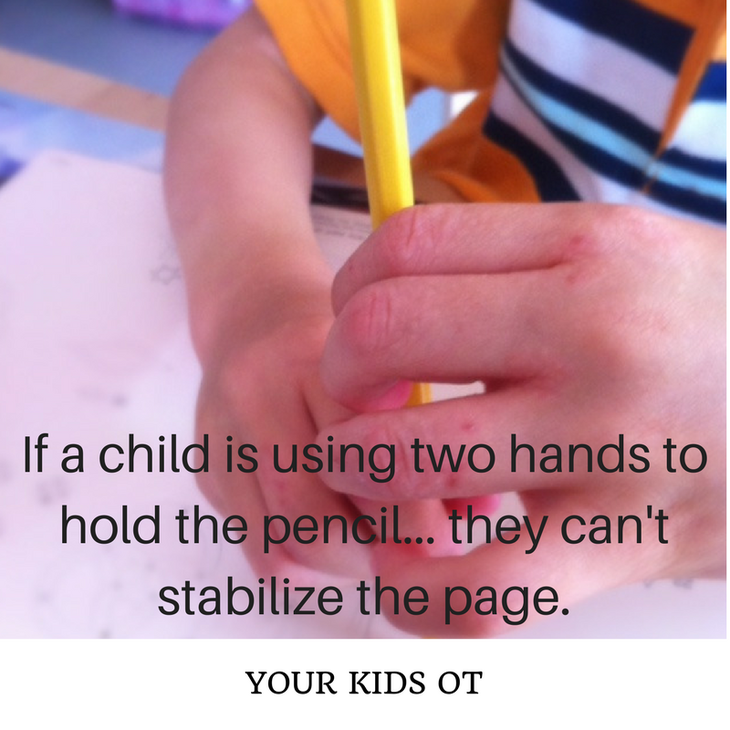
Shoulder Stability
Shoulder stability refers to the ability to contract (pull together) the muscles on either side of the shoulder joint to hold the shoulder steady. This allows the arm to be held in different positions while the forearm and hand do an activity. *** What you might see in the classroom: A child with poor shoulder stability may use their whole arm to control their pencil rather than using their fingers.
Shoulder stability can be developed with tummy time and crawling (for all ages)! Read more about this HERE! For further activity ideas to assist shoulder stability have a look at OT MOM LEARNING ACTIVITIES SHOULDER GIRDLE EXERCISES FOR KIDS! Do you have a child who struggles to stabilize the page on the table during writing? Do they have difficulties with any of these gross motor skills? 
Disclosure: Affiliate links are included in this article to promote products that I recommend. This means that if you follow through with a purchase from these links, Your Kids OT will receive a percentage of the sale. Reviews and endorsements of products will only be made based on my expertise and personal opinion; and deemed worthy of such endorsement. The opinions shared in sponsored content will always be my own and not that of the advertising company or brand.
References:
* Publications, H. H. (n.d.). The real-world benefits of strengthening your core. Retrieved February 07, 2017, from http://www.health.harvard.edu/healthbeat/the-real-world-benefits-of-strengthening-your-core ** Khadir, S. A., Knight, K., Bras, S., Rhule, V., & Pagare, V. Core stability - Physiopedia, universal access to physiotherapy knowledge. Retrieved February 7, 2017, from http://www.physio-pedia.com/Core_stability *** Royal Children's Hospital Melbourne, 2005. Occupational Therapy Kids Health Information: Shoulder Stability and Control. Retrieved February 07, 2017, (n.d.) from http://www.rch.org.au/uploadedFiles/Main/Content/ot/InfoSheet_F.pdf 
You may also like:
Imagine an 11 year old girl attending an evening class at a local school with her friend. They wanted to learn how to type so voluntarily enrolled in a "word processor" course!
Gosh that was a life time ago and certainly ages me! Have you even heard of a "word processor"? Keyboarding and proficient touch typing is an essential skill for the 21st century. I don't believe that it will completely make handwriting obsolete, however I would be living in a cave if I didn't acknowldege how important keyboarding and typing skills are to a student's every learning. Learning to use a keyboard and to type isn't easy! It is a false assumption that children with handwriting difficulties will learn to type easily. It will certainly help these children in the long run, however, it is important to be remember that children with motor and planning difficulties (eg, bilateral coordination, eye-hand coordination, motor planning, visual perceptual and fine motor difficulties) in handwriting will also have these difficulties when initially learning to use a keyboard to type. Accomodations for these difficulties may need to be considered when teaching keyboarding and typing skills. 
I learnt how to type on a word processor! Photo Credit: D. Kadavy via Flickr under the Creative Commons License. No modifications were made to the image.
How do YOU type?
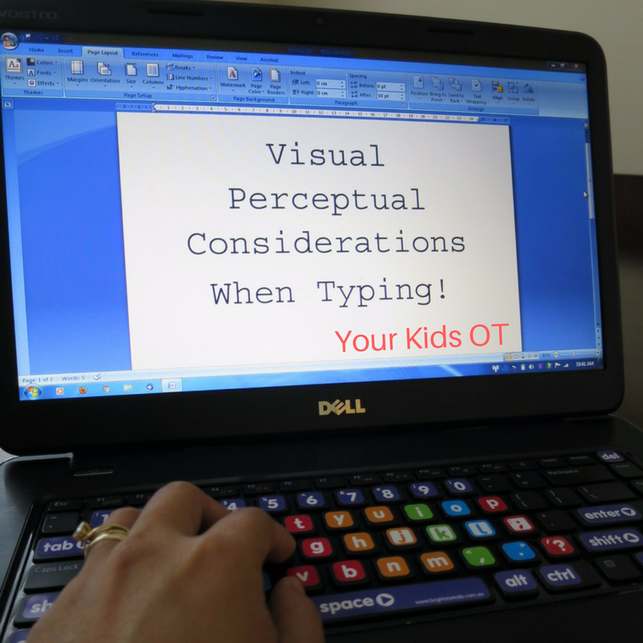
Hands up if you are a "2 finger" typer? Do you use your two index fingers to stab at the keyboard? Whilst there are a lot of proficient "2 finger" typers out there, I think it is important to teach kids proper finger positioning when learning how to use the keyboard! If you have a keyboard in front of you, look down at it for a moment. What do you see?
Did you notice what I asked you to do? Looking up at a screen then looking down at the keyboard. Did you easily find your place back up on the screen to read my suggestions? For children with visual perceptual difficulties this is one of the main issues they may have difficulty with as they look up and down and up again. They may also have to move their hands completely off the keyboard so they can see the keys. One of the main benefits of touch typing is eliminating this need to look up and down so often. Here is a look at the various aspects of visual perceptual skills required with keyboarding and typing. Eye-Hand Coordination Eye –hand coordination is the ability to coordinate eye movement with hand movements and includes the ability to process visual information to guide hand function. In keyboarding and typing, eye- hand coordination is needed to required to press the required keys. Beginner typists will need to look for each key to be typed, look up at the screen to make sure what is typed is accurate, look down again and so on. As touch typing develops, the eye can rest on the screen and monitor what appears rather than how the hand moves. The fingers are less reliant on "sight" of letters on keys and can move more automatically. Children may also need to watch their hand guide a mouse or track ball, with constant looking up at the screen and down at their hand as they work out the visual-spatial differences of moving something on a horizontal plane and how this can affect a cursor on the vertical plane. Visual Discrimination and Form Constancy Visual Discrimination is the ability to classify objects or shapes based on visual information such as colour, form, pattern, size or position. Form Constancy is the ability to identify an object, shape, letter, number, symbol when it is presented in a different way (eg. larger, smaller, rotated, italics, bold, different font, sideways, upside down, different colour). In keyboarding, and typing, children need to be aware that letters are produced in capital and lower case form. Most keyboards come with capital letter keys. Children need to grasp the concept of lower case letters being produced on the screen when capital letters are pressed on the keyboard. Some children will have difficulty reading certain fonts on the screen which they may be unfamiliar with. Some letters look quite different in different fonts (eg. a, g, k). Some children may also have difficulty with words written in italics and they may have difficulty with distinguishing letters because of their size on screen. 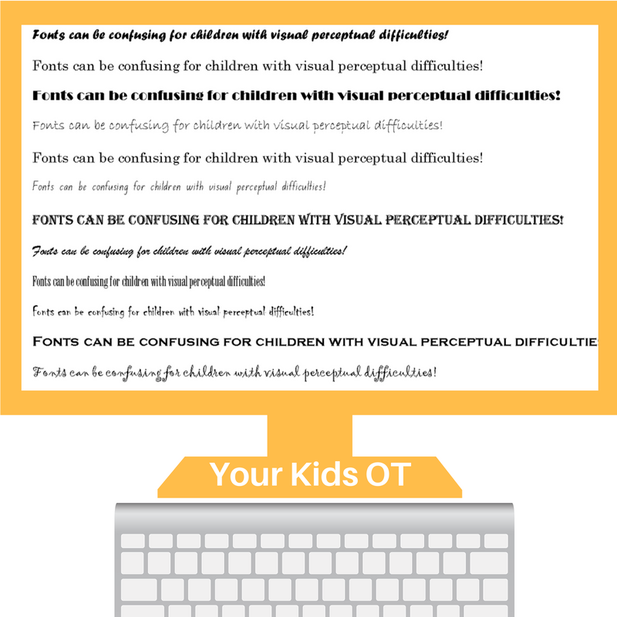
Recommendations and Accomodations for Visual Perceptual Difficulties
Position in Space or Visual Spatial Relationships.
Position in Space or spatial relationships involves the ability to process information about oneself in relation with their environment in space, orientation and position. It may involved the ability to understand directional language concepts such as up/down, next to, left/right, over/under, etc. As mentioned previously, as typing and keyboarding skills develop there is less reliance on visual guidance to find the right keys on the keyboard. Over time touch typers can understand where their fingers are "in space" and in relationship with other keys to be struck without looking. This is also true for the use of the mouse and trackball. Figure-Ground and Visual Memory Figure-Ground is the ability to see an object or form when presented in a complex background. Visual memory is the ability to remember and recall objects, shapes, symbols or movements in short term memory. Visual memory requires visualization of what to remember. In keyboarding and typing skills, both figure-ground and visual memory skills are required to learn the layout of the keyboard. They are needed to have a map (ie. visualization) of the keyboard in one's mind so that that finding the keys becomes automatic. Difficulties with figure-ground and and visual-memory may lead to more reliance on the visual skills of looking and scanning (ie. hunting) for the correct keys on the keyboard. This will slow down the typist and can often be observed with "2 finger typists". Both figure-ground and visual memory skills are also needed to enable a child to maintain their place on the screen when looking down and then up again to keep track of what they are writing on the screen. This is further complicated if the child is copying text to type onto the scren as they are looking at the stimulus, looking at the screen, looking back at the stimulus, looking at the screen, looking a their hands and so forth. Locating the cursor/pointer may also be difficult for children who have difficulty with figure ground skills. The pointer may look like a large capital "I" when typing text and be confused with the print on screen. 
Well I'm please to tell you that that 11 year old girl who learnt to touch type on a word processor can now type approximately 70 words per minute. I use this on a daily basis as an OT and for this blog!
BUT I also pre-wrote most of this article on paper first with scribbes here and there when I edited the order of my work and brainstormed what I wanted to cover! So don't throw the pen and paper away just yet! This article is part of the "Functional Skills for Kids Series by Pediatric Occupational Therapists and Physical Therapist". This is the last month of the 12 month series so do go back and check out any months you might have missed! You will find all the childhood functions HERE. Read all Your Kids OT’s monthly posts HERE Find more information about “keyboarding and typing”, read what other Occupational and Physical Therapists participating in the “Functional Skills for Kids series” have written:
When is My Child Ready to Learn to Keyboard? | Miss Jaime, O.T.
Fine Motor Skills and Typing | Therapy Fun Zone How to Implement a Keyboarding Club | Sugar Aunts 10 Keyboarding Modifications to Help Kids Type Better | Mama OT Activities to Help Children Learn to Type | Growing Hands-On Kids Assistive Technology for Kids Who Struggle With Handwriting | The Inspired Treehouse Work Station, Positioning and Keyboarding Skills| Your Therapy Source Visual Perceptual Considerations When Typing | Your Kids OT
BUT WAIT THERE IS MORE!
Have you enjoyed this 12 month series about Functional Skills for Kids? It has been an honour to work along side these amazing therapy bloggers. You can stay in touch with our whole team by joining us on FACEBOOK. Join THE FUNCTIONAL SKILLS FOR KIDS GROUP PAGE to be find out about the books we will producing based our this series and much more! 
Disclosure: Affiliate links are included in this article to promote products that I recommend. Your Kids OT is a participant in the Amazon Services LLC Associates Program, an affiliate advertising program designed to provide a means for sites to earn advertising fees by advertising and linking to Your Kids OT. Reviews and endorsements of products will only be made based on my expertise and personal opinion; and deemed worthy of such endorsement. The opinions shared in sponsored content will always be my own and not that of the advertising company or brand.
You may also like:
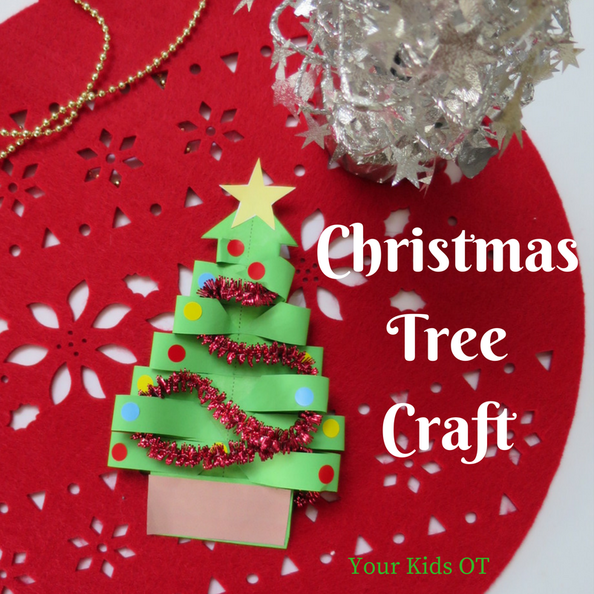
One month until Christmas and it is time to put up the decorations!
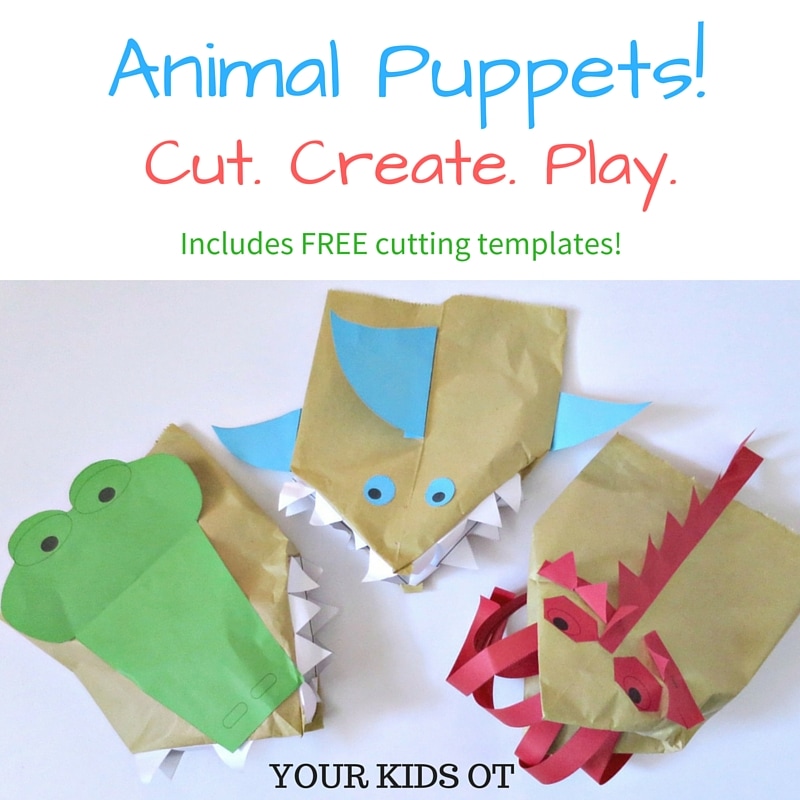
Only a few more OT sessions before we stop for the year! Are you in Christmas-mode yet? My facebook news feed has started to have more and more options to celebrate this festive season! Recently, I came across this "DIY PAPER CHRISTMAS TREE" idea by Krokotak! I thought it was wonderful but wanted to make it a little more structured for my kids who find it difficult to cut without a line to follow. This little craft will work on a number of skills whilst having fun! There will be scissor skills, fine motor manipulation, left and right bilateral coordination skills as well as planning and sequencing skills! 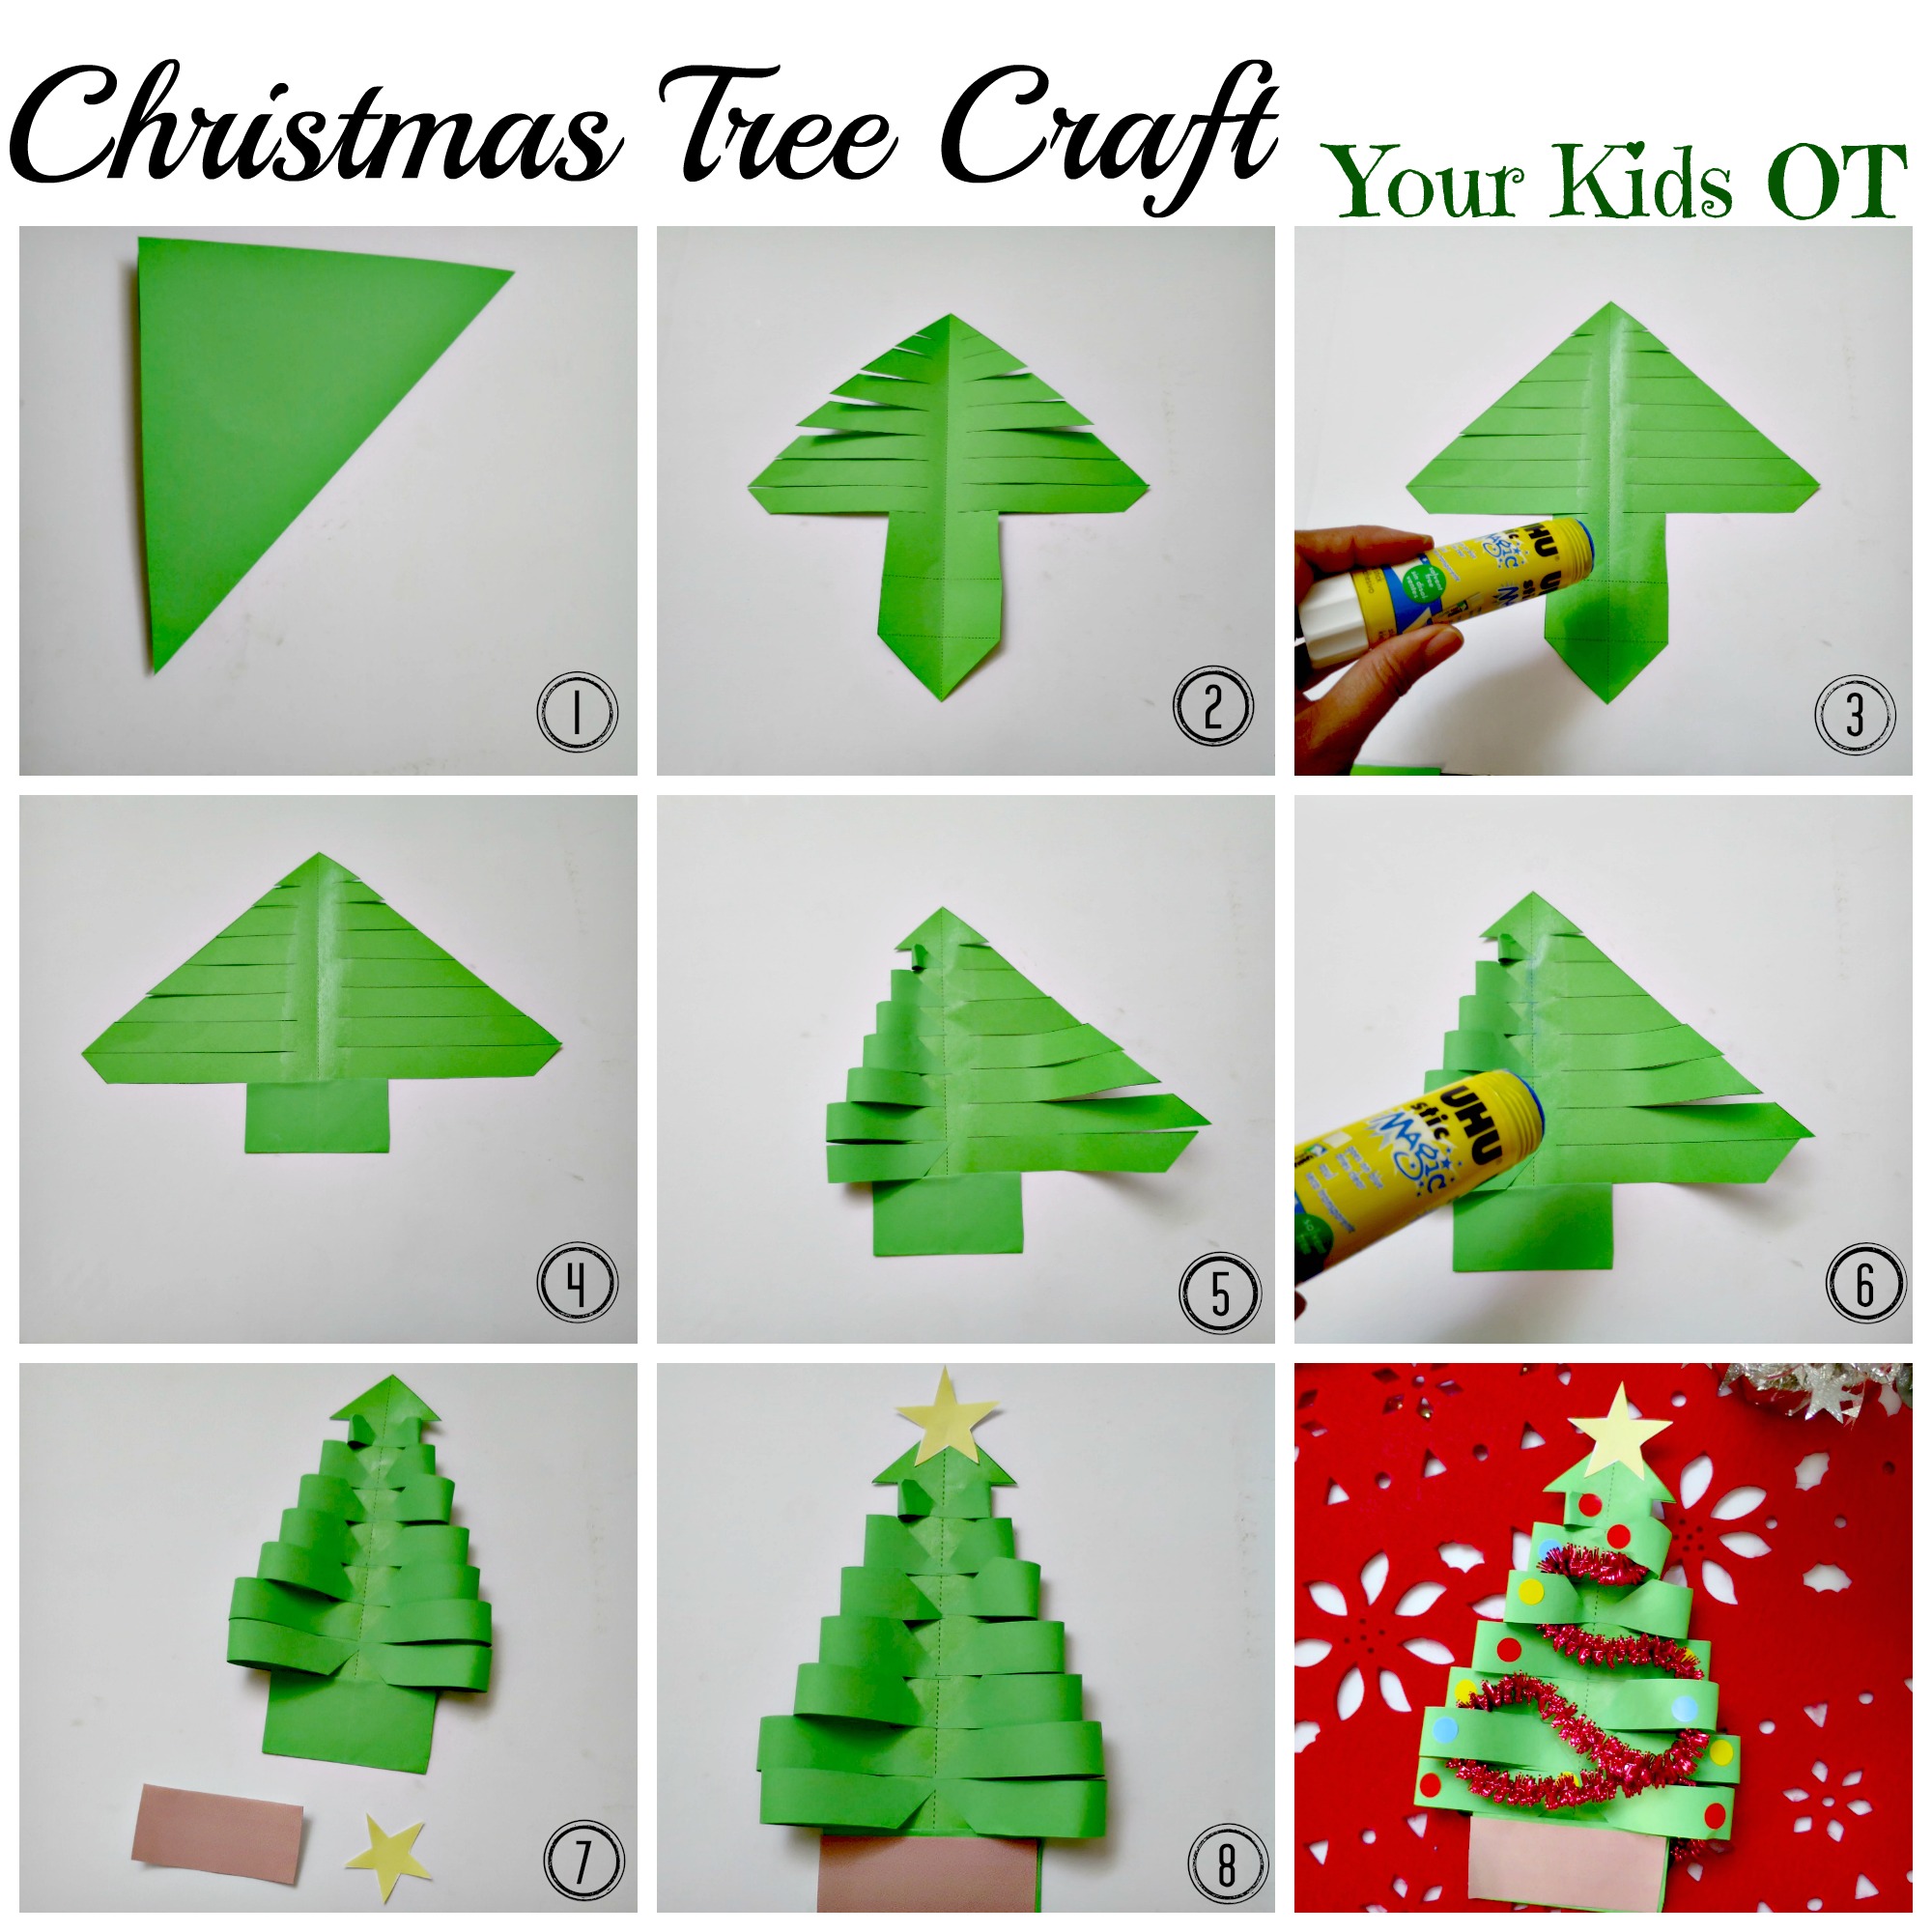
What you will need:
Instructions:
This is an adorable tree that you could hang up in the classroom. You could also add a string to hang it is an ornament on your real Christmas tree! Don't forget to print out theFREE template so you can start creating this tree with your kids! I would love to see your creations if you try this at home. Tag @yourkidsot on Instagram or Facebook! I can't wait to see your trees! 
You may also like:

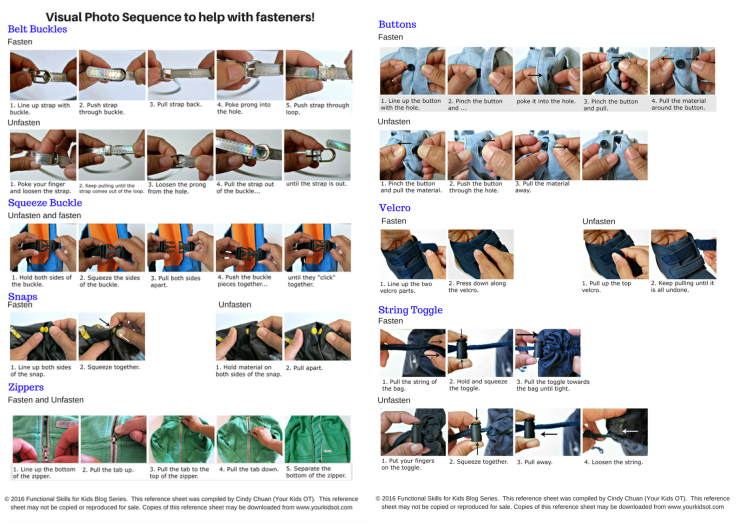
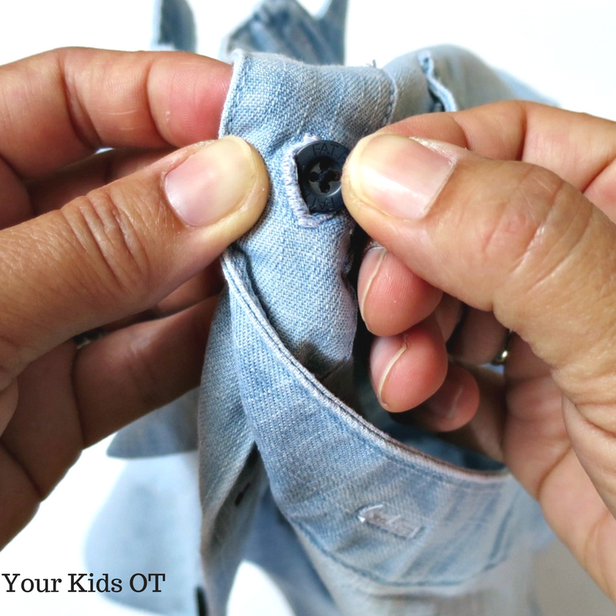
We are going to be late! Hurry up! I can't do this button up! I can't! Put on your jacket, it's cold out! I can't do the zip! I can't! The morning rush out the door to get to school can often be a struggle. Getting dressed can be a chore and then there are fastenings on school bags to manage too! This month in the "Functional Skills for Kids" Series, we look at helping kids with fasteners such as buttons, zippers, snaps (press studs) and more! My blogging colleagues will look at fine motor, gross motor, visual perceptual and sensory motor considerations. We will also cover when we should expect our kids to manage these tasks and how to incorporate this learning in play. Find the links for these articles below! 
So it is time for your child to learn how to manage fastenings on their own but where do you begin? It helps to have an understanding of the steps involved with each of these tasks. I have outlined the steps involved in managing common fastenings here through visual photo sequences. For your printable copy of these sequences, download them HERE!
Once you know the steps involve there are a few tips in teaching your child how to manage these fastenings. (Actually these tips apply to teaching your child most new tasks!)
These are tips occupational therapists use all the time!
generalization of the skill (eg. zipper on dress, zipper on bag, zipper on pencil case, zipper on doll's skirt). 9. Reinforce and reward - We would like our kids to have intrinsic motivation to manage fasteners independently! Many children do desire this independence and often "force" it upon their parents too early with "I can do it myself!" Some children, however are not so intrinsically motivated. They stubbornly refuse to get dressed or insist on a parent helping them. For these children praise and reward are important to encourage desirable behavior. Often these kids benefit from a "backward chaining" approach discussed earlier. Rewards may include verbal praise "Great job!" or "You did it!". The reward may include letting your child choose their preferred outfit to wear or a sticker. A side note about rewards:
Is your child struggling with fasteners? Have you tried these tips?

This post is part of “Functional Skills for Kids: 12 month series by Paediatric Occupational and Physical Therapists”. You can read all of the childhood functions HERE. Read all Your Kids OT’s monthly posts HERE.
Find more information about “helping kids with fasteners” from other Occupational and Physical Therapists participating in the “Functional Skills for Kids series”:
When Can Kids Learn to Button and Zip? | Mama OT
Clothing Fasteners and Fine Motor Skill Development | Kids Play Space Clothing Fasteners and Gross Motor Skill Development | Your Therapy Source Inc How to Adapt Buttoning and Zipping for Your Child | Miss Jaime OT Learning How To Use Buttons, Snaps, Zippers, and Buckles Through Play | Growing Hands-On Kids Tips to Teach Kids to Zip and Button | The Inspired Treehouse Pinch. Poke. Snap... Helping Kids to Manage Buttons, Zips and More! | Your Kids OT Clothing Fasteners and Sensory Processing | Sugar Aunts The Visual Motor Aspect of Buttons and Zippers | Therapy Fun Zone 
Shuffle shuffle. The 8 year old was shuffling along his chair and almost fell off. Why was he doing this?
Left hand. Right hand. Together. The 6 year old girl could not decide which hand to hold the crayon. Snip snip. Hang on! This kid was just using a different hand when holding his pencil! This child can't sit cross-legged on the floor! They either flop about or sit with the legs in a "w" position. Have you seen any of these common issues in the classroom? Hand preference, crossing the midline, bilateral coordination are all related concepts. Read on and let me explain how! 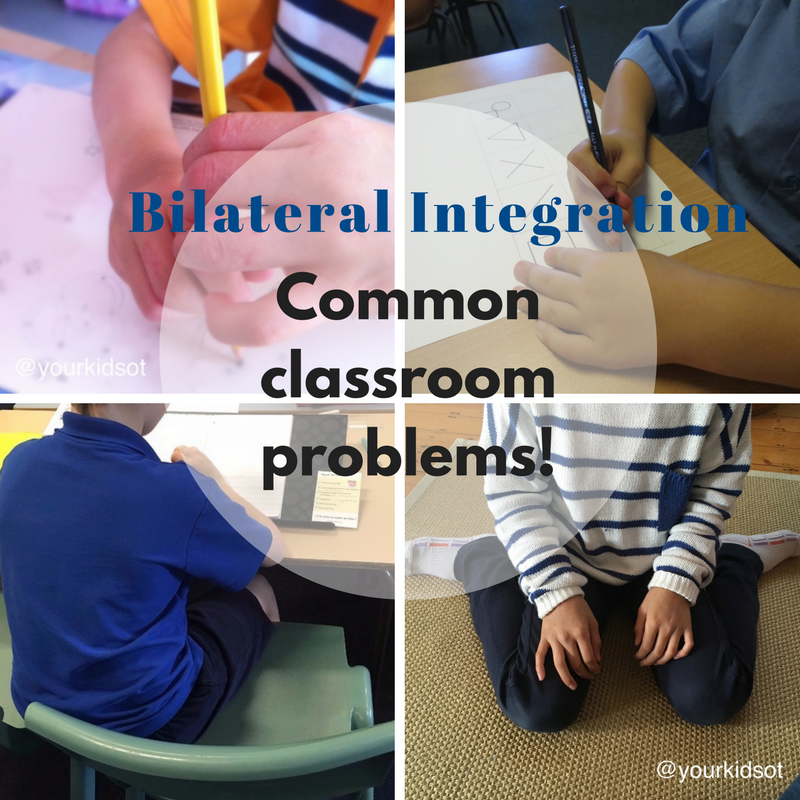
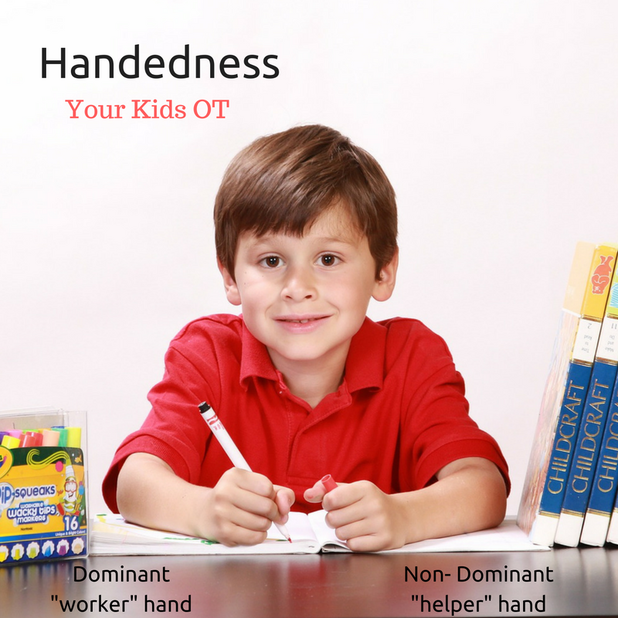
Development of Bilateral Coordination Bilateral coordination/integration is the ability to use both sides of the body at the same time in a coordinated way. Babies develop symmetrical bilateral coordinated movements at 3 months of age (Beery, 2010). They bring objects to their midline (ie. the imaginary line running through the middle of a person separating left from right). Both hands move simultaneously and symmetrically. This skill continues to develop as a child matures, develops muscle tone and control. Examples of symmetrical bilateral coordination include clapping hands, holding onto a cup with two hands to drink, banging a pot with both hands together, using a rolling pin and banging two blocks together. Reciprocal bilateral coordination can be seen when both sides of the body are performing the same actions in an alternating pattern (ie. reciprocal pattern). This may include just the upper limbs or just the lower limbs or a combination of both. Early signs of this include crawling, shaking percussion instruments with alternating hands and walking. Assymetrical bilateral coordination can be seen when both sides of the body are used to perform one activity. One hand acts as the "worker" (dominant) and one hand acts as the "helper" (non-dominant). Both hands play important roles in a variety of bilateral tasks. Handedness (the identification of a dominant hand) is important for the development of fine and gross motor skills. It enables more refined development of the "work" hand to be "skilled". In the brain, this means that cerebral dominance is localized to one hemisphere (ie. lateralized brain). Everyday examples of assymetrical bilateral coordination include using one hand to hold scissors to cut whilst the other hand manipulates the paper, turning a screw bottle top with one hand whilst the other hands holds the bottle, using a screwdriver to turn whilst holding the screw steady, squeezing toothpaste onto a toothbrush whilst holding the toothbrush steady, etc. Through natural opportunities to explore and play, children develop a hand preference (one hand is preferred or chosen) and handedness (one hand is more reliable for use across a range of skillful acts). (Erhardt and Sava, 2008). The age which children demonstrate hand dominance has been quite varied in research stating development anywhere between 5 and 9 years of age (Kaufman, Zalma and Kaufman, 1978). Erhardt (2008) describes the essential developmental components for acquiring hand preference includes postural control, eye-hand coordination and perceptual concepts such as body image. Therefore mixed dominance (where there is no clear choice) should be considered as a symptom of dysfunction (rather than a cause) in areas such as handwriting and cutting. Kaufman, Zalma and Kaufman (1978) also found that preference for the right or left hand is related to knowledge of right versus left with greater mastery or right-left discrimination displayed by youngsters with a consistent hand preference. But wait!.... I hear you say! My child can use both hands equally well. They are ambidextrous! Research has shown that the percentage of true ambidextrous people in the community is quite small. Here is where you can choose your own adventure ( I used to love those books as a kid). If your child is ambidextrous (ie. mixed dominance) and this is not affecting functional tasks, bilateral coordination or the classroom issues mentioned previously then GREAT! Please feel free to skip over this article. If your child has not developed a hand dominance and it is affecting their functional skills then keep reading! Crossing the midline The ability for one side of the body to “crossover†to the other side of the body. This requires good core stability, trunk rotation and body awareness. In the brain, this requires the left and right hemispheres of the brain to communicate across the corpus collosum (the connection between the two sides of the brain). The ability to "cross the midline" is an important skill for kids every day. Examples include sitting cross-legged on the floor, cutting with scissors, reaching across to put on shoes, drawing a diagonal line, unzipping a school bag. Kids sometime compensate for difficulties with crossing the midline by demonstrating some of the problems I listed earlier. They may switch hands when the pencil reaches the midline. They may adjust their work so it is always on the "writing side". They may move themselves along the chair so that the work is kept on the "writing side" as they write along a line. 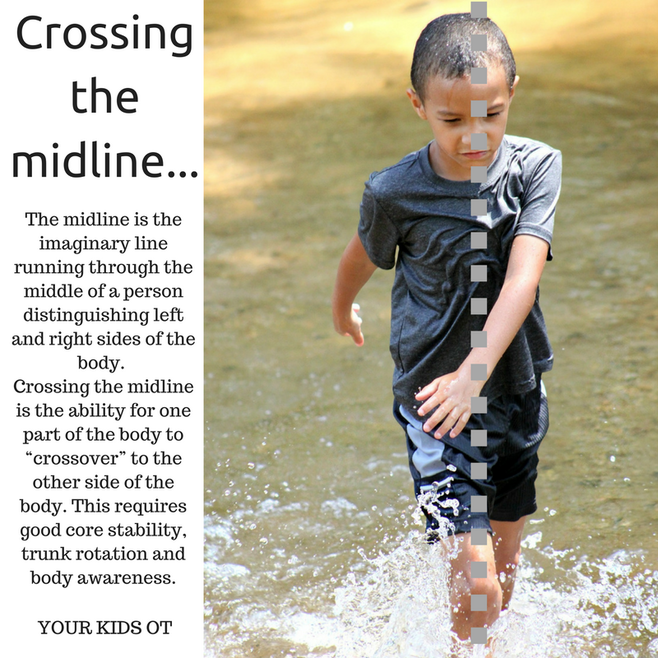
Associated Problems with Bilateral Coordination.
When considering bilateral coordination, there are a number of associated problems that need to be considered as well.
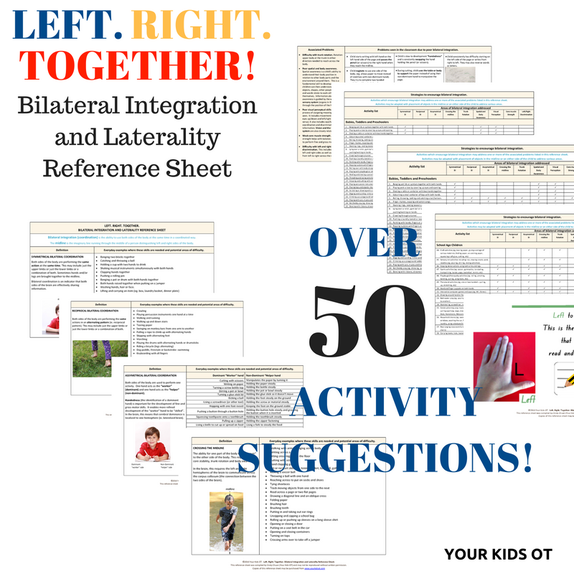
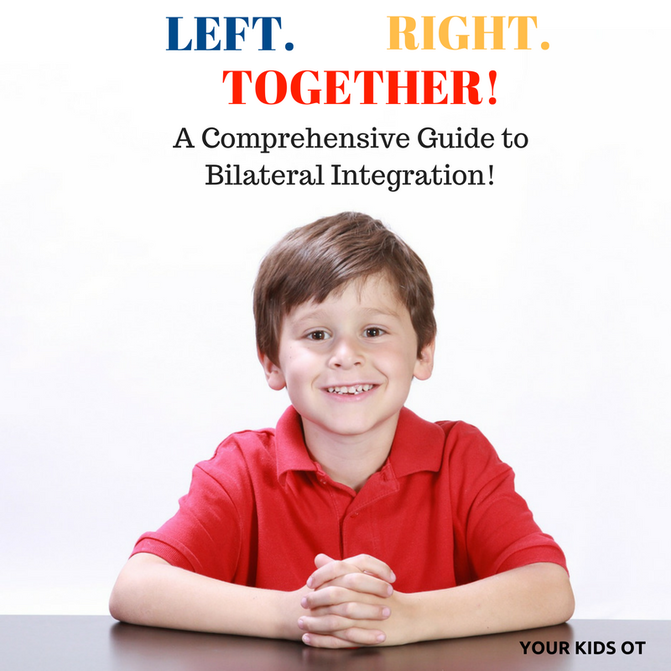
INTRODUCING MY NEWEST REFERENCE SHEET! The "Bilateral Integration and Laterality" reference sheet is a comprehensive guide to bilateral integration! It covers everything in this article as well as over 50 activities to help your child with bilateral coordination skills. This reference sheet has been kindly reviewed by some wonderful therapy bloggers! A big thanks to my colleagues for reading, commenting and reviewing! Read what they are saying about it! "It is incredibly thorough and the checklist is a thoughtful way to provide reasoning for activity use during treatment or education."Becca @ OT Mommy Needs Her Coffee "It is very visually laid out for ease of reading".Laura @ Easter Seals DuPage & Fox Valley "I love how easy it is to follow and understand, especially for parents. But it is also a great refresher for therapists too!" Heather @ Growing Hands On Kids Purchase your copy of the "Bilateral Integration and Laterality Reference Sheet" HERE! As a special introductory offer, you can purchase the BI reference sheet as a bundle with my other popular reference sheets: pencil grasp, sensory, visual perception skills. Purchase your bundle HERE!
Do you know a child with difficulties with bilateral coordination?

References
|
AuthorHi, I'm Cindy and I am an Occupational Therapist. I enjoy working creatively with children to see them reach their potential. Read more about me here. 
SEARCH THIS SITE

Archives
June 2024
Categories
All
Popular Posts

 |


 RSS Feed
Join the YKOT e-newsletter!
Subscribe to get our latest content by email and receive
the SHAPE ROADS PRINTABLE NOW!

Success! Now check your email to confirm your subscription and receive your free printable!
Join our Mailing List!
Subscribe to get our latest content by email and receive
the SHAPE ROADS PRINTABLE NOW as a thankyou!
Success! Now check your email to confirm your subscription and receive your free printable!
Disclaimer: The information on this site is general in nature and should be used for educational and entertainment purposes. The activities are safe for most children, however, you should consult an Occupational Therapist or health professional to address specific movement, sensory or other medical conditions. This blog does not replace formal therapeutic professional advice given by a health professional or medical practitioner. Reviews and endorsements of products will only be made based on my expertise and personal opinion; and deemed worthy of such endorsement. The opinions shared in sponsored content will always be my own and not that of the advertising company or brand. Content, advertising space or posts will be clearly identified if paid, affiliated or sponsored. Affiliate links may be found throughout this website in advertising. This means that if you follow through with a purchase from these links, Your Kids OT will receive a percentage of the sale. Your Kids OT undertakes to meet the requirements of the "Social Media Policy" as published by Australian Health Practitioner Regulation Agency (AHPRA). Further information about this policy can be found here.
Find meFollow me |

|
About me
AuthorHi, I'm Cindy and I am an Occupational Therapist. I enjoy working creatively with children to see them reach their potential. Read more about me here. 
|
Copyright © 2017 Your Kid OT