
Toddlers are busy little people. They like exploring with their hands (and mouths). They love putting things in and taking them out of containers. They continue to explore different textures. They are starting to use both hands together and as they get older starting to choose one hand as the dominant "worker" hand and use their other hand as the "helper. They are starting to learn about colours, shapes and counting. They are learning about their own body parts and how to move them to perform certain actions.
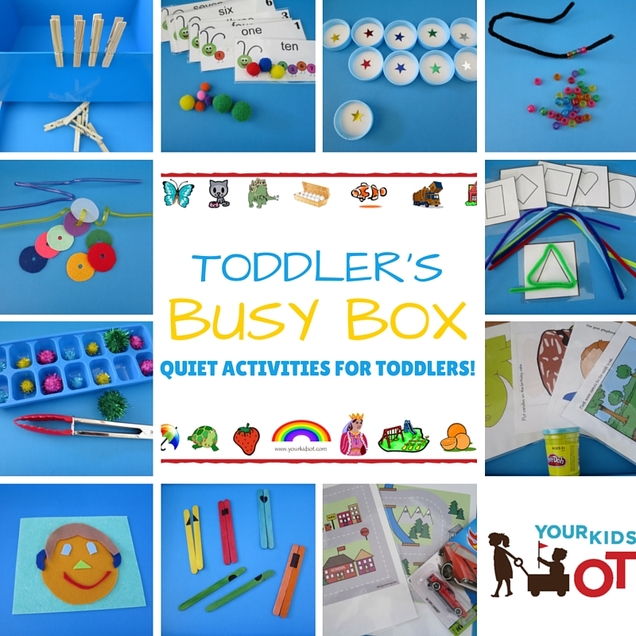
I would like to say recently, but it was actually some time ago I made some "toddler busy boxes" to give to friends who were expecting their second children. These were gifts to keep their "firstborns" busy with quiet interesting activities. These toddler activities were chosen so they can be done almost independent of mum (who may be busy with the newborn) and could be repeated over and over again. Depending on the age of your toddler and their exposure to similar activities, you may need to show them how to do these several times before they are independent. You may like to introduce one activity at a time rather than give your child the whole box of activities in one go. I placed each individual activity into a zip-lock plastic bag so all the pieces could be kept together. I then placed all the activities into a sturdy box with the child's name on top. 10 Great Toddler Busy Box Activities! 1. Felt face - I cut out a square as a background piece, a circle for the face and various interchangeable pieces for the facial features. Your toddler can make "faces" trying out different positions for various features. They may learn about their body parts and how to organise the felt face to match the spatial positions of their own face. As your toddler gets older they could try drawing a face using the felt face as a model. 2. Ice cube tray, tongs and pom poms - Your toddler places a pom pom into each hole in the ice cube tray. They may also use the tongs to pick up and release pom poms. They may develop hand strength and learn colours from this activity. 3. Crazy straw and felt circles - I cut out a series of felt circles and made a hole in each circle. Your toddler may thread the circles onto the crazy straw one at a time so that it goes for a "ride". They may place all the circles onto one straw to see how many fit. They may learn about colours and use both hands collaboratively. 4. Pegs - Your toddler may place the pegs onto the side of the box. You could change this over time by adding colours or letters to the pegs which may be matched to a corresponding card. They may develop hand strength and start using both hands together. 5. Caterpillar counting pages and pom poms - I downloaded these counting pages from Powerful Mothering and laminated them. Your toddler may match the pom poms with the caterpillar body. As they get older they may be able to match the corresponding coloured pom poms to the pictures and count them. 6. Milk Bottle Lids and star stickers - I placed some star stickers onto 10 milk bottle lids. Your toddler may match the stars with the same colours. They may like to stack the lids and knock them over. As your toddler gets older you may use the lids as a memory game placing them all face down and trying to find the matching pair turning over two at a time. 7. Pipecleaner and small beads - Knot one end of the pipe cleaner with a bead so that their is a "stop" end. Your toddler may begin to thread beads onto the pipecleaner. This activity may require supervision so that beads are not placed into the toddler's mouth and swallowed. 8. Shapes and pipecleaners - I provided laminated pictures of shapes and pipecleaners. Older toddlers will be able to manipulate the pipecleaners to the shapes. You may also provide a dry-erase marker for your toddler to trace or colour in the shapes. 9. Playdough and playdough mats - I provided a new tub of playdough and laminated playdough mats from Planet of the Apels. Your toddler may add their playdough to the mats to complete the pictures. You may find more ideas to do with playdough here! 10. Car and Road maps - I provided a new "Matchbox" car and laminated road maps from the DIY Mommy. Toddlers will love driving their car around these roads and race track. 11. Paddlepop stick shapes - Draw a shape across two paddlepop sticks which are the same colour. Your toddler can match the shapes and colours together. The paddlepop sticks could also be used with the playdough. 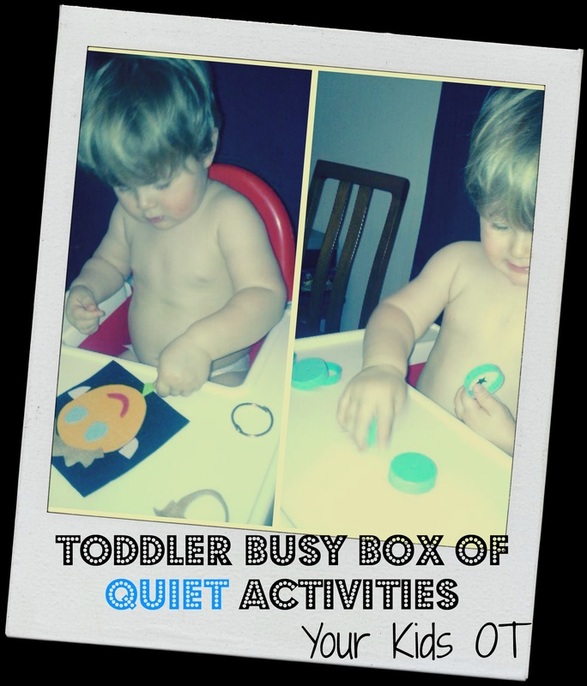

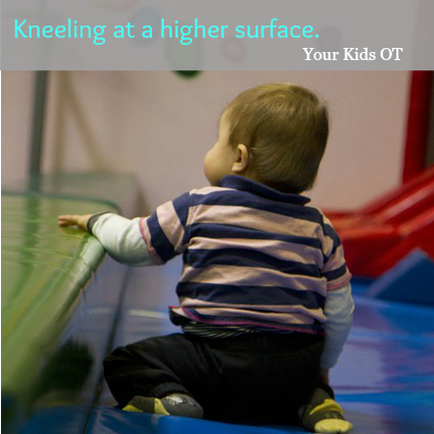
It was lovely to be sent photos of these busy boxes in action! Isn't Mr E adorable?!
These activities would also be great for an OT to have in his/her therapy bag to use with toddlers and preschoolers! Have you made your toddler a "busy box"? Have you made one as a gift? 
You may also like:
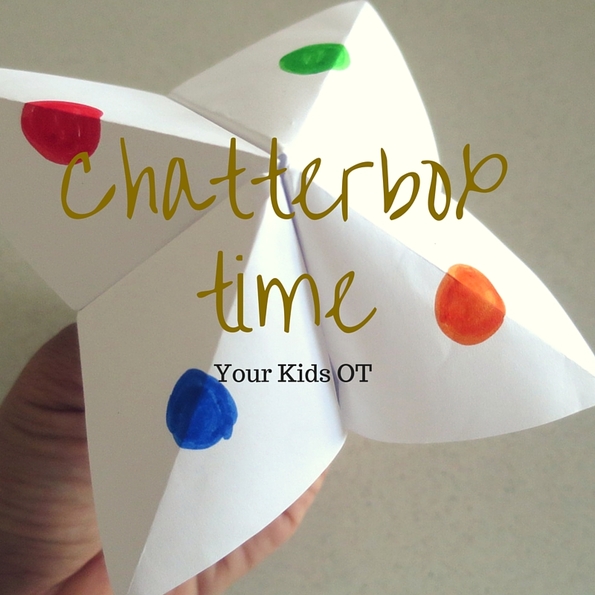

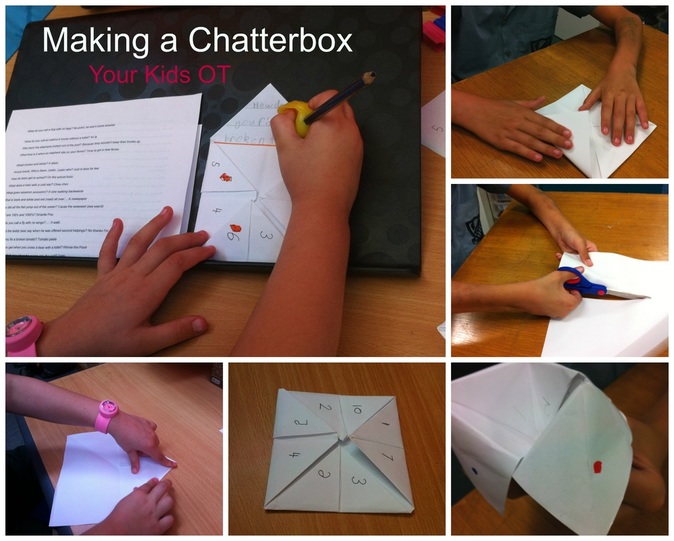
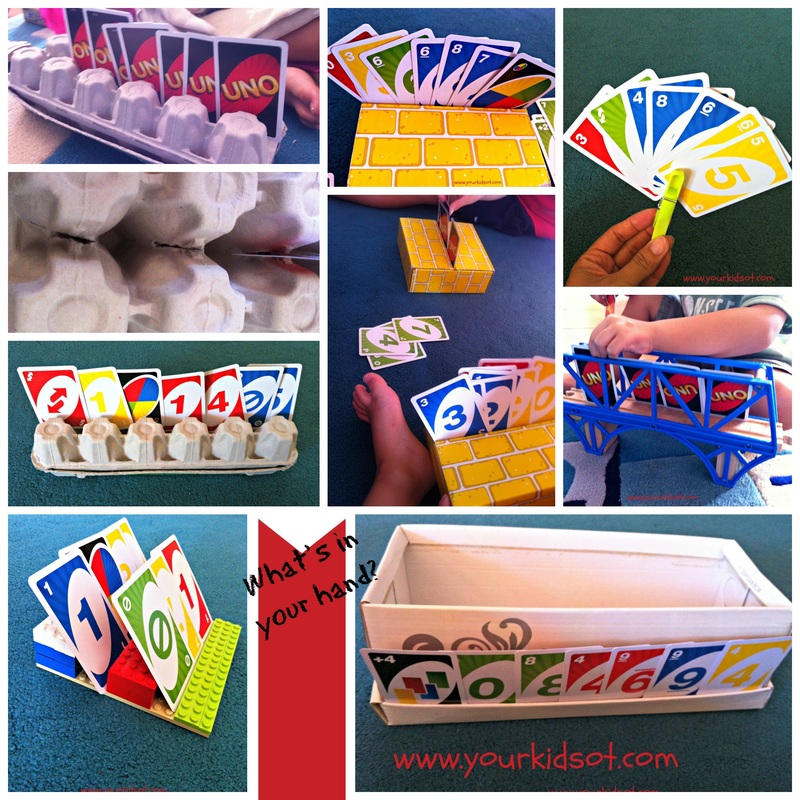
Chatterbox Time! Kids all love to make and play with chatterboxes! I remember making them when I was a child, did you? Last week, I made these with some of the kids I see for therapy and it was the perfect activity to work on a range of skills.
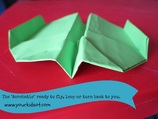
If you haven't made one for a while, this is how you fold your chatterbox. Start with an A4 size piece of paper and make sure you press down each fold neatly. The neater the folding the better the chatterbox will work in the end. 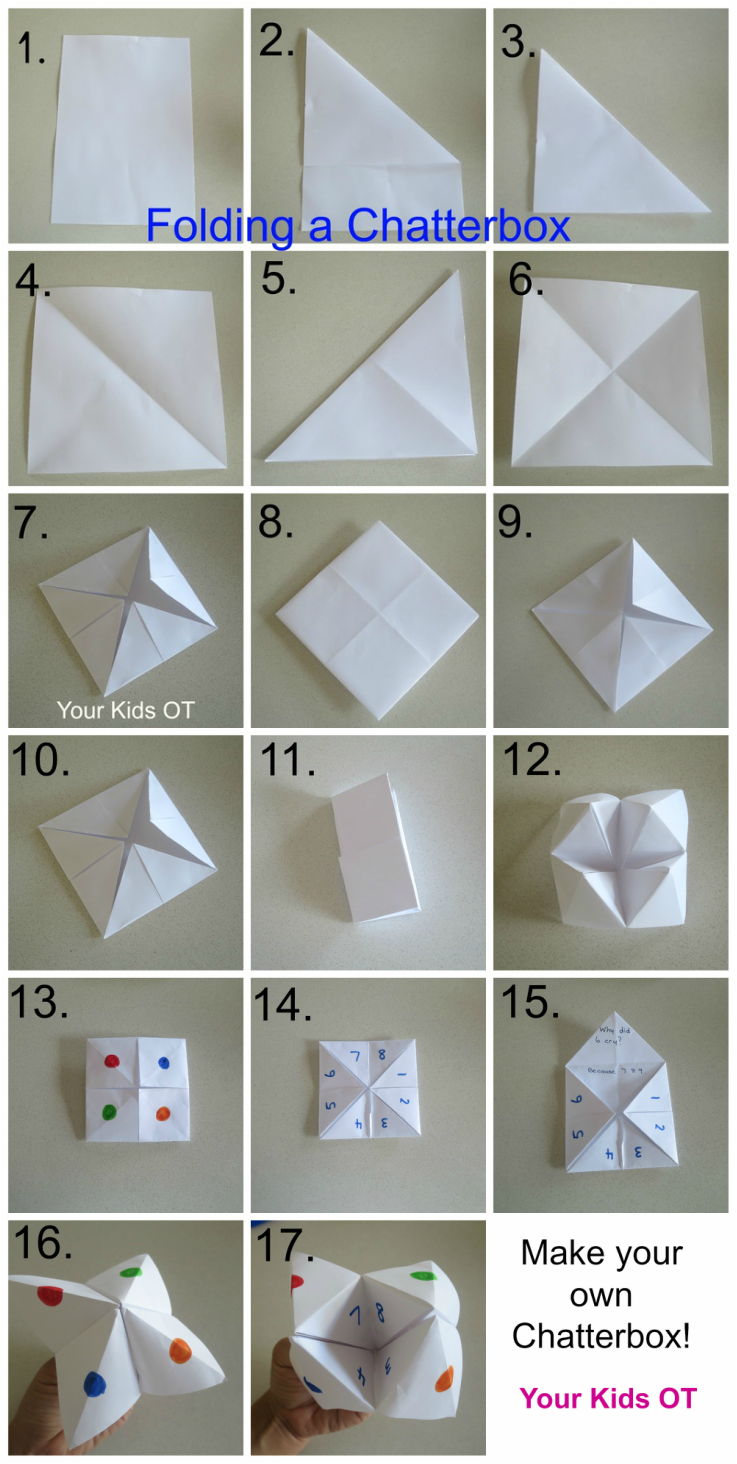

1. Start with an A4 piece of paper. (You could also start with a square piece of paper and skip to step 4.) 2. Fold down one corner so your triangle lines up with the side. 3. Cut off the section under the triangle. 4. Open out your triangle so you can see your square. 5. Fold down another corner creating a triangle. 6. Open out your square so you can see the two folded diagonal lines. 7. Bring each corner into the middle, pressing down on the fold. 8. Flip over your square. 9. Bring each new corner into the middle, pressing down on the fold. 10. Almost there! 11. Fold along the horizontal middle line, open and fold along the vertical middle line, open. (This will held with the movement of the chatterbox when playing.) 12. Put your fingers in the "open square" parts of each quarter. Your chatterbox is now ready to decorate! 13. Add a coloured dot to each square. (We also wrote the colour name for those kids who needed a reference to spell the colours when playing.) 14. Flip over your square and write a number in each triangle section. Try to have odd/even numbers to help later with playing. 15. Open out each double triangle to write a question/joke. Write the answer in the bottom half. (If your child has small legible writing you may be able to fit in a question/joke in each small triangle.) 16 and 17. Ready to play. Use your thumb and index fingers on both hands to open and close the chatterbox. We had a great time making these in OT last week. Here are some of the skills we worked on:
Whilst I had a double-sided page of jokes for the kid's to choose from, these were the clear favourites!
Have you made a chatterbox recently? What's your favourite kids joke? 
You may also like...

Incy Wincy spider climbed up ...in this case the spider's web... with a few supplies, your preschooler can make their own spider and web!
What do you need?
What do you need to do? For the WEB...
For the SPIDER...
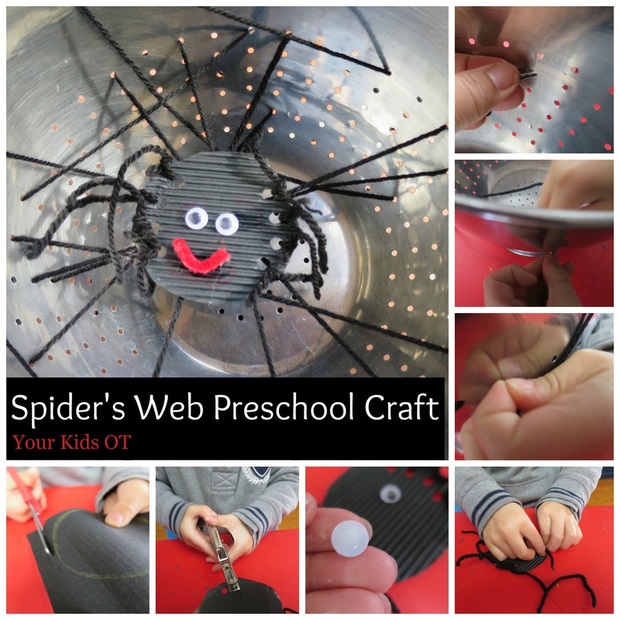

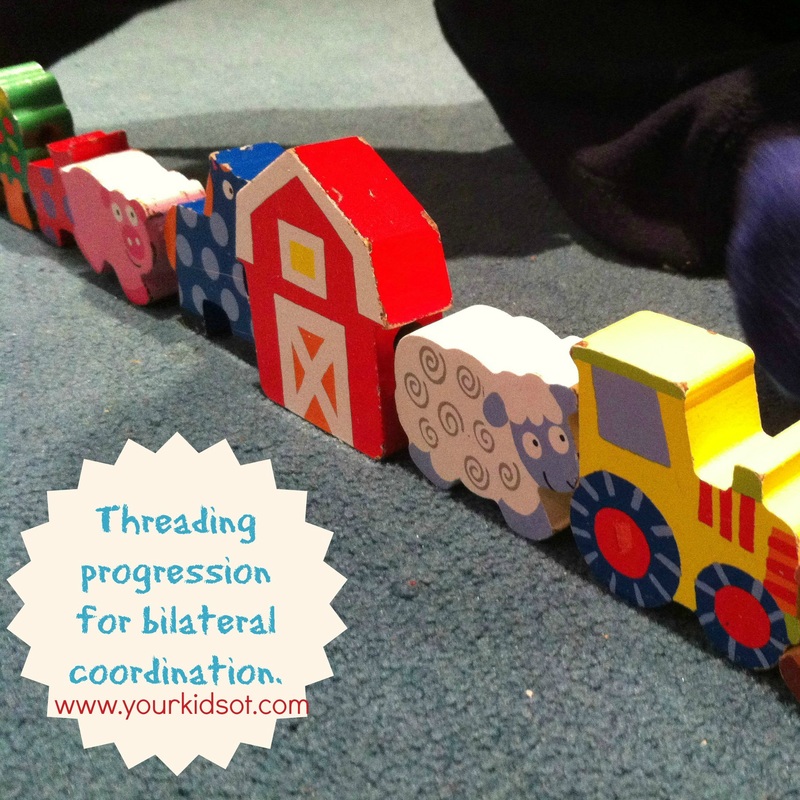
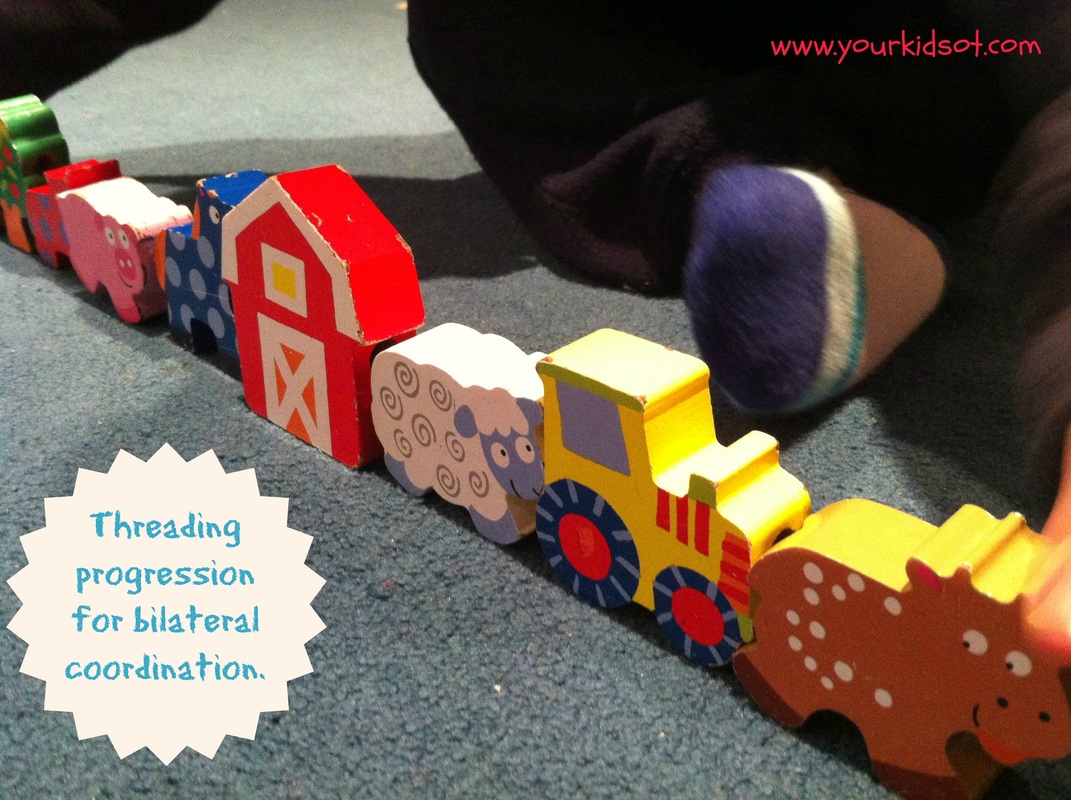
This craft activity is a wonderful way to encourage your preschooler with their fine motor skill development. Involve them in pinching, poking and pulling. Encourage them to use both hands when poking and pulling out the wool. Poking the wool into the colander hole with one hand and pulling out the wool with the other hand is a great way to encourage bilateral coordination. This "Pinch Poke Pull" motion is similar to buttoning up shirts where the button is pinched and poked through a hole with one hand and the other hand pinches the button and pulls it through.
Encourage your preschooler to cut out the circle and punch the holes {the hole punch was a little too hard for my Mr 5}. They can also help to glue the eyes and mouth. Tying the spider's legs is also tricky for little fingers. Mr 5 has been tying up his dressing gown for several months now and we talked about the spider's legs being similar to tying up his dressing gown {only smaller}. This skill is so important when it comes to later learning how to tie shoe laces. You could skip this step completely and sticky tape the legs onto the spider's body if tying the wool is too difficult. 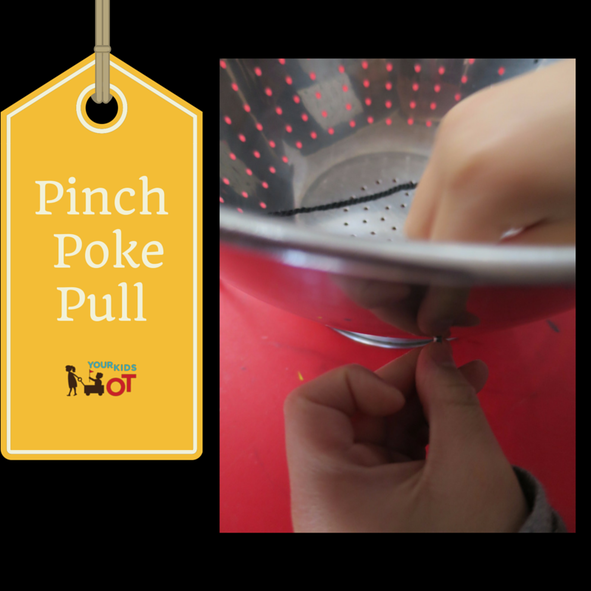

This spider's web craft is all about the process and not the final product. You can remove the sticky tape, wind up the wool and store it with the spider to do the threading over again. If you want a craft to keep, you could place some holes in a paper plate for the wool to be threaded through. Stick the spider to it when the web is finished. Do you have a preschooler who might enjoy this spider's web activity? 
You may also like:
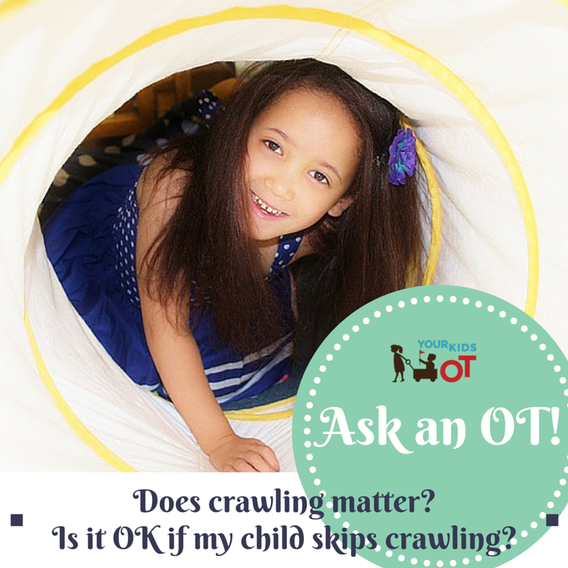

Crawling is important for babies, toddlers and big kids! Crawling is important for all ages!
If you are thinking, "My child skipped crawling and went straight to walking, how does this apply to my child?" or you have a school-age child who is well passed the crawling stage then please continue reading as this article is for you as well! Crawling can appear in a variety of ways. Some babies "commando crawl" pulling themselves forward on the ground with their arms, dragging their legs. Some babies "bear crawl" with arms and legs locked in place. Some babies "crawl" by shuffling backwards or sideways. Traditional crawling involves "four point positioning" with arms moving in a reciprocal coordinated way with legs (ie. right arm and left leg move together). Note: I'm not including bottom-shuffling as "crawling", although some babies move this way, there is no weight-bearing on the arms and therefore does not have the same benefits of crawling I'm about to outline.
Whether a baby is learning to crawl for the first time, a baby being encouraged to crawl even though they can walk, or an older child is crawling for fun... there are therapeutic benefits for them all!
Therapeutic Benefits of crawling! Crawling is a developmental milestone usually reached before walking. It is a gross motor skill that enables a baby to explore and interact with their environment. New found mobility can help a baby to reach new surfaces, pull to stand with furniture and seek social interaction. Physically, crawling helps a baby or child to strengthen their back, neck, shoulder, tummy, arm and hand muscles. Crawling can help develop eye-hand coordination and more importantly bilateral coordination (use of the two sides of the body and the brain). During crawling (at any age), there is coordination and synchronisation of the two hemispheres of the brain as both the left and right sides of the body are used. We need integration of the two sides of the brain to enable us to perform cognitive skills such as reading, writing, communication, etc. “Cross lateral movements, like a baby’s crawling, activate both hemispheres in a balanced way. These activities work both sides of the body evenly…Because both hemispheres and all four lobes are activated, cognitive function is heightened and ease of learning increases.”(1) Crawling not only strengthens the big muscles of a baby (or child's) body, it also helps to strength hand muscles. Specifically, crawling can help with the development of the hand's palmar arches and separation of the two sides of the hand. Crawling also has great sensory benefits. This aspect is especially important for older kids and the main reason I include it into my therapy sessions. Crawling is a form of "heavy work" and includes getting kids off their feet (out of extension patterns) with their bodies aligned for deep breathing. This alignment can also be achieved if the crawling surface is dynamic (eg. an air mattress) or uneven (eg. cushions) or up an incline. This combination of heavy work and deep breathing is really helpful when looking at ways to calm a child's sensory system and helping them to modulate their bodies.
Ways to encourage crawling
(1) for babies who have not yet reached the developmental milestone (under 12 months) * Tummy time will strengthen neck, shoulder, arm and trunk muscles. Tummy time encourages reaching and pivoting skills which are precursors for crawling. Tummy time experiences also assist to develop perception, body awareness and sensory motor skills There are many fantastic ways to encourage tummy time. Read about some of themhere. * Supported kneeling in a crawling position (4 point positioning with an adult behind baby using their legs to provide the necessary support in this position). Supported kneeling promotes good hip control and trunk stability as well as strength in thigh, bottom and stomach muscles. This will assist with standing, crawling, pulling to stand and walking. Facilitate the hip-leg-foot together and the opposite arm/hand during play. 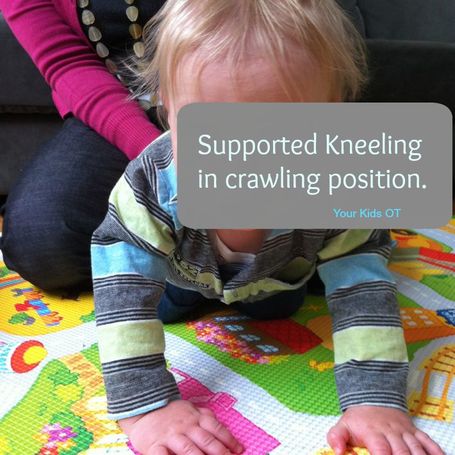
Supported kneeling in a crawling position may also be encouraged over a roller or adult leg. Read about a home made roller here. 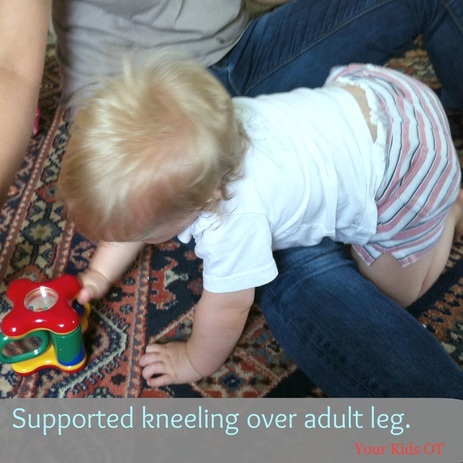
* Supported kneeling at a higher surface (eg. low sofa, small chair, coffee table, etc). Some children will be comfortable in this position on their own and others will need help to be supported around their hips. With support, the position provides opportunity for trunk rotation and development of core muscle strength.
Christie from MamaOT has more great suggestions for helping babies to crawl. Read ithere.
(2) for all ages There are so many ways to encourage your older child to crawl in their natural environments or with simple props. * tunnel play * over a therapy ball * up a slippery dip (slide) * obstacle course * up a grassy hill * "bear walk" * over a mattress/bed * at the beach on the sand or in shallow water * scooter board * wheelbarrow * in the dirt * across the lawn * from bedroom to bathroom * under the dining table * under a clothes horse * across a trampoline, under the trampoline (with no one jumping) 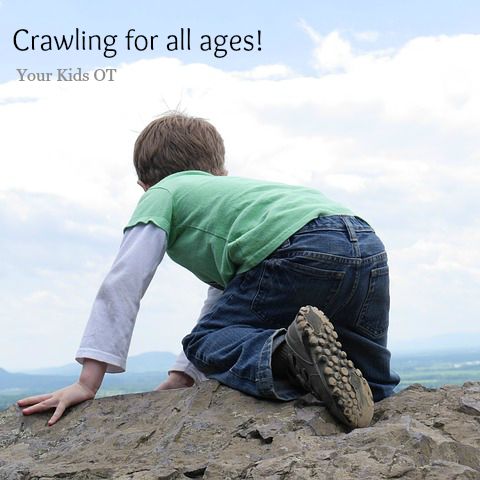
So does it matter if your child skips crawling and starts walking? Children develop in different ways and some prefer to stand. Some babies will move quickly to walking and prefer this to being on all fours. Others will walk and still crawl when they feel like it. Some children will crawl for a long time before eventually walking. There are great benefits for your baby and older child to crawl. I always suggest that babies and children should be encouraged to crawl whether they have "skipped" it or not! Incorporate crawling into your daily routine! Do your babies and kids love crawling? 
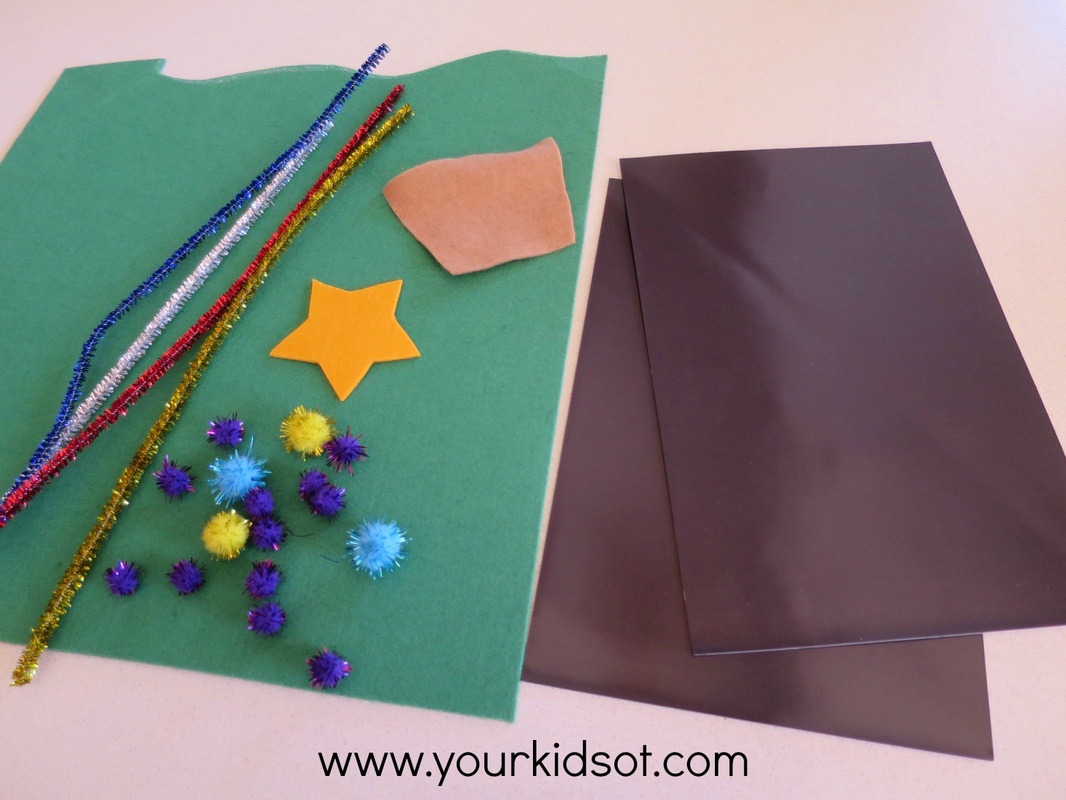
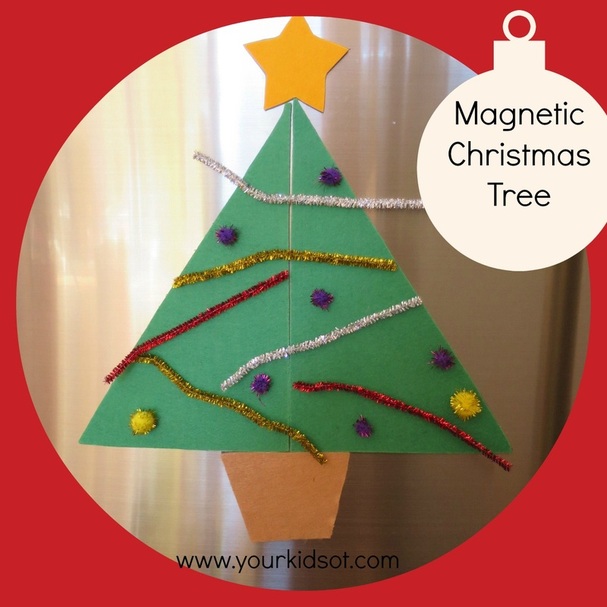  Make your own magnetic Christmas tree to keep your toddlers and preschoolers busy whilst you are in the kitchen. This Christmas tree activity is perfect for your fridge door! A few simple craft supplies and just a few minutes to prepare.
What do you need to do? Cut out two large green triangles, a tree base and a star. Stick the felt onto the photo-magnets and cut around the shapes again. 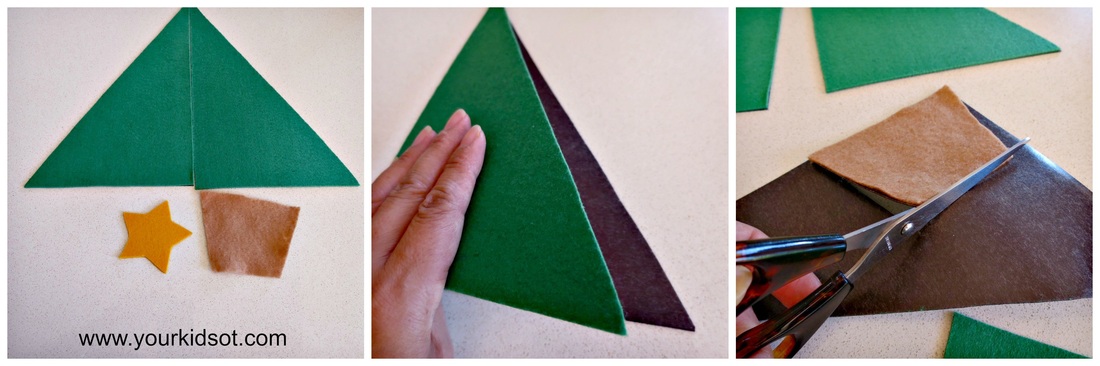  You may also like to cut the pipe cleaners in half. Assemble the felt magnetic pieces, pom poms and pipe cleaners onto a plastic plate and this activity is ready! This is a no-mess activity that your toddlers and preschoolers can do independently. They may need assistance initially with the tree shape or alternatively you could place the tree on for them and they can decorate. They will enjoy putting the pom poms and pipe cleaners where-ever they want to. They will also enjoy taking them off and doing it all over again! Picking up the pom poms and pipe cleaners encourage a pincer grasp. A little visual motor planning and organisation is subtly required to position the tree, star, base and spread out the pom poms and pipe cleaners to fit on the tree. The best thing about this activity is there is no right or wrong way to decorate a tree! Older children may also like to help their younger siblings to decorate the tree. 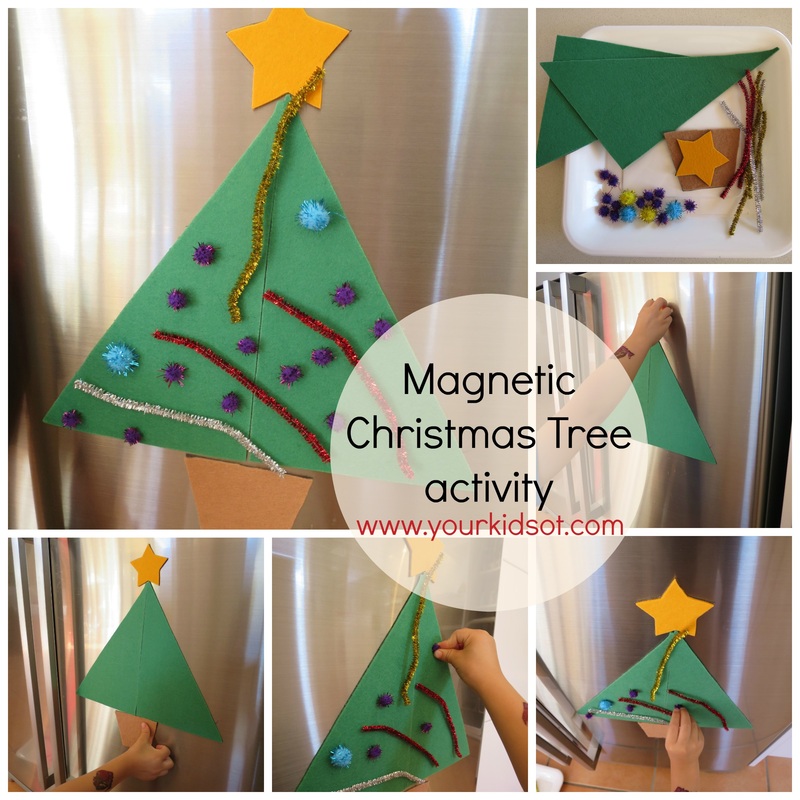  Your toddler or preschooler will love this festive activity! What else do your little kids like to do whilst you are in the kitchen?  You may also like...
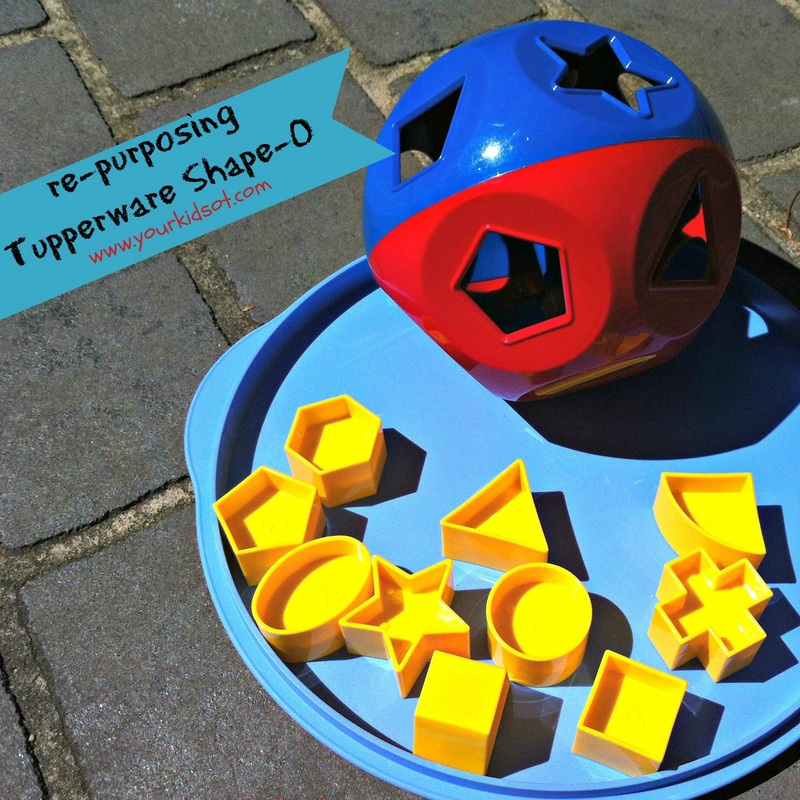
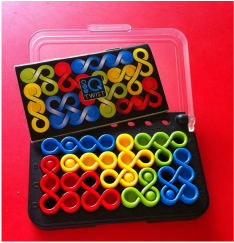
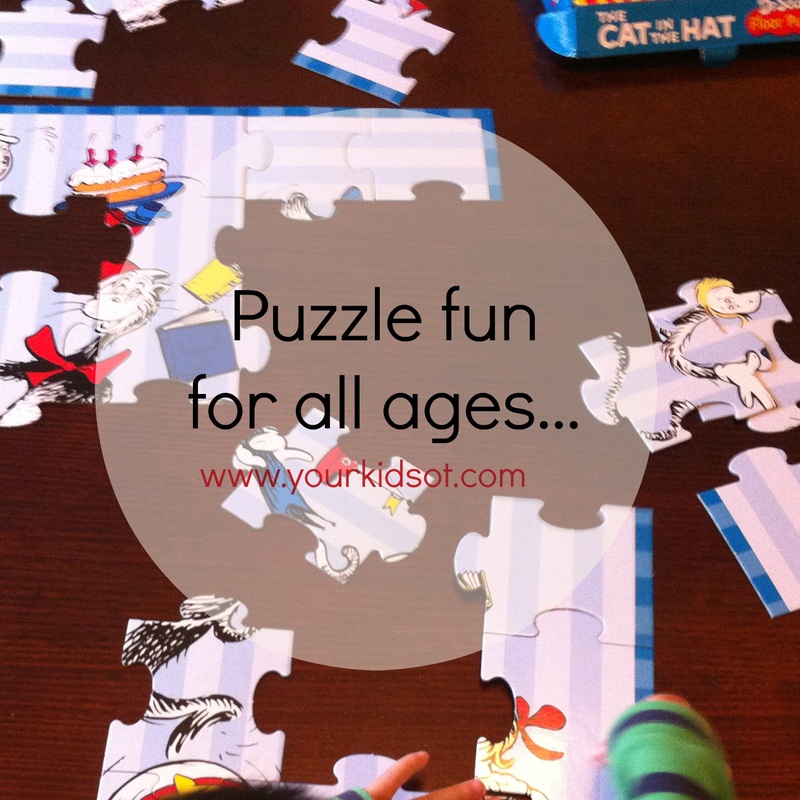  Everyone from babies to grown ups can have fun with puzzles. Some people find them frustrating, whilst others love the challenge! In a world of fast responses, instant satisfaction and technology to grant it, there is something really nice about slowing down to complete a puzzle. Kids can develop a range of skills when working on puzzles and they can have fun in the process! Babies will typically start with large knob wooden inset (or insert) puzzles. Often the picture of the puzzle is printed in the inset section, the knob is large and easy to hold for little hands. 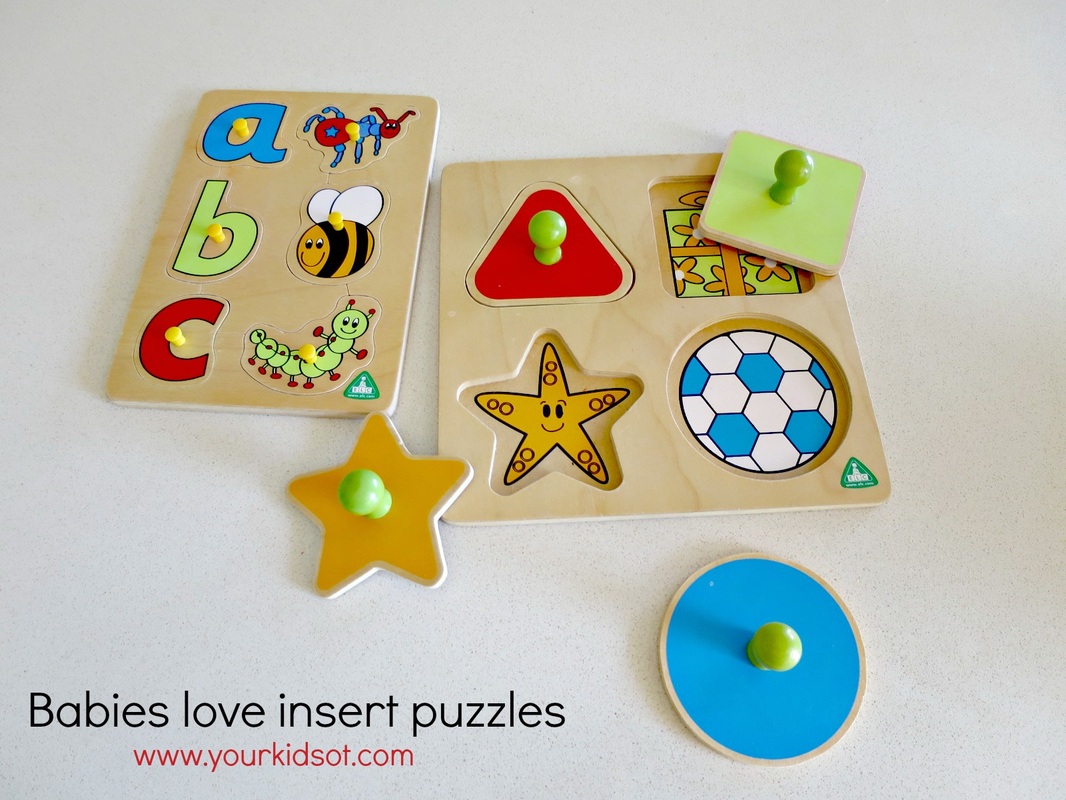  Toddlers will enjoy slightly harder inset puzzles with more options and bright colourful pictures. They will also start to put two, three and maybe four piece interlocking puzzles together. 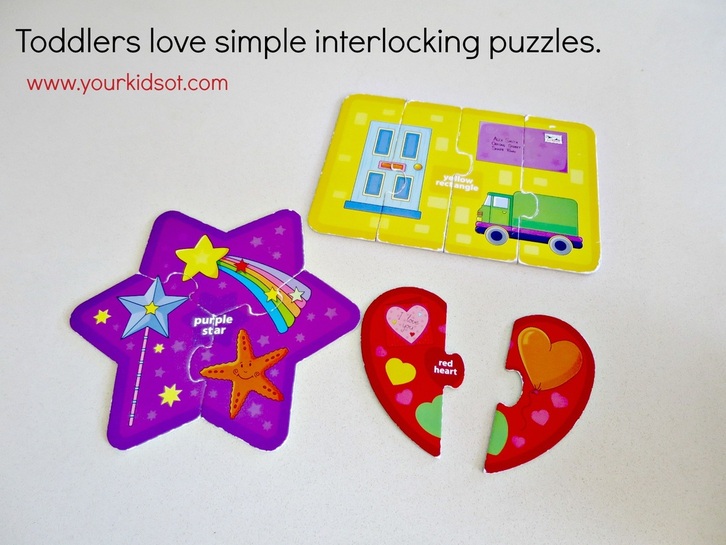  Preschoolers will enjoy layered inset puzzles and more complicated interlocking puzzles (approximately 20-50 pieces). They might be more confident with interlocking puzzles that are within a wooden frame which have the picture underneath to match. Preschoolers also love really large floor puzzles (that are bigger than themselves)! 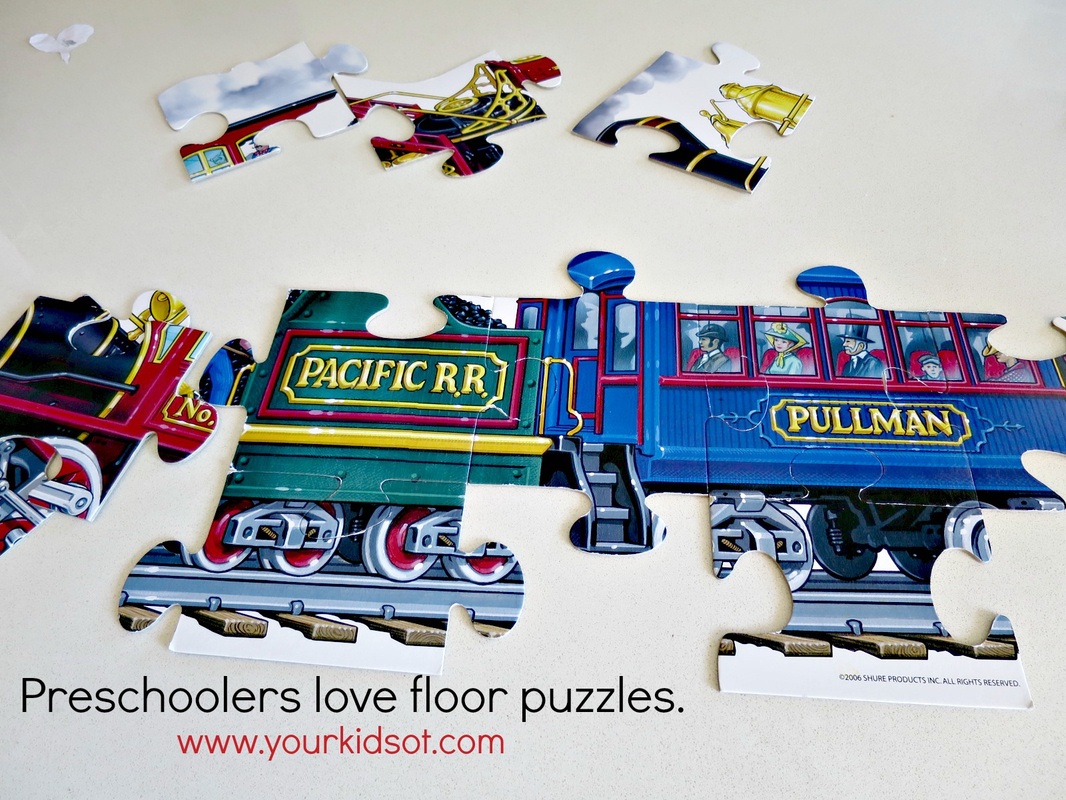  School age children (and adults) will progressively accomplish very complicated interlocking pieces (50+ pieces). The speed of progression will be different for each child, however, your school age child will develop interest in non-traditional puzzles too. This may include 3D models, Tangrams and games (such as Rubik's cubes and Q Twist). 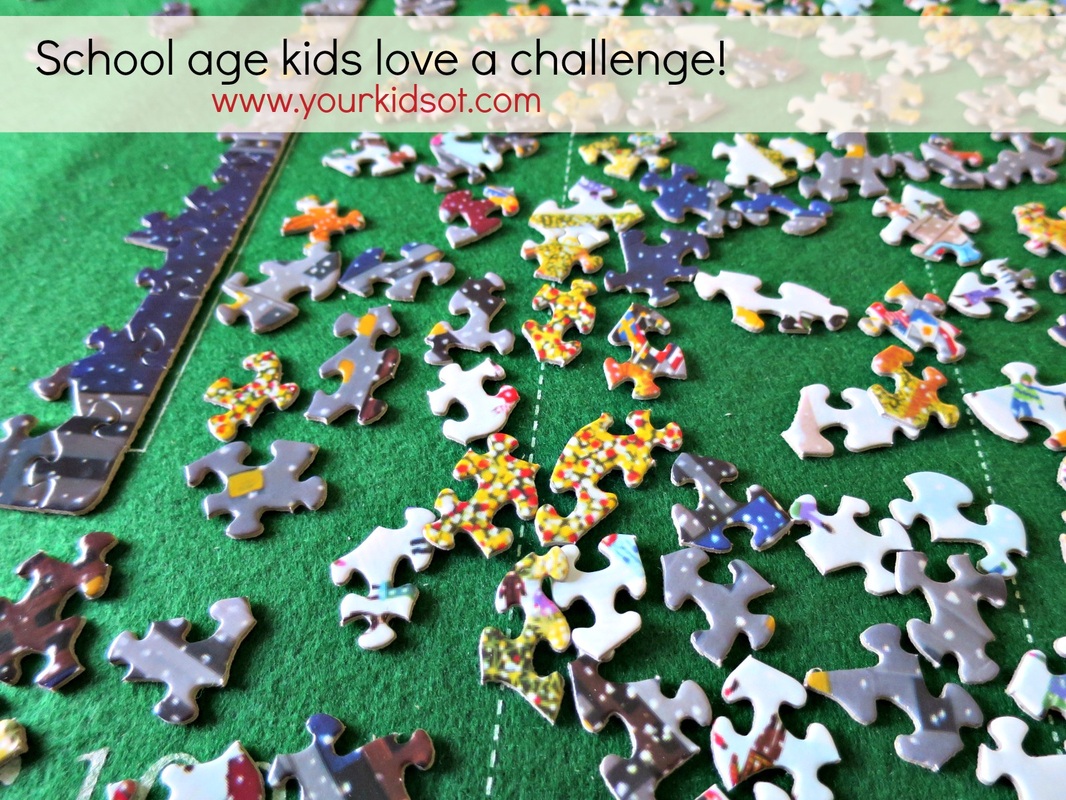  There are so many benefits in encouraging your kids with puzzles:
I'm working on a 1000 piece puzzle whilst Miss 8 works on her first 500 piece puzzle. Whilst there have already been cries of frustration followed by moments of triumph (for both of us), I think she might finish first! Bring on the summer holidays! Do your kids like puzzles? Do you?    You may also like:
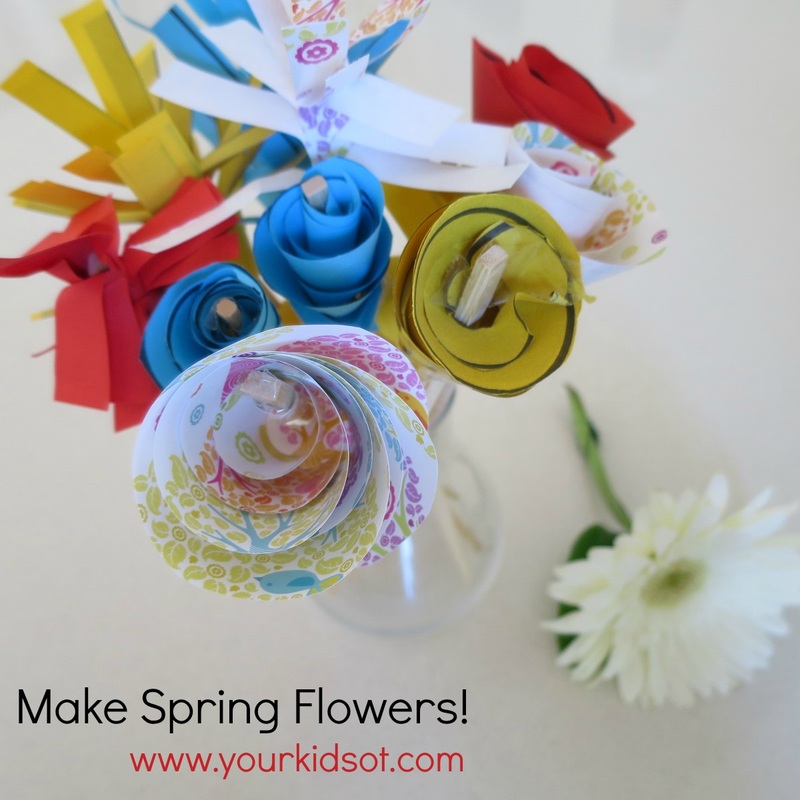
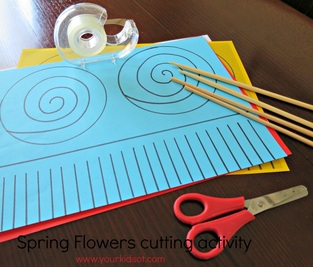
  “Spring is the time of year when it is summer in the sun and winter in the shade.” ― Charles Dickens, Great Expectations Spring is a season of new life and an array of blooms in the garden. Whilst our spring seems to be on hold this week with unseasonal thunderstorms...this cutting and rolling craft is a perfect indoor activity for your kids learning to use scissors!
What do you need to do? There are 2 different flowers in the vase above. 1) To make the spiky variety, you can draw the fringe on the edge of the paper ready for cutting. 2) Cut along the lines to make a fringe. 3) Stick the chopstick to one end of the fringe. 4) Roll the paper up as tightly as possible. 5) Stick down the end of the paper. 6) Holding the chopstick, peel down the fringe (turning the chopstick as you go) to make the flower. 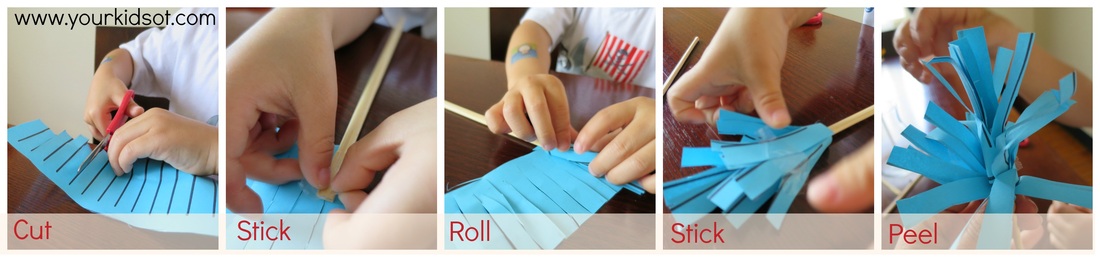 1) To make the curled variety, you can draw a spiral shape. 2) Cut along the lines of the spiral. 3) Stick the chopstick onto the outer end of the spiral with the stick pointing towards the centre of the spiral. 4) Roll the paper up as tightly as possible. 5) Allow the spiral to unravel a little to get nice flower shape. 6) Stick down the end of the paper. 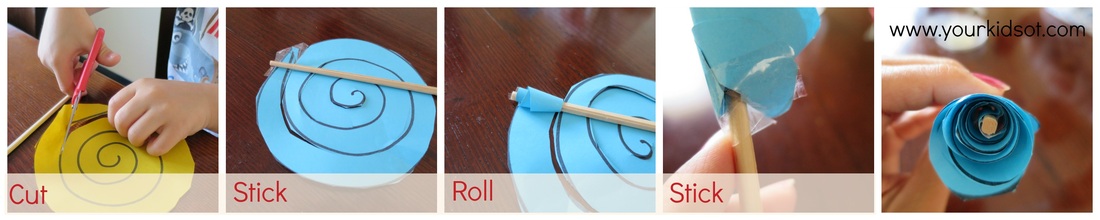 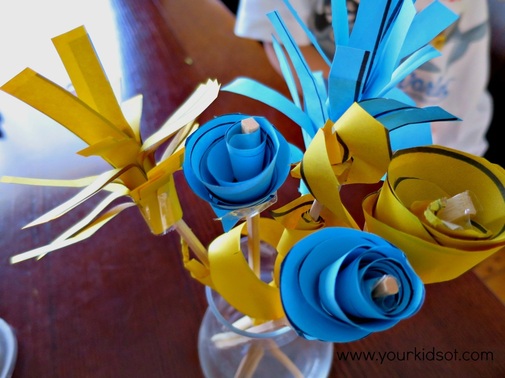 Mr 4 had a great time making these flowers. Each step required Mr 4 to use both his hands at the same time (bilateral coordination). He has always loved cutting and this activity allowed Mr 4 to practise his eye-hand coordination skills in staying on the line and manipulation skills when turning the paper around during cutting. The flowers will of course look better if you draw your lines in pencil rather than a thick texta as I have done here. Some children will require a thick dark line to provide a strong visual guide for cutting. Mr 4 needed some help when rolling the paper (especially when we were trying to figure out the best way to roll the spiral). This photo shows you one he did independently! 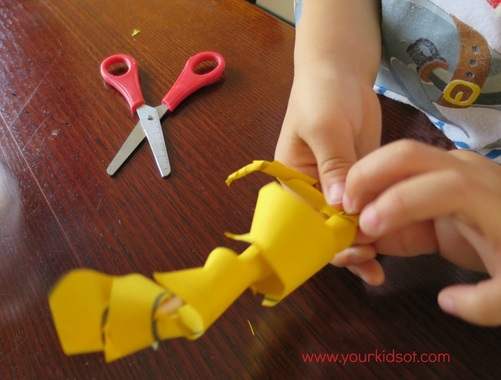 Miss almost-8 came home after school and on finding the vase of flowers wanted to make some too. She made the flowers using patterned craft paper which look great. I have seen "grown ups" do this craft on several sites on the net with some stunning affects in a variety of paper. I especially loved one I saw using vintage paper which was amazing. This craft is not about a perfect stunning posy... but rather an opportunity for your kids to get busy with their hands and have an end result. Can you make a "bunch of flowers" to give to a grandparent or teacher this weekend?  You may also like to try...
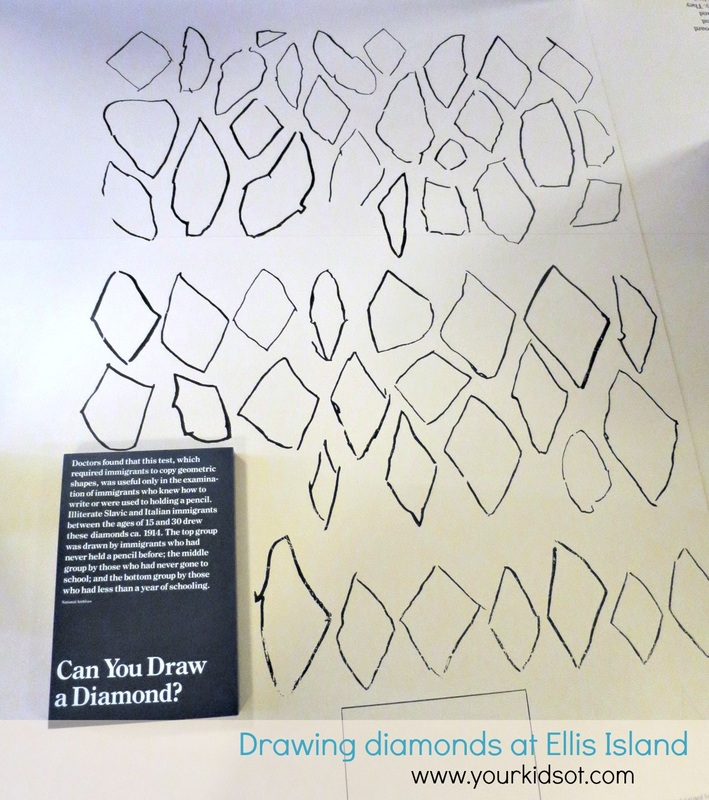
 For those of you who have been following Your Kids OT, you will know that I recently went to New York City. So indulge me a minute whilst I show you some photos from the trip. These photos are from Ellis Island which is located on the same ferry route as the Statue of Liberty. Ellis Island was America's largest and most active immigration station. It is now a museum which documents the stories of some of those who passed through its halls with their hopes and dreams of a better life. It was an interesting and moving experience to see what was involved in the "processing" of hopeful immigrants. 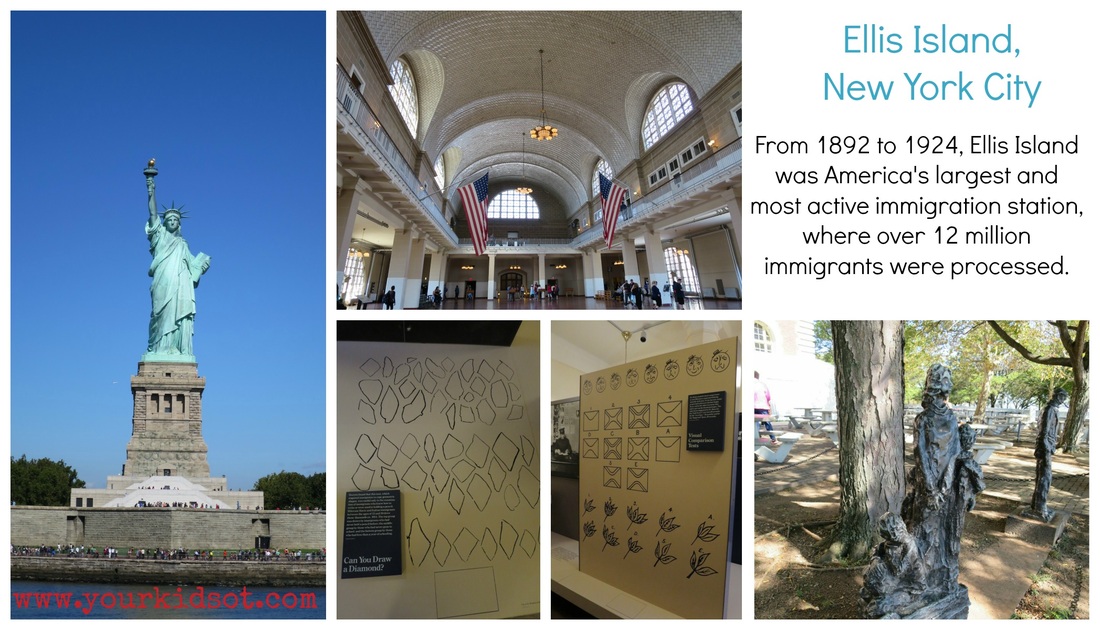
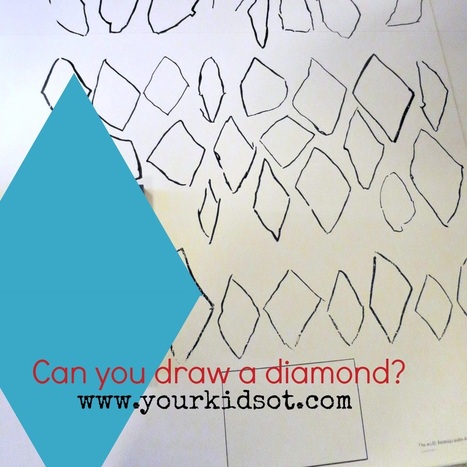
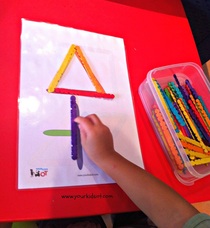
"Visual motor perception is the ability to copy geometric shapes, letter or drawing in a proper spatial manner... Form-copy tests are excellent indicators of a child's future school performance. If I had to choose only one test to give a child to determine his school readiness, it would undoubtedly be the form-copy test". K. A. Lane (2005) Developing Ocular Motor and Visual Perceptual Skills: An Activity Workbook . As OTs, we place emphasis on copying shapes when assessing visual perception. Copying the "vertical diamond" in the Beery VMI is reported to have an age norm of 8yrs 1mth. The developmental trends in drawing a vertical diamond include drawing vertical lines (3yrs), reflections of vertical and straight lines (4yrs), closed form with angles (5yrs), squared diamond (5yrs 8mths), definitely elongated (6yrs 10mths) and then the acceptable angularity (8yrs 1mth).  Craft sticks and shapes! When teaching a child to draw a diamond, I focus on their ability to draw diagonal lines and their ability to cross the midline (taking into consideration the child's age and development). A multi-sensory approach is key so that the child "feels" the action and can understand how to motor-plan. This may include drawing in rice and shaving cream, creating with playdough or using craft sticks to create patterns and shapes. Have you been to Ellis Island? Can your child draw a diamond?  You may also like these articles...
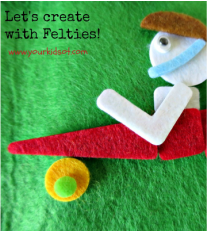
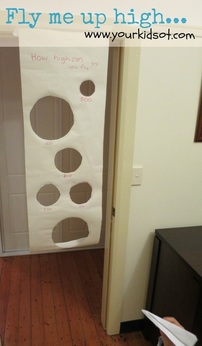
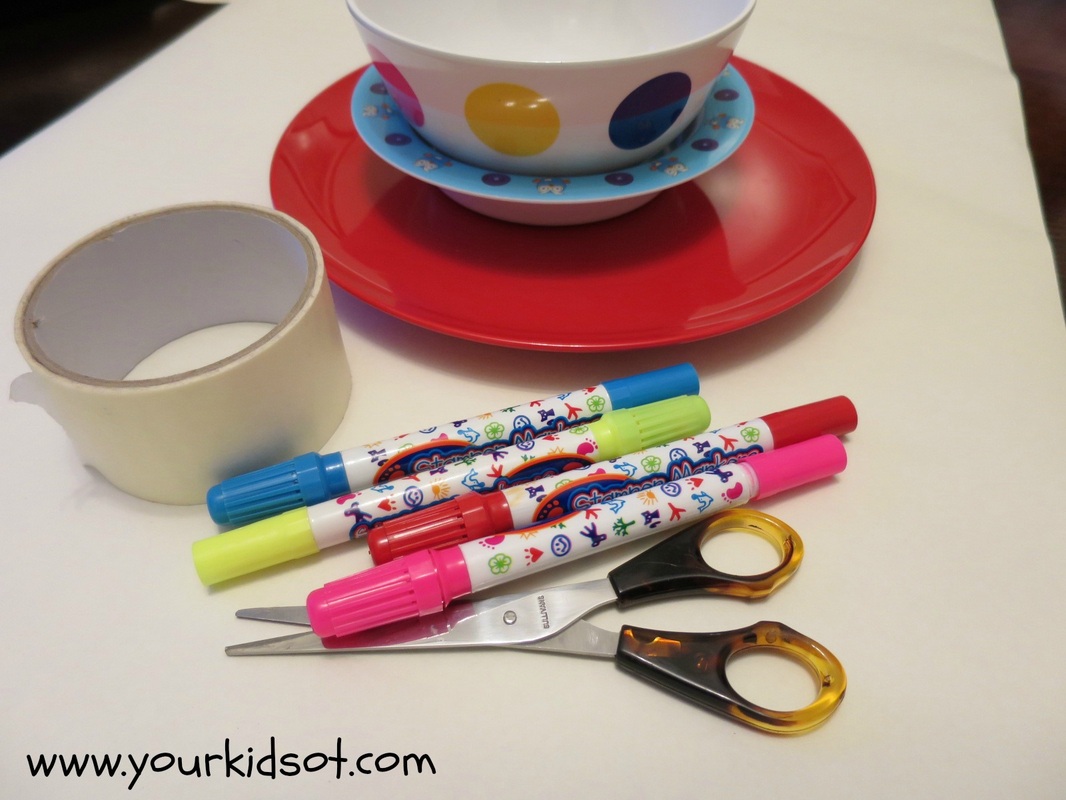
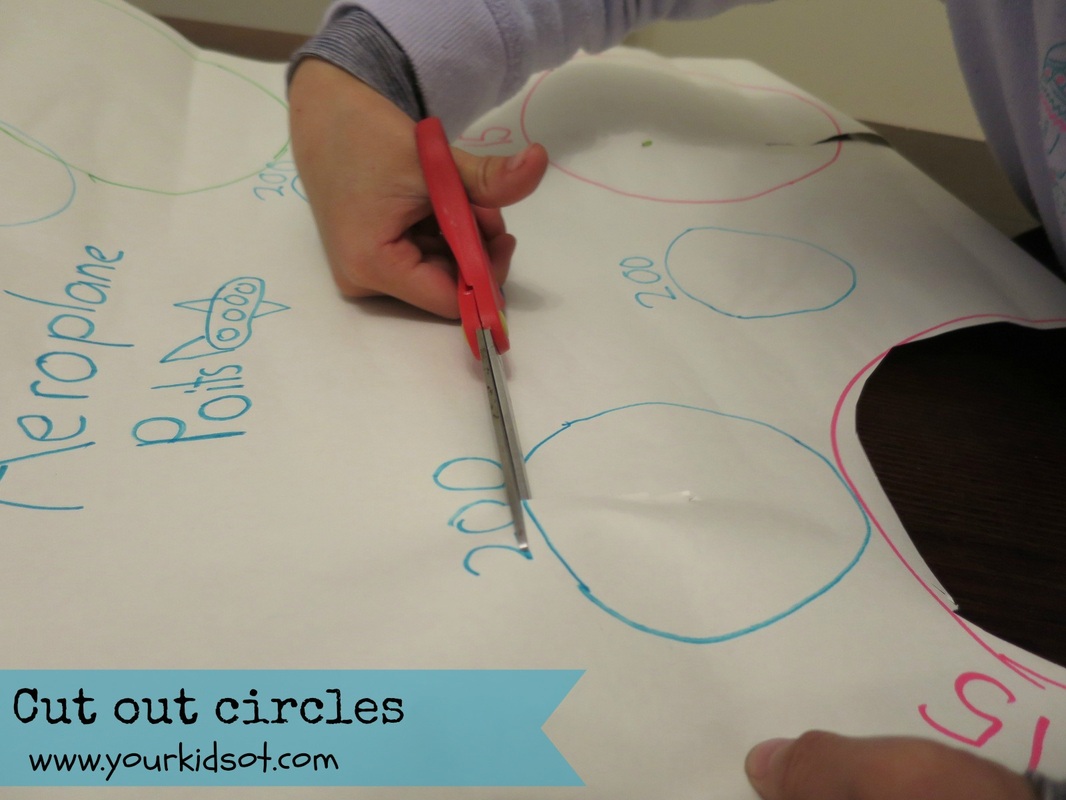
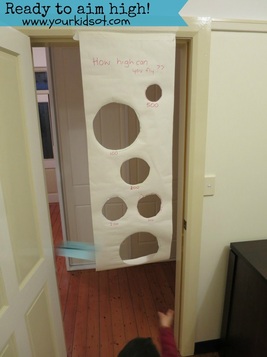
This is a fun extension activity for those who love paper planes. It is perfect for indoors when the outdoors just aren't so inviting or a perfect way to spend the school holidays! If your child doesn't enjoy planes maybe you could scrunch up newspaper to throw or throw something light like pom poms at the target? Do you think your kids will like this target? Don't forget to "pin it" for the next rainy day! 
Enjoy this homemade activity? Try these too...
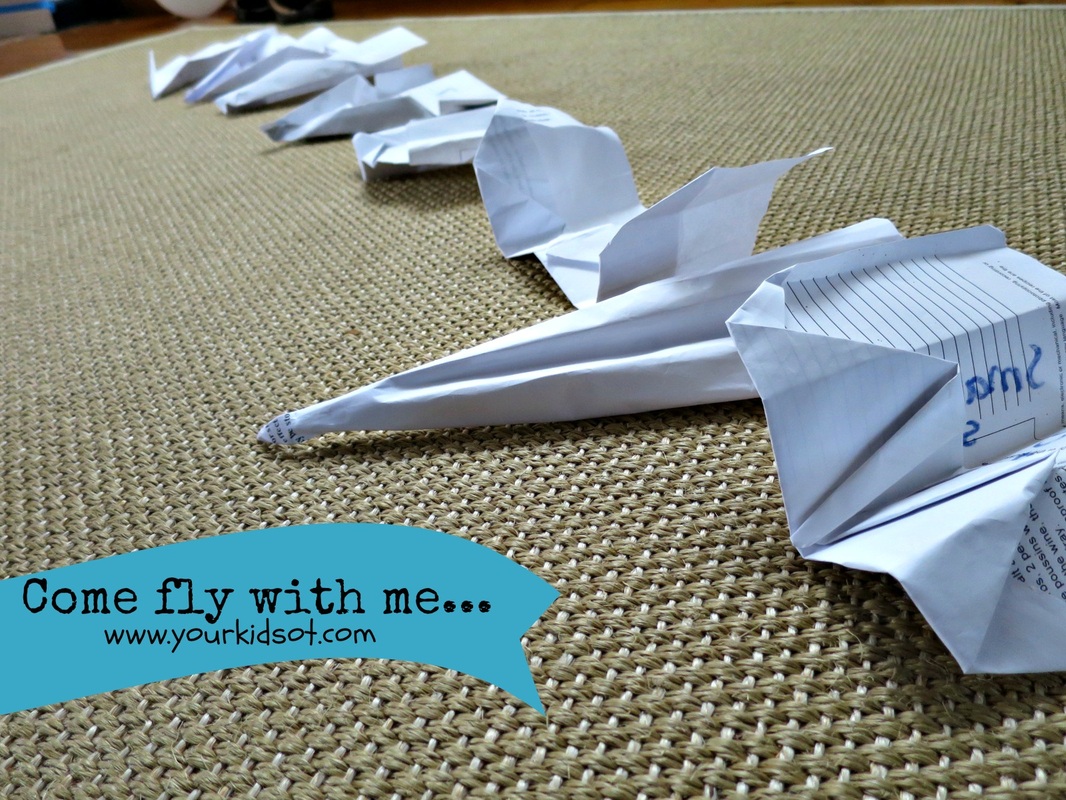
In the Miller Function and Participation Scales there is an "origami" subtest that measures this against age appropriate norms. Miller describes the skills needed for this activity to be similar to participation in home activities (eg. folding towels, napkins, clothes or the newspaper) or school activities (eg. turning pages in books or folding paper for art projects). 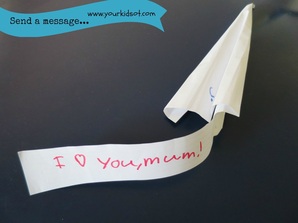 Mr 4 received a terrific book for his birthday recently with over 50 examples for folding paper planes. Whilst he needs lots of help to complete the simple ones, Miss 7 has taken over the book and has loved following the instructions to build a variety of planes. Miss 7 and Mr 4 have spent hours flying the planes {outside, inside, down the stairwell}, decorating them and turning them into characters for stories (mostly Miss 7 with that one). Miss 7 has also attached messages to some of her planes (see the photo). Best of all it is something despite their different interests and abilities that they can do together. Here are instructions for one of Miss 7's favourite planes ... the "acrobatic". Make sure you press down after each step. 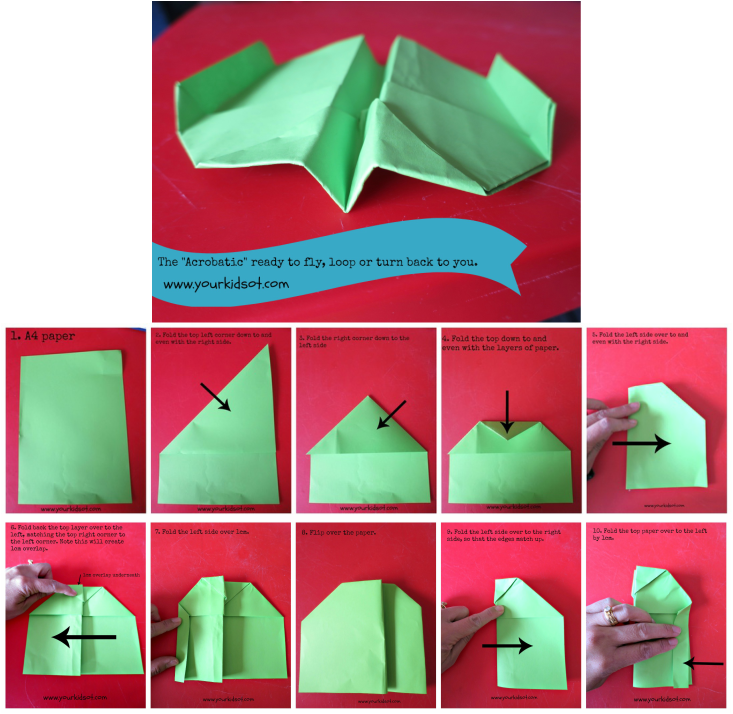 Do your kids enjoy making paper planes? What is their favourite? Send me a photo of your creations, I would love to see them!  Note: This post may contain affiliate links. All photos and comments made here are my own.
|
AuthorHi, I'm Cindy and I am an Occupational Therapist. I enjoy working creatively with children to see them reach their potential. Read more about me here. 
SEARCH THIS SITE

Archives
June 2024
Categories
All
Popular Posts

 |


 RSS Feed
Join the YKOT e-newsletter!
Subscribe to get our latest content by email and receive
the SHAPE ROADS PRINTABLE NOW!

Success! Now check your email to confirm your subscription and receive your free printable!
Join our Mailing List!
Subscribe to get our latest content by email and receive
the SHAPE ROADS PRINTABLE NOW as a thankyou!
Success! Now check your email to confirm your subscription and receive your free printable!
Disclaimer: The information on this site is general in nature and should be used for educational and entertainment purposes. The activities are safe for most children, however, you should consult an Occupational Therapist or health professional to address specific movement, sensory or other medical conditions. This blog does not replace formal therapeutic professional advice given by a health professional or medical practitioner. Reviews and endorsements of products will only be made based on my expertise and personal opinion; and deemed worthy of such endorsement. The opinions shared in sponsored content will always be my own and not that of the advertising company or brand. Content, advertising space or posts will be clearly identified if paid, affiliated or sponsored. Affiliate links may be found throughout this website in advertising. This means that if you follow through with a purchase from these links, Your Kids OT will receive a percentage of the sale. Your Kids OT undertakes to meet the requirements of the "Social Media Policy" as published by Australian Health Practitioner Regulation Agency (AHPRA). Further information about this policy can be found here.
Find meFollow me |

|
About me
AuthorHi, I'm Cindy and I am an Occupational Therapist. I enjoy working creatively with children to see them reach their potential. Read more about me here. 
|
Copyright © 2017 Your Kid OT