
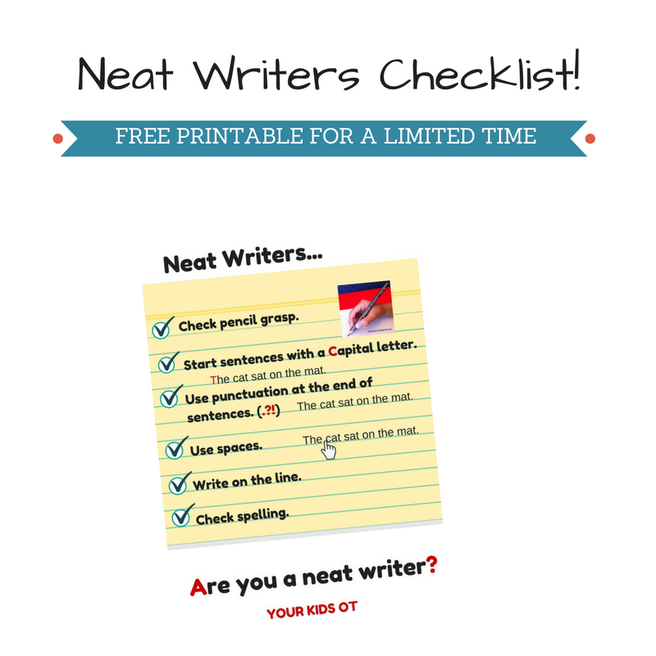
Ever sound like a broken record?
"What does a sentence start with?" "How do you hold the pencil?" "Remember to put a space between your words." "What do we put at the end of the sentence?" Are you encouraging your students to self-evaluate their work? This checklist comes in a set of 3. The perfect prompt for the classroom, home and OT sessions! Download your FREE copy here today! (FREE FOR A LIMITED TIME) 
You may also like:
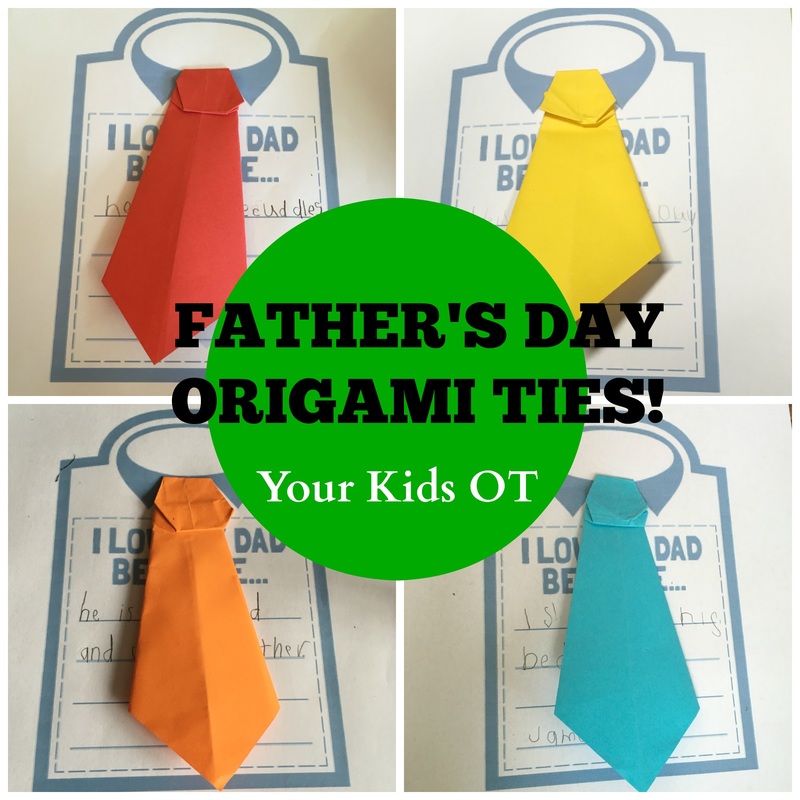
It is almost Father's Day here in Australia! We have been making origami ties and combining it with sentence writing in OT this week!
I love using origami in OT sessions as we can work on a range of skills including fine motor manipulation, bilateral coordination, sequencing steps, organisation and planning. It can be really difficult for those who have never done paper folding and do not understand how to get the edge to meet with another edge. I always suggest to parents to make paper planes at home! This is the easiest and fun way to practise paper folding skills! You can find some step-by-step paper plane instructions HERE. With something a little more complicated like this tie, I model each step for the kids to do and help them to line up the paper. I found this writing prompt "I love my dad because" from Beauty and Bedlam. I resized the original printable so that I could place it on one A4 page and have large lines for writing. You could also make it smaller and turn it into a card for Father's day. WHAT KIDS SAY! It is always amusing to read what kids write about their family! Here are some of the responses that the kids have written this week... I love my dad because he cuddles me. (Andrew, 6 yrs) I love my dad because he is my dad and we play together. (Michael, 7 yrs) I love my dad because I sleep in his bed. (James, 5 yrs) I love my dad because we play basketball together. (Will, 6 yrs) I love my dad because we build things together. (Will, 10 yrs) I love my dad because he is a little bit nice. (Benjamin, 5 yrs) I love my dad because he helps me not to get in trouble with mum. (Finn, 6 yrs) I love my dad because he looks after me. (Oliver, 5 yrs). 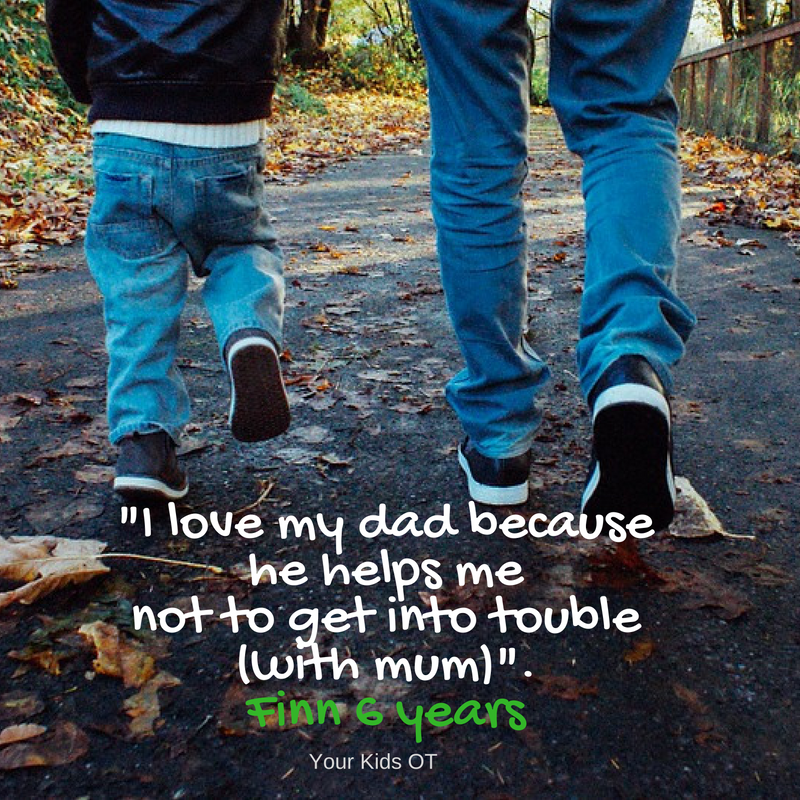
Wishing any fathers reading this a very Happy Father's Day!

You may also like:
 Summer holidays in the northern hemisphere and Winter holidays here in the southern hemisphere. Don't stop writing over the holiday breaks! Encourage your child with some themed writing about the season they are in! The Summer Holiday Writing Prompts Pack includes writing about expectations, what happens when the car stops and a letter to a friend. The Winter Holiday Writing Prompts Pack includes writing about a trip to the snow, things you have to wear during winter and what you might be missing about Summer! Both packs also include a "who/what/when/where grid" for your child to choose the prompts used to write a story with an introduction, complication and resolution. These packs are designed for young writers who need help with story ideas (approximately grades 2 and 3). It provides scaffolded lines to help with writing size and placement. 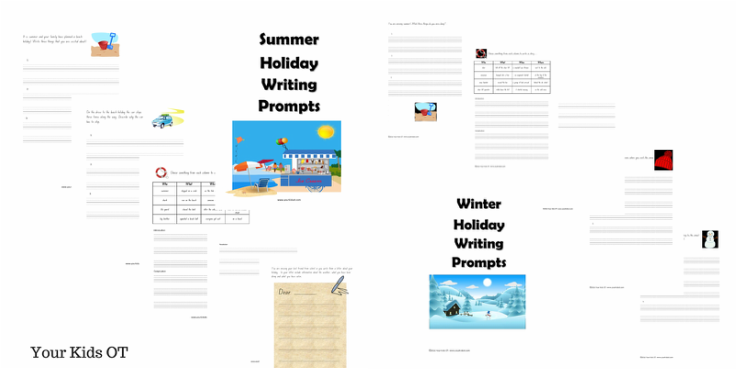 Find both the summer and winter holiday writing prompts at the Your Kids OT shop! Find lots of other helpful resources too! Happy Writing!  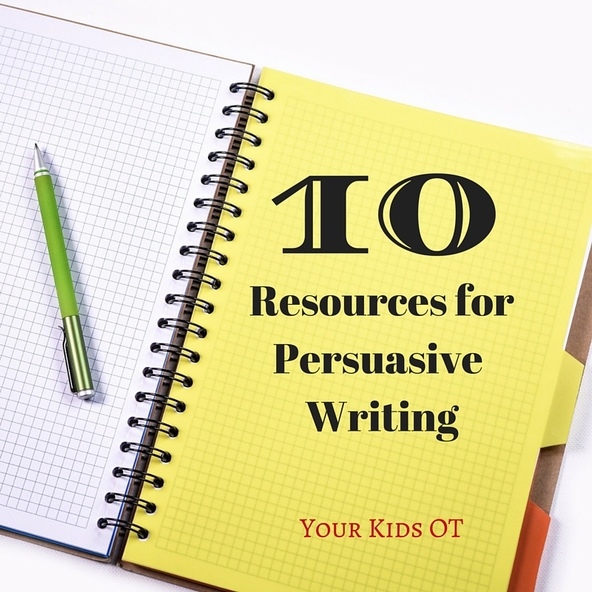

When working on handwriting with older children I like to consider various forms of writing. Persuasive writing is an important genre and may feature in NAPLAN testing from year 3. By definition, "a persuasive text is any text where the main purpose is to present a point of view and seeks to persuade a reader. Persuasive text types include, for example, arguments, expositions, discussions, and letters to the editor, debates, reviews and advertisements" (NAP- National Assessment Program).
Whilst it is the role of your child's primary school teacher to teach your child about persuasive writing, here are a variety of resources which may support your child to develop skills in persuasive writing. I like using some of the writing prompts and writing planners in OT sessions. The persuasive words are really useful for those students who struggle with ideas to put onto paper. Explaining what is persuasive writing: 1. NAP - National Assessment Program: Writing - This outlines the testing requirements required with persuasive text including consideration of the audience, text structure, ideas, persuasive devices, vocabulary, cohesion, paragraphing, sentence structure, punctuation and spelling. There are some samples of writing prompts and how they may be answered. 2. Teaching Without Frills on YouTube - A series of You Tube videos to explain persuasive writing for kids. Episode 1: What is it? Episode 2: Brainstorming Episode 3: Planning and Pre-writing. Episode 4: Reasons Episode 5: Writing an Introduction
3. The Teacher Next Door: Writing to Persuade:_ Lots of great tips to teach persuasive writing including paragraph writing, mentor texts, persuasive techniques, etc.
4. Our Journey Westward: Picture Books which teach persuasive writing. A list of 14 books and how to use them to teach persuasive writing. Writing Prompts: 4. Squarehead Teachers: 62 Persuasive Writing Prompts for Kids - 62 great ideas to get your child thinking and writing persuasively. These inlcude "Which is better: to be an only child or to have siblings? Why?" and "Do you think a monkey would make a good pet? Explain why or why not." The style of prompt is not the same as Naplan testing as this is an American site. 5. 24 Writing Prompts by Blair Turner - These open ended prompts are suitable for a wide age range of grade levels and abilities. They include "Write a letter to your principal explaining why you believe recess should be longer" and "Should People own pets? Write an opinion piece about this." Writing Plans: 6. MargD Teaching Posters and writing plans - A wealth of resources here with posters and writing plans for various genres including persuasive writing. 7. Scholastic Writing Planners - There are a few here including the OREO writing planner, Opinion Writing, Fact/Opinion Glasses and more. Persuasive Words: 8. Mrs Swanda's Writing Resources: A list of persuasive words, sentence starters and transition words. 9. Scholastic Words:_ Introductory Words and Phrases, Transitions, Opinion Clues. 10. Teacher Starter: Persuasive Writing Poster - Includes persuasive language, sentence starters and conclusions. What is your favourite resource for persuasive writing? 
You may also like:
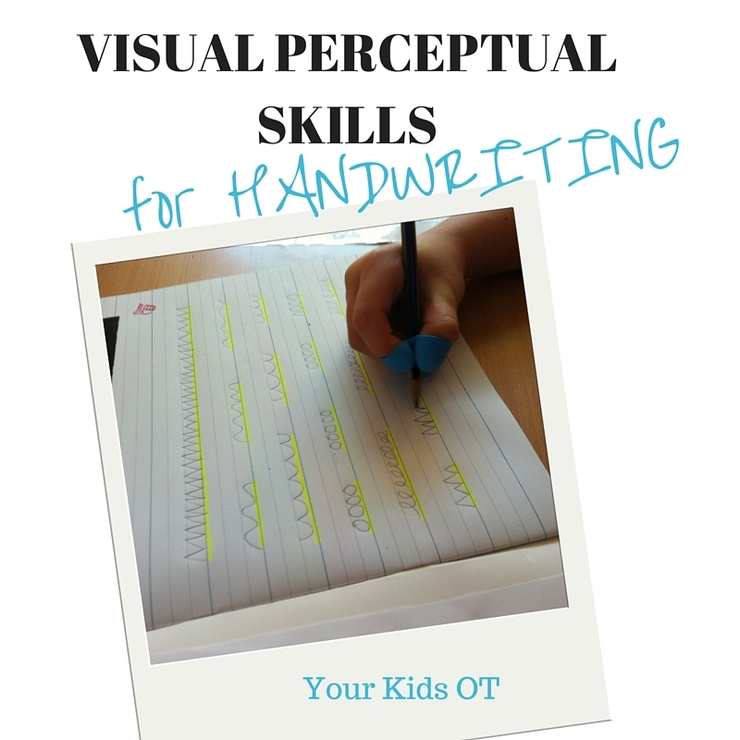

Handwriting is a complex skill. Handwriting involves the ability to form letters with consistent letter size, proportions and spacing, so that others can read words and sentences. Producing legible handwriting requires complex visual perceptual skills as well as an integration of motor skills with these visual perceptual skills. A deficiency in visual-motor integration may be evident when observing poor quality handwriting (Volman, van Schendel, & Jongmans, 2006). Visual perception is the process where the brain extracts and organises information, giving meaning to what we see. Visual-motor integration is the degree to which visual perception and finger-hand movements are well coordinated (Beery & Beery, 2010). There are many components of visual processing which work together to assign meaning to what we see and include eye-hand coordination, figure ground, visual discrimination, form constancy, visual memory and visual-sequential memory. Eye –hand coordination is the ability to coordinate eye movement with hand movements and includes the ability to process visual information to guide hand function. When children are learning to control a pencil for handwriting, they will rely on visual information as they look at their hand and what the pencil is producing as they write. The ability to copy a vertical line, circle, horizontal line, right oblique line, square, left oblique line and an oblique cross have been recognised by therapists as an indication of a child’s readiness to integrate visual-motor skills to begin handwriting instruction. Beery & Beery (2010) recommend that formal pencil-paper instruction is postponed until a child can easily execute an oblique cross as it requires crossing the midline, which is the source of many reversal problems. They also suggest that transfer of improved visual-motor skills does not automatically transfer to academic tasks and teaching letters, words and sentences are still required. Typically children are encouraged to control their pencils and practise eye-hand coordination with tracing various lines, then shapes and then letters. These lines may include bold dotted lines, faded dotted lines, bold unbroken lines, faded unbroken lines to trace on. Children may also be provided with paths, roads or outlines to draw between to produce lines, shapes or letters. Therapist may support children with eye-hand difficulties by contrasting the path to be drawn or by emphasizing the boundary line (eg. with a raised surface). Eye-hand coordination of fine and gross motor tasks may also be encouraged prior to handwriting instruction. This may emphasize large movements before moving to small movements. Children may be encouraged to develop eye-hand coordination of larger tools before using small tools for more accurate control (eg. crayon rock before ordinary crayon). Visual Discrimination is the ability to classify objects or shapes based on visual information such as colour, form, pattern, size or position. In handwriting, children need to be aware of common characteristics as well as subtle differences which distinguish letters and words. Children need to identify letters as well as the sequential order of letters to recognize words for reading, writing and spelling. Difficulties with visual discrimination may be seen with letter reversals or lack of attention to detail in letter formation. For example. When writing “n”, if the initial line is drawn too long it appears as “h” or if the up and over section is too short it appears as “r”. When writing “a”, if the line is produced too long and below the circle it appears as “q”, if the line is produced too long and above the circle it appears as “d”, if the line is too long above and below the circle it is unrecognizable, if the line is too long and placed to the left and below of the circle it appears as “p” or if it is placed to the left and above the circle it appears as “b”. 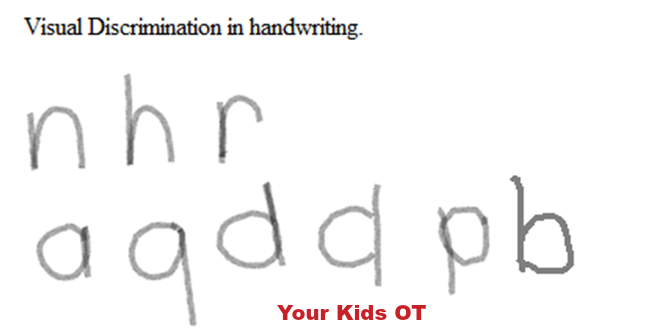
Visual discrimination in handwriting may also be seen with confusions with the use of lower and upper case letters. Children need to be able to firstly identify letters regardless of lower or upper case formation (ie. classification) and then use these appropriately (eg. Capital letters used at the beginning of a sentence).
Children with visual discrimination difficulties may require additional strategies to classify letters. Providing a multi-sensory approach to learning (eg. use of pipe-cleaners, playdough, rice, shaving foam, etc) may assist with kinaesthetic learning and muscle memory. Position in Space or spatial relationships involves the ability to process information about oneself in relation with their environment in space, orientation and position. It may involved the ability to understand directional language concepts such as up/down, next to, left/right, over/under, etc. In handwriting, difficulties with spatial relationships may also affect letter formation as described in visual discrimination as children have difficulty relating the position of lines in relation to other parts of a letter. Children may also demonstrate difficulty with writing on a line, adequate spacing between letters or words. They may have difficulty ruling up a page and maintaining writing on the left hand side of the page with the beginning of each line. Children with difficulties with spatial relationships require a range of intervention strategies to assist with this visual perceptual difficulty. This may include gross motor activities and postural control activities to encourage body awareness as well as shape positioning games such as Tangrams and felt shapes. They may also benefit from copying patterns made with blocks, LEGO models and beads before attempting to copy patterns on paper. Further strategies may include use of speciality writing paper (eg. coloured lines), grid paper, highlighting the writing line, placing a ruler on the writing line and the use of a “spacer” between words. 
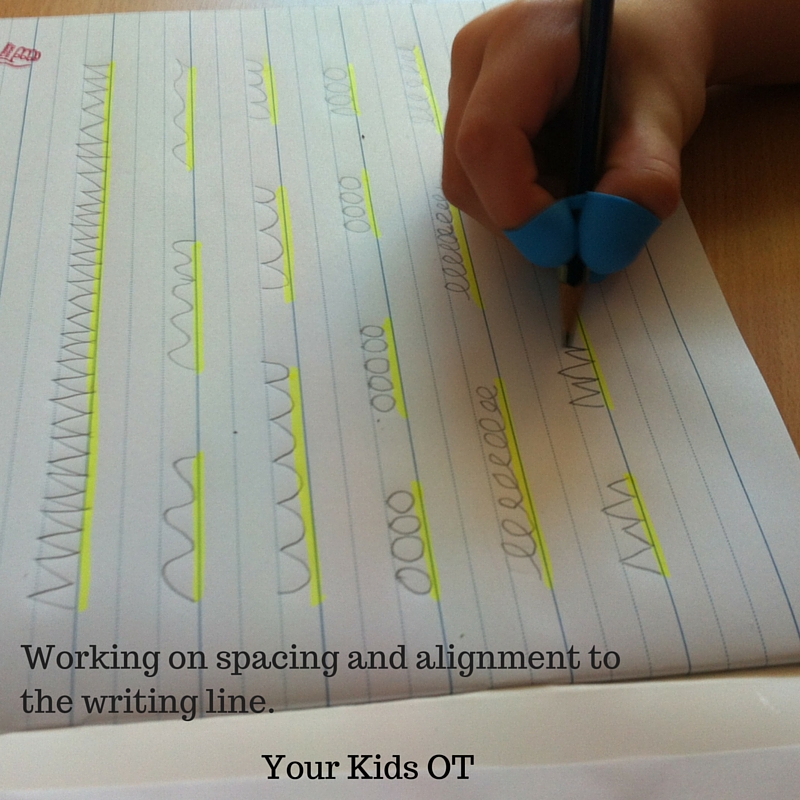
Figure-Ground is the ability to see an object or form when presented in a complex background. In handwriting, this is needed when copying information from a source (eg. the whiteboard) and keeping track of where you are up to. Children with figure-ground difficulties may begin writing on a line and then after looking up do not know where they should write the next letter on their page. They may also miss important information or segments of a letter or a word when writing.
Extra cues may be needed for children with figure-ground difficulties such as providing information on a piece of paper rather than a board, a square drawn around a word or phrase to be copied or a ruler to highlight the writing line. They may also benefit from scanning exercises. Visual Closure is the ability to process visual information when the object or word is partially hidden. In handwriting, this may affect letter formation and spelling words. Visual closure in letter formation is closely related to visual discrimination described earlier. Children may also demonstrate incomplete letter formation which affects handwriting legibility and neatness. Activities recommended in the visual discrimination section are relevant for those with visual closure difficulties. 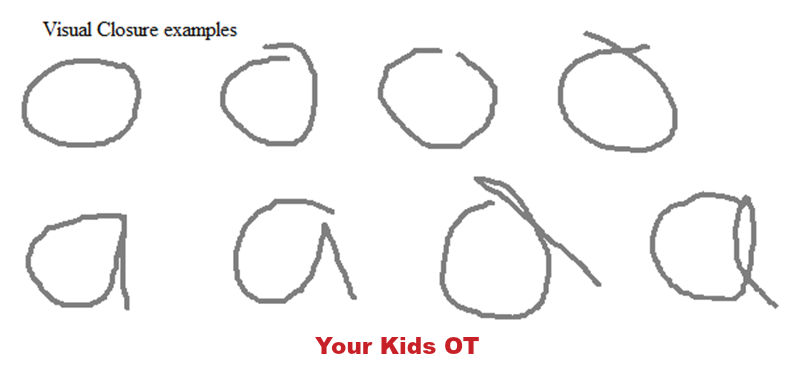
Form Constancy is the ability to identify an object, shape, letter, number, symbol when it is presented in a different way (eg. larger, smaller, rotated, italics, bold, different font, sideways, upside down, different colour). In handwriting this may result in not realising when they are having difficulty with letter formation as they may interpret their formation as accurate. For example they may see the visual closure examples above and may consider the forms to be constant (form constancy) and are unable to identify the discriminating features (visual discrimination). Children who have difficulty with form constancy may also have difficulty transitioning from printing to cursive writing.
Children who experience with difficulty with form constancy may benefit from consistent use of the same writing font in the classroom, presentation of information at the same orientation that it is expected to be reproduced (eg. flat on the table when writing at the table or vertical when writing on a whiteboard). Teaching letters and words using a multi-sensory approach can help children to become more aware of the properties of shapes and letters needed for handwriting. Visual memory is the ability to remember and recall objects, shapes, symbols or movements in short term memory. Visual memory requires visualization of what to remember. This may affect a child’s ability to recognize and name shapes, letters and words. They may have difficulty remember what these “look like” without a visual prompt. For example, children may be able to copy the letters of the alphabet when it is on a desk strip, however if you randomly ask them to write various letters of the alphabet they may not recall what it looks like. They may also have difficulty remembering all the letters of a word to copy and need to “look up” to copy each letter even with familiar words. Children with visual memory difficulties benefit from playing memory card games and chunking small amounts of information at a time for writing (eg. word on a flash cards rather than a whole sheet). They may require visual aids for longer than other students (eg. use of desk strips of the alphabet). These children also benefit from multi-sensory learning especially incorporating the use of verbal cues associated with motor movements (eg. tall straight line down, up and over to draw an “h” can be creating walking on a chalk line, creating this with a skipping rope, tracing in shaving cream, writing on a whiteboard, using a ribbon to draw in the sky and using finger to write on someone’s back). Visual sequential memory is the ability to remember and recall a sequence of objects, shapes, symbols or movements in a particular order. In handwriting, this may affect letter formation with more frequent letter reversals as children have difficulty remembering the order for letter formation as well as the spatial position of the next line. This may also affect a child’s ability to write words which may have similar letters (eg. on, no, one) or a sequence of words to make a sentence. Children with visual sequential memory difficulties benefit from pairing verbal cues with motor skills as described in visual memory. Children may read and repeat letters for writing words, or read and repeat phrases and sentences for extended writing. These verbal cues may need to be said “aloud” before the child learns to internalise this and “says it in their heads”. Simple sequential memory games using physical props such as beads, blocks, pom poms may precede games using letters, numbers, shapes and words. These may be presented in increasingly large numbers and covered to be reproduced with shorter time frames over time as skills develop. Occupational Therapists use a variety of assessment tools to identify visual perceptual and visual-motor integration difficulties. If your child is experiencing difficulties with these aspects of handwriting contact a registered Occupational Therapist for a comprehensive assessment. This post is part of “Functional Skills for Kids: 12 month series by Paediatric Occupational and Physical Therapists”. You can read all of the childhood functionsHERE. Read all Your Kids OT’s monthly posts HERE. The information in this article may now be found in THE HANDWRITING BOOK! The Handwriting Book breaks down the functional skill of handwriting into developmental areas. These include developmental progression of pre-writing strokes, fine motor skills, gross motor development, sensory considerations, and visual perceptual skills. Read more about THE HANDWRITING BOOK HERE (an e-book which you can download instantly)!
References: Beery, K. E., Buktenica, N. A., & Beery, N. A. (2010). The Beery-Buktenica developmental test of visual-motor integration: Administration, scoring, and teaching manual (6th ed.). Minneapolis, MN: NSC Pearson. Volman, M. J. M., van Schendel, B., & Jongmans, M. J. (2006). Handwriting difficulties in primary school children: A search for underlying mechanisms. American Journal of Occupational Therapy, 60(4), 451-460. 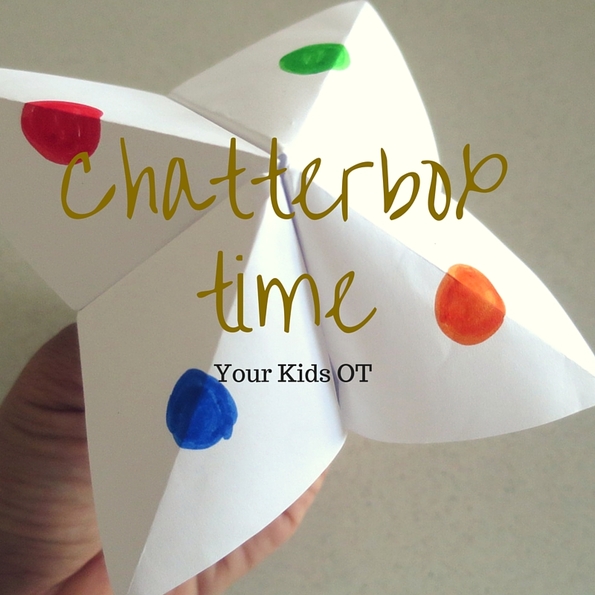

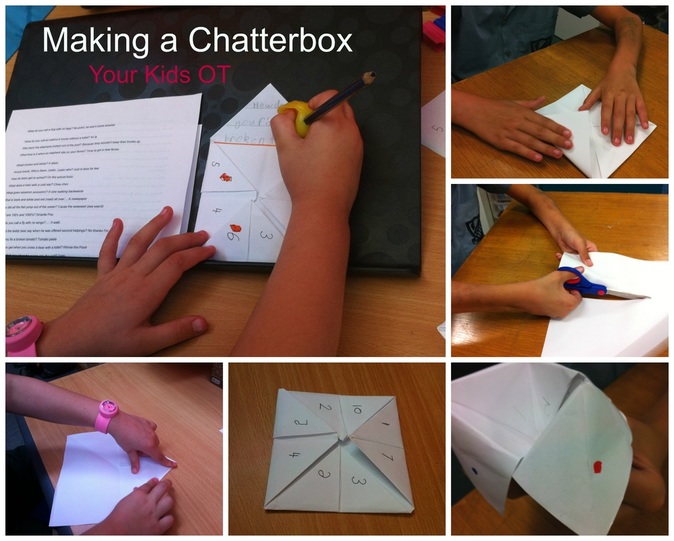
Chatterbox Time! Kids all love to make and play with chatterboxes! I remember making them when I was a child, did you? Last week, I made these with some of the kids I see for therapy and it was the perfect activity to work on a range of skills.
If you haven't made one for a while, this is how you fold your chatterbox. Start with an A4 size piece of paper and make sure you press down each fold neatly. The neater the folding the better the chatterbox will work in the end. 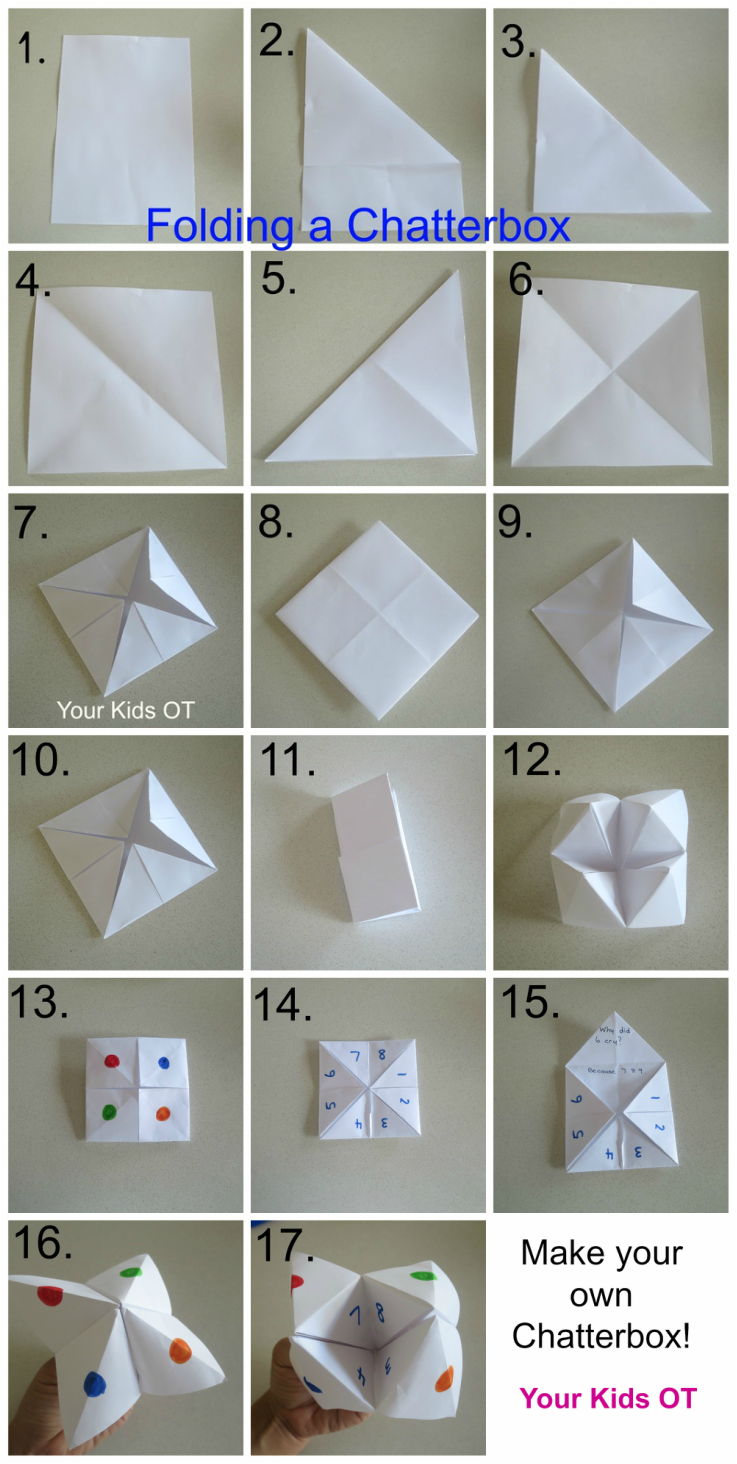

1. Start with an A4 piece of paper. (You could also start with a square piece of paper and skip to step 4.) 2. Fold down one corner so your triangle lines up with the side. 3. Cut off the section under the triangle. 4. Open out your triangle so you can see your square. 5. Fold down another corner creating a triangle. 6. Open out your square so you can see the two folded diagonal lines. 7. Bring each corner into the middle, pressing down on the fold. 8. Flip over your square. 9. Bring each new corner into the middle, pressing down on the fold. 10. Almost there! 11. Fold along the horizontal middle line, open and fold along the vertical middle line, open. (This will held with the movement of the chatterbox when playing.) 12. Put your fingers in the "open square" parts of each quarter. Your chatterbox is now ready to decorate! 13. Add a coloured dot to each square. (We also wrote the colour name for those kids who needed a reference to spell the colours when playing.) 14. Flip over your square and write a number in each triangle section. Try to have odd/even numbers to help later with playing. 15. Open out each double triangle to write a question/joke. Write the answer in the bottom half. (If your child has small legible writing you may be able to fit in a question/joke in each small triangle.) 16 and 17. Ready to play. Use your thumb and index fingers on both hands to open and close the chatterbox. We had a great time making these in OT last week. Here are some of the skills we worked on:
Whilst I had a double-sided page of jokes for the kid's to choose from, these were the clear favourites!
Have you made a chatterbox recently? What's your favourite kids joke? 
You may also like...
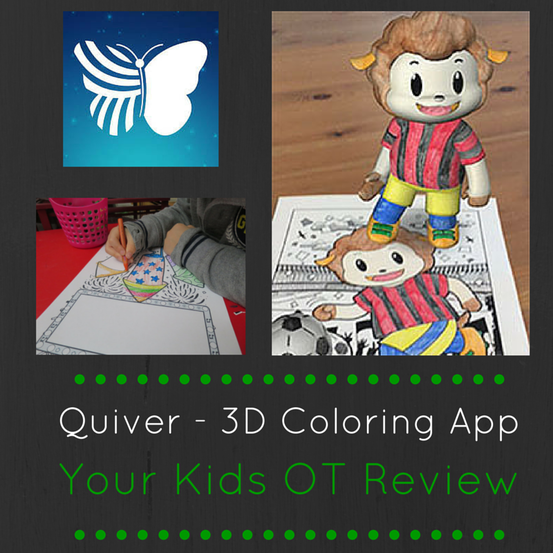 When colouring-in doesn't stay on the page! Quiver-3D Coloring App is designed to bring your colouring-in to life! Formally known as ColarMix, this app has been around for a few years. It has always been a hit with kids I see for OT. With a few upgrades, Quiver-3D Coloring App has developed with more interaction and appeal! What do you need? 1. Download the Quiver-3D Coloring App for free (however you will need to pay to use certain "packs"). 2. Visit the Quiver website to download colouring-in pages and print off the pages you want to use. 3. Encourage your child to colour-in the pages (or you could colour-in a page too! Watching a "grown up" colour-in can be incredibly motivating for children). 4. Open the app and hover your device over the colouring-in page. Select the page and then once processed keep holding the device to see the page come to life. Most pages have an interactive component so that you can press to activate fireworks, kick a ball, squirt the fire hose, etc. 
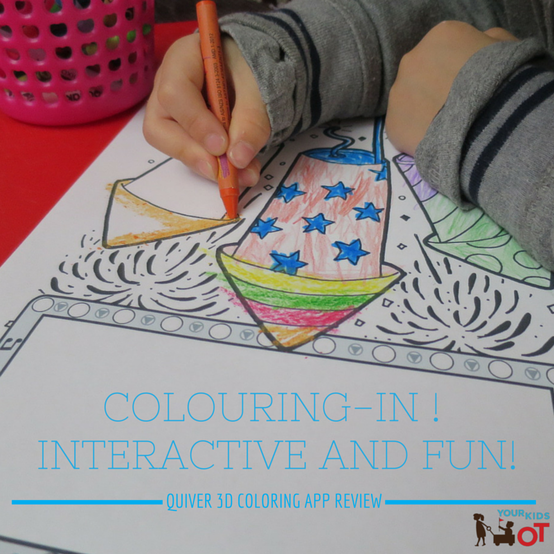 
The app has a few options whilst playing such as taking a photo, recording a video or changing the size of characters. Here is a video we recorded of Mr 5's colouring-in. He was thrilled to see the fireworks actually take off and explode! {Note: If you are reading this in an email, you may need to click on the title of this article to take you to a live web page to view the video.} Young children will need help to hold the device whilst they press the screen for interactive play. We found that this worked whether the page was flat on the table or stuck to a vertical surface. This app is a fantastic way to encourage colouring-in the traditional "crayon to paper" way we have always coloured-in. The surprise is the magical touch of bringing your child's pictures to life. Your kids will love it! With so many amazing apps encouraging "device colouring-in" where the screen is coloured in with a stylus or finger, it is refreshing to see kids being encouraged to put marks on actual paper. Colouring-in is a great way to prepare kids for handwriting. Here are 5 ways your child can benefit from "traditional colouring-in"... 1) Proprioceptive feedback - It is important for kids to learn about pressure applied to the page. Too much and the output is dark (or you break a pencil or make a hole in the page), too little and the output is light. Trying different tools (ie. crayons, textas, pencils, paint) can provide different outputs. Which tool is easier to colour in large spaces? 2) Hand dominance and bilateral coordination - Which hand is used to colour in? Does your child switch hands when they move across their bodies to colour? Is one hand being a "helper" to stop the paper from moving? 3) Dynamic Tripod grasp and wrist position - How does your child hold the pencil? What is developmentally appropriate? Do they hook their wrist? Do they move their whole hand as they colour? 4) Observing visual cues - Does your child notice they boundaries where they should colour-in? Depending on their age, you may encourage different colours for different parts of the picture. 5) Pride in their work - Children love praise. They love recognition of what they have done and this reinforces their behaviour, encouraging them to repeat it! All children love having their "work" displayed. Perhaps you could display their "picture of the week" and change it in a prominent position (the fridge is always popular)? Some of you may be reading this shaking your heads! What is the world coming to where we need to be reminded of the benefits of traditional "colouring-in"...well this is the way things are right now. Technology is here to stay and evolving all the time. Our kids are part of this digital age with all it's expectations. I love how this app brings both the traditional and modern together. Have you got a reluctant "colourer"? Would this app motivate your child to "colour-in"?  Disclosure: No remuneration was received for this article. All opinions expressed here are my own. You may also like this:

Mr 5 has been addicted to "Snakes and Ladders" for the last 6 months. He loves the counting, the turn taking, the thrill of climbing up the ladders, seeing others slide down the snakes and most importantly "winning"! There has been lots of discussion that it is ok to lose and even good sportsmanship to congratulate the winner. Most of the time he gets it, however, he does have a knack for winning!
We have made our own homemade board in a previous school holidays...drawing up 100 squares and using up old stickers to "decorate" the board, glueing on paddlepop sticks and pipecleaners to act as the snakes and ladders. Mr 5 also helped to draw on the paddlepop sticks to make them more like "ladders". There are so many opportunities for fine motor manipulation, pencil control, writing, pincer grip and bilateral coordination if you make your own board. The kids will love to create and will be more inclined to play their OWN board! 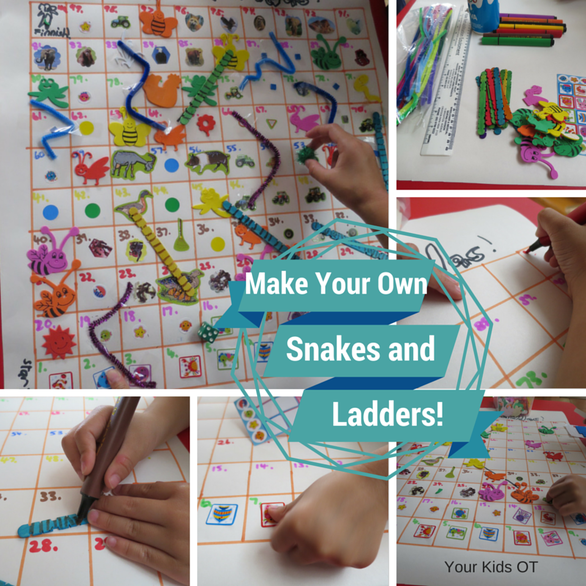
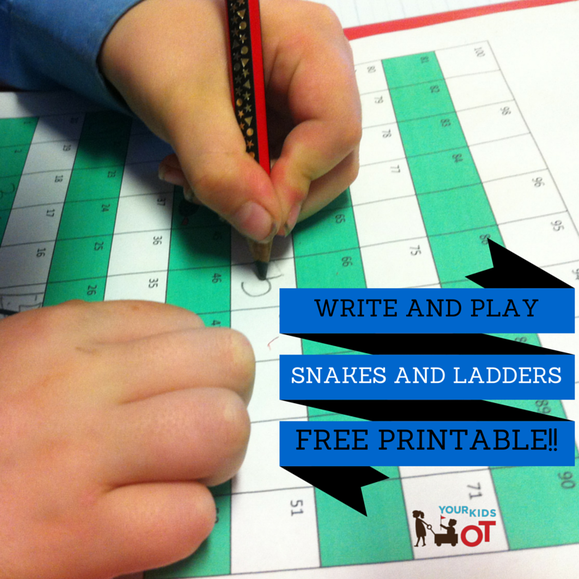
Whilst it is not possible to make such a "detailed" game board in a therapy session, I have made a FREE printable that I use with the kids I see for OT. I encourage writing numbers to fill in the missing ones from the printable as well as drawing some additional snakes and ladders. I love to incorporate play into therapy sessions and there is much more motivation to write numbers on a game (which they can take home) than just writing them without a reason. Download your FREE PRINTABLE Snakes and Ladders HERE! 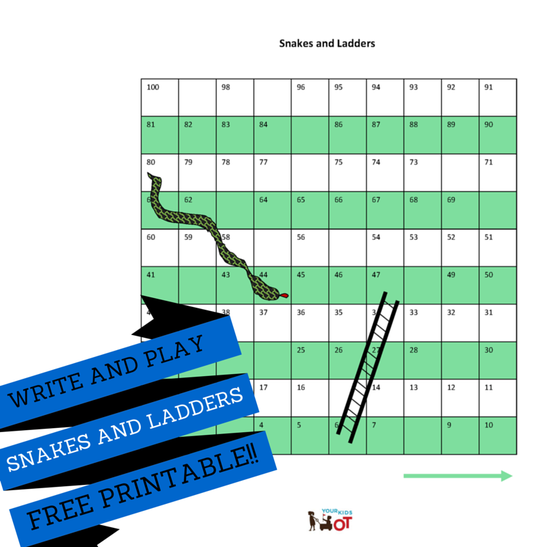
Here is why I love "Snakes and Ladders": * Number recognition and writing - In creating the game ... number writing and pencil grasp may be practised. In playing the game... there are opportunities for number recognition and naming , sequencing numbers and counting out spaces to move. * Fine motor skills - I use small objects such as pom poms, blocks or checkers as our game pieces. Picking up the pieces often requires a pincer grasp. Controlled release is also needed to place the pieces on the correct square. If your child is practising separating the two sides of their hand, then you could get them to hold the dice under their 4th and 5th fingers as they move their marker. A dice is usually used in play and this is great for encouraging the palmar arches of the hand as the dice is shaken prior to rolling. * Visual scanning and tracking - Keeping track of your own game piece and opponents as they move up, around or down the game board. * Social Skills - When playing the game, children need to take turns and wait. They also learn how to "win" and "lose". This may a good opportunity to practise emotional regulation skills if a child has difficulty "losing". * End point - The game is finished when someone reaches 100 on the game board. Having an end point is important for kids who benefit from clear boundaries and structured play. * Children and adults of all ages can play this together. * It's fun and unpredictable! 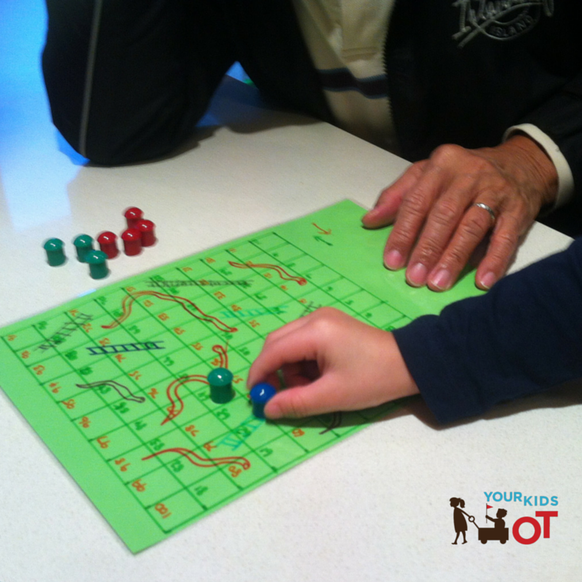
Mr 5 recently taught his grandfather how to play "Snakes and Ladders". I was surprised that he had never played before. It was certainly a heart melting moment for me! Do your kids love "Snakes and Ladders"? Have you downloaded your FREE PRINTABLE GAME BOARD? 
You may also like:
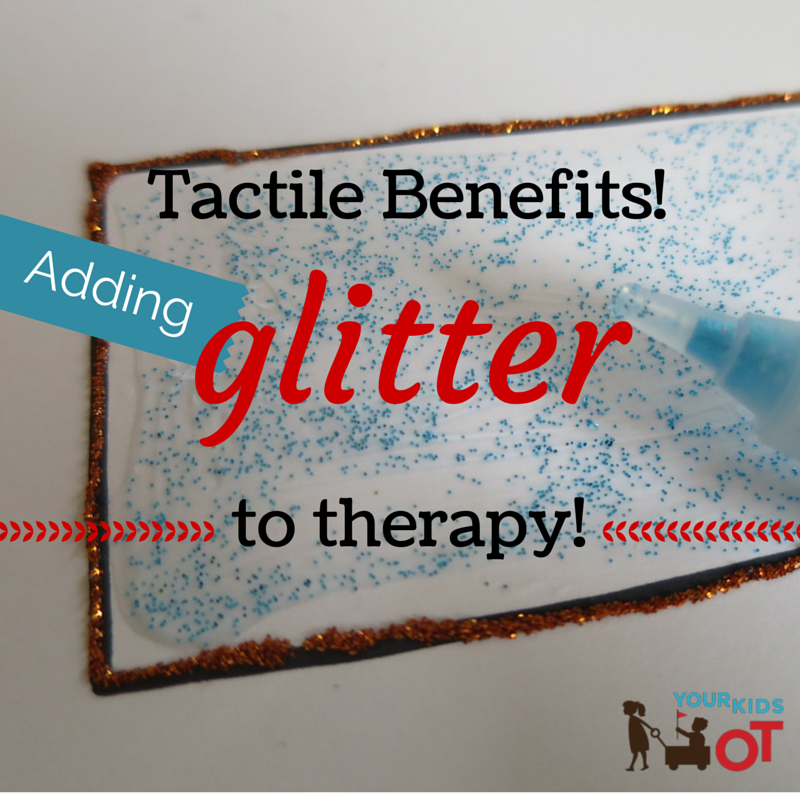

Adding some sparkle or bling in therapy sessions can provide great tactile benefits! A little bit of preparation and patience as the glue dries and you are ready for some great glitter resources!
All you need to make these resources are a packet of glitter glue pens, a marker, cardstock {this is thicker than ordinary paper} and scissors. 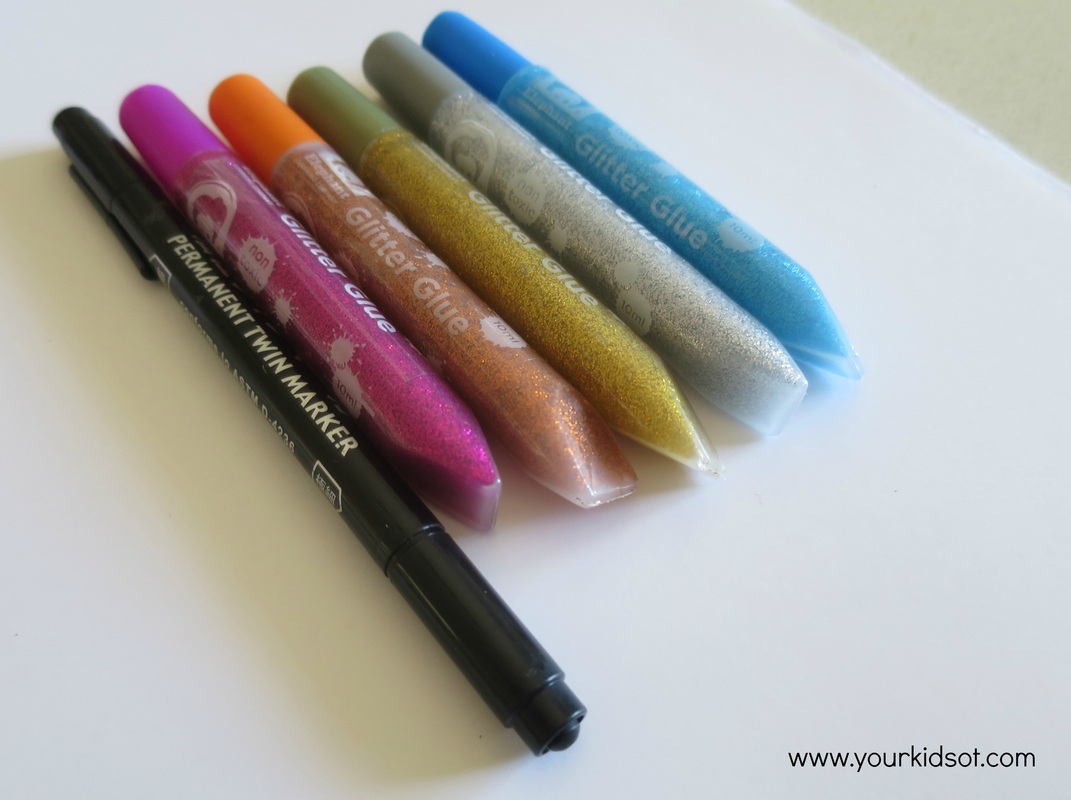
The glitter forms a raised surface with a "bumpy" texture. Encourage your child to "feel" with their fingers along the dried glitter. This provides your child with tactile information in addition to just visual information. Tactile feedback can help with learning letters, shapes, names, etc.
You could also spread the glitter out so your child can then colour over the glitter. This is excellent for those kids who have difficulty "colouring" in the lines or colouring the entire surface area they need to colour. Kids love colouring over the bumpy surface of the glitter. Here are some of the ways I add glitter to therapy sessions and sometimes my own kids benefit too! 1. Alphabet glitter - Use these cards to learn the alphabet, sort into letter families, spell your child's name, learn correct letter formation, etc. If you have used or heard of "sand paper letters", then these glitter letters can be used in the same way for a fraction of the cost. You can make these whatever size you want and do capital letters too! 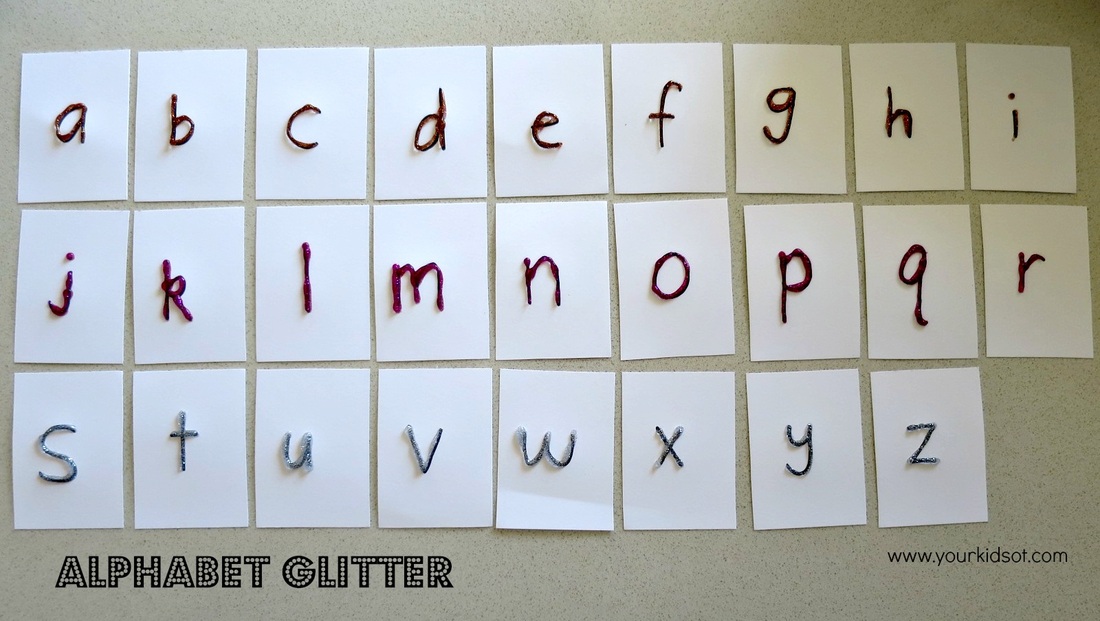

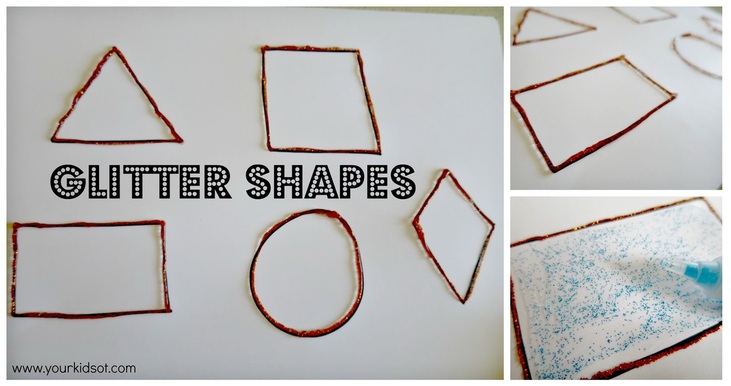
2. Glitter Shapes - Use glitter glue to outline shapes or to colour in the entire surface of the shape. Imagine colouring within these shapes and "hitting" the raised boundary. Your child will have a better understanding of where to stop colouring. Your child can also trace around the raised border to learn how many sides these shapes have as well as the names of the shapes.

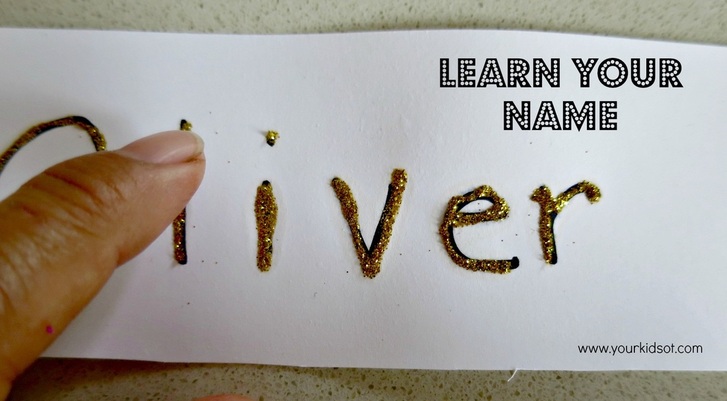
3. Glitter Names - Your child will love learning the letters of their name in glitter! Trace over, write over, spell...do it again with their eyes shut! Teach left to right direction of letters and letter formation too.

4. Glitter Colouring - Do you have child who avoids colouring? Have you tried glitter colouring? Draw simple pictures {small is good} and fill with glitter glue. Spread out the glitter so that is quite thin and wait for it to dry. Don't these Easter eggs look pretty? Your kids will be happy to colour in these eggs and then the pictures may be used in a treasure hunt.
My Mr reluctant-colourer was happy to colour these, after which Miss 8 hid them in the garden for him to find. Lots of fun and bit of pencil control in there too, win-win-win, I say! 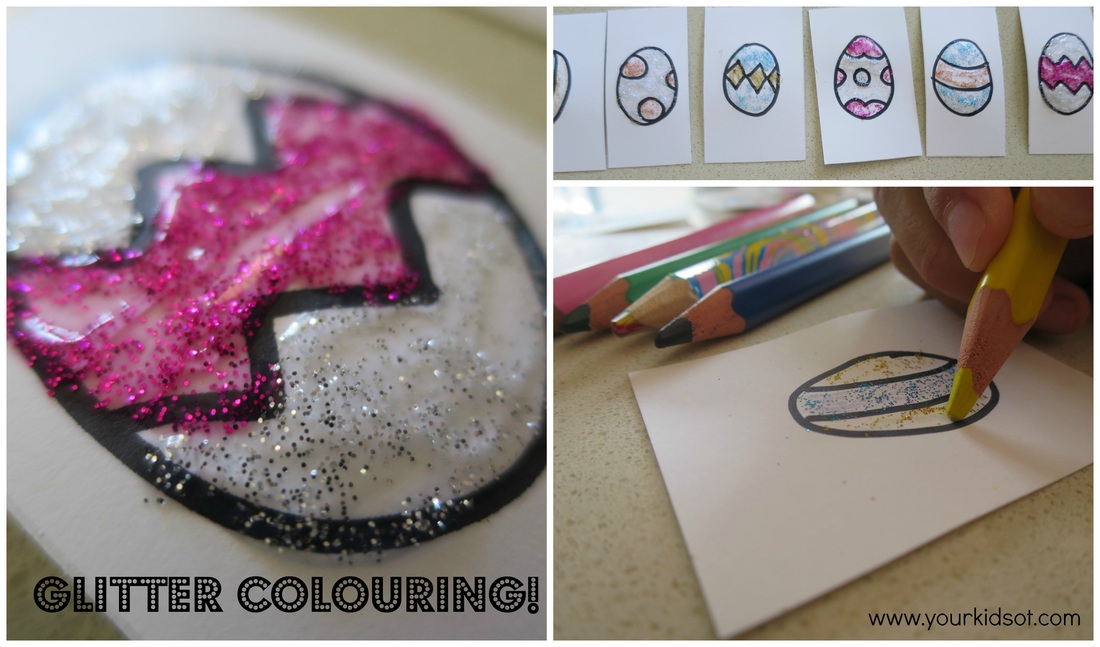

I don't usually let the kids I see for OT use the glitter glue pens as I generally see kids in school. I can't be sure there is somewhere for art to dry and that we won't make a huge mess!
So this next activity is something I would do at home. 5. Glitter drawing - Encourage your child to draw a simple picture with a marker. Then give them the glitter glue to trace over their drawing. Squeezing the glitter glue is a great way to encourage a pincer grasp and work some intrinsic hand muscles. 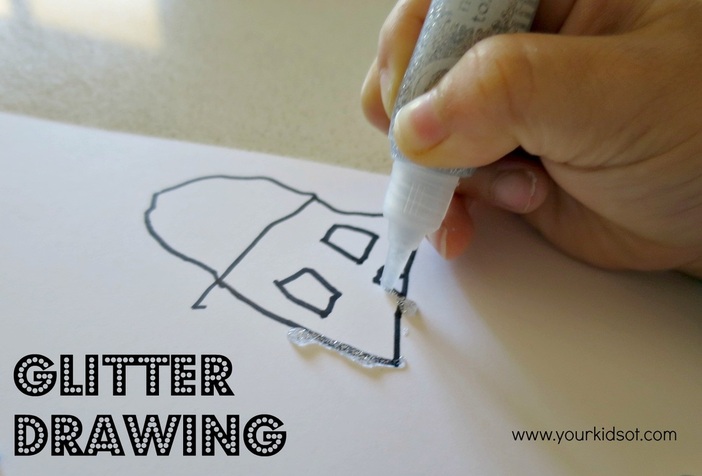

Has this inspired you to get out the glitter glue? I promise that it is isn't too messy and it doesn't actually take much time to organise. Your kids will love the effort that you have put in!
Have you used glitter to make resources for therapy, home or school? 
You may also like:
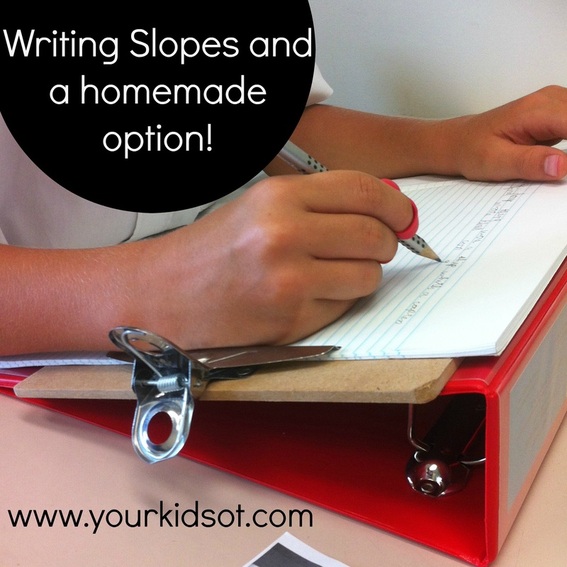  Using a sloped desk is nothing new! Victorian school classrooms had desks like the one below. These school desks were designed with a slight slope to help the child to write comfortably (no comment about the fixed chair being too far from the table). 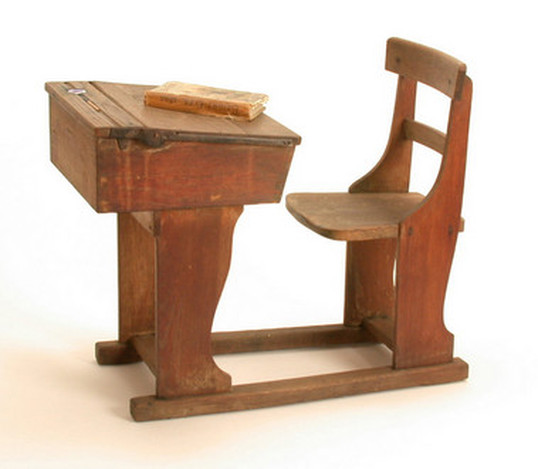 Image found at http://www.objectlessons.org/ The designers of these school desks understood some of the ergonomics of writing. The slope encourages good posture for the student bringing the work closer to look at. The slope provides support to the child's wrist {in slight extension) and forearm to encourage fluent writing {imagine what the "pencil grip" of a quill may have been!}. There are many products on the market now with "slopes" to encourage the same things the school children of the Victorian era experienced. These are available to both adults and children, for writing and computer keyboards and tablets. Here are a few writing slope options. 1. Windmill Desk Top Writing Slope $49.95 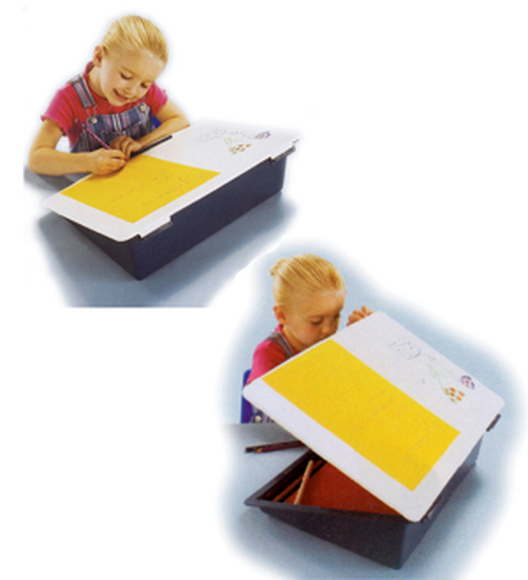 Windmill Desk Top Writing Slope 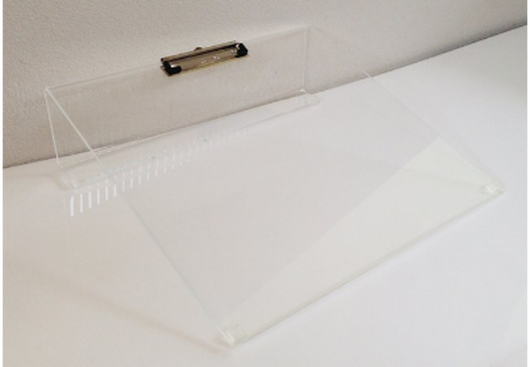 Pencil Grips Plus Perspex Writing Slope Board 3. Make your own using 3 easy items.
Simply assemble and you are ready to use it! This is definitely an economical way to make a slope board and is perfect for those wanting to try out a slope board before paying for a longer term item. This homemade version cost me less than $15. 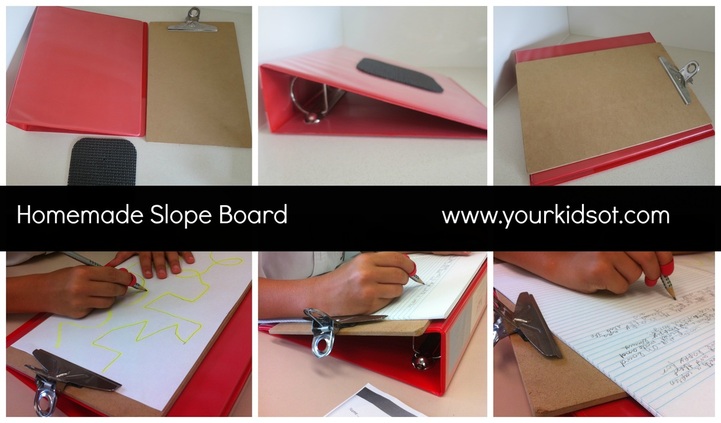  Does your child hold their head too close to their work? Does your child "hook" their wrist when writing? Does your child rotate their arm when holding a pencil? Does your child tend to move their arm as a whole unit rather than using the "skilled side" of their hand? Your child may benefit from writing on a vertical surface (such as a whiteboard) or using a slope board to support their wrist and forearm. Have you tried a slope board? Have you tried making your own?  Note: I have not received any renumeration for the products in this article. You may also like:
|
AuthorHi, I'm Cindy and I am an Occupational Therapist. I enjoy working creatively with children to see them reach their potential. Read more about me here. 
SEARCH THIS SITE

Archives
April 2024
Categories
All
Popular Posts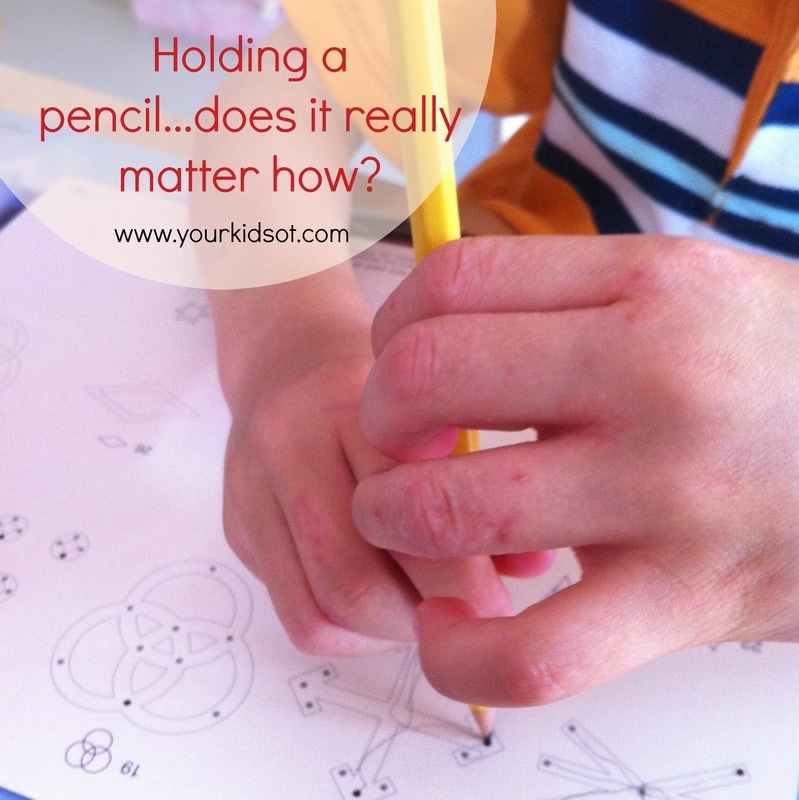

 |


 RSS Feed
%22%20%3A%20Your%20Kids%20OT)
Join the YKOT e-newsletter!
Subscribe to get our latest content by email and receive
the SHAPE ROADS PRINTABLE NOW!

Success! Now check your email to confirm your subscription and receive your free printable!
Join our Mailing List!
Subscribe to get our latest content by email and receive
the SHAPE ROADS PRINTABLE NOW as a thankyou!
Success! Now check your email to confirm your subscription and receive your free printable!
Disclaimer: The information on this site is general in nature and should be used for educational and entertainment purposes. The activities are safe for most children, however, you should consult an Occupational Therapist or health professional to address specific movement, sensory or other medical conditions. This blog does not replace formal therapeutic professional advice given by a health professional or medical practitioner. Reviews and endorsements of products will only be made based on my expertise and personal opinion; and deemed worthy of such endorsement. The opinions shared in sponsored content will always be my own and not that of the advertising company or brand. Content, advertising space or posts will be clearly identified if paid, affiliated or sponsored. Affiliate links may be found throughout this website in advertising. This means that if you follow through with a purchase from these links, Your Kids OT will receive a percentage of the sale. Your Kids OT undertakes to meet the requirements of the "Social Media Policy" as published by Australian Health Practitioner Regulation Agency (AHPRA). Further information about this policy can be found here.
Find meFollow me |

|
About me
AuthorHi, I'm Cindy and I am an Occupational Therapist. I enjoy working creatively with children to see them reach their potential. Read more about me here. 
|
Copyright © 2017 Your Kid OT