
Breathing can help children {and adults} to regulate their bodies. Breath may affect posture and and behaviour will always be exhibited when a child has difficulty breathing. Some children benefit from quiet, resistive suck and blow activities such as blowing bubbles in slime, sucking up soup through a straw and blowing balloons. Some children benefit from easy-to-blow big noise toys. Other children benefit from oral motor toys which encourage breath to be graded such as a harmonica.**
My favourite oral-motor toy are these animal eye-poppers you see below. Children need to grade their breath so that the eye balls hover just above the eye sockets. This appeals on so many levels to kids {and big kids too}! 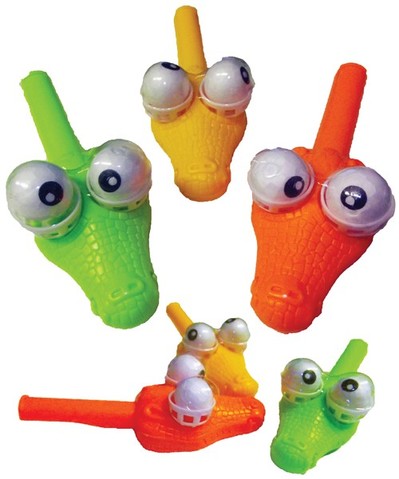
Animal Eye Poppers available from Sensory Tools
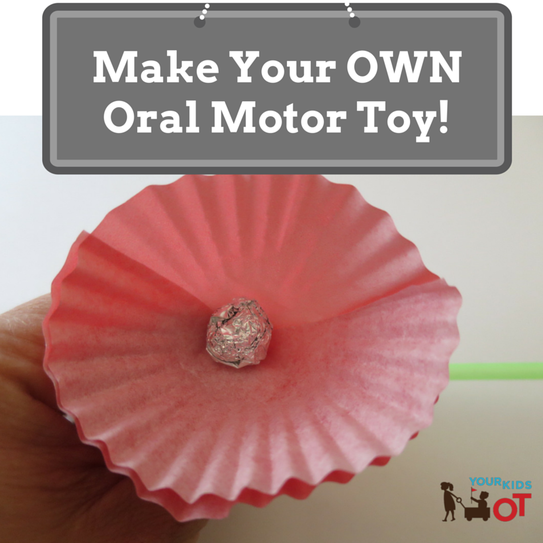
The dilemma as a therapist is not being able to use oral motor toys easily between children. Obviously there are hygiene considerations! It is too expensive to buy one for each child I see. When I saw the idea to make your own oral motor toy on Pinterest, I couldn't wait to make it with my OT kids! I have made a few adjustments to the original instructions to encourage some fine motor and visual motor skills in making the toy.
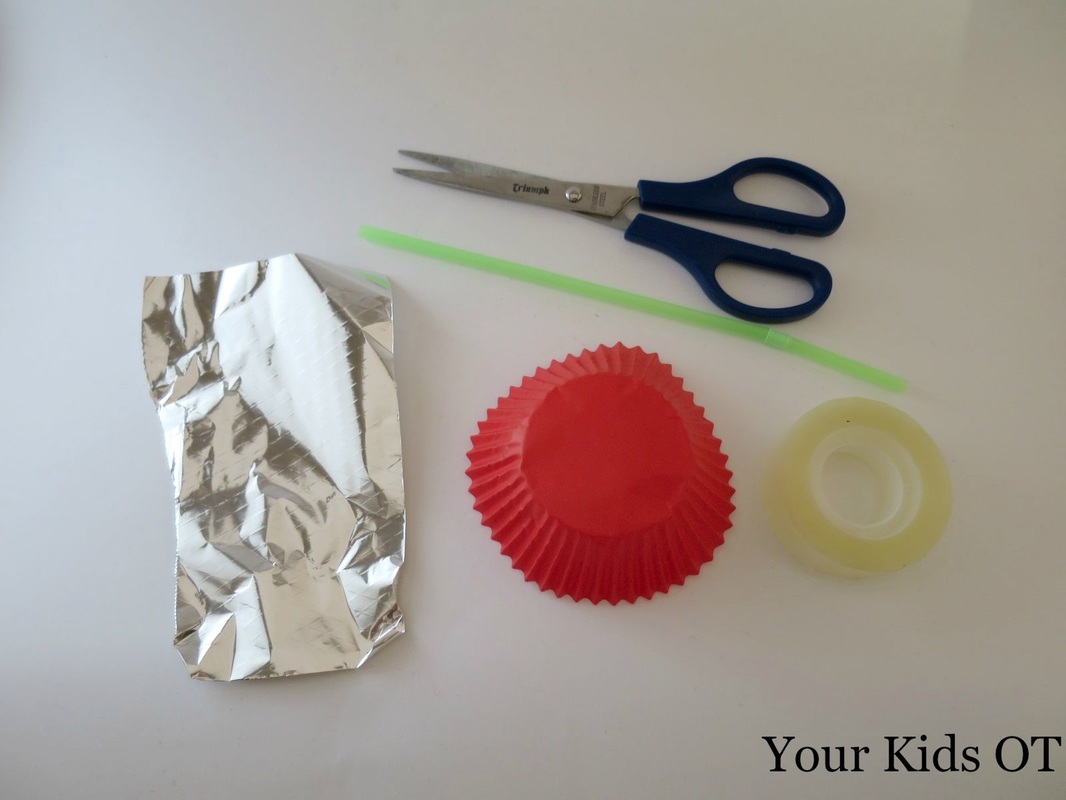
What do you need to do?
1. Cut the small section of the bendy straw in half. 2. Cut the "cut off" piece of straw in half. 3. Place the two small pieces of straw on the foil. 4. Scrunch up the foil, covering the straw pieces, into a small ball. {The small pieces of straw add volume, however keep the ball light}. 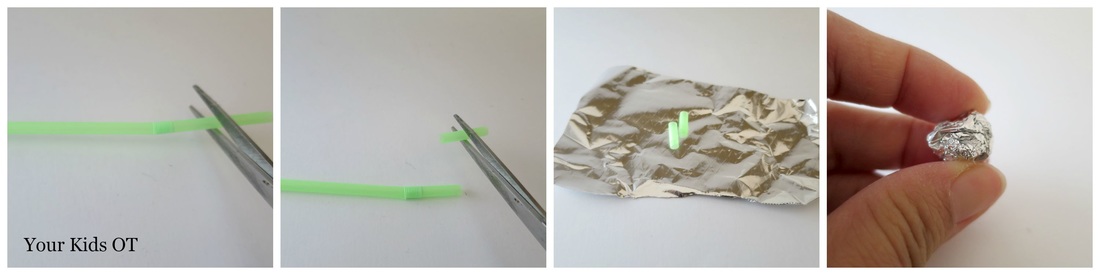
5. Fold the patty pan in half and press down the fold.
6. Fold the patty pan in half again and press down the fold. 7. Open up the patty pan and cut along one fold stopping at the centre. 8. Make a funnel shape with your patty pan and secure with sticky tape. 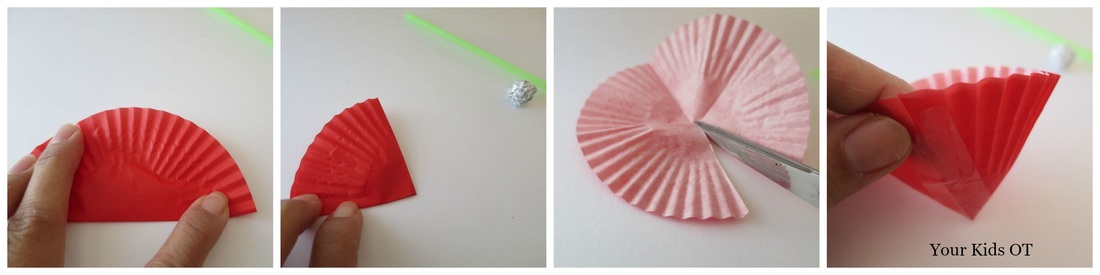
9. Make a small cut a the bottom of the funnel shape (enough for the straw to poke through). 10. Place the small section of the straw through the hole in the patty pan. Try to have a minimal amount of straw poking through. 11. Secure the straw with sticky tape. 12. Stretch out the "bendy" section of the straw and you are ready to blow! 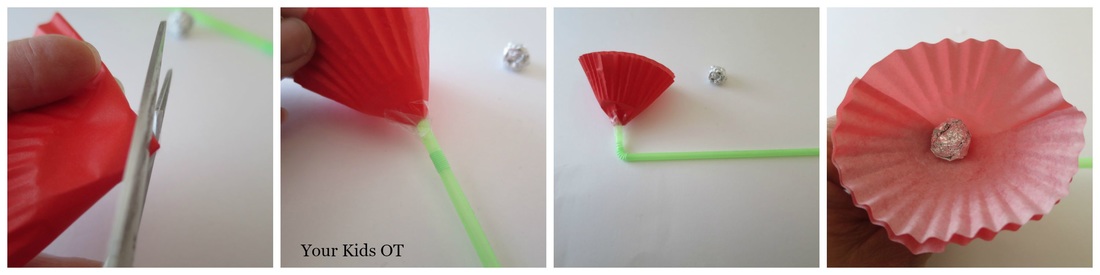
I have been doing this activity with my 1st and 2nd graders at school. I bring the supplies in a small zip lock bag and encourage them to follow the steps. Most of them have needed help with creating the funnel and securing the straw. They have all enjoyed blowing into the straw attempting to grade their breath to keep the ball floating. It takes practise! Mr L shows you in this video how it is done! {If you are reading this in an email, you may need to press the title of this article and view it in an online browser} We can use respiration as a tool to regulate our heart rate and to support attention and focus.** This oral motor toy encourages an aligned postural position to facilitate controlled breathing. As children attempt to float the ball above the straw, their breath is graded and controlled. 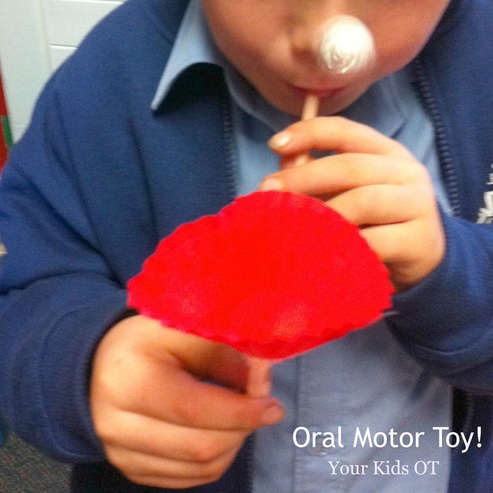

Click to set custom HTML
What is your favourite oral motor toy? Have you made one? 
Note: This article does NOT contain affiliate links. All opinions expressed about products in this article are my own. I have not received any remuneration for this article.
** Gen Jereb's "The Traffic Jam in My Brain" presented 10th April, 2015.
You may also like:
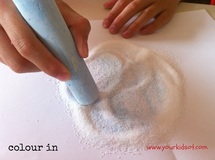
 When colouring-in doesn't stay on the page! Quiver-3D Coloring App is designed to bring your colouring-in to life! Formally known as ColarMix, this app has been around for a few years. It has always been a hit with kids I see for OT. With a few upgrades, Quiver-3D Coloring App has developed with more interaction and appeal! What do you need? 1. Download the Quiver-3D Coloring App for free (however you will need to pay to use certain "packs"). 2. Visit the Quiver website to download colouring-in pages and print off the pages you want to use. 3. Encourage your child to colour-in the pages (or you could colour-in a page too! Watching a "grown up" colour-in can be incredibly motivating for children). 4. Open the app and hover your device over the colouring-in page. Select the page and then once processed keep holding the device to see the page come to life. Most pages have an interactive component so that you can press to activate fireworks, kick a ball, squirt the fire hose, etc. 
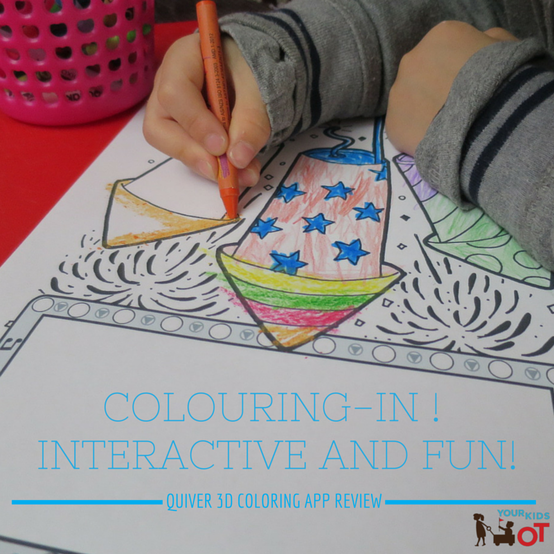 
The app has a few options whilst playing such as taking a photo, recording a video or changing the size of characters. Here is a video we recorded of Mr 5's colouring-in. He was thrilled to see the fireworks actually take off and explode! {Note: If you are reading this in an email, you may need to click on the title of this article to take you to a live web page to view the video.} Young children will need help to hold the device whilst they press the screen for interactive play. We found that this worked whether the page was flat on the table or stuck to a vertical surface. This app is a fantastic way to encourage colouring-in the traditional "crayon to paper" way we have always coloured-in. The surprise is the magical touch of bringing your child's pictures to life. Your kids will love it! With so many amazing apps encouraging "device colouring-in" where the screen is coloured in with a stylus or finger, it is refreshing to see kids being encouraged to put marks on actual paper. Colouring-in is a great way to prepare kids for handwriting. Here are 5 ways your child can benefit from "traditional colouring-in"... 1) Proprioceptive feedback - It is important for kids to learn about pressure applied to the page. Too much and the output is dark (or you break a pencil or make a hole in the page), too little and the output is light. Trying different tools (ie. crayons, textas, pencils, paint) can provide different outputs. Which tool is easier to colour in large spaces? 2) Hand dominance and bilateral coordination - Which hand is used to colour in? Does your child switch hands when they move across their bodies to colour? Is one hand being a "helper" to stop the paper from moving? 3) Dynamic Tripod grasp and wrist position - How does your child hold the pencil? What is developmentally appropriate? Do they hook their wrist? Do they move their whole hand as they colour? 4) Observing visual cues - Does your child notice they boundaries where they should colour-in? Depending on their age, you may encourage different colours for different parts of the picture. 5) Pride in their work - Children love praise. They love recognition of what they have done and this reinforces their behaviour, encouraging them to repeat it! All children love having their "work" displayed. Perhaps you could display their "picture of the week" and change it in a prominent position (the fridge is always popular)? Some of you may be reading this shaking your heads! What is the world coming to where we need to be reminded of the benefits of traditional "colouring-in"...well this is the way things are right now. Technology is here to stay and evolving all the time. Our kids are part of this digital age with all it's expectations. I love how this app brings both the traditional and modern together. Have you got a reluctant "colourer"? Would this app motivate your child to "colour-in"?  Disclosure: No remuneration was received for this article. All opinions expressed here are my own. You may also like this:

Mr 5 has been addicted to "Snakes and Ladders" for the last 6 months. He loves the counting, the turn taking, the thrill of climbing up the ladders, seeing others slide down the snakes and most importantly "winning"! There has been lots of discussion that it is ok to lose and even good sportsmanship to congratulate the winner. Most of the time he gets it, however, he does have a knack for winning!
We have made our own homemade board in a previous school holidays...drawing up 100 squares and using up old stickers to "decorate" the board, glueing on paddlepop sticks and pipecleaners to act as the snakes and ladders. Mr 5 also helped to draw on the paddlepop sticks to make them more like "ladders". There are so many opportunities for fine motor manipulation, pencil control, writing, pincer grip and bilateral coordination if you make your own board. The kids will love to create and will be more inclined to play their OWN board! 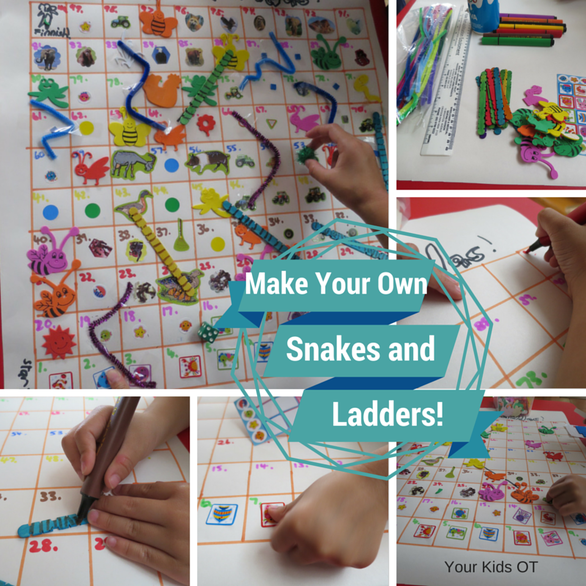
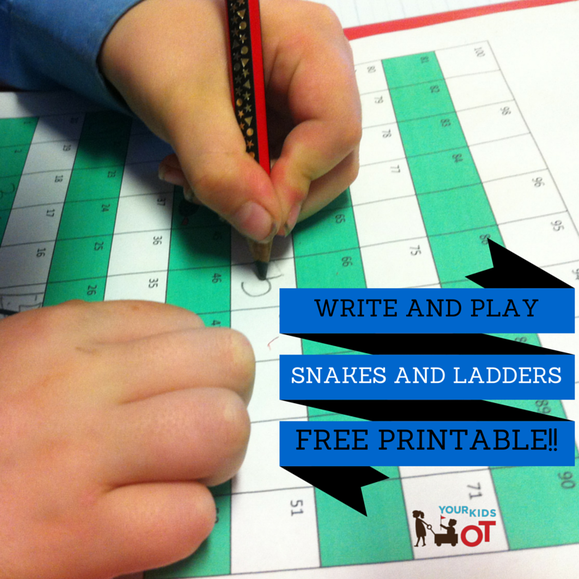
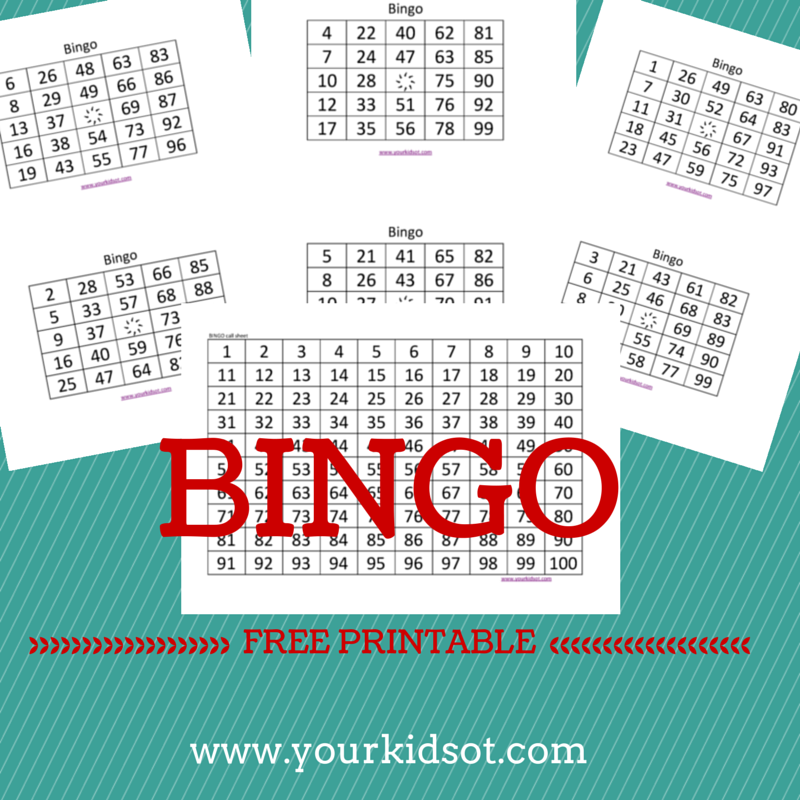
Whilst it is not possible to make such a "detailed" game board in a therapy session, I have made a FREE printable that I use with the kids I see for OT. I encourage writing numbers to fill in the missing ones from the printable as well as drawing some additional snakes and ladders. I love to incorporate play into therapy sessions and there is much more motivation to write numbers on a game (which they can take home) than just writing them without a reason. Download your FREE PRINTABLE Snakes and Ladders HERE! 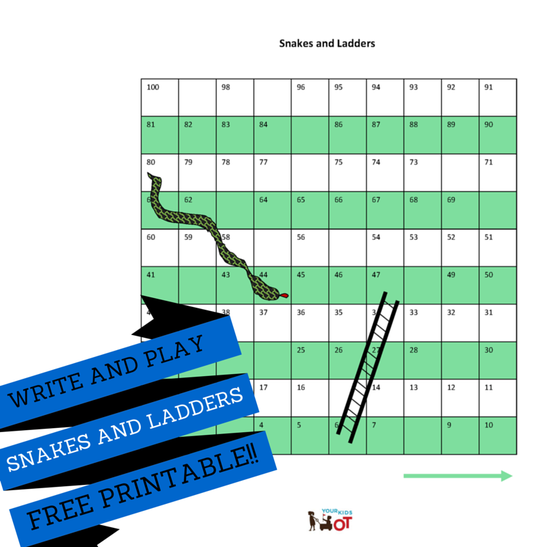
Here is why I love "Snakes and Ladders": * Number recognition and writing - In creating the game ... number writing and pencil grasp may be practised. In playing the game... there are opportunities for number recognition and naming , sequencing numbers and counting out spaces to move. * Fine motor skills - I use small objects such as pom poms, blocks or checkers as our game pieces. Picking up the pieces often requires a pincer grasp. Controlled release is also needed to place the pieces on the correct square. If your child is practising separating the two sides of their hand, then you could get them to hold the dice under their 4th and 5th fingers as they move their marker. A dice is usually used in play and this is great for encouraging the palmar arches of the hand as the dice is shaken prior to rolling. * Visual scanning and tracking - Keeping track of your own game piece and opponents as they move up, around or down the game board. * Social Skills - When playing the game, children need to take turns and wait. They also learn how to "win" and "lose". This may a good opportunity to practise emotional regulation skills if a child has difficulty "losing". * End point - The game is finished when someone reaches 100 on the game board. Having an end point is important for kids who benefit from clear boundaries and structured play. * Children and adults of all ages can play this together. * It's fun and unpredictable! 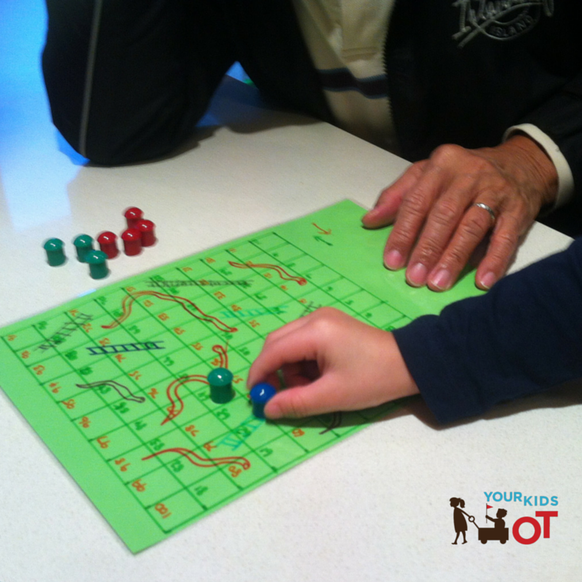
Mr 5 recently taught his grandfather how to play "Snakes and Ladders". I was surprised that he had never played before. It was certainly a heart melting moment for me! Do your kids love "Snakes and Ladders"? Have you downloaded your FREE PRINTABLE GAME BOARD? 
You may also like:
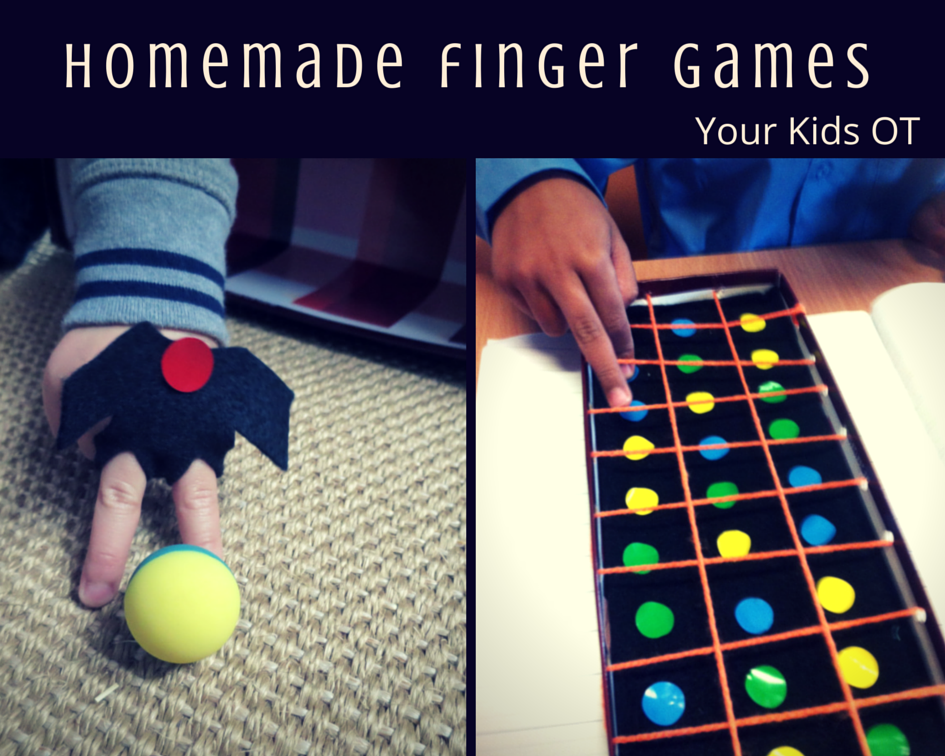
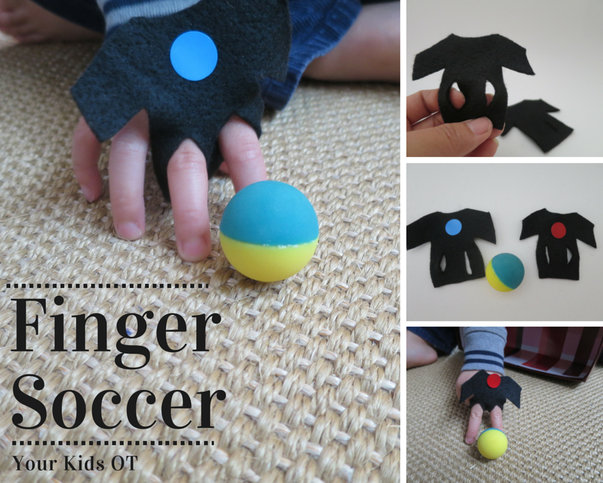
Two quick-to-make little games to play at home, preschool or in an OT session. Finger Soccer and a finger obstacle course! Finger Soccer What do you need? Black Felt Scissors Stickers Small ball What do you need to do? 1. Cut out some felt soccer shirts. 2. Cut two slits for fingers, 3. Decorate each shirt with a colour sticker and get a ball. Ready to play in less than 5 minutes! This is a fun little game that encourages finger isolation, strength and coordination. The fingers tucked underneath need to be stabilised so that the index and third fingers can be used. Fingers can "kick" the ball to another person and defend their own goal. 

Finger Obstacle Course What do you need? Lid from a shoe box. Felt Glue Scissors Hole Punch Wool Coloured stickers What do you need to do? 1. Cut out and glue a piece of felt to fit the shoe box lid. 2. Place holes around the lid on all four sides. 3. Secure the wool to a corner hole and weave in one direction across the lid. Then weave the wool in the opposite direction to form the squares. 4. Place colour stickers in each square so that it is either next to or diagonally opposite one of the same colour. You can nominate which fingers need to participate in the obstacle course. I get kids to either use their "pinchy fingers" (thumb and index finger) or their "walking" fingers (2nd and 3rd fingers). They have to get from one end of the lid to the other only touching a certain colour. We try to avoid touching the wool ... but that gets tricky. Just like finger soccer, this game promotes finger isolation, strength, coordination and separation of the two sides of the hand (where some fingers are used and others are stabilised). 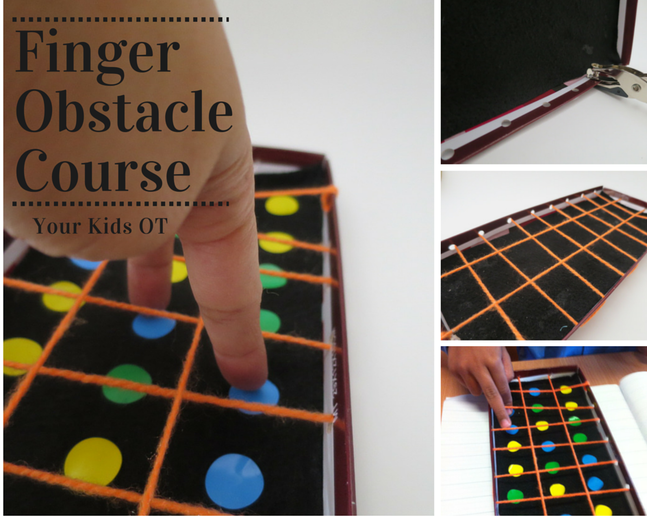

These games are really simple to make. They are great to warm up fingers ready to do other fine motor activities, handwriting or cutting. Did you read last week's article about heavy work finger activities that need no equipment and preparation? Would your child like to play finger soccer or challenge their way through an obstacle course? 
You may also like:
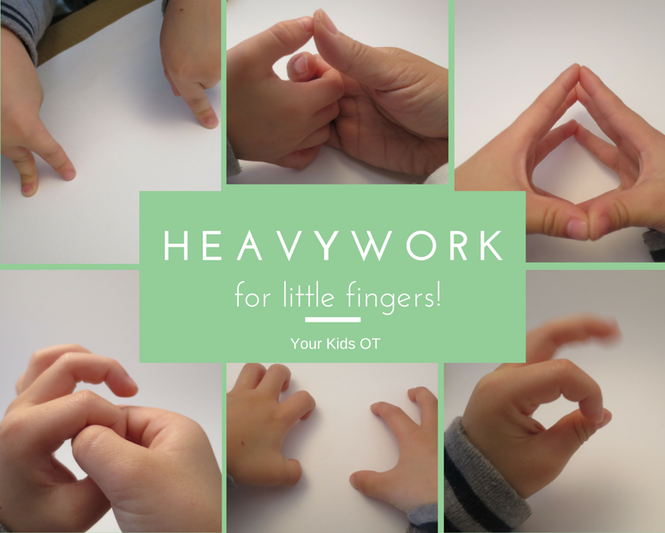

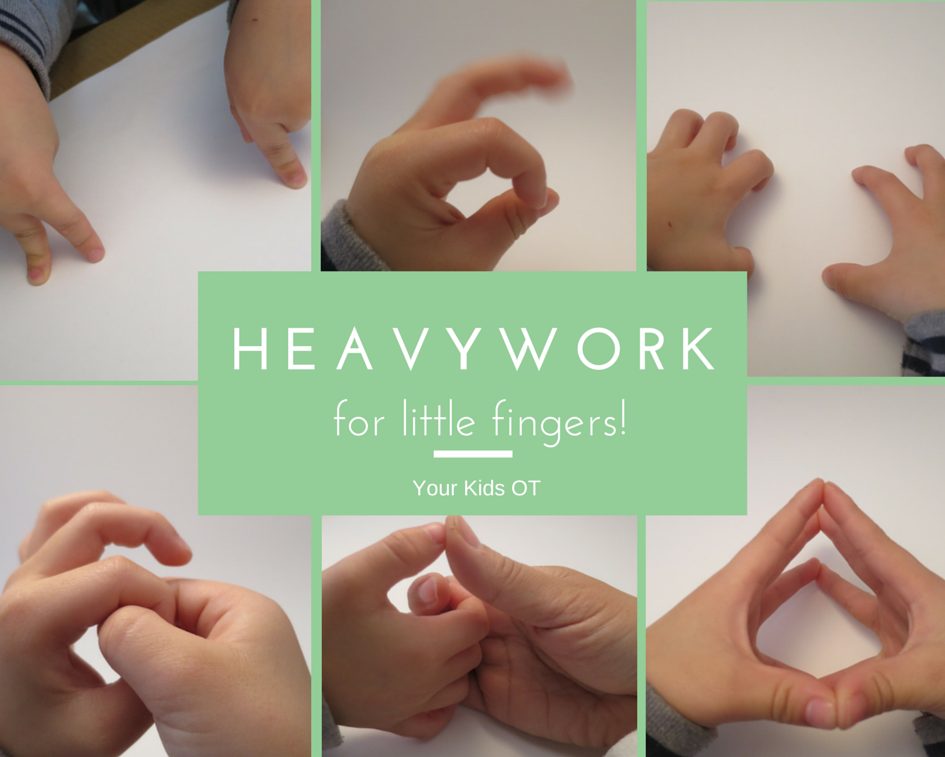
Heavy work activities refer to activities where the body has input to the muscles and joints. Heavy work activities are generally recognised as a way to help children improve attention, arousal level, body awareness, muscle tone as well as decreasing defensiveness. Heavy work activities can involve whole body movements (pushing, pulling, lifting, etc) or parts of the body.
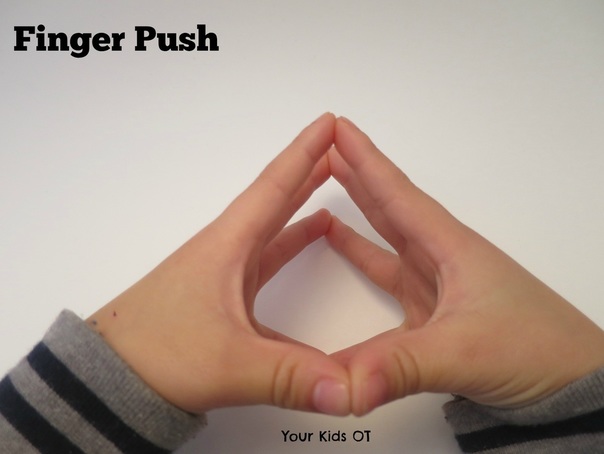
Here are some ideas for "heavy work" for fingers and do not require any equipment. These are great as finger warm-ups in the classroom, something to do in the car on the way to school or even waiting for a bus! Warming up the fingers is a good idea before they are needed for fine motor activities or tool use in the classroom. 1. Fingers push - Place each finger tip of the left hand with the matching finger tips of the right hand. Push fingers together. Do this in front, up high or even behind your back! 
2. "Thumb Wars" - Get a friend to play this one. Make a fist with your right hand, lock your fingers with your friend and leave your thumbs free. Move your thumbs to opposite sides saying "I, 2, 3, 4, I declare a thumb war". Touch thumbs and try and "pin down" your friend's thumb. Don't let go of the fist hold...and maybe start with short nails! 

3. Finger tip touch - Touch each finger to your thumb of one hand then the other hand. Try both hands at the same time. Try really fast and really slow. Try pressing really hard against your thumb. 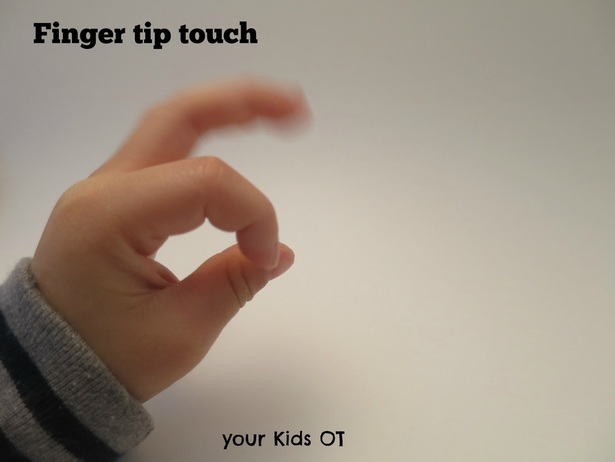

4. Pinch n Pull - With one hand pinch your thumb and index finger together making a circle. Do the same with the other hand but lock the circle together with the first hand. Pull! Try this with each finger making a circle. 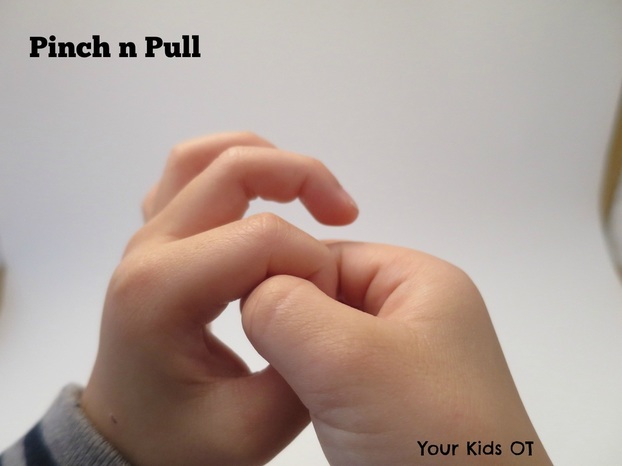

5. Piano Press - Curl your fingers with the tips touching the table (or your lap). "Play" the piano... a slow piece, a dramatic piece, all fingers together, one at a time... press down into the table as you play (try not to hyperextend at the joints). You could even print out a paper keyboard to aid this finger game or sing-a-long to your favourite songs. 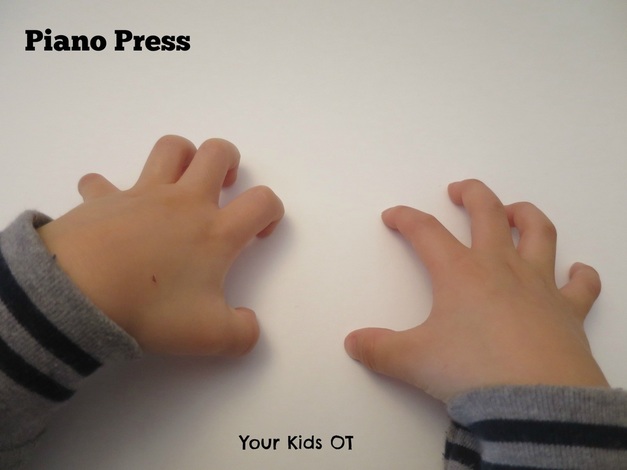

6. Dancing Fingers - There was a "Playschool" song called "One day a hand went walking"... This reminds me of that song. Stand your index fingers and third fingers up onto a table top. They can walk, jump, run and even dance. Fingers could also cross the mid-line and come back again. A friend of mine gets her fingers to do the "can can" with coordinated bending and kicking... 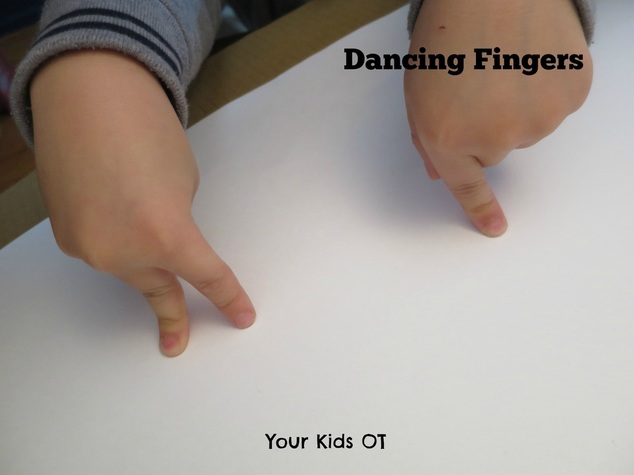

This article is the first in a series. Stay tune for more finger warm ups with some easy homemade props, finger friendly songs for toddlers and preschoolers as well as fine motor activities for older kids! These finger exercises are great for any age and the best thing is that they require no equipment and no preparation! Find "Heavy Work for Little Fingers" as a one page hand out in theYKOT shop! Do you have a favourite finger "warm up"? 
You may also like...
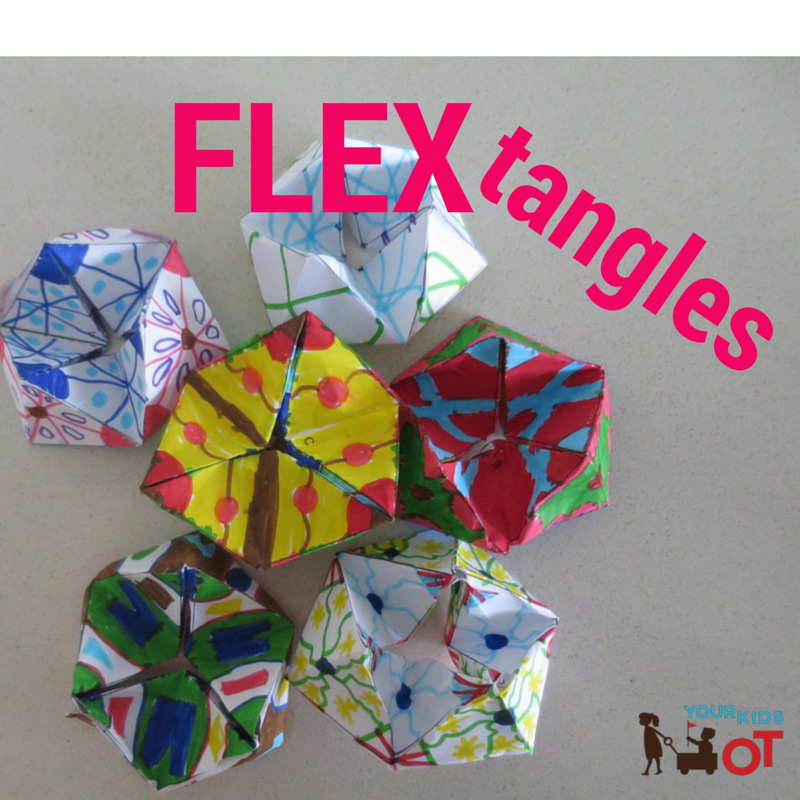

Facebook followers of YKOT will have seen that I recently shared a video about making "Flextangles" by Babble Dabble Do. You can find the video below. It is pretty amazing!
My kids and I were inspired to give it try. The template can be found on Babble Dabble Do and whilst we took a couple of attempts to master the folding, we got it! Miss 8 became transfixed and we printed out multiple templates to decorate. Show your reluctant colourer the video of Flextangles in action and they will want to make their own too. The video convinced Mr 4 to put texta to paper and he was also happy to cut out the template. What you will need. 1. Print the template found at Babble Dabble Do. 2. Textas 3. Scissors 4. Glue (or sticky tape) What you need to do. 1. Connect the marks on the template with whatever designs you like. Colour in between these lines. 2. Cut out the template along the bold lines. 3. Crease all the lines. {Note: to ensure it worked for us we did every line back and forwards so that it had "give"} 4. Gently fold the paper into a tube and glue the tabs as marked. {Note: I bent the tube into shape as I was going so that the flex shape took form as I we glued and connected.} 5. Gently glue the end tabs into place so that the tube is connected. Allow to dry. 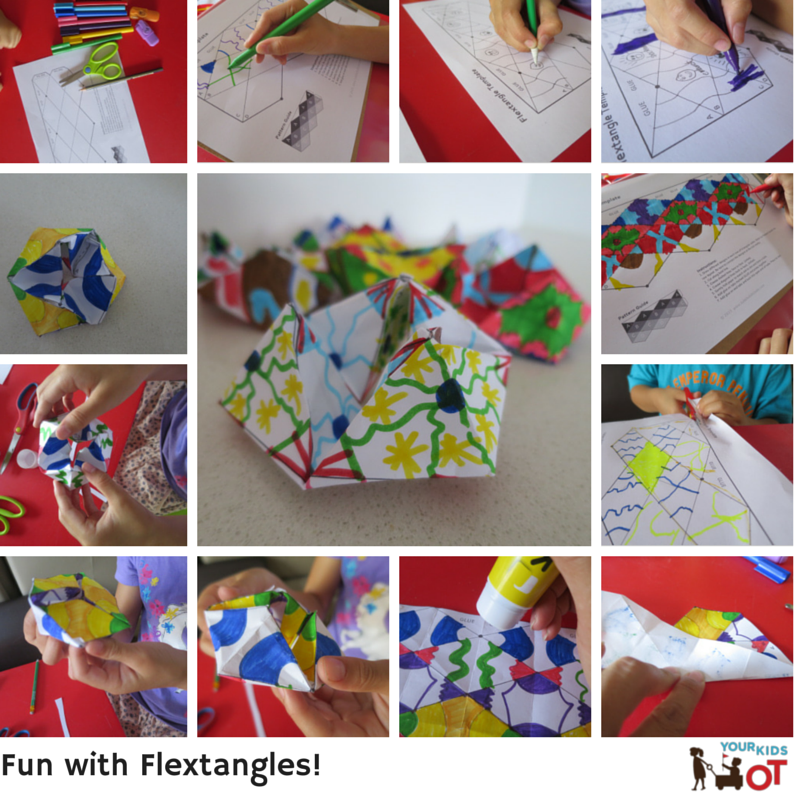

You may need to read the instructions and watch the video a few times...but it does work! The folding and glueing parts are best done by an adult or older child but once it is dry, hand back your child's creation so that can turn it in and out over and over again. Remember, if you are watching this video via your emailled copy of this blog, click on the title of the blog so that it opens in a webpage to view the video. This is a great school holiday project, especially with the on again off again wet weather we have been having. Let me know if you {I mean your kids} give this a go! 
You may also like...
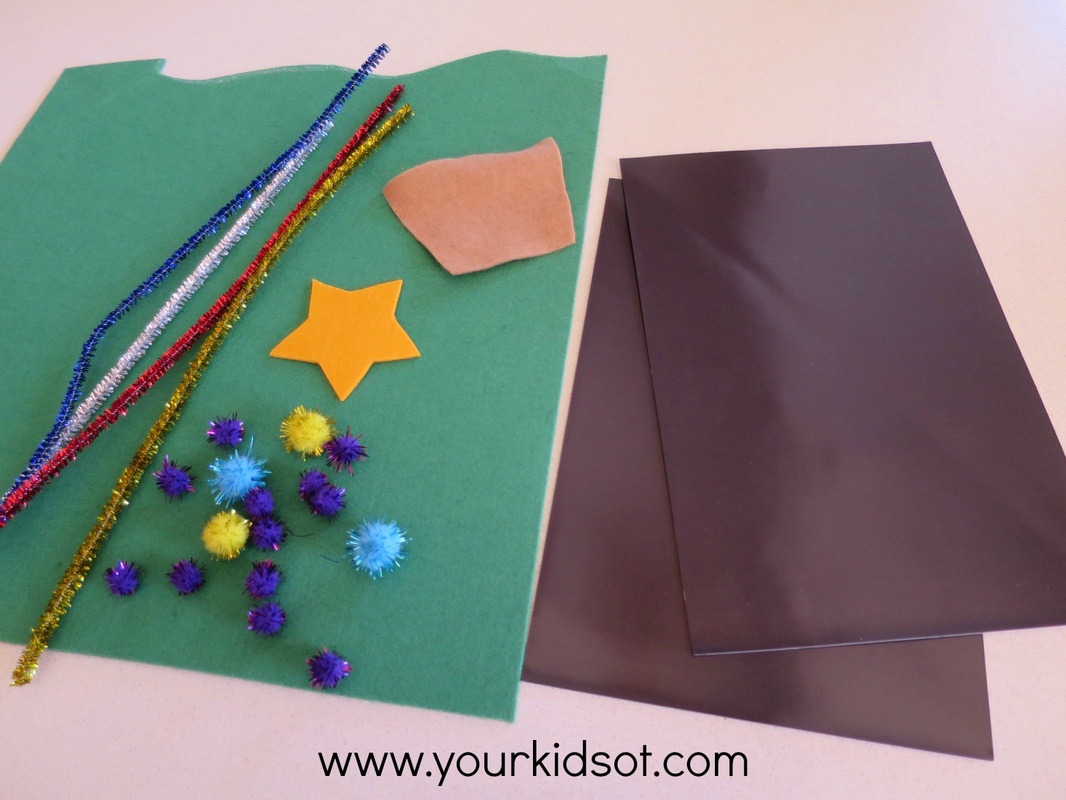
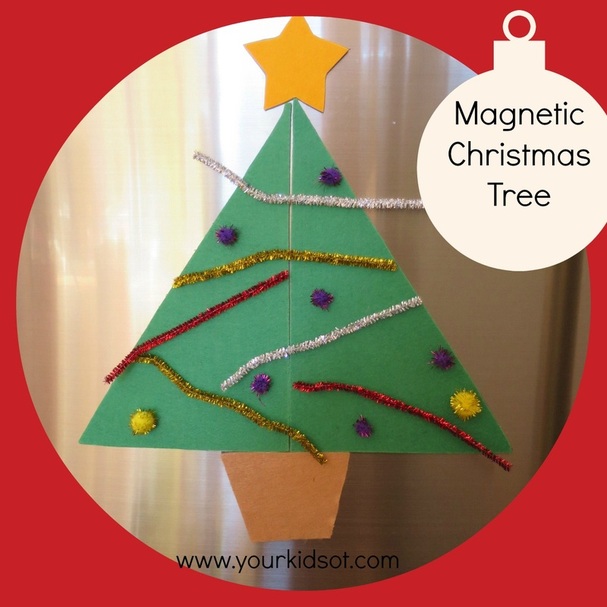  Make your own magnetic Christmas tree to keep your toddlers and preschoolers busy whilst you are in the kitchen. This Christmas tree activity is perfect for your fridge door! A few simple craft supplies and just a few minutes to prepare.
What do you need to do? Cut out two large green triangles, a tree base and a star. Stick the felt onto the photo-magnets and cut around the shapes again. 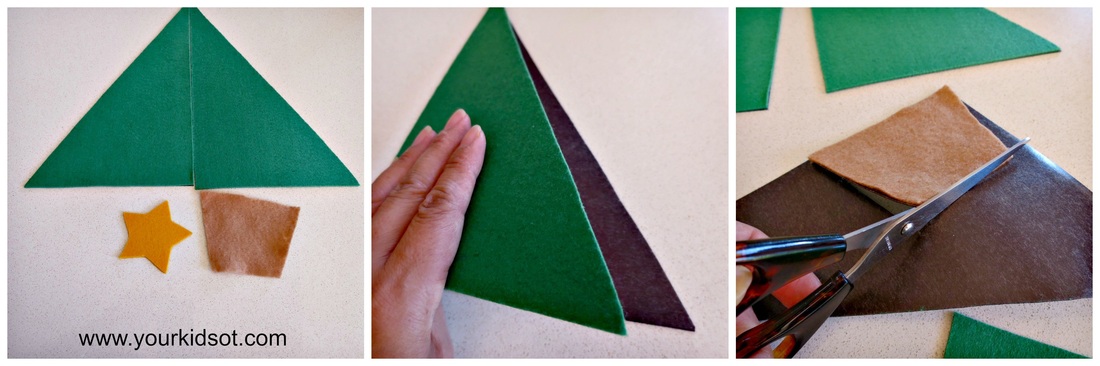  You may also like to cut the pipe cleaners in half. Assemble the felt magnetic pieces, pom poms and pipe cleaners onto a plastic plate and this activity is ready! This is a no-mess activity that your toddlers and preschoolers can do independently. They may need assistance initially with the tree shape or alternatively you could place the tree on for them and they can decorate. They will enjoy putting the pom poms and pipe cleaners where-ever they want to. They will also enjoy taking them off and doing it all over again! Picking up the pom poms and pipe cleaners encourage a pincer grasp. A little visual motor planning and organisation is subtly required to position the tree, star, base and spread out the pom poms and pipe cleaners to fit on the tree. The best thing about this activity is there is no right or wrong way to decorate a tree! Older children may also like to help their younger siblings to decorate the tree. 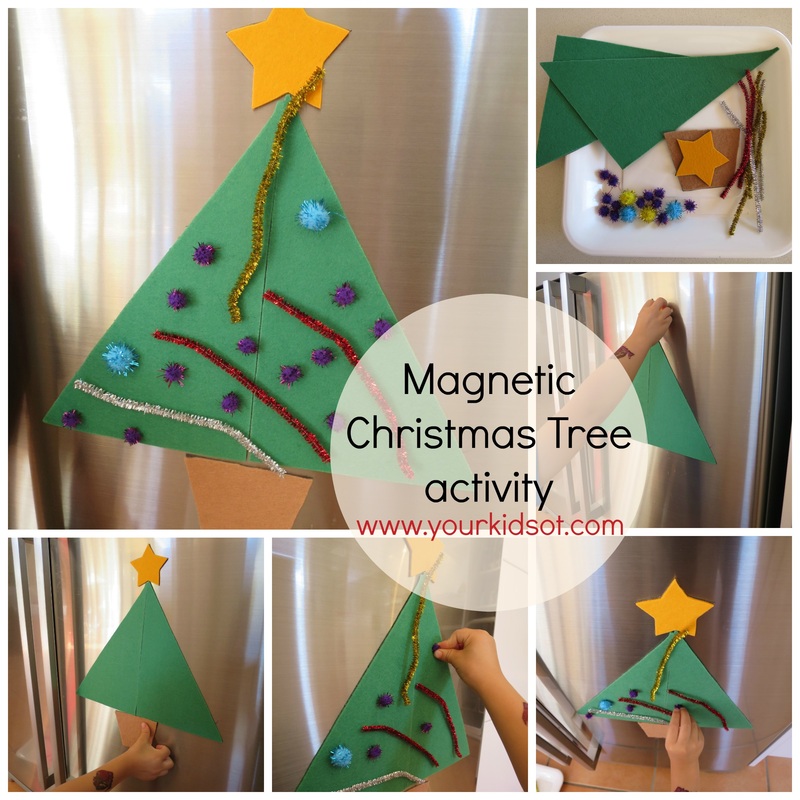  Your toddler or preschooler will love this festive activity! What else do your little kids like to do whilst you are in the kitchen?  You may also like...
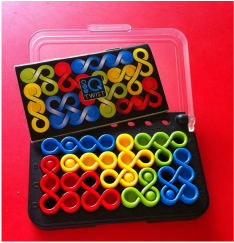
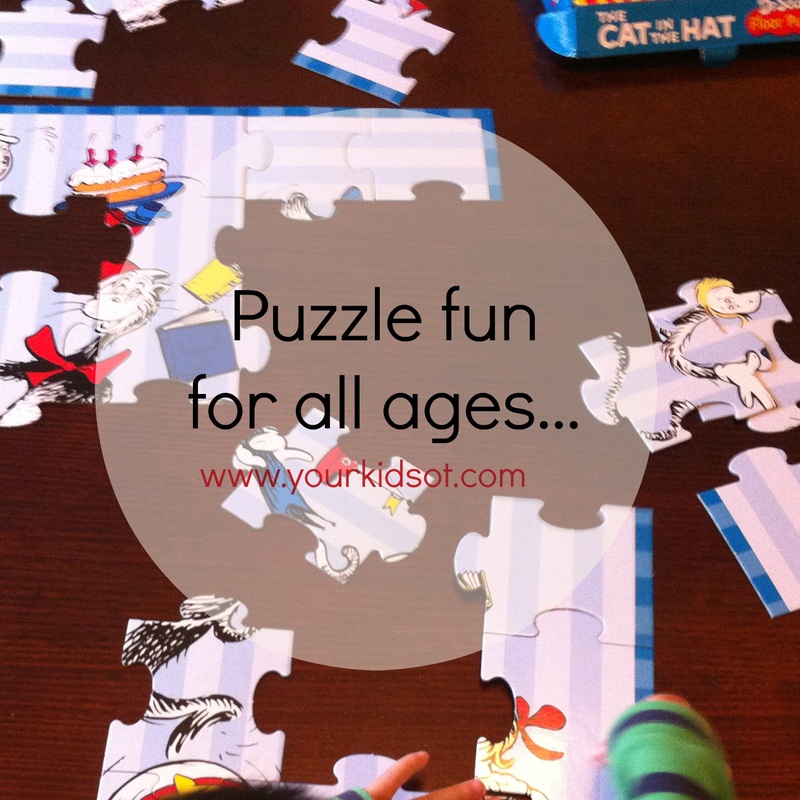  Everyone from babies to grown ups can have fun with puzzles. Some people find them frustrating, whilst others love the challenge! In a world of fast responses, instant satisfaction and technology to grant it, there is something really nice about slowing down to complete a puzzle. Kids can develop a range of skills when working on puzzles and they can have fun in the process! Babies will typically start with large knob wooden inset (or insert) puzzles. Often the picture of the puzzle is printed in the inset section, the knob is large and easy to hold for little hands. 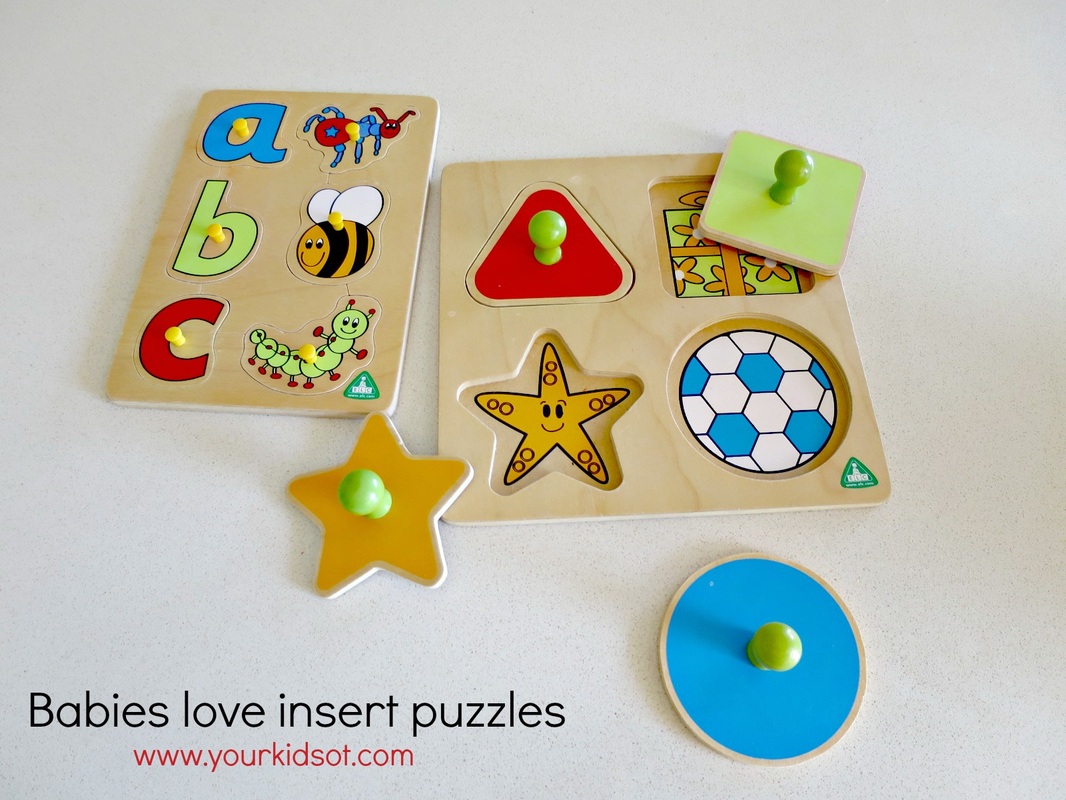  Toddlers will enjoy slightly harder inset puzzles with more options and bright colourful pictures. They will also start to put two, three and maybe four piece interlocking puzzles together. 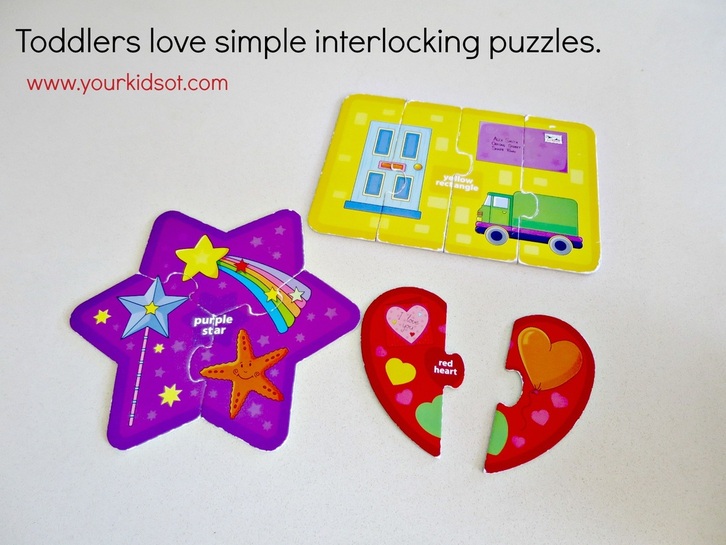  Preschoolers will enjoy layered inset puzzles and more complicated interlocking puzzles (approximately 20-50 pieces). They might be more confident with interlocking puzzles that are within a wooden frame which have the picture underneath to match. Preschoolers also love really large floor puzzles (that are bigger than themselves)! 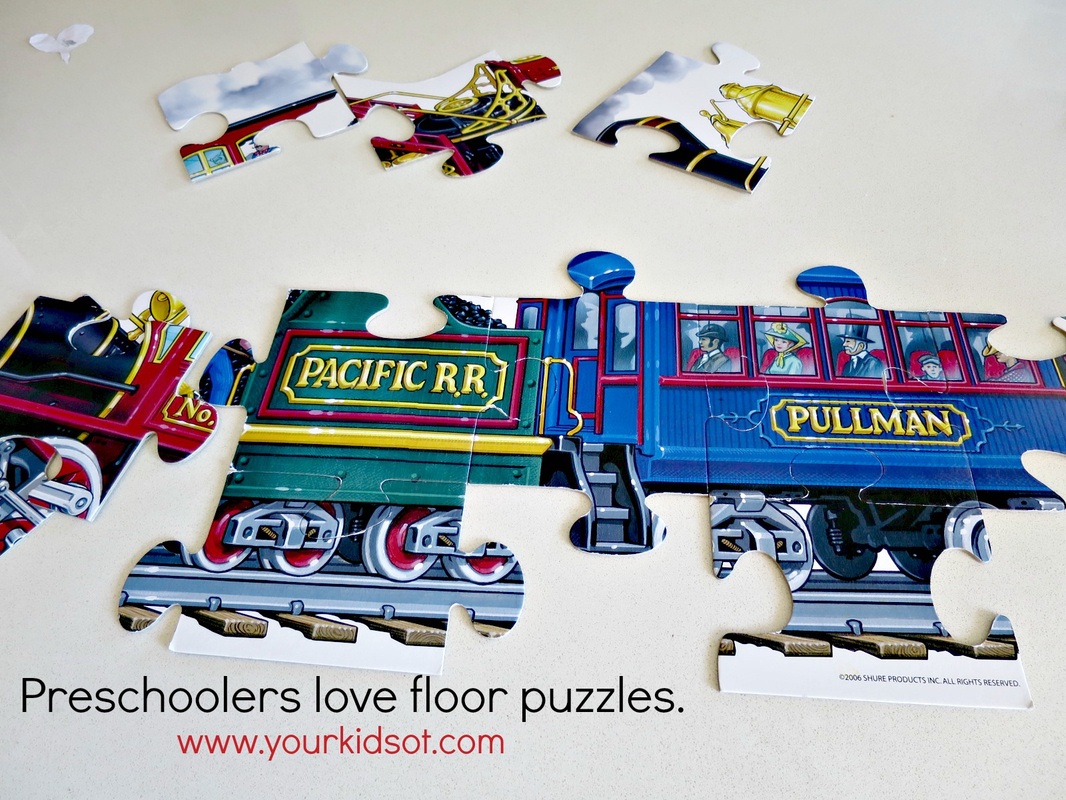  School age children (and adults) will progressively accomplish very complicated interlocking pieces (50+ pieces). The speed of progression will be different for each child, however, your school age child will develop interest in non-traditional puzzles too. This may include 3D models, Tangrams and games (such as Rubik's cubes and Q Twist). 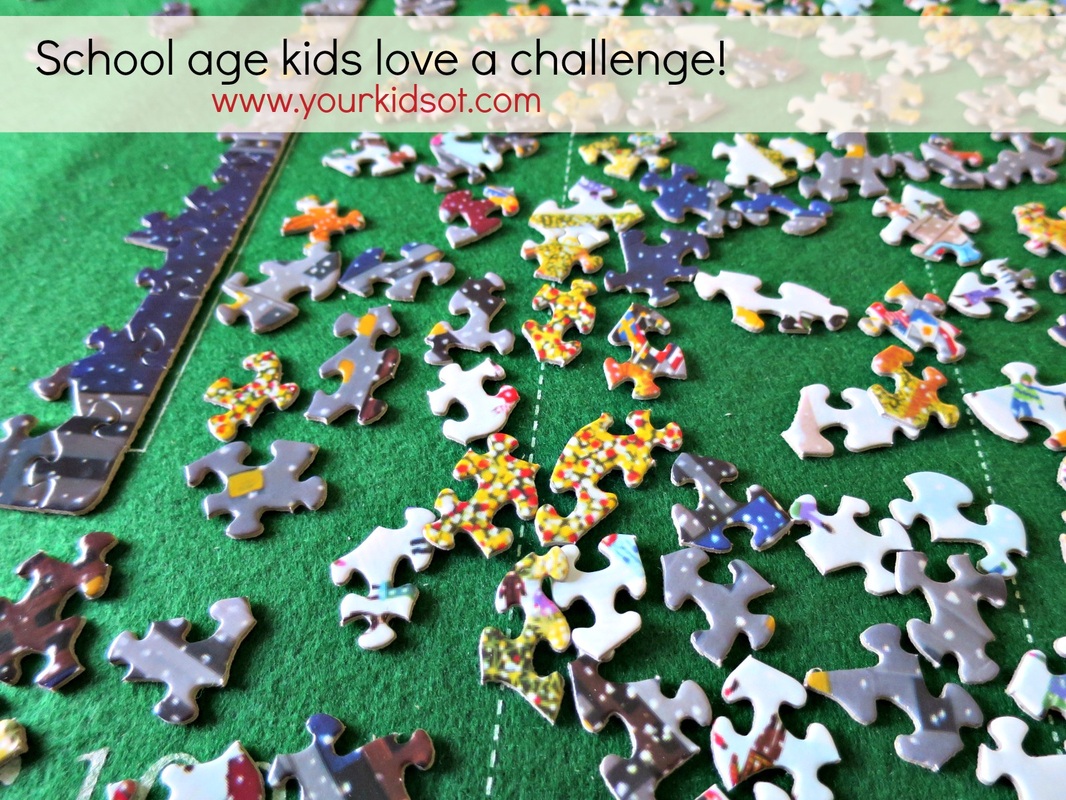  There are so many benefits in encouraging your kids with puzzles:
I'm working on a 1000 piece puzzle whilst Miss 8 works on her first 500 piece puzzle. Whilst there have already been cries of frustration followed by moments of triumph (for both of us), I think she might finish first! Bring on the summer holidays! Do your kids like puzzles? Do you?    You may also like:
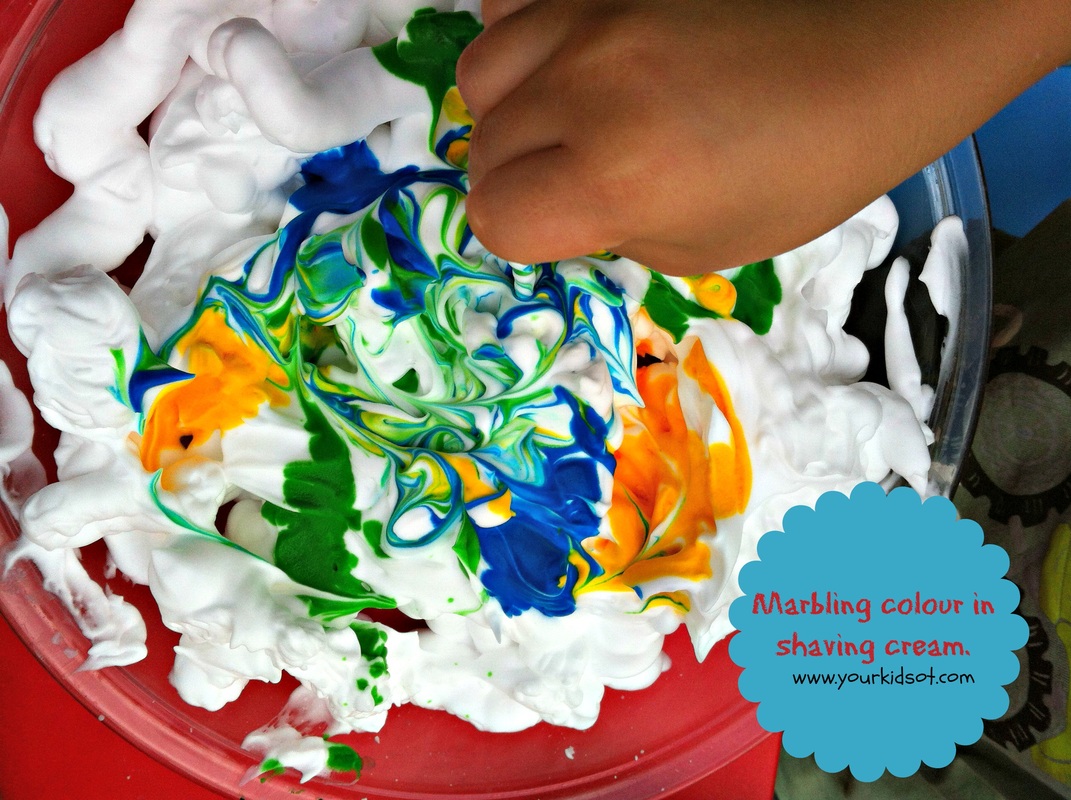
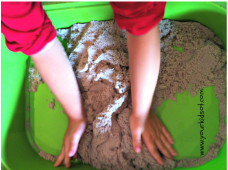
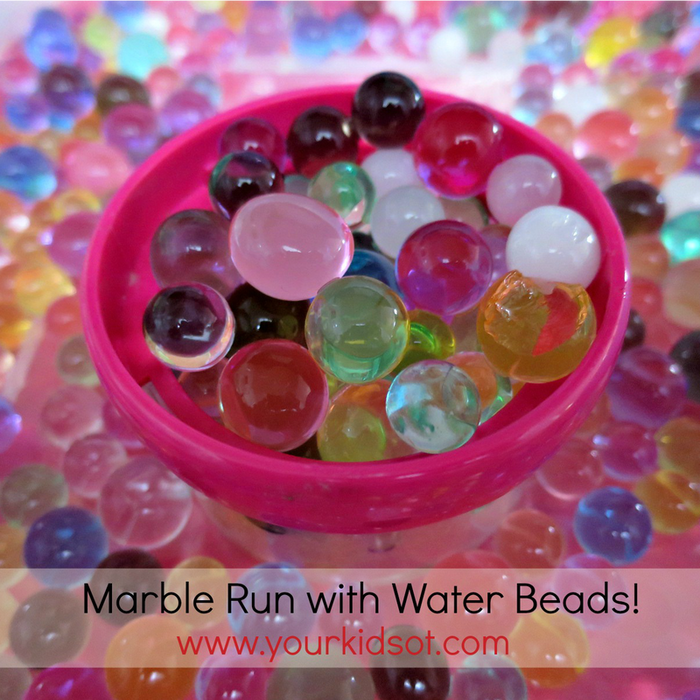  Water beads or water marbles are these amazing little super-absorbent polymers. They have traditionally been used by florists in flower arranging but in the last few years "water beads" have become THE must-have material for sensory play. Edible water beads (aka tapioca pearls) have also surfaced as the new "must-have". If you haven't seen these water beads before. Here is a collage of how they work. Place the beads (which are super tiny) into a large bowl or container. Add 6 cups of water and watch them grow for 6 hours. Drain away any excess water. You can play with them before that time but they will continue to grow if more water is added. They grow to 150 times their original size. Amazing for kids of all ages to watch (not for the whole 6 hours). 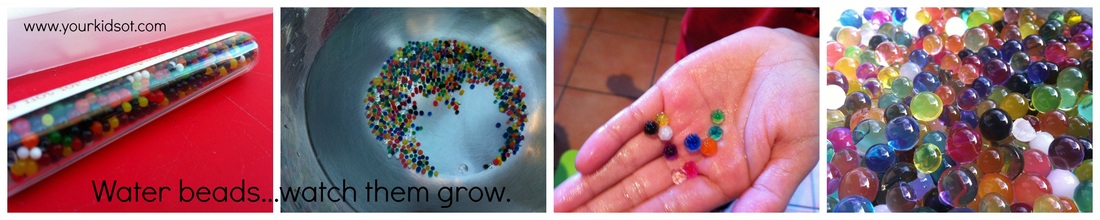  The water beads become firm balls which are bouncy and slippery. You can also allow the beads to dry out and re-use them by adding water to the beads again. There are plenty of activities you can do with water beads. The water beads are great in a large tray or container as a sensory material. Kids will love scooping, pouring, sorting, mixing and stirring. 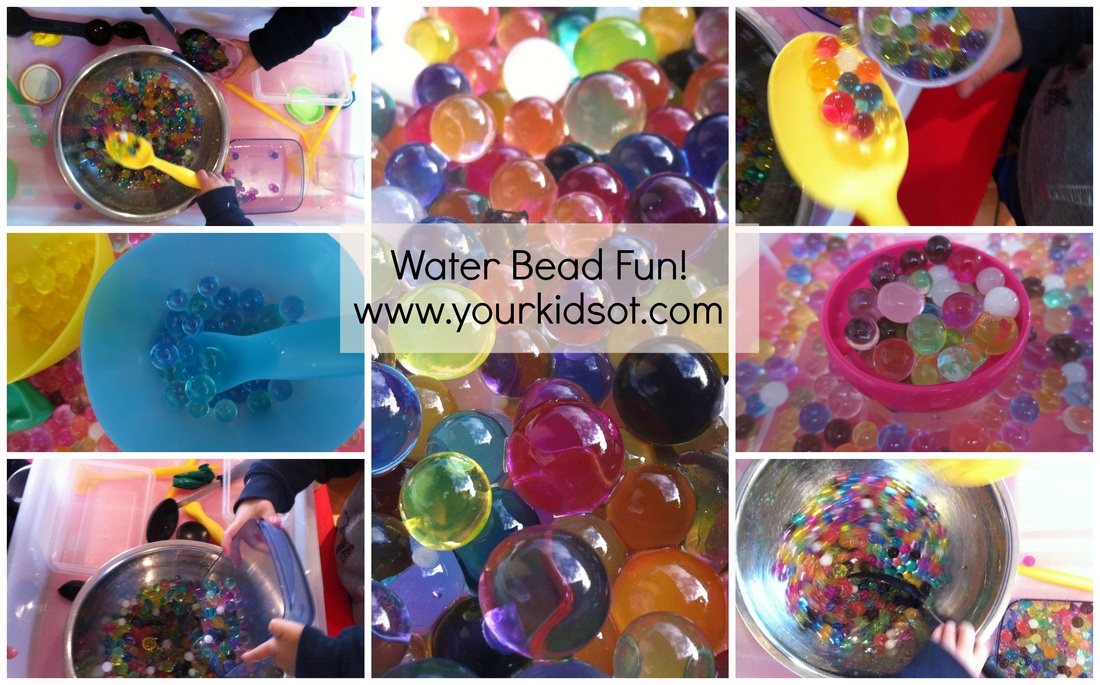  We have also built a simple marble run for water bead races using household rolls, plastic containers and lots of masking tape! Despite how "homemade" it looks, both Mr 4 and Miss almost-8 enjoy racing the beads and watching them go from top to bottom. 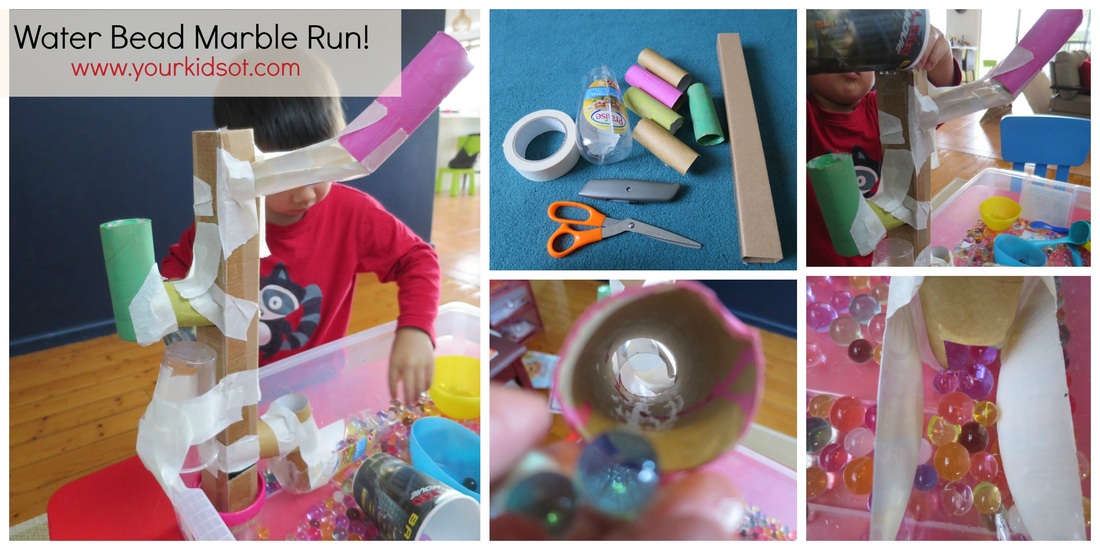  The water beads have also found themselves in bath play where they are like treasure to be sought and scooped. Combined with some shaving cream and ice-cream creations were made. 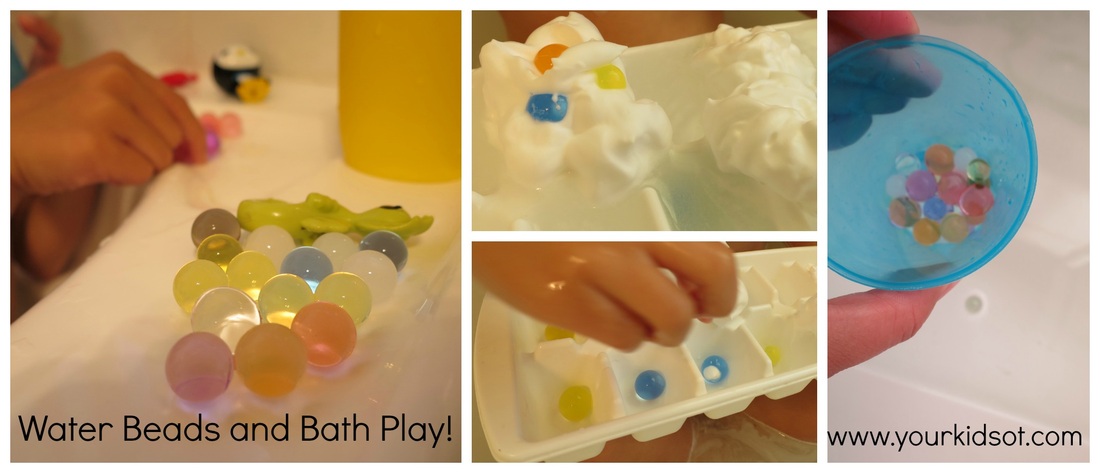  Have your kids played with water beads? What do they enjoy doing with them?  These water beads were given to our family as a gift and were originally purchased from an Australian Company (Nic-Nac). This is not a sponsored post and I have not received remuneration for the comments made here. You may also like more sensory play...
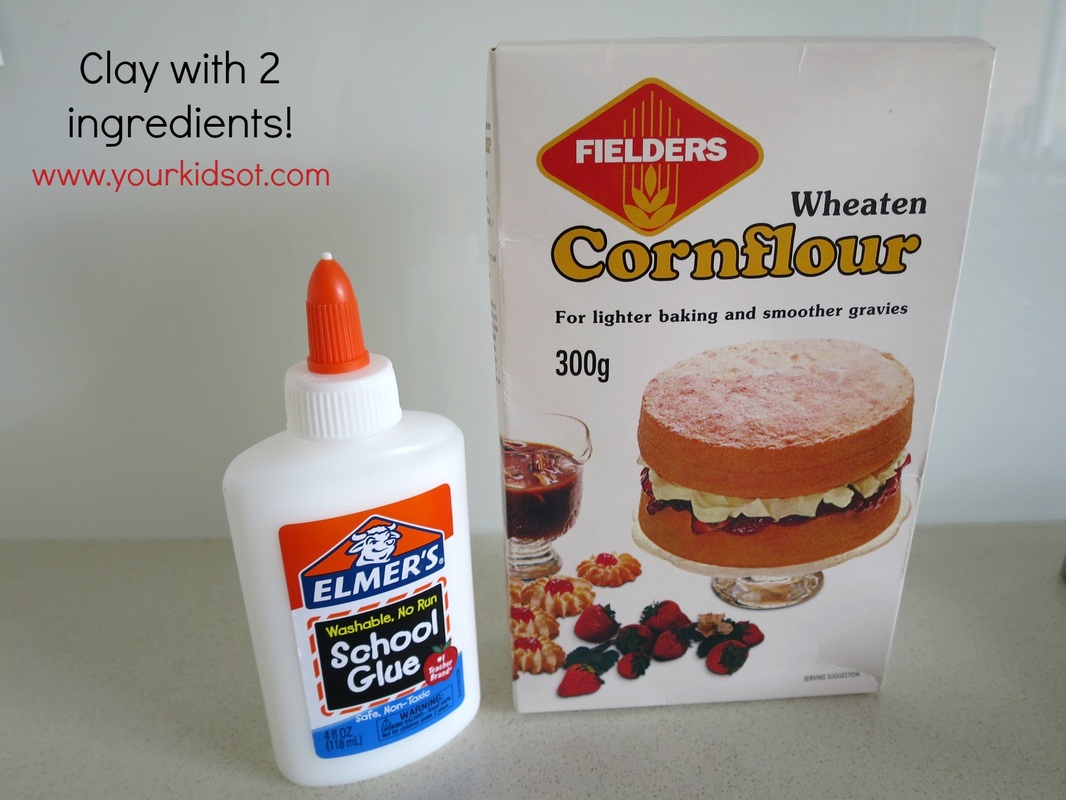
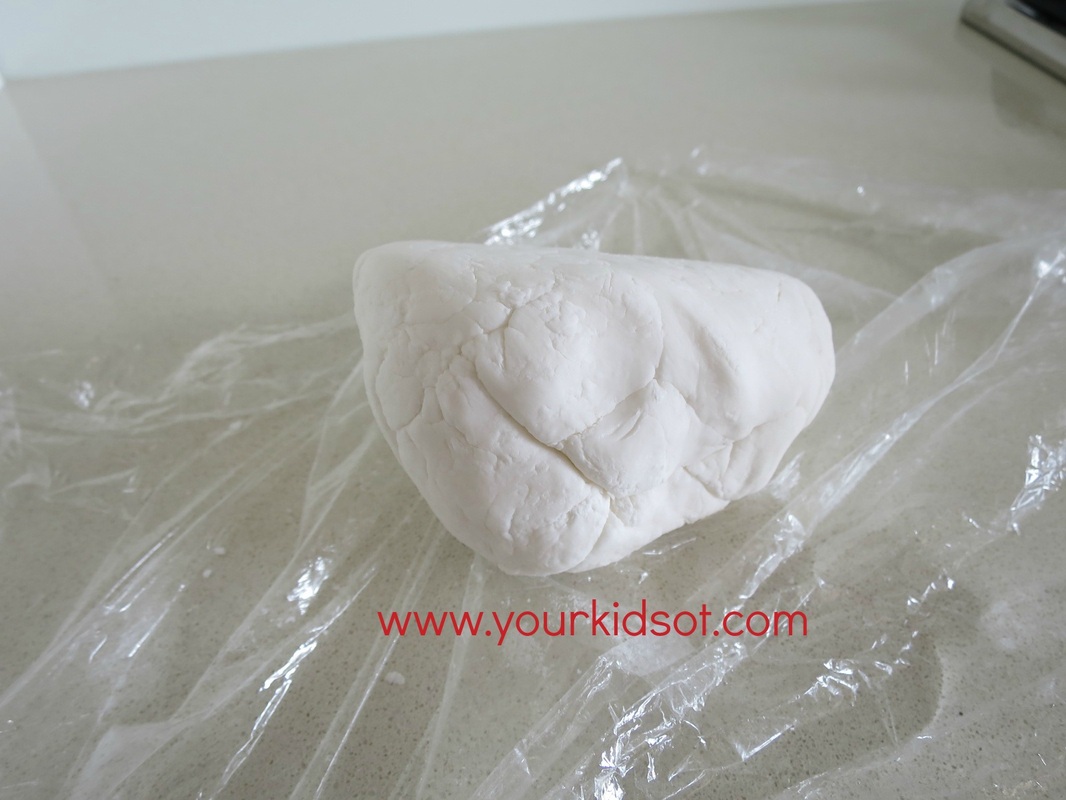
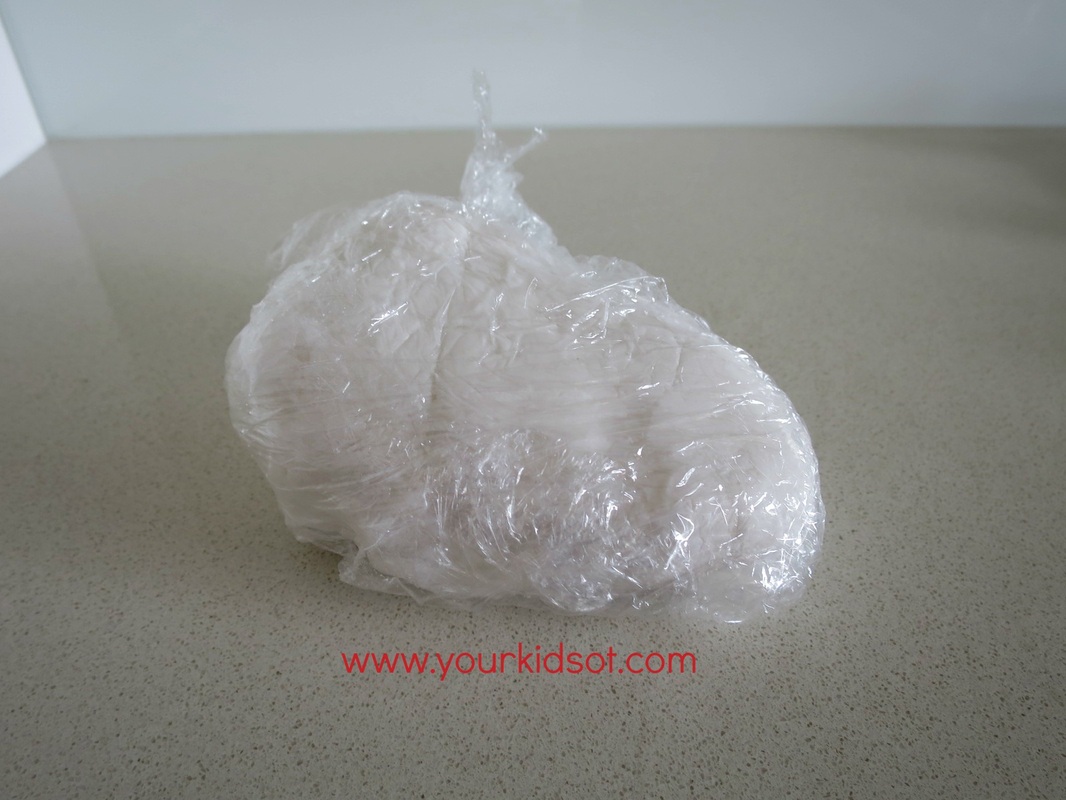
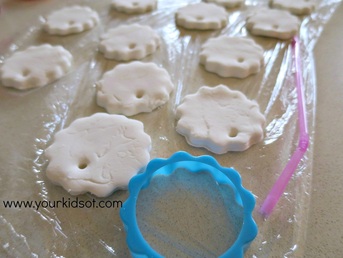
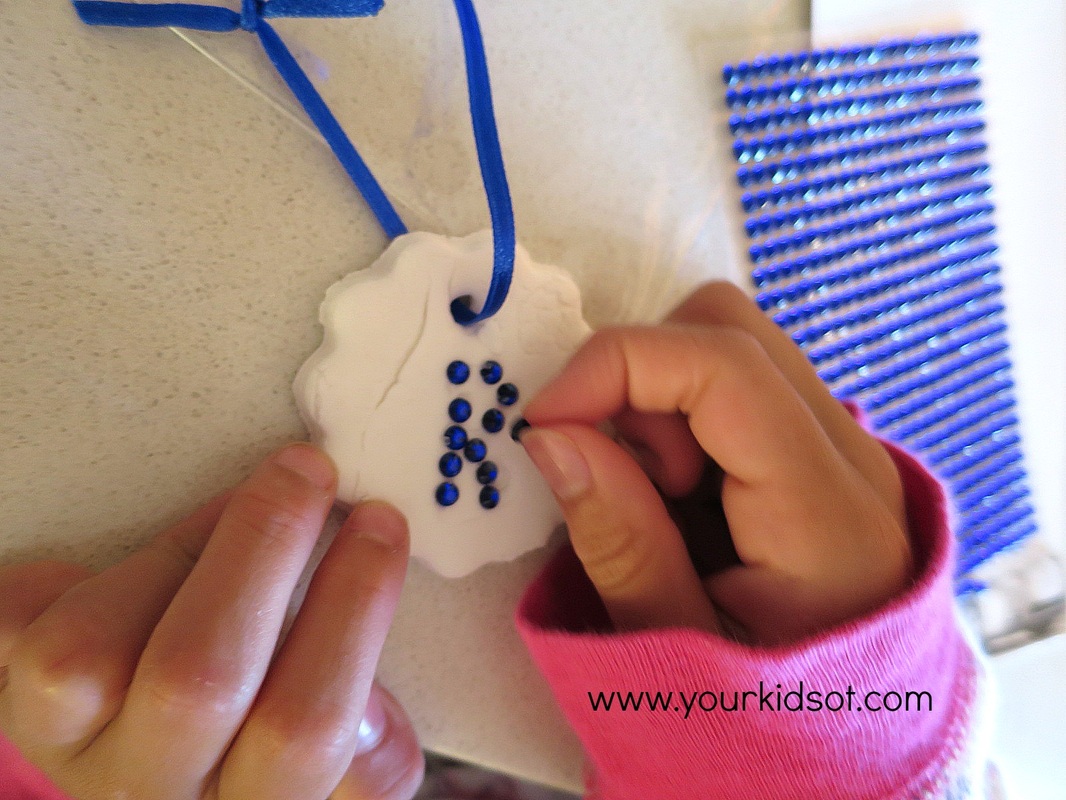
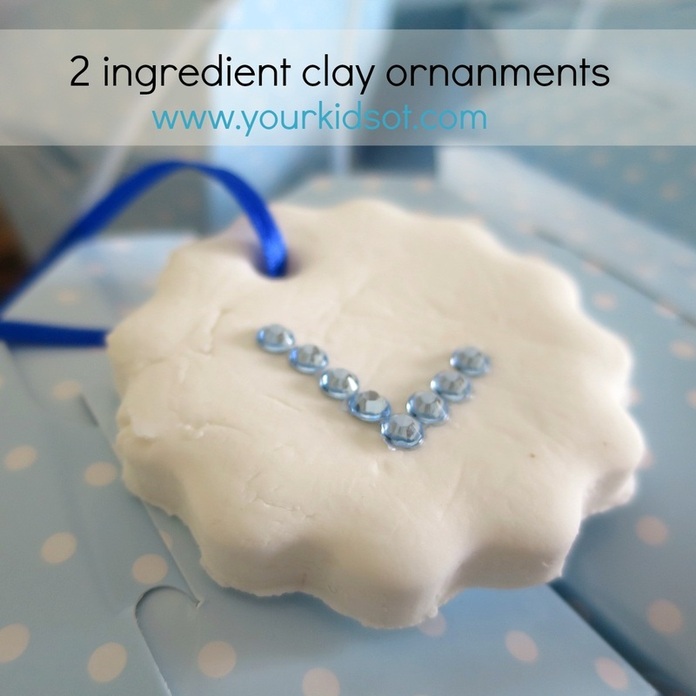  Miss 7 is almost 8 years old! I can hardly believe how quickly the years have passed. Each birthday brings back a flood of memories of the day she was born ... at a tiny 2.2 kg. We decided to make a couple of things to put in the birthday party favour bags this year. We hope these will last longer than the sweets! We made these lovely clay ornaments which we thought Miss almost-8's friends could hang on their Christmas tree or just decorate their bedrooms. I found this great 2 ingredient clay recipe from Paging Fun Mums. There is no baking required as the clay air dries.
Miss almost-8 really enjoyed every step of making these ornaments. They were simple to make and I think it is nice for the "birthday girl" to give something back to her guests as a small momento of their friendship. We hope her friends like them! 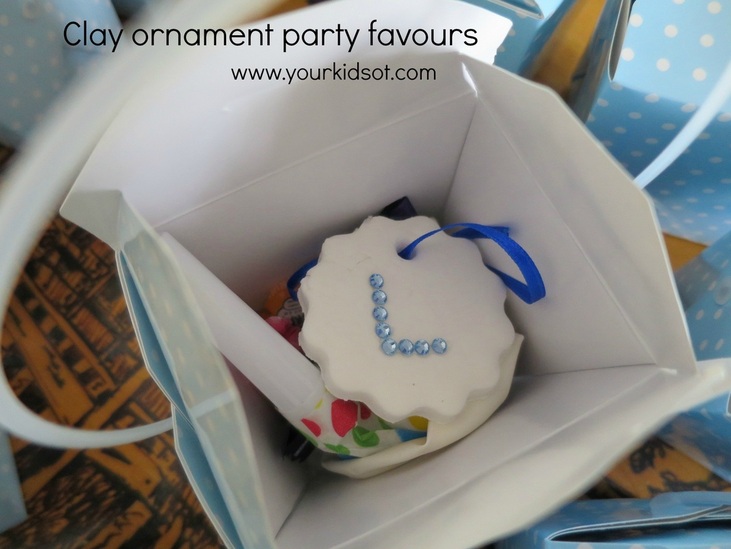  We are looking forward to making more of these ornaments closer to Christmas! Do you like making things for your kids party bags? What are you going to make with this clay?   You may also like these crafts...
|
AuthorHi, I'm Cindy and I am an Occupational Therapist. I enjoy working creatively with children to see them reach their potential. Read more about me here. 
SEARCH THIS SITE

Archives
April 2024
Categories
All
Popular Posts

 |


 RSS Feed
Join the YKOT e-newsletter!
Subscribe to get our latest content by email and receive
the SHAPE ROADS PRINTABLE NOW!

Success! Now check your email to confirm your subscription and receive your free printable!
Join our Mailing List!
Subscribe to get our latest content by email and receive
the SHAPE ROADS PRINTABLE NOW as a thankyou!
Success! Now check your email to confirm your subscription and receive your free printable!
Disclaimer: The information on this site is general in nature and should be used for educational and entertainment purposes. The activities are safe for most children, however, you should consult an Occupational Therapist or health professional to address specific movement, sensory or other medical conditions. This blog does not replace formal therapeutic professional advice given by a health professional or medical practitioner. Reviews and endorsements of products will only be made based on my expertise and personal opinion; and deemed worthy of such endorsement. The opinions shared in sponsored content will always be my own and not that of the advertising company or brand. Content, advertising space or posts will be clearly identified if paid, affiliated or sponsored. Affiliate links may be found throughout this website in advertising. This means that if you follow through with a purchase from these links, Your Kids OT will receive a percentage of the sale. Your Kids OT undertakes to meet the requirements of the "Social Media Policy" as published by Australian Health Practitioner Regulation Agency (AHPRA). Further information about this policy can be found here.
Find meFollow me |

|
About me
AuthorHi, I'm Cindy and I am an Occupational Therapist. I enjoy working creatively with children to see them reach their potential. Read more about me here. 
|
Copyright © 2017 Your Kid OT