One month until Christmas and it is time to put up the decorations!
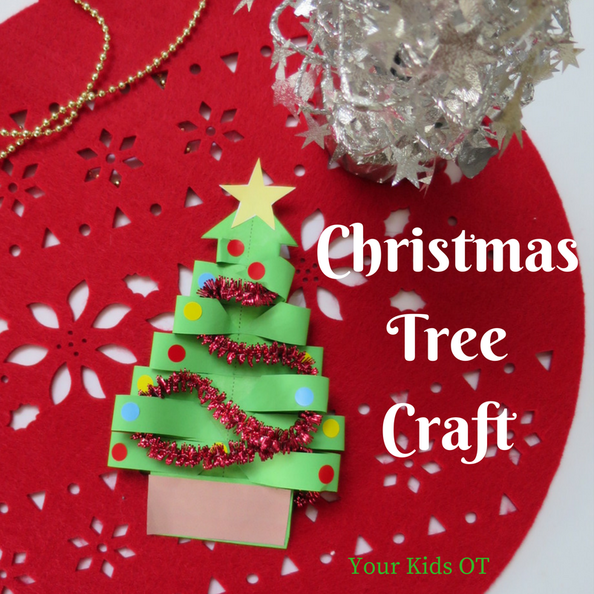
Only a few more OT sessions before we stop for the year! Are you in Christmas-mode yet? My facebook news feed has started to have more and more options to celebrate this festive season! Recently, I came across this "DIY PAPER CHRISTMAS TREE" idea by Krokotak! I thought it was wonderful but wanted to make it a little more structured for my kids who find it difficult to cut without a line to follow. This little craft will work on a number of skills whilst having fun! There will be scissor skills, fine motor manipulation, left and right bilateral coordination skills as well as planning and sequencing skills! 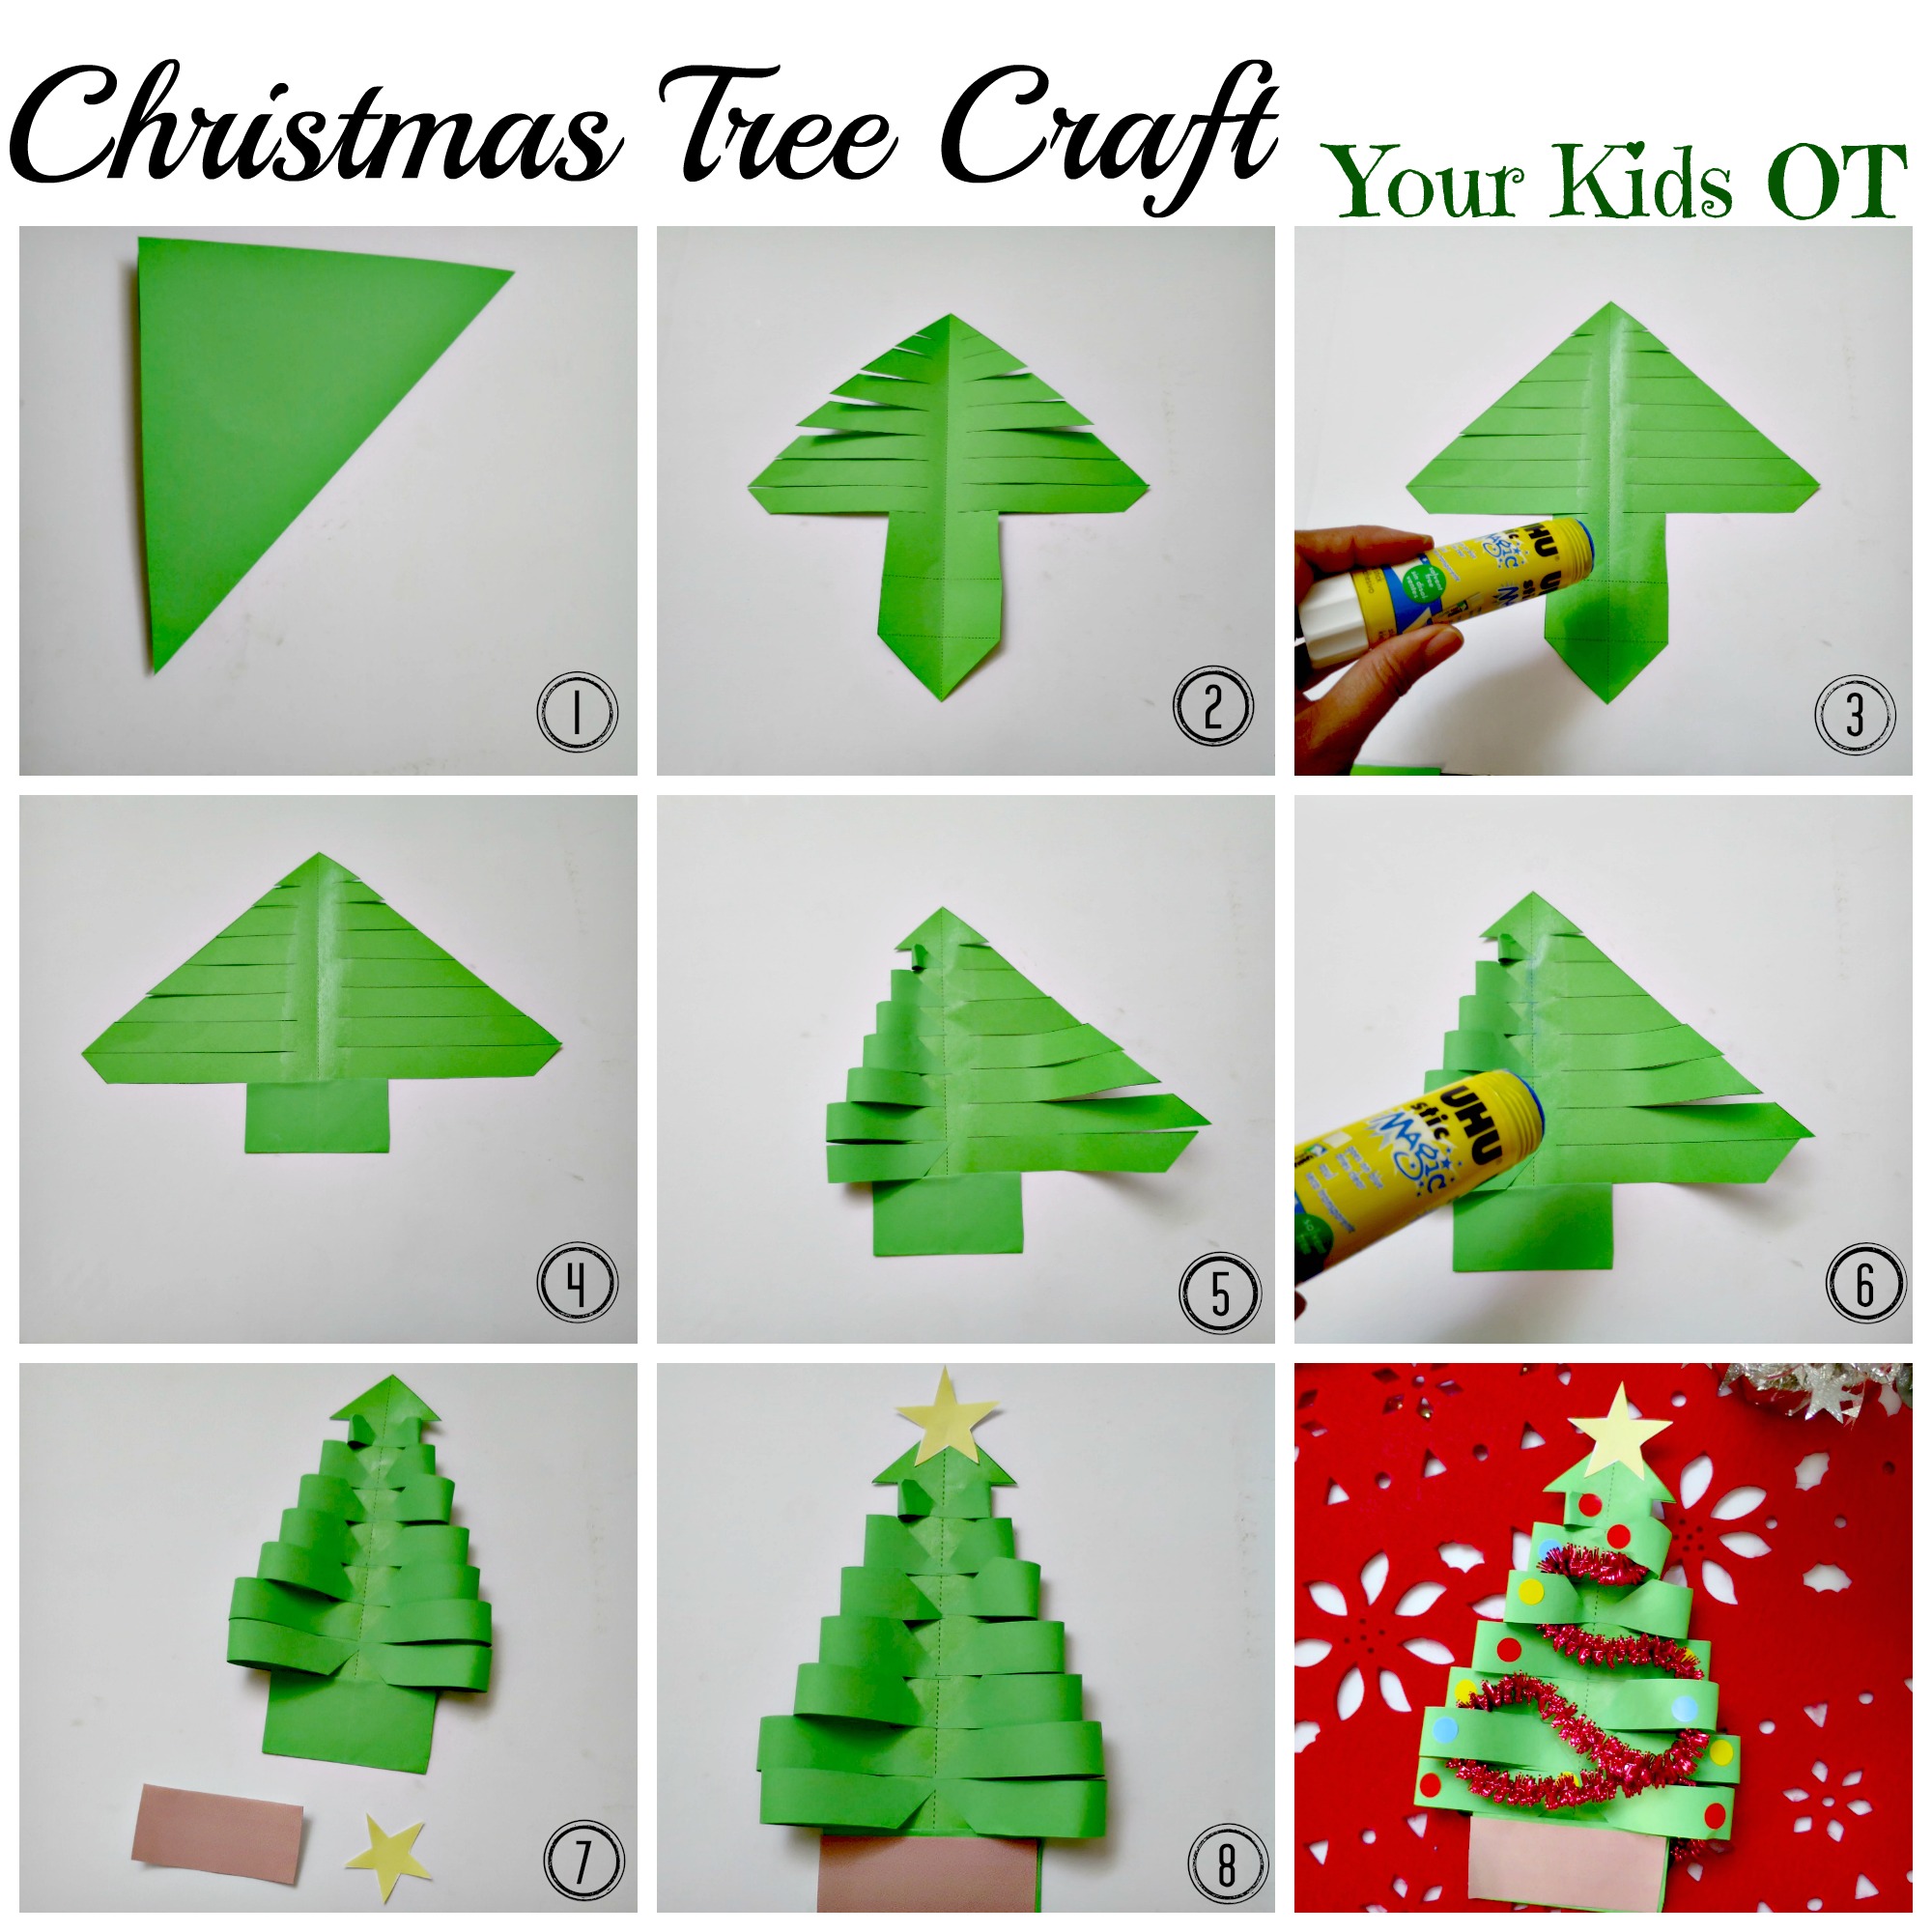
What you will need:
Instructions:
This is an adorable tree that you could hang up in the classroom. You could also add a string to hang it is an ornament on your real Christmas tree! Don't forget to print out theFREE template so you can start creating this tree with your kids! I would love to see your creations if you try this at home. Tag @yourkidsot on Instagram or Facebook! I can't wait to see your trees! 
You may also like:

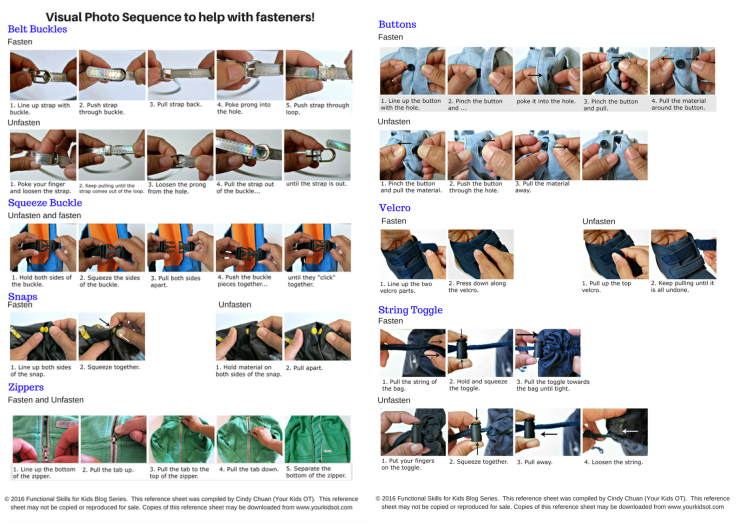
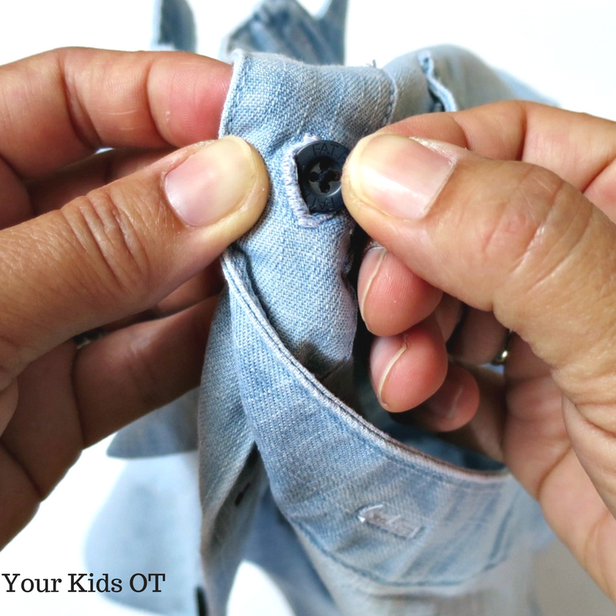
We are going to be late! Hurry up! I can't do this button up! I can't! Put on your jacket, it's cold out! I can't do the zip! I can't! The morning rush out the door to get to school can often be a struggle. Getting dressed can be a chore and then there are fastenings on school bags to manage too! This month in the "Functional Skills for Kids" Series, we look at helping kids with fasteners such as buttons, zippers, snaps (press studs) and more! My blogging colleagues will look at fine motor, gross motor, visual perceptual and sensory motor considerations. We will also cover when we should expect our kids to manage these tasks and how to incorporate this learning in play. Find the links for these articles below! 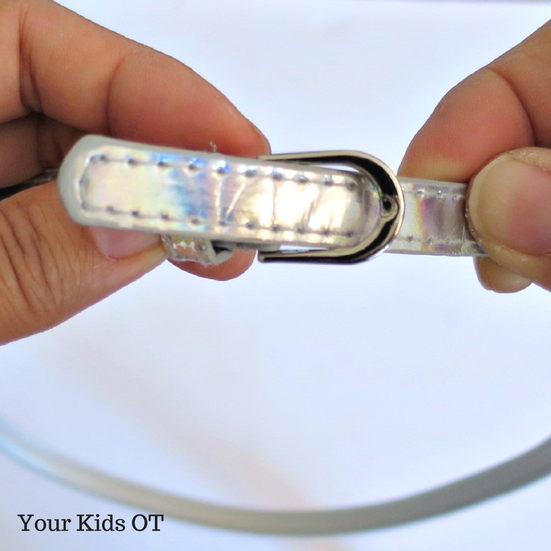
So it is time for your child to learn how to manage fastenings on their own but where do you begin? It helps to have an understanding of the steps involved with each of these tasks. I have outlined the steps involved in managing common fastenings here through visual photo sequences. For your printable copy of these sequences, download them HERE!
Once you know the steps involve there are a few tips in teaching your child how to manage these fastenings. (Actually these tips apply to teaching your child most new tasks!)
These are tips occupational therapists use all the time!
generalization of the skill (eg. zipper on dress, zipper on bag, zipper on pencil case, zipper on doll's skirt). 9. Reinforce and reward - We would like our kids to have intrinsic motivation to manage fasteners independently! Many children do desire this independence and often "force" it upon their parents too early with "I can do it myself!" Some children, however are not so intrinsically motivated. They stubbornly refuse to get dressed or insist on a parent helping them. For these children praise and reward are important to encourage desirable behavior. Often these kids benefit from a "backward chaining" approach discussed earlier. Rewards may include verbal praise "Great job!" or "You did it!". The reward may include letting your child choose their preferred outfit to wear or a sticker. A side note about rewards:
Is your child struggling with fasteners? Have you tried these tips?

This post is part of “Functional Skills for Kids: 12 month series by Paediatric Occupational and Physical Therapists”. You can read all of the childhood functions HERE. Read all Your Kids OT’s monthly posts HERE.
Find more information about “helping kids with fasteners” from other Occupational and Physical Therapists participating in the “Functional Skills for Kids series”:
When Can Kids Learn to Button and Zip? | Mama OT
Clothing Fasteners and Fine Motor Skill Development | Kids Play Space Clothing Fasteners and Gross Motor Skill Development | Your Therapy Source Inc How to Adapt Buttoning and Zipping for Your Child | Miss Jaime OT Learning How To Use Buttons, Snaps, Zippers, and Buckles Through Play | Growing Hands-On Kids Tips to Teach Kids to Zip and Button | The Inspired Treehouse Pinch. Poke. Snap... Helping Kids to Manage Buttons, Zips and More! | Your Kids OT Clothing Fasteners and Sensory Processing | Sugar Aunts The Visual Motor Aspect of Buttons and Zippers | Therapy Fun Zone 
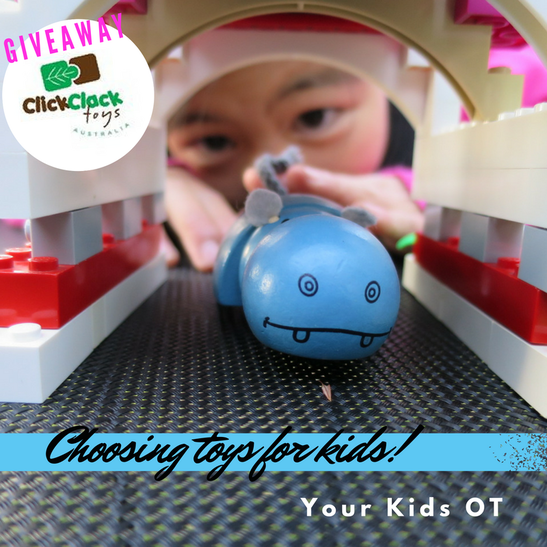
As an occupational therapist and mum, I always have a mental checklist when I am buying toys for my own kids, my practice and as gifts for others.
I have recently discovered the beautiful range of Click Clack Toys: "Designing for today's kids for tomorrow's world"! Click Clack Toys is an Australian owned company which designs and makes handmade toys. Click Clack Toys have sent me some of their toys for the purposes of review and have a given me an "Airport Starter Kit" and "Helicopter" to giveaway to one lucky Australian reader. More details to follow below. Back to my checklist when choosing toys... Is the toy well made? I was really pleased to "feel" the Click Clack Toys. The wood is really smooth and made from sustainably managed plantation timber forests. They use water-based non-toxic paint which add really great detail to the toys and won't scratch off easily. Does the toy promote skill development (motor, visual-motor, problem solving, pretend play, co-operation, sensory)? A big tick here! The unique design and main feature of these toys are that they "click" together. Children are encouraged to join parts of the toy together to make a whole. From a simple animal "Critterz" that has two parts to a more complex vehicle and then to building a structure that houses the vehicle. This promotes your child's busy fingers to match components using fine motor skills, hand strength as well as their problem solving skills. Younger kids will need help to match the right parts together. Once "clicked" into place, the toys are ready to be played with! This is where imaginary and pretend play take over. There are a wide range of vehicles in the range including a plane, helicopter, police car, postal van, fire truck and more. Made at just the right size for little hands to move, these vehicles can be used to create their own stories of rescue, delivery and construction. Children develop play themes from their experience with books, story telling and real life opportunities. Visiting the local fire station may encourage "fire truck" play to rescue people or animals. Watching a building site may encourage "diggers" and "cement mixers" to create their own work site. Seeing a plane flying over the house may create intrigue about "plane" and "airport" play. The "Critterz" range are incredibly cute animals that "pull back" on wheels. Hand skills are put into practise applying just enough pressure to activate the "pull back" mechanism before seeing these animals race away. Great for racing with a friend or sibling. We found the perfect spot on the trampoline! 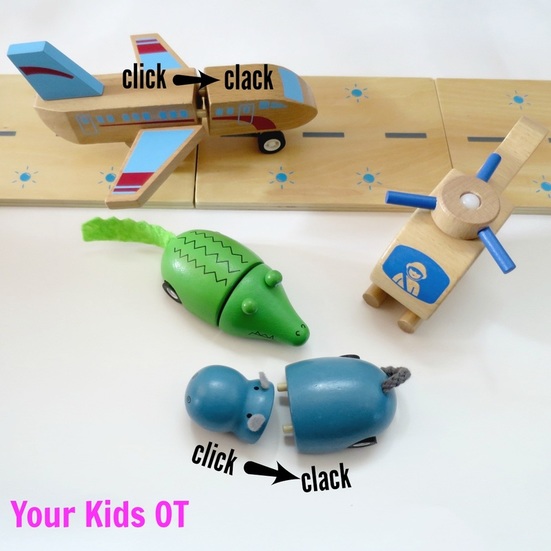
Is the toy "open ended"? Can it used in a few different ways?
These toys are definitely "open ended". Although the nature of the vehicle, structure and animal may guide initial play ideas... there are no set rules. Children may play with these toys and have a different "story" each time. The "helicopter" might fly to rescue someone an accident in the snowy mountains one day and then fly on a sight-seeing tour over a volcano next time. Some children will need help to think of new ideas as play is initially limited to personal experiences. To extend play, children may like to use existing toys or create their own extensions. For example, they may create a cardboard city for the people to visit. They may use blocks to build a bridge or animal shelter. They may use playdough or kinetic sand as a "building material" for the construction toys. Changing "where" your child plays with their toys will also extend play. We took our play set and critterz onto the trampoline! Will the toy endure the test of time? These quality toys are "classics". They do not follow the latest blockbuster movie or cartoon character. These toys build on traditional play experiences. These toys are built to last and can be passed onto the next generation! Is the toy appealing? When we opened the box, my children instantly found the toys appealing. They are child-friendly in size and shape. The painted features and life-like resemblance of the toys will appeal to both kids and adults. The wheels work on the vehicles and "Critterz", moving these great distances on smooth surfaces. Both Mr 6 and Miss 10 found this very appealing as they raced their "Critterz". For more information about Click Clack Toys, refer to their website. 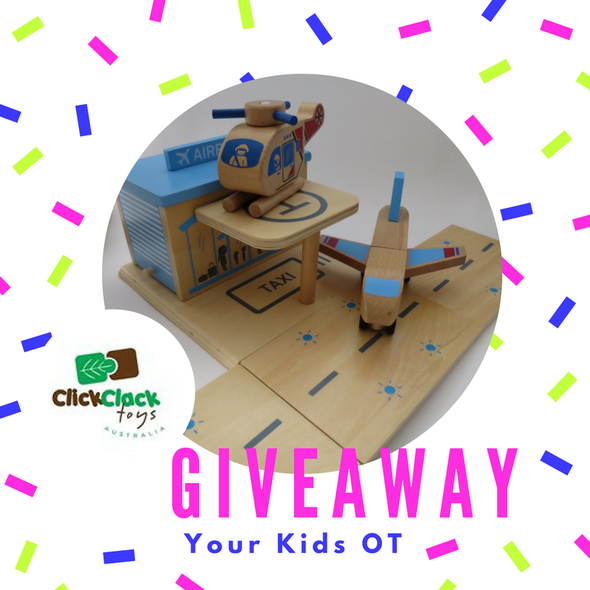
Love the sound of Click Clack Toys? Thanks to the lovely people at Click Clack Toys, I am giving away an "Airport Starter Kit and Helicopter" to celebrate reaching 4000 Your Kids OT FB likers! This set will make an excellent Christmas present for your child, niece, nephew or grand child! Open to Australian residents, enter now!
Note: I have not received remuneration or compensation from Click Clack Toys. I have been gifted an "Airport Starter Kit and Helicopter" and Critterz for this review. All comments and opinions are my own. Click Clack Toys will supply the winner of this giveaway an "Airport Starter Kit and Helicopter". Conditions apply. 1. This is a game of skill. Mandatory requirements include visiting Your Kids OT FB page and Click Clack Toys FB page. Entries must answer the question "Complete Click Clack Toys slogan - Designing for today's kids for ........". Additional entry points are given for following Your Kids OT and Click Clack Toys on Instagram. 2. This game is open to Australian residents only. 3. This game of skill is open from Monday 26/09/2016 12am and closes Monday 17/10/2016 12am (Sydney time). 4. Eligible prize winners will be drawn randomly on the 17/10/2016 at 12:00PM. Prize winners will be notified via YOUR KIDS OT Facebook page and private message. Prize winners must inform Your Kids OT of their mailing address within 48 hours of being notified as the winning entry. 5. There will be 1 prize winner drawn with the winner receiving an airport starter pack and helicopter. The prize will be delivered by Click Clack toys directly to the winner. 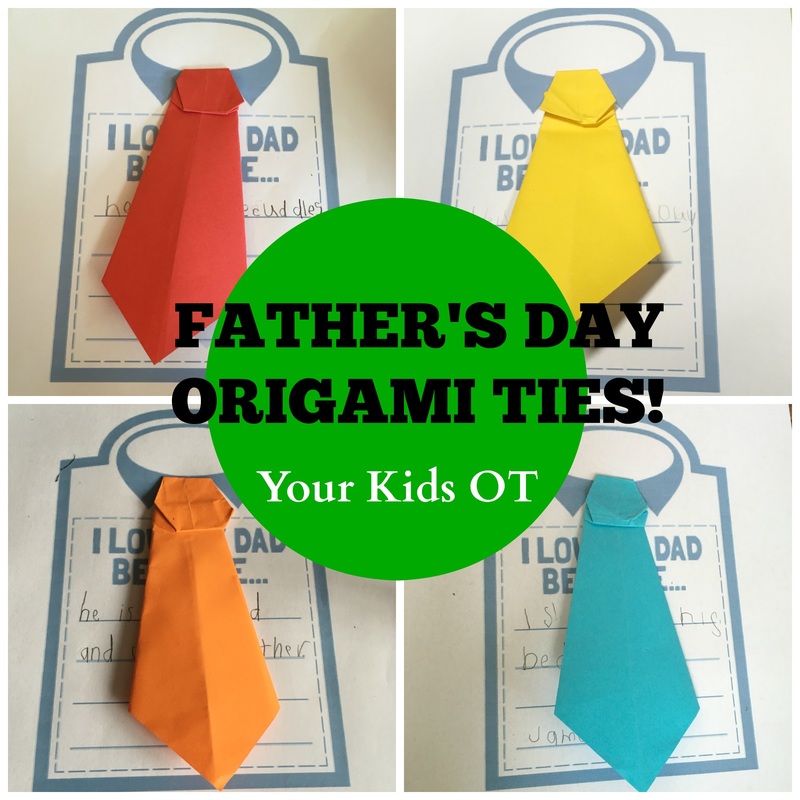
It is almost Father's Day here in Australia! We have been making origami ties and combining it with sentence writing in OT this week!
I love using origami in OT sessions as we can work on a range of skills including fine motor manipulation, bilateral coordination, sequencing steps, organisation and planning. It can be really difficult for those who have never done paper folding and do not understand how to get the edge to meet with another edge. I always suggest to parents to make paper planes at home! This is the easiest and fun way to practise paper folding skills! You can find some step-by-step paper plane instructions HERE. With something a little more complicated like this tie, I model each step for the kids to do and help them to line up the paper. I found this writing prompt "I love my dad because" from Beauty and Bedlam. I resized the original printable so that I could place it on one A4 page and have large lines for writing. You could also make it smaller and turn it into a card for Father's day. WHAT KIDS SAY! It is always amusing to read what kids write about their family! Here are some of the responses that the kids have written this week... I love my dad because he cuddles me. (Andrew, 6 yrs) I love my dad because he is my dad and we play together. (Michael, 7 yrs) I love my dad because I sleep in his bed. (James, 5 yrs) I love my dad because we play basketball together. (Will, 6 yrs) I love my dad because we build things together. (Will, 10 yrs) I love my dad because he is a little bit nice. (Benjamin, 5 yrs) I love my dad because he helps me not to get in trouble with mum. (Finn, 6 yrs) I love my dad because he looks after me. (Oliver, 5 yrs). 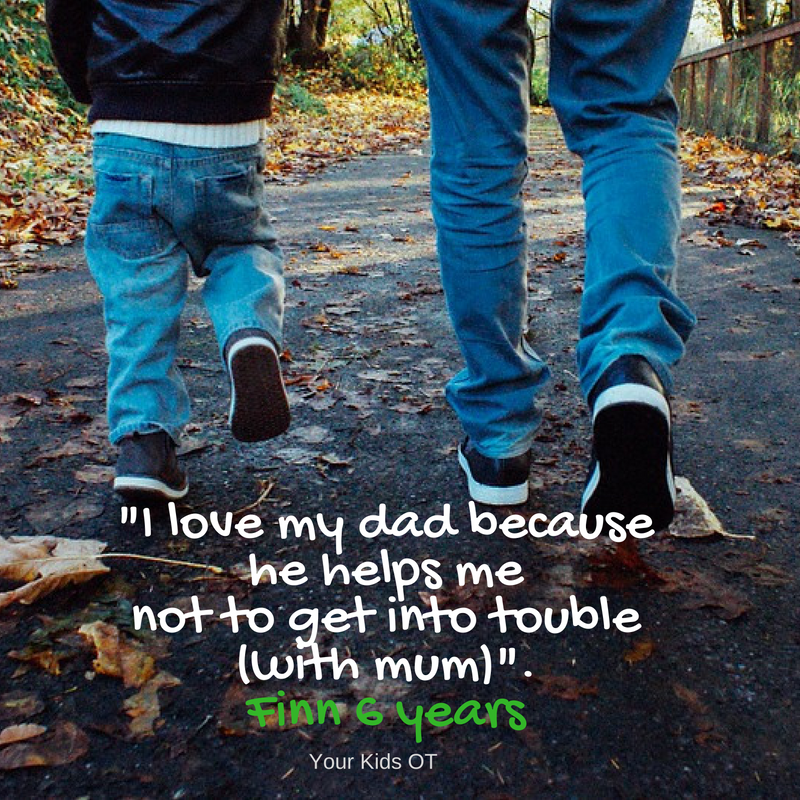
Wishing any fathers reading this a very Happy Father's Day!
You may also like:
Rainbow "coloured" rice is a great addition to a "sensory bin"! There are heaps of tutorials on-line to teach you how to colour rice. I used a really simple method ... I added a cup of rice to a plastic container and a few drops of food colouring. I shook the container until all the rice was covered with food colouring, then lay the rice out on baking paper to dry. Our rice took less than 24 hours to dry (drying time will depend on the weather and the amount of food colouring used). You may notice we have a few lentils in our rice mix (already mixed in when we used the rice in a sensory bin). I didn't bother with vinegar or alcohol and did not have a problem with the colour transferring onto our hands. I found that my cheap supermarket food colouring worked better than may gel colours as this was more "blobby".
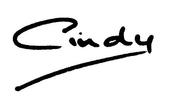
Combining our coloured rice with some small items, we made a beautiful "I spy" bottle! I took a photo of our treasures and laminated a print out before Mr 6 enjoyed pouring the rice into a funnel and hiding the treasures. Once filled, I sealed the lid and attached the laminated page with a dry-erase marker. Super-easy craft! Watch our fun video to see how we made the I spy bottle - You Tube Link!
We made this "I spy" bottle to use as a travel toy. It is a fun way to work on visual memory and visual discrimination skills. I'm looking forward to trying it out with my OT kids this term.
For younger children, you may choose a clear plastic bottle rather than glass. For older kids you could choose very small similar items to place in your bottle ... you can make this really difficult! When we have finished with this bottle, I can pour the contents out into a sensory bin for further play! It will make a great treasure hunt to explore with busy fingers as well. Have you made an "I spy" bottle? What is your favourite thing to hide? 
Cindy is a registered Occupational Therapist practising in Sydney Australia. She has two young children who are a constant source of inspiration and learning. Cindy loves working creatively to help children to reach their potential, finding opportunities in everyday living and making learning fun. Cindy is the author of the Occupational Therapy blog Your Kids OT.
You may also like:
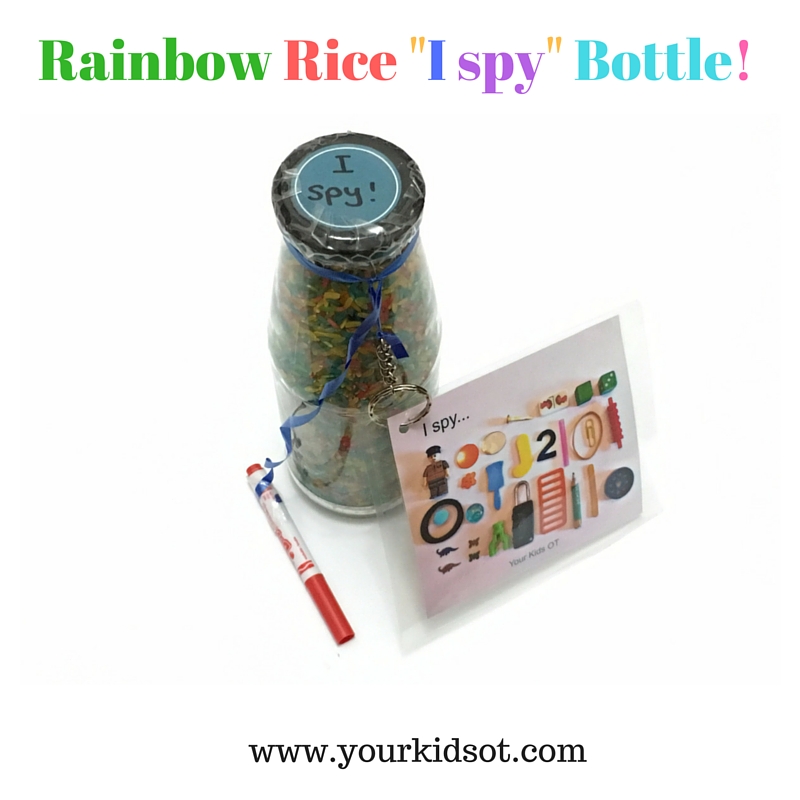
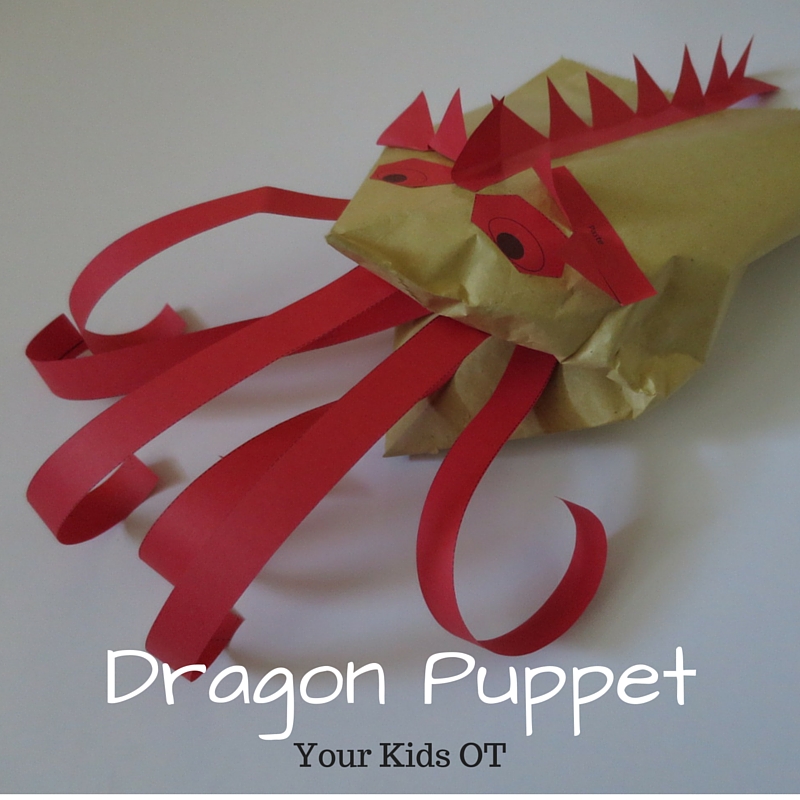
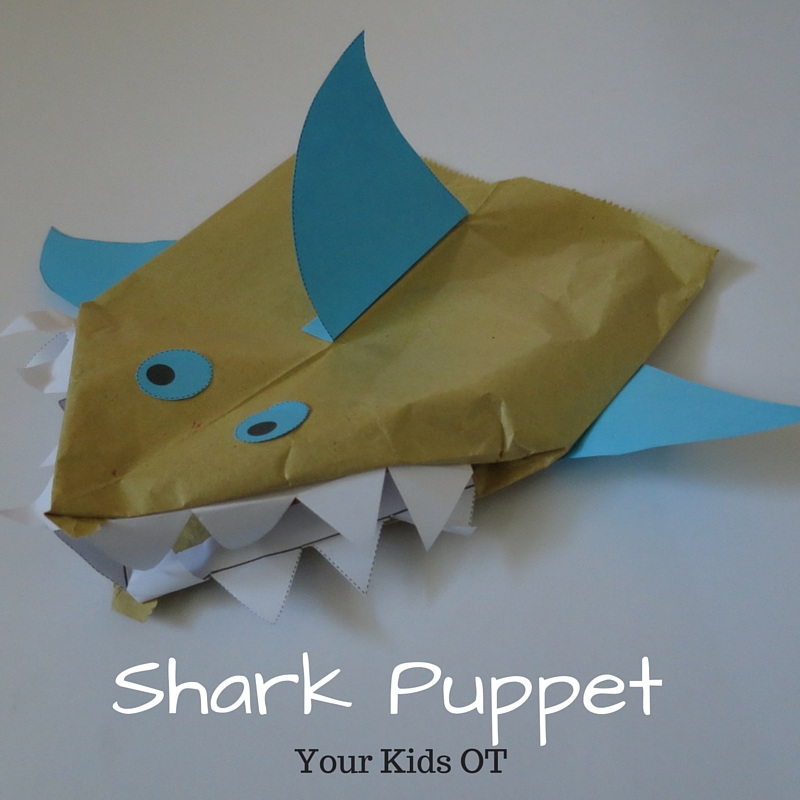
2022: This is no longer a free item. The puppet templates may be purchased as part of the Scissor Skills Printable Pack.
This month in the Functional Skills for Kids Series, we are looking at cutting and scissor skills! You will find lots of great tips and tricks looking at scissor skills and cutting from the best therapy bloggers on the links at the end of this article. My focus is on incorporating play with scissor skills, so what better way to do this than to make puppets?! Making a puppet gives your child's cutting some purpose. It extends the activity so the "craft" can be played with ... encouraging further creativity with imaginary story lines, character interactions, animal noises and speech. I have created these cute animal hand puppets with some ordinary brown paper bags and my FREE templates. Download these FREE templates to create a dragon, crocodile and shark from the YKOT shop. 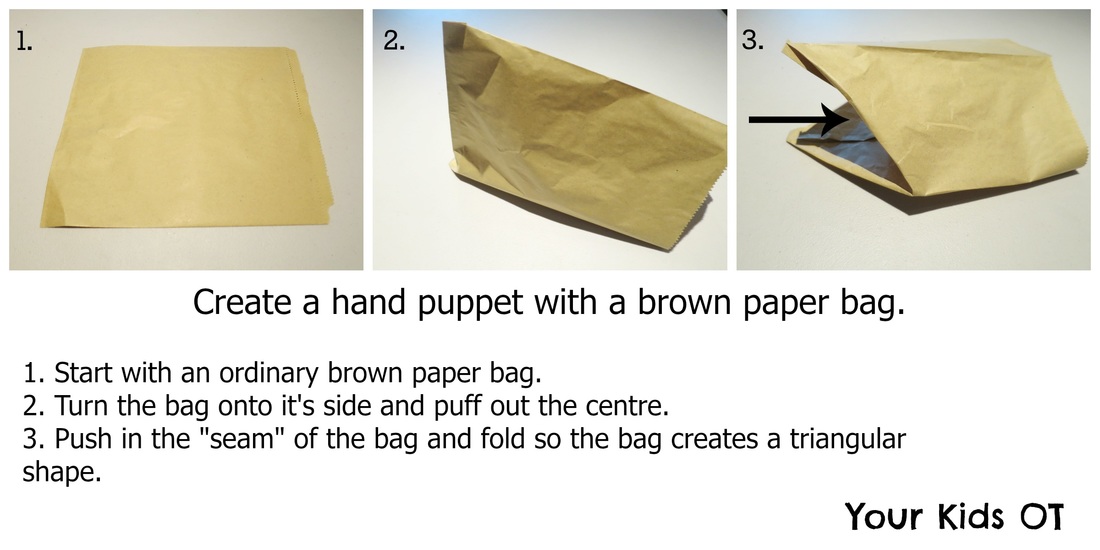
These cutting templates include a range of skills including cutting along straight lines, zig zag lines, simple shapes and more complex shapes. Cutting requires bilateral coordination with one hand holding the scissors and the "helper" hand holding and manipulating the paper as it is cut.
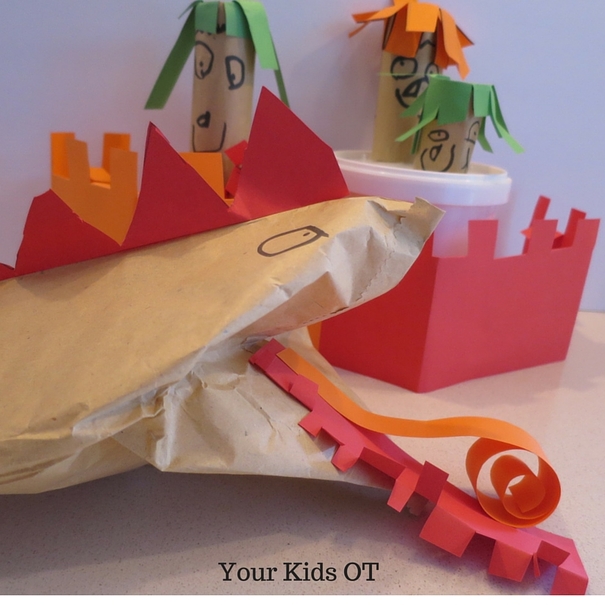
You could help to encourage further play with these puppets by cutting out props such as trees, a castle, people or other animals. Mr almost 6 years and I made this scene above to give some characters for the dragon puppet to harass. Unfortunately one of the characters was captured by the dragon when they ventured out of the castle and needed to be rescued!
Do your kids like cutting? Do they like puppets?
This article is part of “Functional Skills for Kids: 12 month series by Paediatric Occupational and Physical Therapists”. You can find lots of great tips and tricks to help your children with scissor skills in the links below. Make sure you bookmark this page so you can come back to read all the links!
Developmental Progression of Scissor Skills: 35 Best Tips for Teaching Kids to Use Scissors | Mama OT
Fine Motor Considerations for Learning to Use Scissors | Miss Jaime, O.T. Gross Motor Skills and Scissor Use | Your Therapy Source Sensory Processing and Scissor Skills - a Surprising Link | Kids Play Space Teach Kids How to Slow Down to Cut on Lines |Sugar Aunts 5 Tips for Difficulties with Scissor Skills | Growing Hands-On Kids Creative Cutting Practice for Kids | The Inspired Treehouse Visual Motor Skills and Cutting With Scissors | Therapy Fun Zone Animal Puppets! Cut. Create. Play. | Your Kids OT 

Toddlers are busy little people. They like exploring with their hands (and mouths). They love putting things in and taking them out of containers. They continue to explore different textures. They are starting to use both hands together and as they get older starting to choose one hand as the dominant "worker" hand and use their other hand as the "helper. They are starting to learn about colours, shapes and counting. They are learning about their own body parts and how to move them to perform certain actions.
I would like to say recently, but it was actually some time ago I made some "toddler busy boxes" to give to friends who were expecting their second children. These were gifts to keep their "firstborns" busy with quiet interesting activities. These toddler activities were chosen so they can be done almost independent of mum (who may be busy with the newborn) and could be repeated over and over again. Depending on the age of your toddler and their exposure to similar activities, you may need to show them how to do these several times before they are independent. You may like to introduce one activity at a time rather than give your child the whole box of activities in one go. I placed each individual activity into a zip-lock plastic bag so all the pieces could be kept together. I then placed all the activities into a sturdy box with the child's name on top. 10 Great Toddler Busy Box Activities! 1. Felt face - I cut out a square as a background piece, a circle for the face and various interchangeable pieces for the facial features. Your toddler can make "faces" trying out different positions for various features. They may learn about their body parts and how to organise the felt face to match the spatial positions of their own face. As your toddler gets older they could try drawing a face using the felt face as a model. 2. Ice cube tray, tongs and pom poms - Your toddler places a pom pom into each hole in the ice cube tray. They may also use the tongs to pick up and release pom poms. They may develop hand strength and learn colours from this activity. 3. Crazy straw and felt circles - I cut out a series of felt circles and made a hole in each circle. Your toddler may thread the circles onto the crazy straw one at a time so that it goes for a "ride". They may place all the circles onto one straw to see how many fit. They may learn about colours and use both hands collaboratively. 4. Pegs - Your toddler may place the pegs onto the side of the box. You could change this over time by adding colours or letters to the pegs which may be matched to a corresponding card. They may develop hand strength and start using both hands together. 5. Caterpillar counting pages and pom poms - I downloaded these counting pages from Powerful Mothering and laminated them. Your toddler may match the pom poms with the caterpillar body. As they get older they may be able to match the corresponding coloured pom poms to the pictures and count them. 6. Milk Bottle Lids and star stickers - I placed some star stickers onto 10 milk bottle lids. Your toddler may match the stars with the same colours. They may like to stack the lids and knock them over. As your toddler gets older you may use the lids as a memory game placing them all face down and trying to find the matching pair turning over two at a time. 7. Pipecleaner and small beads - Knot one end of the pipe cleaner with a bead so that their is a "stop" end. Your toddler may begin to thread beads onto the pipecleaner. This activity may require supervision so that beads are not placed into the toddler's mouth and swallowed. 8. Shapes and pipecleaners - I provided laminated pictures of shapes and pipecleaners. Older toddlers will be able to manipulate the pipecleaners to the shapes. You may also provide a dry-erase marker for your toddler to trace or colour in the shapes. 9. Playdough and playdough mats - I provided a new tub of playdough and laminated playdough mats from Planet of the Apels. Your toddler may add their playdough to the mats to complete the pictures. You may find more ideas to do with playdough here! 10. Car and Road maps - I provided a new "Matchbox" car and laminated road maps from the DIY Mommy. Toddlers will love driving their car around these roads and race track. 11. Paddlepop stick shapes - Draw a shape across two paddlepop sticks which are the same colour. Your toddler can match the shapes and colours together. The paddlepop sticks could also be used with the playdough. 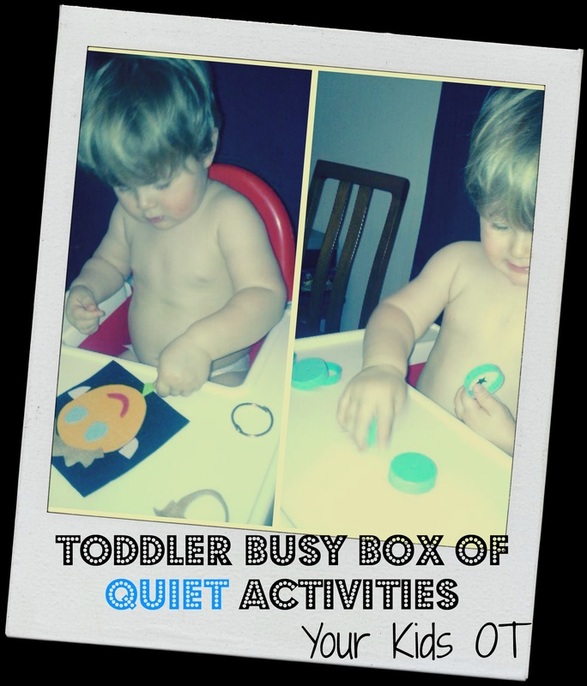

It was lovely to be sent photos of these busy boxes in action! Isn't Mr E adorable?!
These activities would also be great for an OT to have in his/her therapy bag to use with toddlers and preschoolers! Have you made your toddler a "busy box"? Have you made one as a gift? 
You may also like:
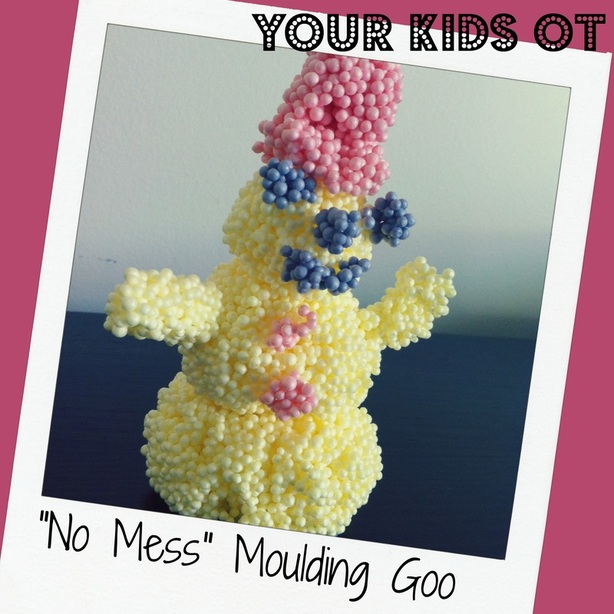

A "no-mess" moulding goo? We had to try this out!
I purchased these for $1 a tub from Kmart (price is now $1.50 Aust). It comes in a range of colours and is not suitable for children less that 3 years of age. Definitely a potential choking hazard! It says "sticky but not wet" on the label and it was. The moulding goo is made from little polystyrene balls that stick together. The first challenge is to get it out the plastic container as it is so sticky. 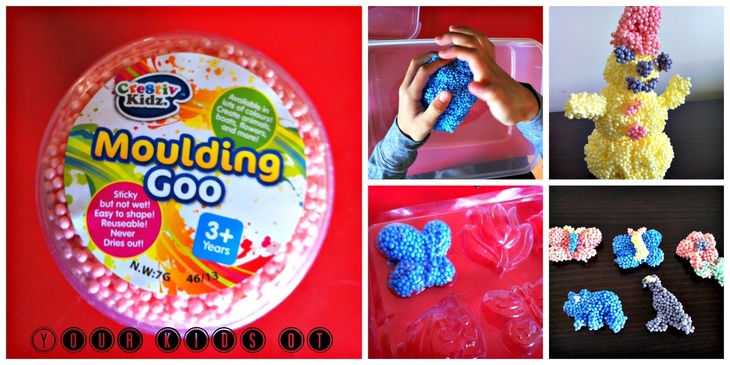
Once out of the container, you can shape the goo with your fingers and hands into basically whatever you want. You can roll it into balls or press it into a mould.
Mr 5 found it a challenge to think of ideas for moulding and wasn't very fond of the "stickiness" of the balls. Miss 9 enjoyed pressing the goo into shape moulds and mixing the colours to come up with a creation. Separating the colours out again was pretty impossible so if you want separate colours don't mix them in the first place! Suitable for children 3 years and older, this activity should be supervised with preschoolers as it should not be consumed! Three year olds will be able to manipulate and shape this "goo" without leaving a mess on your table or floor. It also never dries out so if it is not packed away straight after use it will be fine to use again and again. OTs may find this a great alternative to take along to therapy sessions as an alternative sensory experience. It can be used to encourage exploratory play as well as an opportunity to develop fine motor skills. A cheap alternative sensory experience. Have your kids tried it? 
Note: I have received no remuneration for this post and all comments made are my own.
Also linking up with: 
Looking for more sensory experiences? Try these...
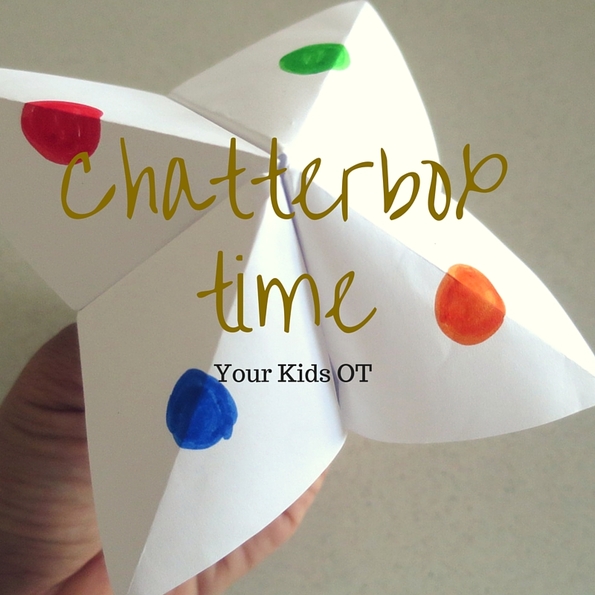

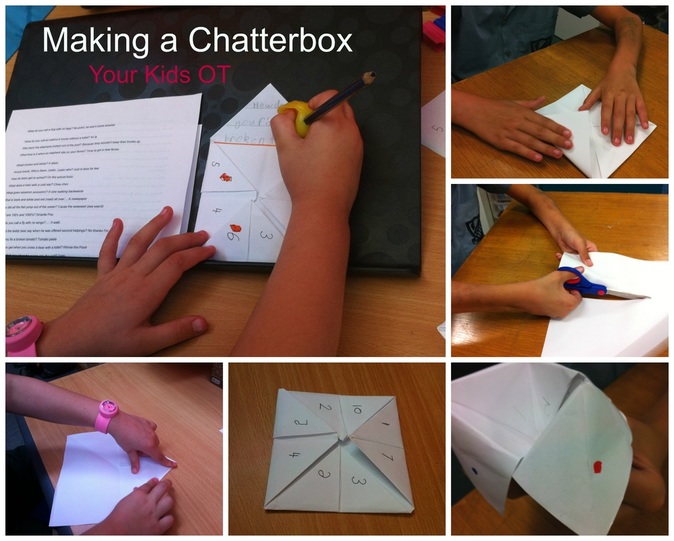
Chatterbox Time! Kids all love to make and play with chatterboxes! I remember making them when I was a child, did you? Last week, I made these with some of the kids I see for therapy and it was the perfect activity to work on a range of skills.
If you haven't made one for a while, this is how you fold your chatterbox. Start with an A4 size piece of paper and make sure you press down each fold neatly. The neater the folding the better the chatterbox will work in the end. 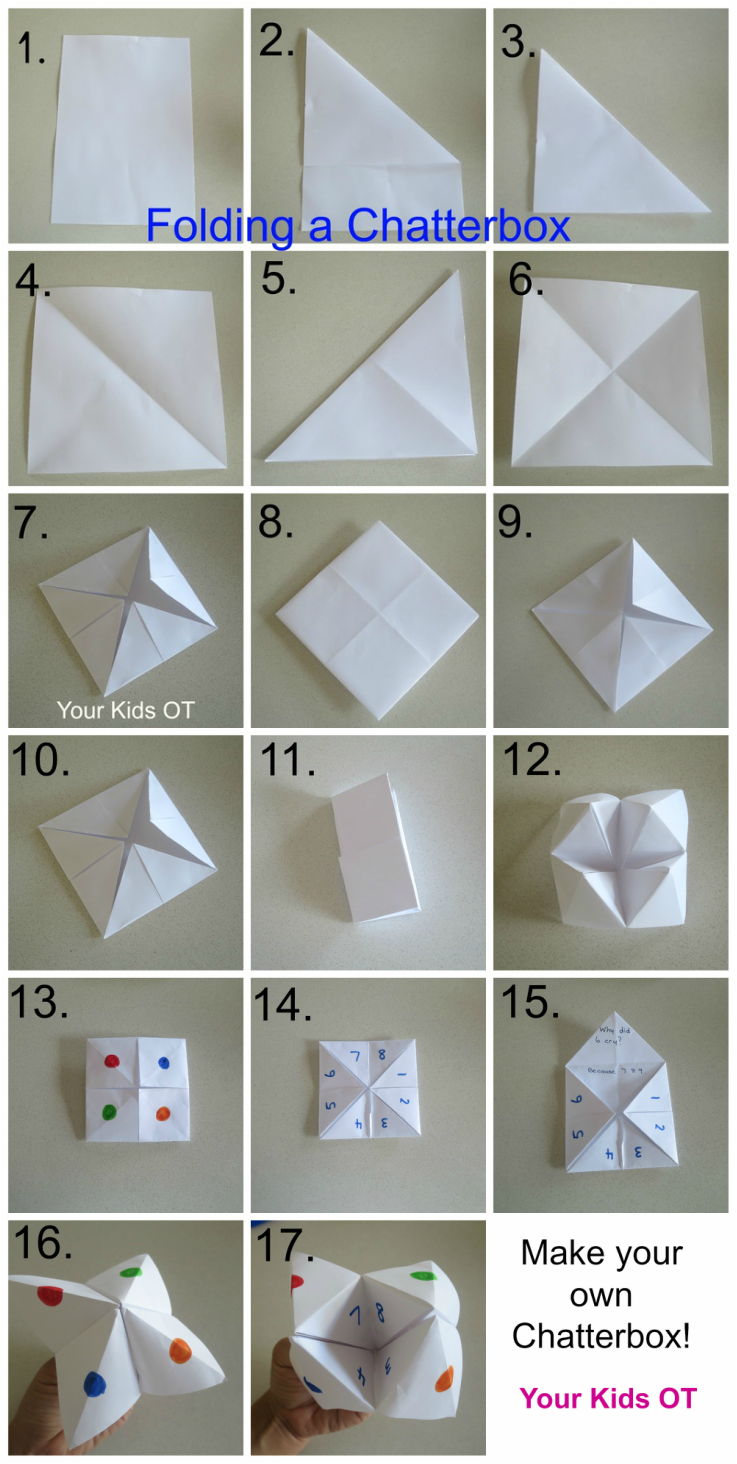

1. Start with an A4 piece of paper. (You could also start with a square piece of paper and skip to step 4.) 2. Fold down one corner so your triangle lines up with the side. 3. Cut off the section under the triangle. 4. Open out your triangle so you can see your square. 5. Fold down another corner creating a triangle. 6. Open out your square so you can see the two folded diagonal lines. 7. Bring each corner into the middle, pressing down on the fold. 8. Flip over your square. 9. Bring each new corner into the middle, pressing down on the fold. 10. Almost there! 11. Fold along the horizontal middle line, open and fold along the vertical middle line, open. (This will held with the movement of the chatterbox when playing.) 12. Put your fingers in the "open square" parts of each quarter. Your chatterbox is now ready to decorate! 13. Add a coloured dot to each square. (We also wrote the colour name for those kids who needed a reference to spell the colours when playing.) 14. Flip over your square and write a number in each triangle section. Try to have odd/even numbers to help later with playing. 15. Open out each double triangle to write a question/joke. Write the answer in the bottom half. (If your child has small legible writing you may be able to fit in a question/joke in each small triangle.) 16 and 17. Ready to play. Use your thumb and index fingers on both hands to open and close the chatterbox. We had a great time making these in OT last week. Here are some of the skills we worked on:
Whilst I had a double-sided page of jokes for the kid's to choose from, these were the clear favourites!
Have you made a chatterbox recently? What's your favourite kids joke? 
You may also like...

Incy Wincy spider climbed up ...in this case the spider's web... with a few supplies, your preschooler can make their own spider and web!
What do you need?
What do you need to do? For the WEB...
For the SPIDER...
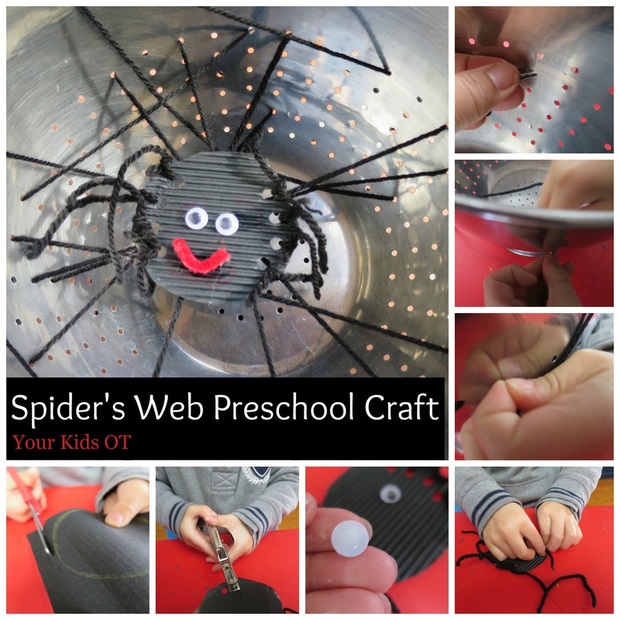

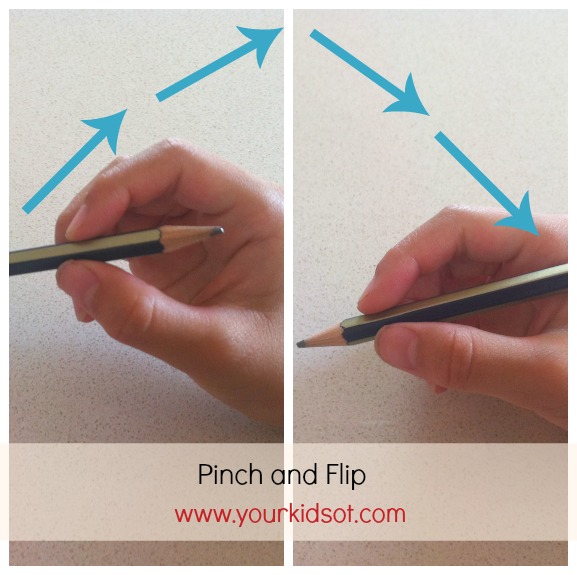
This craft activity is a wonderful way to encourage your preschooler with their fine motor skill development. Involve them in pinching, poking and pulling. Encourage them to use both hands when poking and pulling out the wool. Poking the wool into the colander hole with one hand and pulling out the wool with the other hand is a great way to encourage bilateral coordination. This "Pinch Poke Pull" motion is similar to buttoning up shirts where the button is pinched and poked through a hole with one hand and the other hand pinches the button and pulls it through.
Encourage your preschooler to cut out the circle and punch the holes {the hole punch was a little too hard for my Mr 5}. They can also help to glue the eyes and mouth. Tying the spider's legs is also tricky for little fingers. Mr 5 has been tying up his dressing gown for several months now and we talked about the spider's legs being similar to tying up his dressing gown {only smaller}. This skill is so important when it comes to later learning how to tie shoe laces. You could skip this step completely and sticky tape the legs onto the spider's body if tying the wool is too difficult. 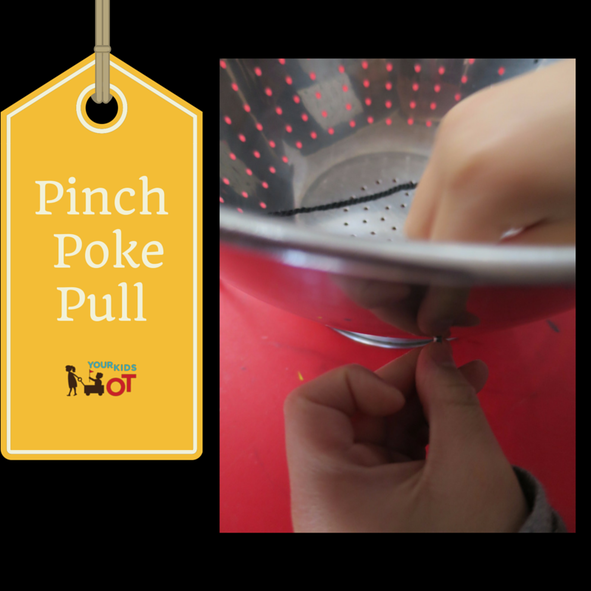

This spider's web craft is all about the process and not the final product. You can remove the sticky tape, wind up the wool and store it with the spider to do the threading over again. If you want a craft to keep, you could place some holes in a paper plate for the wool to be threaded through. Stick the spider to it when the web is finished. Do you have a preschooler who might enjoy this spider's web activity? 
You may also like:
|
AuthorHi, I'm Cindy and I am an Occupational Therapist. I enjoy working creatively with children to see them reach their potential. Read more about me here. 
SEARCH THIS SITE

Archives
April 2024
Categories
All
Popular Posts

 |


 RSS Feed
%22%20%3A%20Your%20Kids%20OT)
Join the YKOT e-newsletter!
Subscribe to get our latest content by email and receive
the SHAPE ROADS PRINTABLE NOW!

Success! Now check your email to confirm your subscription and receive your free printable!
Join our Mailing List!
Subscribe to get our latest content by email and receive
the SHAPE ROADS PRINTABLE NOW as a thankyou!
Success! Now check your email to confirm your subscription and receive your free printable!
Disclaimer: The information on this site is general in nature and should be used for educational and entertainment purposes. The activities are safe for most children, however, you should consult an Occupational Therapist or health professional to address specific movement, sensory or other medical conditions. This blog does not replace formal therapeutic professional advice given by a health professional or medical practitioner. Reviews and endorsements of products will only be made based on my expertise and personal opinion; and deemed worthy of such endorsement. The opinions shared in sponsored content will always be my own and not that of the advertising company or brand. Content, advertising space or posts will be clearly identified if paid, affiliated or sponsored. Affiliate links may be found throughout this website in advertising. This means that if you follow through with a purchase from these links, Your Kids OT will receive a percentage of the sale. Your Kids OT undertakes to meet the requirements of the "Social Media Policy" as published by Australian Health Practitioner Regulation Agency (AHPRA). Further information about this policy can be found here.
Find meFollow me |

|
About me
AuthorHi, I'm Cindy and I am an Occupational Therapist. I enjoy working creatively with children to see them reach their potential. Read more about me here. 
|
Copyright © 2017 Your Kid OT